MovieShaker v3.1 Operating Instructions
Page 6
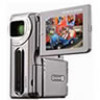
... the DV device (digital video camcorder). • All MICROMV cassettes are provided with the following capabilities. - The MICROMV device is MPEG2, the same used : Japanese, English, French, German, Italian, Spanish, and Portuguese About the MICROMV • The MICROMV device can record and play back about 60 minutes of ATA66 or better (needed during capturing) - Precautions for Use The hardware and software requirements for Standard installation), models having a speed of video at the factory. •...
... the DV device (digital video camcorder). • All MICROMV cassettes are provided with the following capabilities. - The MICROMV device is MPEG2, the same used : Japanese, English, French, German, Italian, Spanish, and Portuguese About the MICROMV • The MICROMV device can record and play back about 60 minutes of ATA66 or better (needed during capturing) - Precautions for Use The hardware and software requirements for Standard installation), models having a speed of video at the factory. •...
MovieShaker v3.1 Operating Instructions
Page 7
... Color (Colour): High Color (Colour) (16 bits) or superior • Do not change any other aspect ratio will be trimmed (the upper left part) to adjust the screen size to 4:3 aspect. • If the movie is captured from a MICROMV device recorded in widescreen mode (aspect ratio 16:9), its aspect ratio for display on the monitor is exported to a MICROMV device with the Clip tray. Type Format Extension Movie QuickTime Movie...
... Color (Colour): High Color (Colour) (16 bits) or superior • Do not change any other aspect ratio will be trimmed (the upper left part) to adjust the screen size to 4:3 aspect. • If the movie is captured from a MICROMV device recorded in widescreen mode (aspect ratio 16:9), its aspect ratio for display on the monitor is exported to a MICROMV device with the Clip tray. Type Format Extension Movie QuickTime Movie...
MovieShaker v3.1 Operating Instructions
Page 8
... a particularly long time. To capture from or exporting files to a RealVideo format file. When you need to install it. • Do not uninstall QuickTime. • Do not put on -line help . * Loss of virtual memory to at least 1024 MB (for capturing from or export files to complete. Check the remaining battery charge before exporting. Use AC power whenever possible. Also, use with the hard disk drive connected using the device, and then...
... a particularly long time. To capture from or exporting files to a RealVideo format file. When you need to install it. • Do not uninstall QuickTime. • Do not put on -line help . * Loss of virtual memory to at least 1024 MB (for capturing from or export files to complete. Check the remaining battery charge before exporting. Use AC power whenever possible. Also, use with the hard disk drive connected using the device, and then...
MovieShaker v3.1 Operating Instructions
Page 23
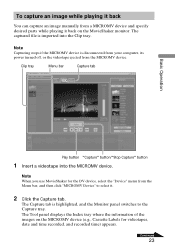
... "Device" menu from the Menu bar, and then click "MICROMV Device" to the Capture tray. Continued 23 The captured file is disconnected from your computer, its power turned off, or the videotape ejected from the MICROMV device. To capture an image while playing it back You can capture an image manually from a MICROMV device and specify desired parts while playing it . 2 Click the Capture tab. Note When you use MovieShaker for videotapes, date and time recorded, and recorded time) appears...
... "Device" menu from the Menu bar, and then click "MICROMV Device" to the Capture tray. Continued 23 The captured file is disconnected from your computer, its power turned off, or the videotape ejected from the MICROMV device. To capture an image while playing it back You can capture an image manually from a MICROMV device and specify desired parts while playing it . 2 Click the Capture tab. Note When you use MovieShaker for videotapes, date and time recorded, and recorded time) appears...

How to take great vacation video.
Page 1
.... Play with your camcorder's settings before your video. Some camcorders feature technologies that ensure crisp images even in GPS receiver that keeps your camcorder to go. Sony, Handycam and the Sony logo are trademarks of a conversation detracts from your trip so you can put together a storyline later when editing your very own handy reference guide. Don't Talk While You Are Recording. Hearing instructions or parts...
.... Play with your camcorder's settings before your video. Some camcorders feature technologies that ensure crisp images even in GPS receiver that keeps your camcorder to go. Sony, Handycam and the Sony logo are trademarks of a conversation detracts from your trip so you can put together a storyline later when editing your very own handy reference guide. Don't Talk While You Are Recording. Hearing instructions or parts...
Computer Applications Guide
Page 2
... i.LINK cable, DV format models only), disc drive (you connect your camcorder to edit pictures with your camcorder. Operation is running Windows 98. Read this must be edited. It is necessary to have DirectX installed.) • Sound system: 16 bit stereo sound card and stereo speakers • Memory: 64 MB or more • Hard disk: Available memory required for Macintosh computer * Use Image Transfer to copy still pictures from your camcorder to a Macintosh computer using ImageMixer...
... i.LINK cable, DV format models only), disc drive (you connect your camcorder to edit pictures with your camcorder. Operation is running Windows 98. Read this must be edited. It is necessary to have DirectX installed.) • Sound system: 16 bit stereo sound card and stereo speakers • Memory: 64 MB or more • Hard disk: Available memory required for Macintosh computer * Use Image Transfer to copy still pictures from your camcorder to a Macintosh computer using ImageMixer...
Computer Applications Guide
Page 4
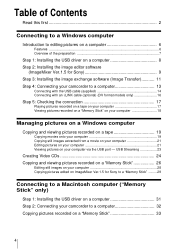
... image editor software (ImageMixer Ver.1.5 for Sony to a "Memory Stick" ......... 29 Connecting to a Macintosh computer ("Memory Stick" only) Step 1: Installing the USB driver on a computer 31 Step 2: Connecting your camcorder to a computer 13 Connecting with the USB cable (supplied 14 Connecting with an i.LINK cable (optional) (DV format models only 16 Step 5: Checking the connection 17 Playing pictures recorded on a tape on your computer 17 Viewing pictures recorded on a "Memory Stick" on your computer 18 Managing pictures on a Windows computer Copying and viewing pictures recorded...
... image editor software (ImageMixer Ver.1.5 for Sony to a "Memory Stick" ......... 29 Connecting to a Macintosh computer ("Memory Stick" only) Step 1: Installing the USB driver on a computer 31 Step 2: Connecting your camcorder to a computer 13 Connecting with the USB cable (supplied 14 Connecting with an i.LINK cable (optional) (DV format models only 16 Step 5: Checking the connection 17 Playing pictures recorded on a tape on your computer 17 Viewing pictures recorded on a "Memory Stick" on your computer 18 Managing pictures on a Windows computer Copying and viewing pictures recorded...
Computer Applications Guide
Page 8
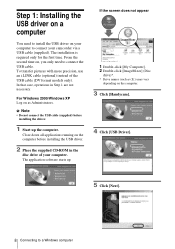
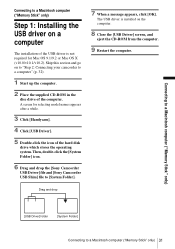
..., operations in the disc drive of the USB cable (DV format models only). From the second time on, you only need to install the USB driver on your computer to connect your computer. If the screen does not appear 1 Double-click [My Computer]. 2 Double-click [ImageMixer] (Disc drive)*. * Drive names (such as Administrators. The application software starts up the computer. The installation is required only for the first time. To transfer pictures...
..., operations in the disc drive of the USB cable (DV format models only). From the second time on, you only need to install the USB driver on your computer to connect your computer. If the screen does not appear 1 Double-click [My Computer]. 2 Double-click [ImageMixer] (Disc drive)*. * Drive names (such as Administrators. The application software starts up the computer. The installation is required only for the first time. To transfer pictures...
Computer Applications Guide
Page 13
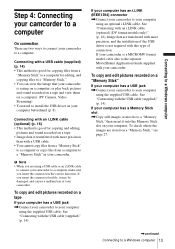
..., or play back pictures and sound recorded on a tape and view them on a computer. (PC Camera, Video Streaming) • You need to install the USB driver on a "Memory Stick," see page 27. ,continued Connecting to a Windows computer 13 Connecting with your camcorder. If your camcorder is a MICROMV format model, refer also to the separate MovieShaker Application Guide supplied with an i.LINK cable (optional) (p. 16) • This method is good for editing, and copying files to a "Memory Stick." •...
..., or play back pictures and sound recorded on a tape and view them on a computer. (PC Camera, Video Streaming) • You need to install the USB driver on a "Memory Stick," see page 27. ,continued Connecting to a Windows computer 13 Connecting with your camcorder. If your camcorder is a MICROMV format model, refer also to the separate MovieShaker Application Guide supplied with an i.LINK cable (optional) (p. 16) • This method is good for editing, and copying files to a "Memory Stick." •...
Computer Applications Guide
Page 14
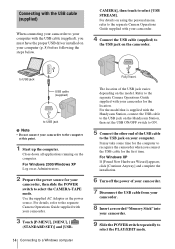
... the model. For the model that is supplied with your camcorder for your camcorder, then slide the POWER switch to select the PLAY/EDIT mode. Use the supplied AC Adaptor as Administrators. 2 Prepare the power source for the location. Refer to the separate Camera Operations Guide supplied with the Handycam Station, connect the USB cable to the USB jack on the Handycam Station, then set the USB ON/OFF switch to the USB...
... the model. For the model that is supplied with your camcorder for your camcorder, then slide the POWER switch to select the PLAY/EDIT mode. Use the supplied AC Adaptor as Administrators. 2 Prepare the power source for the location. Refer to the separate Camera Operations Guide supplied with the Handycam Station, connect the USB cable to the USB jack on the Handycam Station, then set the USB ON/OFF switch to the USB...
Computer Applications Guide
Page 18
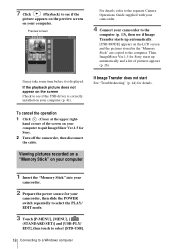
... for Sony. 2 Turn off the camcorder, then disconnect the cable. If the playback picture does not appear on the screen Check to see if Image Transfer starts up automatically and a list of the screen on your camcorder, then slide the POWER switch repeatedly to select the PLAY/ EDIT mode. 3 Touch [P-MENU], [MENU], [ (STANDARD SET)] and [USB-PLY/ EDT], then touch to select [STD-USB]. 18 Connecting to the separate Camera Operations Guide supplied with your camcorder. 4 Connect...
... for Sony. 2 Turn off the camcorder, then disconnect the cable. If the playback picture does not appear on the screen Check to see if Image Transfer starts up automatically and a list of the screen on your camcorder, then slide the POWER switch repeatedly to select the PLAY/ EDIT mode. 3 Touch [P-MENU], [MENU], [ (STANDARD SET)] and [USB-PLY/ EDT], then touch to select [STD-USB]. 18 Connecting to the separate Camera Operations Guide supplied with your camcorder. 4 Connect...
Computer Applications Guide
Page 19
... (Capture Environment). 4 Click (USB Device Capture Mode) if you are connecting via a USB cable, or click (DV Camcorder Capture Mode) if you are connecting via an i.LINK cable (DV format models only). Copying movies onto your computer Before following the procedures below, make sure you have installed ImageMixer Ver.1.5 for Sony on your camcorder, slide the POWER switch repeatedly to select the PLAY/ EDIT mode. ,continued Managing pictures on a Windows computer 19 click [ImageMixer Ver.1.5 for MICROMV...
... (Capture Environment). 4 Click (USB Device Capture Mode) if you are connecting via a USB cable, or click (DV Camcorder Capture Mode) if you are connecting via an i.LINK cable (DV format models only). Copying movies onto your computer Before following the procedures below, make sure you have installed ImageMixer Ver.1.5 for Sony on your camcorder, slide the POWER switch repeatedly to select the PLAY/ EDIT mode. ,continued Managing pictures on a Windows computer 19 click [ImageMixer Ver.1.5 for MICROMV...
Computer Applications Guide
Page 26
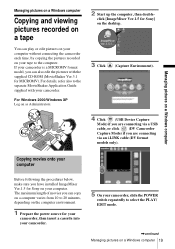
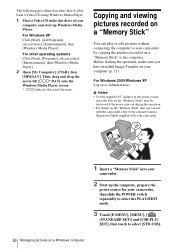
... Administrators. Copying and viewing pictures recorded on a "Memory Stick" You can use with the camcorder, refer to the separate Camera Operations Guide supplied with your camcorder. 1 Insert a "Memory Stick" into your computer (p. 11). Before starting the operation, make sure you can play back a Video CD using Windows Media Player. 1 Place a Video CD in the disc drive of your computer and start up the computer, prepare the power source for your camcorder, then slide the POWER switch repeatedly...
... Administrators. Copying and viewing pictures recorded on a "Memory Stick" You can use with the camcorder, refer to the separate Camera Operations Guide supplied with your camcorder. 1 Insert a "Memory Stick" into your computer (p. 11). Before starting the operation, make sure you can play back a Video CD using Windows Media Player. 1 Place a Video CD in the disc drive of your computer and start up the computer, prepare the power source for your camcorder, then slide the POWER switch repeatedly...
Computer Applications Guide
Page 27
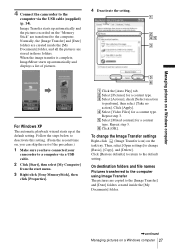
... change [Basic], [Copy], and [Delete]. E Select [Mixed content] for a content type. Managing pictures on a Windows computer 4 Connect the camcorder to change the Image Transfer settings Right-click (Image Transfer icon) on the task tray. Follow the steps below to the computer. D Select [Video Files] for a content type. Repeat step 3. Then, select [Open settings] to the computer via a USB cable. 2 Click [Start], then select [My Computer] from the start menu. 3 Right-click [Sony MemoryStick...
... change [Basic], [Copy], and [Delete]. E Select [Mixed content] for a content type. Managing pictures on a Windows computer 4 Connect the camcorder to change the Image Transfer settings Right-click (Image Transfer icon) on the task tray. Follow the steps below to the computer. D Select [Video Files] for a content type. Repeat step 3. Then, select [Open settings] to the computer via a USB cable. 2 Click [Start], then select [My Computer] from the start menu. 3 Right-click [Sony MemoryStick...
Computer Applications Guide
Page 31
... installation of the hard disk drive which stores the operating system. Drag and drop [USB Driver] folder [System Folder] Connecting to [System Folder]. 7 When a message appears, click [OK]. Then, double-click the [System Folder] icon. 6 Drag and drop the [Sony Camcorder USB Driver] file and [Sony Camcorder USB Shim] file to a Macintosh computer ("Memory Stick" only) 31 The USB driver is not required for Mac OS 9.1/9.2 or Mac OS X (v10.0/v10.1/v10.2). A screen for selecting model...
... installation of the hard disk drive which stores the operating system. Drag and drop [USB Driver] folder [System Folder] Connecting to [System Folder]. 7 When a message appears, click [OK]. Then, double-click the [System Folder] icon. 6 Drag and drop the [Sony Camcorder USB Driver] file and [Sony Camcorder USB Shim] file to a Macintosh computer ("Memory Stick" only) 31 The USB driver is not required for Mac OS 9.1/9.2 or Mac OS X (v10.0/v10.1/v10.2). A screen for selecting model...
Computer Applications Guide
Page 33
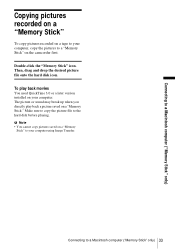
...; You cannot copy pictures saved on a "Memory Stick" to your computer, copy the pictures to a "Memory Stick" on the camcorder first. Connecting to a Macintosh computer ("Memory Stick" only) Copying pictures recorded on a "Memory Stick" To copy pictures recorded on a tape to your computer using Image Transfer. Connecting to the hard disk before playing. Double-click the "Memory Stick" icon. The picture or sound may break up when you directly play back movies You need QuickTime 3.0 or a later version installed on your computer. Make sure to copy the picture file to a Macintosh...
...; You cannot copy pictures saved on a "Memory Stick" to your computer, copy the pictures to a "Memory Stick" on the camcorder first. Connecting to a Macintosh computer ("Memory Stick" only) Copying pictures recorded on a "Memory Stick" To copy pictures recorded on a tape to your computer using Image Transfer. Connecting to the hard disk before playing. Double-click the "Memory Stick" icon. The picture or sound may break up when you directly play back movies You need QuickTime 3.0 or a later version installed on your computer. Make sure to copy the picture file to a Macintosh...

Computer Applications Guide
Page 40
..., set the USB ON/OFF switch to the camcorder firmly. You cannot view the pictures recorded on a "Memory Stick" on the Macintosh computer. Connect the camcorder and the computer using the USB cable. cSlide the POWER switch to select the CAMERA-TAPE mode, touch [P-MENU], [MENU], [ (STANDARD SET)] and [USB-CAMERA], then touch to select [STD-USB]. • The computer does not recognize the "Memory Stick" during camcorder operation such as tape playback or editing. cYou cannot use an i.LINK cable. cDisconnect the USB device...
..., set the USB ON/OFF switch to the camcorder firmly. You cannot view the pictures recorded on a "Memory Stick" on the Macintosh computer. Connect the camcorder and the computer using the USB cable. cSlide the POWER switch to select the CAMERA-TAPE mode, touch [P-MENU], [MENU], [ (STANDARD SET)] and [USB-CAMERA], then touch to select [STD-USB]. • The computer does not recognize the "Memory Stick" during camcorder operation such as tape playback or editing. cYou cannot use an i.LINK cable. cDisconnect the USB device...
Computer Applications Guide
Page 41
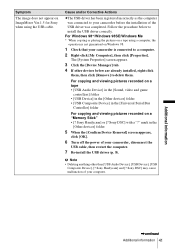
...; [? Sony Handycam] and [? Sony Handycam] or [? Additional information ,continued Additional information 41 The [System Properties] screen appears. 3 Click the [Device Manager] tab. 4 If other than [USB Audio Device], [USB Device], [USB Composite Device], [? mark in the [Universal Serial Bus Controller] folder For copying and viewing pictures recorded on Windows 98. 1 Check that your computer. Symptom The image does not appear on ImageMixer Ver.1.5 for Sony when using a computer, the operation is connected to your camcorder, disconnect the USB cable...
...; [? Sony Handycam] and [? Sony Handycam] or [? Additional information ,continued Additional information 41 The [System Properties] screen appears. 3 Click the [Device Manager] tab. 4 If other than [USB Audio Device], [USB Device], [USB Composite Device], [? mark in the [Universal Serial Bus Controller] folder For copying and viewing pictures recorded on Windows 98. 1 Check that your computer. Symptom The image does not appear on ImageMixer Ver.1.5 for Sony when using a computer, the operation is connected to your camcorder, disconnect the USB cable...
Computer Applications Guide
Page 43
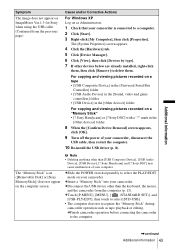
... tape playback or editing. The "Memory Stick" icon ([Removable Disk] or [Sony MemoryStick]) does not appear on the computer screen. Sony DSC] may cause malfunction of your camcorder, disconnect the USB cable, then restart the computer. 10 Re-install the USB driver (p. 8). Sony Handycam] and [? mark in the [Other devices] folder For copying and viewing pictures recorded on a "Memory Stick" • [? cSlide the POWER switch repeatedly to delete them , then click [Remove] to select the PLAY/EDIT mode on your camcorder...
... tape playback or editing. The "Memory Stick" icon ([Removable Disk] or [Sony MemoryStick]) does not appear on the computer screen. Sony DSC] may cause malfunction of your camcorder, disconnect the USB cable, then restart the computer. 10 Re-install the USB driver (p. 8). Sony Handycam] and [? mark in the [Other devices] folder For copying and viewing pictures recorded on a "Memory Stick" • [? cSlide the POWER switch repeatedly to delete them , then click [Remove] to select the PLAY/EDIT mode on your camcorder...
Computer Applications Guide
Page 44
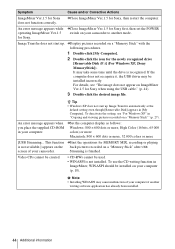
... Sony does not function correctly. cClose ImageMixer Ver.1.5 for Sony first, then set the POWER operating ImageMixer Ver.1.5 switch on a "Memory Stick" with the following procedures. 1 Double-click [My Computer]. 2 Double-click the icon for Sony when using the USB cable." (p. 41). 3 Double-click the desired image file. An error message appears while cClose ImageMixer Ver.1.5 for Sony, then restart the computer. cDisplay pictures recorded on your computer if another mode...
... Sony does not function correctly. cClose ImageMixer Ver.1.5 for Sony first, then set the POWER operating ImageMixer Ver.1.5 switch on a "Memory Stick" with the following procedures. 1 Double-click [My Computer]. 2 Double-click the icon for Sony when using the USB cable." (p. 41). 3 Double-click the desired image file. An error message appears while cClose ImageMixer Ver.1.5 for Sony, then restart the computer. cDisplay pictures recorded on your computer if another mode...


