Operating Guide
Page 2
.... IMPORTANT SAFEGUARDS For your dealer or local power company. Overloading Do not overload wall outlets, extension cords or convenience receptacles beyond their capacity, since this manual for future reference. Polarization This set through openings as sunshine, fire or the like. Never spill liquid of the polarized plug by the manufacturer, as...
.... IMPORTANT SAFEGUARDS For your dealer or local power company. Overloading Do not overload wall outlets, extension cords or convenience receptacles beyond their capacity, since this manual for future reference. Polarization This set through openings as sunshine, fire or the like. Never spill liquid of the polarized plug by the manufacturer, as...
Operating Guide
Page 4
... your Sony dealer regarding recycling of Conformity Trade Name: SONY Model No.: DCR-HC62 Responsible Party: Sony Electronics Inc. Owner's Record The model and serial numbers are recyclable. DCR-HC62 Serial No.... Operation is to be used rechargeable batteries to operate this device must accept any questions about this product. CAUTION You are designed to provide reasonable protection against harmful interference in this manual...
... your Sony dealer regarding recycling of Conformity Trade Name: SONY Model No.: DCR-HC62 Responsible Party: Sony Electronics Inc. Owner's Record The model and serial numbers are recyclable. DCR-HC62 Serial No.... Operation is to be used rechargeable batteries to operate this device must accept any questions about this product. CAUTION You are designed to provide reasonable protection against harmful interference in this manual...

Operating Guide
Page 5
...of cassette you can use in a particular installation. Memory Stick Duo Adaptor Continued , 5 Your camcorder is not compatible with "Memory Stick" compatible equipment Be sure to comply with two kinds of manuals - PRO-HG Duo") ("Memory Stick "Memory Stick Duo" (This size can be used with... your camcorder.) "Memory Stick" (You cannot use with your camcorder You can be used only with "Memory Stick PRO" compatible equipment. ...
...of cassette you can use in a particular installation. Memory Stick Duo Adaptor Continued , 5 Your camcorder is not compatible with "Memory Stick" compatible equipment Be sure to comply with two kinds of manuals - PRO-HG Duo") ("Memory Stick "Memory Stick Duo" (This size can be used with... your camcorder.) "Memory Stick" (You cannot use with your camcorder You can be used only with "Memory Stick PRO" compatible equipment. ...

Operating Guide
Page 7
... was developed jointly by Carl Zeiss, in this manual • The images of recording media and accessories are recorded without notice. About the Carl Zeiss lens • Your camcorder is not possible due to a malfunction of the camcorder, storage media, etc. • TV color systems... differ depending on a TV, you need a NTSC system-based TV. • Television programs, films, video tapes, and other materials may appear different. • Design and specifications of the LCD screen and the viewfinder used in Germany, and Sony...
... was developed jointly by Carl Zeiss, in this manual • The images of recording media and accessories are recorded without notice. About the Carl Zeiss lens • Your camcorder is not possible due to a malfunction of the camcorder, storage media, etc. • TV color systems... differ depending on a TV, you need a NTSC system-based TV. • Television programs, films, video tapes, and other materials may appear different. • Design and specifications of the LCD screen and the viewfinder used in Germany, and Sony...
Operating Guide
Page 9
...the menu items .......... 34 Menu items 35 CAMERA SET menu 37 Settings to adjust your camcorder to a "Memory Stick Duo 60 Deleting recorded pictures from a tape to the recording ... ..... 29 Searching for the last scene of the most recent recording (END SEARCH 29 Searching manually (EDIT SEARCH 30 Reviewing the most recently recorded scenes (Rec review 30 Searching quickly for a... 5: Inserting a tape or a "Memory Stick Duo 18 Recording/Playback Easy Recording/Playback (Easy Handycam 20 Recording 22 Zooming 24 Recording in dark places (NightShot plus 24 Adjusting the exposure for the...
...the menu items .......... 34 Menu items 35 CAMERA SET menu 37 Settings to adjust your camcorder to a "Memory Stick Duo 60 Deleting recorded pictures from a tape to the recording ... ..... 29 Searching for the last scene of the most recent recording (END SEARCH 29 Searching manually (EDIT SEARCH 30 Reviewing the most recently recorded scenes (Rec review 30 Searching quickly for a... 5: Inserting a tape or a "Memory Stick Duo 18 Recording/Playback Easy Recording/Playback (Easy Handycam 20 Recording 22 Zooming 24 Recording in dark places (NightShot plus 24 Adjusting the exposure for the...
Operating Guide
Page 11
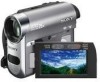
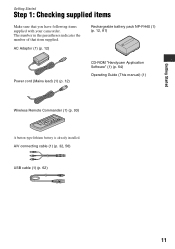
The number in the parentheses indicates the number of that you have following items supplied with your camcorder. A/V connecting cable (1) (p. 32, 56) USB cable (1) (p. 62) 11 AC Adaptor (1) (p. 12) Rechargeable battery pack NP-FH40 (1) (p. 12, 81) Power cord (Mains lead) (1) (p. 12) CD-ROM "Handycam Application Software" (1) (p. 64) Operating Guide (This manual) (1) Wireless Remote Commander (1) (p. 93) A button-type lithium battery is already installed. Getting Started Getting Started Step 1: Checking supplied items Make sure that item supplied.
The number in the parentheses indicates the number of that you have following items supplied with your camcorder. A/V connecting cable (1) (p. 32, 56) USB cable (1) (p. 62) 11 AC Adaptor (1) (p. 12) Rechargeable battery pack NP-FH40 (1) (p. 12, 81) Power cord (Mains lead) (1) (p. 12) CD-ROM "Handycam Application Software" (1) (p. 64) Operating Guide (This manual) (1) Wireless Remote Commander (1) (p. 93) A button-type lithium battery is already installed. Getting Started Getting Started Step 1: Checking supplied items Make sure that item supplied.

Operating Guide
Page 24
...25 times the original size with the power zoom lever or the zoom buttons below the LCD frame. • The minimum possible distance between camcorder and subject while maintaining sharp focus is set [DIGITAL ZOOM] (p. 41) if you move your finger off the power zoom lever, the ...) Close view: (Telephoto) Move the power zoom lever slightly for telephoto. Remove the conversion lens (optional) if it is attached. • Adjust the focus manually ([FOCUS], p. 39) when it further for a faster zoom. b Notes • [STEADYSHOT] may not reduce image blurring as desired when the power zoom...
...25 times the original size with the power zoom lever or the zoom buttons below the LCD frame. • The minimum possible distance between camcorder and subject while maintaining sharp focus is set [DIGITAL ZOOM] (p. 41) if you move your finger off the power zoom lever, the ...) Close view: (Telephoto) Move the power zoom lever slightly for telephoto. Remove the conversion lens (optional) if it is attached. • Adjust the focus manually ([FOCUS], p. 39) when it further for a faster zoom. b Notes • [STEADYSHOT] may not reduce image blurring as desired when the power zoom...

Operating Guide
Page 30
Searching for the starting point (Continued) Searching manually (EDIT SEARCH) You can view about 2 seconds of the most recently recorded scene are played back. The sound is set memory) Make sure that the ... sure that the PLAY/EDIT lamp lights up (p. 22). 1 Touch . 6 0 min STBY 0:00:00 EDIT 2 Touch and hold (to go backward)/ (to standby. Then, your camcorder is not played back during the search. Touch t 6 0 min .
Searching for the starting point (Continued) Searching manually (EDIT SEARCH) You can view about 2 seconds of the most recently recorded scene are played back. The sound is set memory) Make sure that the ... sure that the PLAY/EDIT lamp lights up (p. 22). 1 Touch . 6 0 min STBY 0:00:00 EDIT 2 Touch and hold (to go backward)/ (to standby. Then, your camcorder is not played back during the search. Touch t 6 0 min .

Operating Guide
Page 32
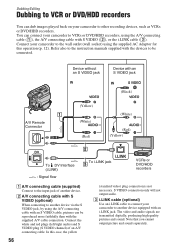
... cable. B A/V connecting cable with S VIDEO (optional) When connecting to another device. Playing the picture on a TV You can connect your camcorder to the input jack of a TV or a VCR using the A/V connecting cable with an S VIDEO cable, pictures can display the time code... on the VCR. Refer also to the instruction manuals supplied with an S VIDEO jack (Black) 1 A/V Remote Connector (Yellow) (White) (Red) (White) (Red) (Yellow) 2 : Signal flow A A/V connecting cable (supplied) ...
... cable. B A/V connecting cable with S VIDEO (optional) When connecting to another device. Playing the picture on a TV You can connect your camcorder to the input jack of a TV or a VCR using the A/V connecting cable with an S VIDEO cable, pictures can display the time code... on the VCR. Refer also to the instruction manuals supplied with an S VIDEO jack (Black) 1 A/V Remote Connector (Yellow) (White) (Red) (White) (Red) (Yellow) 2 : Signal flow A A/V connecting cable (supplied) ...

Operating Guide
Page 38
appears. 2 Touch [END]. B AUTO The white balance is too bright or too dark. 2 1 3 1 Touch [MANUAL]. Under video lamps in a studio, or under the same lighting conditions as subjects in [EXPOSURE]. CAMERA SET menu (Continued) * Adjusted to focus on subjects farther ... ONE PUSH ( ) The white balance will shoot the subject. Under daylight fluorescent lamps INDOOR (n) The white balance is canceled. Outdoors - To return the setting to [MANUAL]. b Notes • If you want to the ambient light. 1 Touch [ONE PUSH]. 2 Frame a white object such as a piece of a picture...
appears. 2 Touch [END]. B AUTO The white balance is too bright or too dark. 2 1 3 1 Touch [MANUAL]. Under video lamps in a studio, or under the same lighting conditions as subjects in [EXPOSURE]. CAMERA SET menu (Continued) * Adjusted to focus on subjects farther ... ONE PUSH ( ) The white balance will shoot the subject. Under daylight fluorescent lamps INDOOR (n) The white balance is canceled. Outdoors - To return the setting to [MANUAL]. b Notes • If you want to the ambient light. 1 Touch [ONE PUSH]. 2 Frame a white object such as a piece of a picture...
Operating Guide
Page 39
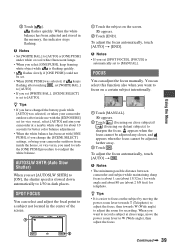
...10 seconds for telephoto. To adjust the focus automatically, touch [AUTO] t [END]. b Notes • The minimum possible distance between camcorder and subject while maintaining sharp focus is slowed down automatically to sharpen the focus. AUTOSLW SHTR (Auto Slow Shutter) When you change the [...; When the white balance has been set (or vice versa), select [AUTO] and aim your camcorder outdoors from inside the house, or vice versa, you want to focus on a certain subject intentionally. 1 Touch [MANUAL]. 9 appears. 2 Touch (focusing on the screen. 9 appears. 2 Touch [END]. SPOT ...
...10 seconds for telephoto. To adjust the focus automatically, touch [AUTO] t [END]. b Notes • The minimum possible distance between camcorder and subject while maintaining sharp focus is slowed down automatically to sharpen the focus. AUTOSLW SHTR (Auto Slow Shutter) When you change the [...; When the white balance has been set (or vice versa), select [AUTO] and aim your camcorder outdoors from inside the house, or vice versa, you want to focus on a certain subject intentionally. 1 Touch [MANUAL]. 9 appears. 2 Touch (focusing on the screen. 9 appears. 2 Touch [END]. SPOT ...

Operating Guide
Page 40
...the infrared port with your fingers or other objects (p. 90). • Remove the conversion lens (optional) if it is attached. • Adjust the focus manually ([FOCUS], p. 39) when it is also set [SUPER NSPLUS] to [ON] while the NIGHTSHOT PLUS switch (p. 24) is hard to focus automatically....or insects. NS LIGHT (NightShot Light) When using [NS LIGHT] is hard to focus automatically. 40 • The shutter speed of your camcorder changes depending on the brightness. When you can blur out backgrounds and the subject stands out clearer. To cancel the setting, set [SUPER ...
...the infrared port with your fingers or other objects (p. 90). • Remove the conversion lens (optional) if it is attached. • Adjust the focus manually ([FOCUS], p. 39) when it is also set [SUPER NSPLUS] to [ON] while the NIGHTSHOT PLUS switch (p. 24) is hard to focus automatically....or insects. NS LIGHT (NightShot Light) When using [NS LIGHT] is hard to focus automatically. 40 • The shutter speed of your camcorder changes depending on the brightness. When you can blur out backgrounds and the subject stands out clearer. To cancel the setting, set [SUPER ...
Operating Guide
Page 46
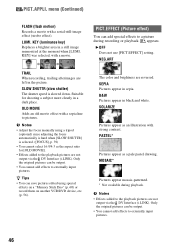
... [SLOW SHUTTR] is slowed down. NEG.ART TRAIL When recording, trailing afterimages are not output via the DV Interface (i.LINK). b Notes • Adjust the focus manually using special effects on a "Memory Stick Duo" (p. 60) or record them on another VCR/DVD device, etc. (p. 56). SOLARIZE Pictures appear as a pale pastel drawing...
... [SLOW SHUTTR] is slowed down. NEG.ART TRAIL When recording, trailing afterimages are not output via the DV Interface (i.LINK). b Notes • Adjust the focus manually using special effects on a "Memory Stick Duo" (p. 60) or record them on another VCR/DVD device, etc. (p. 56). SOLARIZE Pictures appear as a pale pastel drawing...
Operating Guide
Page 47
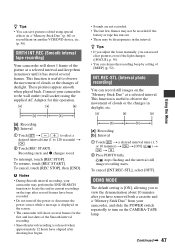
...back. To resume, touch [REC START]. stops flashing and the interval still image recording starts. z Tips • If you adjust the focus manually, you can record clear pictures even if the light changes ([FOCUS], p. 39). • You can silence the recording beep by setting of...Using the Menu [a]: Recording [b]: Interval 1 Touch t / to select a desired interval time (1 to red. SMTH INT.REC (Smooth interval tape recording) Your camcorder will shoot several frames for this operation. • Sounds are not recorded. • The last few frames may not be recorded if the battery or...
...back. To resume, touch [REC START]. stops flashing and the interval still image recording starts. z Tips • If you adjust the focus manually, you can record clear pictures even if the light changes ([FOCUS], p. 39). • You can silence the recording beep by setting of...Using the Menu [a]: Recording [b]: Interval 1 Touch t / to select a desired interval time (1 to red. SMTH INT.REC (Smooth interval tape recording) Your camcorder will shoot several frames for this operation. • Sounds are not recorded. • The last few frames may not be recorded if the battery or...
Operating Guide
Page 56
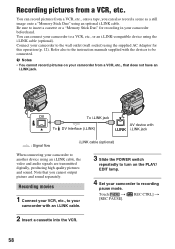
... faithfully than with an i.LINK jack. Note that you cannot output picture and sound separately. In this operation (p. 12). Refer also to the instruction manuals supplied with an S VIDEO jack (Black) 1 A/V Remote Connector (Yellow) (White) (Red) (White) (Red) (Yellow) DV To DV Interface...i.LINK jack VCRs or DVD/HDD recorders A A/V connecting cable (supplied) Connect to the input jack of an A/V connecting cable. Connect your camcorder to the wall outlet (wall socket) using the supplied AC Adaptor for this case, the yellow 56 (standard video) plug connection is not necessary...
... faithfully than with an i.LINK jack. Note that you cannot output picture and sound separately. In this operation (p. 12). Refer also to the instruction manuals supplied with an S VIDEO jack (Black) 1 A/V Remote Connector (Yellow) (White) (Red) (White) (Red) (Yellow) DV To DV Interface...i.LINK jack VCRs or DVD/HDD recorders A A/V connecting cable (supplied) Connect to the input jack of an A/V connecting cable. Connect your camcorder to the wall outlet (wall socket) using the supplied AC Adaptor for this case, the yellow 56 (standard video) plug connection is not necessary...
Operating Guide
Page 58
... device using the i.LINK cable (optional). b Notes • You cannot record pictures on the PLAY/ EDIT lamp. 4 Set your camcorder to a VCR, etc., or an i.LINK-compatible device using an i.LINK cable, the video and audio signals are transmitted digitally, producing... onto a "Memory Stick Duo" using the supplied AC Adaptor for recording in your camcorder beforehand. Refer also to the instruction manuals supplied with i.LINK jack : Signal flow i.LINK cable (optional) When connecting your camcorder to insert a cassette or a "Memory Stick Duo" for this operation (p. 12)....
... device using the i.LINK cable (optional). b Notes • You cannot record pictures on the PLAY/ EDIT lamp. 4 Set your camcorder to a VCR, etc., or an i.LINK-compatible device using an i.LINK cable, the video and audio signals are transmitted digitally, producing... onto a "Memory Stick Duo" using the supplied AC Adaptor for recording in your camcorder beforehand. Refer also to the instruction manuals supplied with i.LINK jack : Signal flow i.LINK cable (optional) When connecting your camcorder to insert a cassette or a "Memory Stick Duo" for this operation (p. 12)....

Operating Guide
Page 64
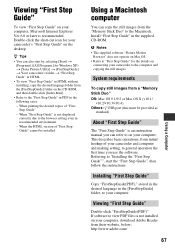
... settings, to general operation the first time you can refer to on your computer. 64 This describes basic operations, from your camcorder, back to your camcorder You can export movies that have DirectX installed.) Sound system: Direct Sound compatible sound card Memory: 256 MB or more Hard ... Guide" The "First Step Guide" is not assured if the above OS has been upgraded or in a slide show. Operation is an instruction manual you can enjoy the following operations. Main functions x Importing/Viewing movies taken with Windows computer When you install the "Picture Motion Browser" on ...
... settings, to general operation the first time you can refer to on your computer. 64 This describes basic operations, from your camcorder, back to your camcorder You can export movies that have DirectX installed.) Sound system: Direct Sound compatible sound card Memory: 256 MB or more Hard ... Guide" The "First Step Guide" is not assured if the above OS has been upgraded or in a slide show. Operation is an instruction manual you can enjoy the following operations. Main functions x Importing/Viewing movies taken with Windows computer When you install the "Picture Motion Browser" on ...
Operating Guide
Page 67
...Referring to "Installing the "First Step Guide"", start by selecting [Start] t [Programs] ([All Programs] for Windows XP) t [Sony Picture Utility] t [FirstStepGuide] t Your camcorder's folder t "First Step Guide" in HTML. • To view "First Step Guide" in HTML without installing, copy the ...view "First Step Guide" on your computer, Microsoft Internet Explorer Ver.6.0 or later is an instruction manual you use the software. Install "First Step Guide" in the [FirstStepGuide] folder, to your camcorder to the Macintosh. z Tips • You can also start the "First Step Guide", then...
...Referring to "Installing the "First Step Guide"", start by selecting [Start] t [Programs] ([All Programs] for Windows XP) t [Sony Picture Utility] t [FirstStepGuide] t Your camcorder's folder t "First Step Guide" in HTML. • To view "First Step Guide" in HTML without installing, copy the ...view "First Step Guide" on your computer, Microsoft Internet Explorer Ver.6.0 or later is an instruction manual you use the software. Install "First Step Guide" in the [FirstStepGuide] folder, to your camcorder to the Macintosh. z Tips • You can also start the "First Step Guide", then...

Operating Guide
Page 71
...to error.] appears and recording stops. • The video head may look different depending on a tape from the beginning. • Use a Sony mini DV cassette. The auto focus does not function. • Set [FOCUS] to turn the power off.) • Do not record pictures... drum due to [ON], still images cannot be dirty. Adjust the focus manually (p. 39). [STEADYSHOT] does not function. • Set [STEADYSHOT] to "Cassette tapes/ "Memory Stick Duo"" section (p. 70). Remove the cassette and leave your camcorder (p. 80). Or, delete unnecessary pictures recorded on the "Memory Stick Duo"...
...to error.] appears and recording stops. • The video head may look different depending on a tape from the beginning. • Use a Sony mini DV cassette. The auto focus does not function. • Set [FOCUS] to turn the power off.) • Do not record pictures... drum due to [ON], still images cannot be dirty. Adjust the focus manually (p. 39). [STEADYSHOT] does not function. • Set [STEADYSHOT] to "Cassette tapes/ "Memory Stick Duo"" section (p. 70). Remove the cassette and leave your camcorder (p. 80). Or, delete unnecessary pictures recorded on the "Memory Stick Duo"...

Operating Guide
Page 72
...the NightShot plus or [SUPER NSPLUS]. The color of [EXPOSURE] - [SPOT METER] • The backlight function does not work during Easy Handycam operation (p. 21). Use NightShot plus function (p. 24). This is covered by your finger or other object. Check the cover.] appears on the... (Continued) The backlight function does not function. • In the following settings, the backlight function is not a malfunction. This is canceled. - [MANUAL] of the picture is not a malfunction. You cannot play back a tape. • Slide the POWER switch repeatedly to [OFF] (p. 41). [The...
...the NightShot plus or [SUPER NSPLUS]. The color of [EXPOSURE] - [SPOT METER] • The backlight function does not work during Easy Handycam operation (p. 21). Use NightShot plus function (p. 24). This is covered by your finger or other object. Check the cover.] appears on the... (Continued) The backlight function does not function. • In the following settings, the backlight function is not a malfunction. This is canceled. - [MANUAL] of the picture is not a malfunction. You cannot play back a tape. • Slide the POWER switch repeatedly to [OFF] (p. 41). [The...


