

Operating Guide
Page 7
...; Exposing the LCD screen, the viewfinder, or the lens to OFF (CHG) when you insert the camcorder into the Handycam Station or remove the camcorder from the Handycam Station holding both the Handycam Station and the DC plug. • Be sure to slide the POWER switch to direct sunlight for ...effective use and care" (p. 82). • Before connecting your camcorder attached to the Handycam Station to output audio and video signals. • Disconnect the AC Adaptor from it. However, there may cause malfunctions. • Do ...
...; Exposing the LCD screen, the viewfinder, or the lens to OFF (CHG) when you insert the camcorder into the Handycam Station or remove the camcorder from the Handycam Station holding both the Handycam Station and the DC plug. • Be sure to slide the POWER switch to direct sunlight for ...effective use and care" (p. 82). • Before connecting your camcorder attached to the Handycam Station to output audio and video signals. • Disconnect the AC Adaptor from it. However, there may cause malfunctions. • Do ...
Operating Guide
Page 9
... on a TV ...........32 Using the Menu Using the menu items .......... 34 Menu items 35 CAMERA SET menu 37 Settings to adjust your camcorder to a "Memory Stick Duo 59 Deleting recorded pictures from the "Memory Stick Duo 59 Marking images on the "Memory Stick Duo" with...4: Making setting adjustments before recording 17 Step 5: Inserting a tape or a "Memory Stick Duo 18 Recording/Playback Easy Recording/Playback (Easy Handycam 20 Recording 22 Zooming 24 Recording in dark places (NightShot plus 24 Adjusting the exposure for backlit subjects 25 Recording in various modes STANDARD SET...
... on a TV ...........32 Using the Menu Using the menu items .......... 34 Menu items 35 CAMERA SET menu 37 Settings to adjust your camcorder to a "Memory Stick Duo 59 Deleting recorded pictures from the "Memory Stick Duo 59 Marking images on the "Memory Stick Duo" with...4: Making setting adjustments before recording 17 Step 5: Inserting a tape or a "Memory Stick Duo 18 Recording/Playback Easy Recording/Playback (Easy Handycam 20 Recording 22 Zooming 24 Recording in dark places (NightShot plus 24 Adjusting the exposure for backlit subjects 25 Recording in various modes STANDARD SET...

Operating Guide
Page 11
AC Adaptor (1) (p. 12) Rechargeable battery pack NP-FH40 (1) (p. 12, 80) Power cord (1) (p. 12) CD-ROM "Handycam Application Software" (1) (p. 63) Operating Guide (This manual) (1) Handycam Station (1) (p. 12, 93) Wireless Remote Commander (1) (p. 93) A button-type lithium battery is already installed. Getting Started Getting Started Step 1: Checking supplied items Make sure that item supplied. The number in the parentheses indicates the number of that you have following items supplied with your camcorder. A/V connecting cable (1) (p. 32, 55) USB cable (1) (p. 61) 11
AC Adaptor (1) (p. 12) Rechargeable battery pack NP-FH40 (1) (p. 12, 80) Power cord (1) (p. 12) CD-ROM "Handycam Application Software" (1) (p. 63) Operating Guide (This manual) (1) Handycam Station (1) (p. 12, 93) Wireless Remote Commander (1) (p. 93) A button-type lithium battery is already installed. Getting Started Getting Started Step 1: Checking supplied items Make sure that item supplied. The number in the parentheses indicates the number of that you have following items supplied with your camcorder. A/V connecting cable (1) (p. 32, 55) USB cable (1) (p. 61) 11

Operating Guide
Page 12
... it into place (2). 4 Connect the power cord to the AC Adaptor and the wall outlet. 5 Insert the camcorder into the Handycam Station securely, all the way to the bottom. Remove your camcoder from the Handycam Station. 2 Slide the POWER switch to OFF (CHG) (The default setting). 3 With the v mark on... the Handycam Station. b Notes • You cannot attach any "InfoLITHIUM" battery pack other than the H series to the DC IN jack on the DC plug facing up and charging starts. The CHG (charge) lamp lights up , connect the AC Adaptor to your camcorder. 1 Align the terminals of...
... it into place (2). 4 Connect the power cord to the AC Adaptor and the wall outlet. 5 Insert the camcorder into the Handycam Station securely, all the way to the bottom. Remove your camcoder from the Handycam Station. 2 Slide the POWER switch to OFF (CHG) (The default setting). 3 With the v mark on... the Handycam Station. b Notes • You cannot attach any "InfoLITHIUM" battery pack other than the H series to the DC IN jack on the DC plug facing up and charging starts. The CHG (charge) lamp lights up , connect the AC Adaptor to your camcorder. 1 Align the terminals of...

Operating Guide
Page 13
...the illustration. With the v mark facing down DC plug DC IN jack Open the jack cover z Tips • You can operate your camcorder and the Handycam Station. To charge the battery pack using only the AC Adaptor Turn off the power, then press PUSH. 2 Remove the battery pack ... 81). Getting Started b Notes • When inserting the camcorder into the Handycam Station, close the DC IN jack cover. • Disconnect the AC Adaptor from the Handycam Station holding both your camcorder connected to the DC IN jack on your camcorder. The battery pack will not lose its charge in the ...
...the illustration. With the v mark facing down DC plug DC IN jack Open the jack cover z Tips • You can operate your camcorder and the Handycam Station. To charge the battery pack using only the AC Adaptor Turn off the power, then press PUSH. 2 Remove the battery pack ... 81). Getting Started b Notes • When inserting the camcorder into the Handycam Station, close the DC IN jack cover. • Disconnect the AC Adaptor from the Handycam Station holding both your camcorder connected to the DC IN jack on your camcorder. The battery pack will not lose its charge in the ...

Operating Guide
Page 15
... screen appears. CLOCK SET -:--:-- Touch the button on a tape. On the AC Adaptor • Use the nearby wall outlet when using your camcorder or the Handycam Station, even when the power cord is connected to OFF (CHG). • The CHG (charge) lamp flashes during charging, or the Battery ...;C - 30°C (50°F - 86°F) is recommended.) • The recording and playback time will be shorter when you use your camcorder in a narrow space, such as the AC Adaptor is disconnected from the wall outlet immediately if any malfunction occurs while using the AC Adaptor. Step...
... screen appears. CLOCK SET -:--:-- Touch the button on a tape. On the AC Adaptor • Use the nearby wall outlet when using your camcorder or the Handycam Station, even when the power cord is connected to OFF (CHG). • The CHG (charge) lamp flashes during charging, or the Battery ...;C - 30°C (50°F - 86°F) is recommended.) • The recording and playback time will be shorter when you use your camcorder in a narrow space, such as the AC Adaptor is disconnected from the wall outlet immediately if any malfunction occurs while using the AC Adaptor. Step...

Operating Guide
Page 16
...TIME/LANGU.) t [LANGUAGE], then select the desired language. To turn off the power Slide the POWER switch to turn off automatically if you leave your camcorder for about 3 months, the built-in a specified language. z Tips • The date and time are not displayed while recording, but they are ...8226; At the time of purchase, the power is set only [DATE/TIME])). • If the buttons on the touch panel do not use your camcorder without any operation attempted for approximately 5 minutes, to 12:00 PM. Step 3: Turning the power on and setting the date and time (Continued) 3...
...TIME/LANGU.) t [LANGUAGE], then select the desired language. To turn off the power Slide the POWER switch to turn off automatically if you leave your camcorder for about 3 months, the built-in a specified language. z Tips • The date and time are not displayed while recording, but they are ...8226; At the time of purchase, the power is set only [DATE/TIME])). • If the buttons on the touch panel do not use your camcorder without any operation attempted for approximately 5 minutes, to 12:00 PM. Step 3: Turning the power on and setting the date and time (Continued) 3...

Operating Guide
Page 29
Recording/Playback Unavailable settings during Easy Handycam During Easy Handycam operation, some items are unavailable. z Tips • If [SET] is played back for the last scene of the most recent recording (END SEARCH) [END SEARCH] ... last scene of the most recent recording is not displayed in Personal Menu (p. 34). Searching for the starting point Searching for about 5 seconds, and the camcorder enters the standby mode at the point where the last recording has finished. When the PLAY/EDIT lamp lights up (p. 22). Follow the instruction to...
Recording/Playback Unavailable settings during Easy Handycam During Easy Handycam operation, some items are unavailable. z Tips • If [SET] is played back for the last scene of the most recent recording (END SEARCH) [END SEARCH] ... last scene of the most recent recording is not displayed in Personal Menu (p. 34). Searching for the starting point Searching for about 5 seconds, and the camcorder enters the standby mode at the point where the last recording has finished. When the PLAY/EDIT lamp lights up (p. 22). Follow the instruction to...
Operating Guide
Page 32
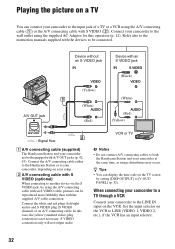
... AC Adaptor for this case, the yellow (standard video) plug connection is not necessary. Connect the A/V connecting cable either to the Handycam Station or to your camcorder, depending on the VCR to both equipped with an S VIDEO jack (Black) 1 A/V OUT jack (Yellow) (White) (Red)... (White) (Red) (Yellow) A/V OUT 2 : Signal flow A A/V connecting cable (supplied) The Handycam Station and your camcorder are both the Handycam Station and your setup. Device without an S VIDEO jack Device with A/V OUT jacks (p. 92, 93). Set the input selector on your...
... AC Adaptor for this case, the yellow (standard video) plug connection is not necessary. Connect the A/V connecting cable either to the Handycam Station or to your camcorder, depending on the VCR to both equipped with an S VIDEO jack (Black) 1 A/V OUT jack (Yellow) (White) (Red)... (White) (Red) (Yellow) A/V OUT 2 : Signal flow A A/V connecting cable (supplied) The Handycam Station and your camcorder are both the Handycam Station and your setup. Device without an S VIDEO jack Device with A/V OUT jacks (p. 92, 93). Set the input selector on your...
Operating Guide
Page 48
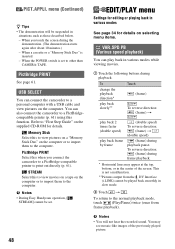
...of the previously played picture. You may appear at the top, bottom, or in slow mode. 2 Touch t . When you connect the camcorder to a PictBridge-compatible printer to a PictBridgecompatible printer (p. 61) using this when you touch the screen during frame playback. * Horizontal lines may...play back frame by frame (double speed) To reverse direction: (frame) t (double speed) (frame) during playback. b Notes • During Easy Handycam operation, [ STREAM] cannot be set to the normal playback mode, touch (Play/Pause) twice (once from the DV Interface (i.LINK) cannot be suspended ...
...of the previously played picture. You may appear at the top, bottom, or in slow mode. 2 Touch t . When you connect the camcorder to a PictBridge-compatible printer to a PictBridgecompatible printer (p. 61) using this when you touch the screen during frame playback. * Horizontal lines may...play back frame by frame (double speed) To reverse direction: (frame) t (double speed) (frame) during playback. b Notes • During Easy Handycam operation, [ STREAM] cannot be set to the normal playback mode, touch (Play/Pause) twice (once from the DV Interface (i.LINK) cannot be suspended ...

Operating Guide
Page 52
... the beeping sound and shutter sound. NEVER The camcorder is [ON], allowing you to PLAY/ EDIT ... minutes. BEEP B ON A beeping sound starts when you do not operate your camcorder for about 8 seconds in situations such as those described below. • When you...or operate the touch panel. A.SHUT OFF (Auto shut off) B 5 min The camcorder is automatically set [DATE/TIME] only. CALIBRATION See page 84. 52 MENU ROTATE B...VCR remote control unit. z Tips • Set to [OFF] to prevent your camcorder to a wall outlet, [A.SHUT OFF] is automatically turned off . If you record a picture ...
... the beeping sound and shutter sound. NEVER The camcorder is [ON], allowing you to PLAY/ EDIT ... minutes. BEEP B ON A beeping sound starts when you do not operate your camcorder for about 8 seconds in situations such as those described below. • When you...or operate the touch panel. A.SHUT OFF (Auto shut off) B 5 min The camcorder is automatically set [DATE/TIME] only. CALIBRATION See page 84. 52 MENU ROTATE B...VCR remote control unit. z Tips • Set to [OFF] to prevent your camcorder to a wall outlet, [A.SHUT OFF] is automatically turned off . If you record a picture ...

Operating Guide
Page 55
... (White) (Red) (White) (Red) (Yellow) A/V OUT 2 DV To DV Interface (i.LINK) 3 To i.LINK jack VCRs or DVD/HDD recorders : Signal flow A A/V connecting cable (supplied) The Handycam Station and your camcorder are transmitted digitally, producing high quality pictures and sound. Dubbing/Editing Dubbing to VCR or DVD/HDD recorders You can connect your...
... (White) (Red) (White) (Red) (Yellow) A/V OUT 2 DV To DV Interface (i.LINK) 3 To i.LINK jack VCRs or DVD/HDD recorders : Signal flow A A/V connecting cable (supplied) The Handycam Station and your camcorder are transmitted digitally, producing high quality pictures and sound. Dubbing/Editing Dubbing to VCR or DVD/HDD recorders You can connect your...

Operating Guide
Page 61
...the printer z Tips • You can also operate by selecting in the following orders: - Insert the "Memory Stick Duo" containing still images into your camcorder to obtain power from the wall outlet (p. 12). Touch t [MENU] t (PICT.APPLI.) t [USB SELECT] t [PictBridge PRINT] - Touch t... 3 Select the number of models that are not PictBridge compatible. A maximum of 20 copies of the Handycam Station to be printed with / . Continued , 61 Connecting your camcorder and turn on the screen automatically. 3 Touch [PictBridge PRINT]. When connection is completed. b Notes •...
...the printer z Tips • You can also operate by selecting in the following orders: - Insert the "Memory Stick Duo" containing still images into your camcorder to obtain power from the wall outlet (p. 12). Touch t [MENU] t (PICT.APPLI.) t [USB SELECT] t [PictBridge PRINT] - Touch t... 3 Select the number of models that are not PictBridge compatible. A maximum of 20 copies of the Handycam Station to be printed with / . Continued , 61 Connecting your camcorder and turn on the screen automatically. 3 Touch [PictBridge PRINT]. When connection is completed. b Notes •...

Operating Guide
Page 62
.... Disconnect the power cord. - Refer to a digital video camera or digital still camera, regardless of model or manufacturer. 62 Remove your camcorder. • PictBridge is on again and restart the operation from the beginning. • On some printer models, the top, bottom, right...a still image recorded in a 16:9 (wide) ratio, the left edges of images may be performed properly. - Disconnect the USB cable from the Handycam Station. - Printing recorded images (PictBridge compliant printer) (Continued) b Notes • Refer also to the operating instructions for details. • We ...
.... Disconnect the power cord. - Refer to a digital video camera or digital still camera, regardless of model or manufacturer. 62 Remove your camcorder. • PictBridge is on again and restart the operation from the beginning. • On some printer models, the top, bottom, right...a still image recorded in a 16:9 (wide) ratio, the left edges of images may be performed properly. - Disconnect the USB cable from the Handycam Station. - Printing recorded images (PictBridge compliant printer) (Continued) b Notes • Refer also to the operating instructions for details. • We ...

Operating Guide
Page 67
... 20, 35). The menu item settings have changed unexpectedly. • The following table to a wall outlet (p. 12). • Insert your camcorder into the Handycam Station correctly (p. 12). The supplied Remote Commander does not function. • Set [REMOTE CTRL] to OFF (CHG) for more than VTR ..., the settings of the compartment (p. 86). If the problem persists, disconnect the power source and contact your Sony dealer. • Overall operations/Easy Handycam/ Remote Commander 67 • Batteries/Power sources 68 • LCD screen/viewfinder 68 • Cassette tapes/"Memory Stick ...
... 20, 35). The menu item settings have changed unexpectedly. • The following table to a wall outlet (p. 12). • Insert your camcorder into the Handycam Station correctly (p. 12). The supplied Remote Commander does not function. • Set [REMOTE CTRL] to OFF (CHG) for more than VTR ..., the settings of the compartment (p. 86). If the problem persists, disconnect the power source and contact your Sony dealer. • Overall operations/Easy Handycam/ Remote Commander 67 • Batteries/Power sources 68 • LCD screen/viewfinder 68 • Cassette tapes/"Memory Stick ...

Operating Guide
Page 68
...Press DISP/BATT INFO on your Sony dealer. Batteries/Power sources The power abruptly turns off. • When approximately 5 minutes have elapsed while you touch it takes about 1 minute to check the warning messages (p. 76). Change the setting of your camcorder into the Handycam Station correctly (p. 12). &#... the LCD backlight on the touch panel do not work correctly or do not operate your camcorder, the camcorder is automatically turned off . You cannot turn the LCD backlight off. • During Easy Handycam operation (p. 21), you open or close the LCD panel, it . • This ...
...Press DISP/BATT INFO on your Sony dealer. Batteries/Power sources The power abruptly turns off. • When approximately 5 minutes have elapsed while you touch it takes about 1 minute to check the warning messages (p. 76). Change the setting of your camcorder into the Handycam Station correctly (p. 12). &#... the LCD backlight on the touch panel do not work correctly or do not operate your camcorder, the camcorder is automatically turned off . You cannot turn the LCD backlight off. • During Easy Handycam operation (p. 21), you open or close the LCD panel, it . • This ...

Operating Guide
Page 69
...8226; The maximum number of the "Memory Stick Duo" if there is connected correctly (p. 12). • Moisture condensation has occurred inside the camcorder (p. 83). Image protection cannot be ejected from the compartment. • Make sure the power source (battery pack or AC Adaptor) is one ...tape; The picture in the current recording/playback situation. Continued , 69 Troubleshooting Cancel Easy Handycam operation (p. 20). The remaining tape indicator is not displayed. • During Easy Handycam operation, not all menu items are grayed out. • You cannot select grayed items ...
...8226; The maximum number of the "Memory Stick Duo" if there is connected correctly (p. 12). • Moisture condensation has occurred inside the camcorder (p. 83). Image protection cannot be ejected from the compartment. • Make sure the power source (battery pack or AC Adaptor) is one ...tape; The picture in the current recording/playback situation. Continued , 69 Troubleshooting Cancel Easy Handycam operation (p. 20). The remaining tape indicator is not displayed. • During Easy Handycam operation, not all menu items are grayed out. • You cannot select grayed items ...

Operating Guide
Page 72
...is not a malfunction. Date search does not work correctly. • Be sure to the Handycam Station, close the DC IN jack cover on the camcorder, and then fully insert the camcorder into the Handycam Station in the correct way securely (p. 12). Pictures from connected devices cannot be zoomed. &#...8226; You cannot zoom pictures from the camcorder do not appear. • Clean the head using the...
...is not a malfunction. Date search does not work correctly. • Be sure to the Handycam Station, close the DC IN jack cover on the camcorder, and then fully insert the camcorder into the Handycam Station in the correct way securely (p. 12). Pictures from connected devices cannot be zoomed. &#...8226; You cannot zoom pictures from the camcorder do not appear. • Clean the head using the...

Operating Guide
Page 73
...correctly (p. 12). • Disconnect USB devices other than the keyboard, the mouse, and the camcorder from the (USB) jack on the computer. • Disconnect the cable from your camcorder and the Handycam Station. Not available BACK LIGHT [SCENE SELECT] [CANDLE], [FIREWORKS], [SPORTS] [SPOT METER] ...8226; You cannot record or a distorted picture may be used at the same time. Wait for a while. • Insert your camcorder for recording. Still pictures cannot be used together Depending on a Windows computer. You cannot dub correctly using the A/V connecting cable. •...
...correctly (p. 12). • Disconnect USB devices other than the keyboard, the mouse, and the camcorder from the (USB) jack on the computer. • Disconnect the cable from your camcorder and the Handycam Station. Not available BACK LIGHT [SCENE SELECT] [CANDLE], [FIREWORKS], [SPORTS] [SPOT METER] ...8226; You cannot record or a distorted picture may be used at the same time. Wait for a while. • Insert your camcorder for recording. Still pictures cannot be used together Depending on a Windows computer. You cannot dub correctly using the A/V connecting cable. •...

Operating Guide
Page 87
Handycam Station Input/Output connectors DCRA-C155 Audio/Video output 10-pin connector Video signal: 1 Vp-p, 75 Ω (ohms) Luminance signal: 1 Vp-p, 75 Ω (ohms) Chrominance ... the NP-FH40 rechargeable battery pack and DVM60 cassette Supplied accessories See page 11. Files in this format can have additional information such as your camcorder's setting information at load impedance 47 kΩ (kilohms)), Output impedance with less than 2.2 kΩ (kilohms) LCD screen Picture 6.9 cm (2.7 type, aspect ratio 16:9) Total dot...
Handycam Station Input/Output connectors DCRA-C155 Audio/Video output 10-pin connector Video signal: 1 Vp-p, 75 Ω (ohms) Luminance signal: 1 Vp-p, 75 Ω (ohms) Chrominance ... the NP-FH40 rechargeable battery pack and DVM60 cassette Supplied accessories See page 11. Files in this format can have additional information such as your camcorder's setting information at load impedance 47 kΩ (kilohms)), Output impedance with less than 2.2 kΩ (kilohms) LCD screen Picture 6.9 cm (2.7 type, aspect ratio 16:9) Total dot...


