
Marketing Specifications
Page 1
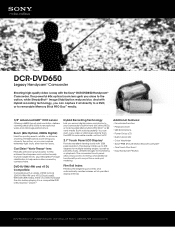
... and photos to your camcorder's built-in hard disk drive (HDD), or to removable media-without a PC. 2.7" Touch Panel LCD Display3 Provides excellent viewing clarity with the Sony® DCR-DVD650 Handycam® Camcorder. Carl Zeiss® ...Vario-Tessar® lens Features precision-ground optics to help achieve the sharpness and contrast usually found in larger lenses, plus SteadyShot® image stabilization to help reduce blur caused by LCD • Built-in a compatible DVD or Blu-ray Disc™ player.6 Hybrid...
... and photos to your camcorder's built-in hard disk drive (HDD), or to removable media-without a PC. 2.7" Touch Panel LCD Display3 Provides excellent viewing clarity with the Sony® DCR-DVD650 Handycam® Camcorder. Carl Zeiss® ...Vario-Tessar® lens Features precision-ground optics to help achieve the sharpness and contrast usually found in larger lenses, plus SteadyShot® image stabilization to help reduce blur caused by LCD • Built-in a compatible DVD or Blu-ray Disc™ player.6 Hybrid...
Marketing Specifications
Page 2
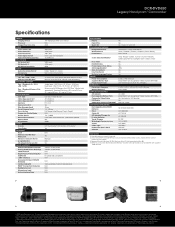
DCR-DVD650 Legacy Handycam® Camcorder Specifications IMAGER ...Speed) 60x 2000x 2.7" touch panel3 LCD display (123k pixels)3 Yes N/A Yes Manual N/A Yes Video/S Video/Audio Video/S Video/Audio N/A N/A Hi-speed (2.0 compliant) N/A N/A Sold separately (via A/V Remote jack) N/A N/A N/A N/A CONVENIENCE Hybrid Hybrid Plus Quick On CONVENIENCE FEATURES Image ... 12. All rights reserved. Specifications and features are trademarks of Sony DVD-R and DVD-RW media recommended. Sony is a trademark. Sony, the Sony logo, Handycam, the Handycam logo, Memory Stick, Memory Stick PRO Duo,...
DCR-DVD650 Legacy Handycam® Camcorder Specifications IMAGER ...Speed) 60x 2000x 2.7" touch panel3 LCD display (123k pixels)3 Yes N/A Yes Manual N/A Yes Video/S Video/Audio Video/S Video/Audio N/A N/A Hi-speed (2.0 compliant) N/A N/A Sold separately (via A/V Remote jack) N/A N/A N/A N/A CONVENIENCE Hybrid Hybrid Plus Quick On CONVENIENCE FEATURES Image ... 12. All rights reserved. Specifications and features are trademarks of Sony DVD-R and DVD-RW media recommended. Sony is a trademark. Sony, the Sony logo, Handycam, the Handycam logo, Memory Stick, Memory Stick PRO Duo,...
Operating Guide
Page 7
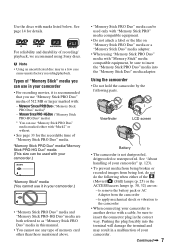
...are on "Memory Stick PRO Duo" media or a "Memory Stick Duo" media adaptor. • When using Sony discs. to another device with : - Viewfinder LCD screen Battery • The camcorder is recommended that you can be sure to insert the "Memory Stick PRO Duo" media into the terminal will ...damage the terminal and may in your camcorder to remove the battery pack or AC Adaptor from ...
...are on "Memory Stick PRO Duo" media or a "Memory Stick Duo" media adaptor. • When using Sony discs. to another device with : - Viewfinder LCD screen Battery • The camcorder is recommended that you can be sure to insert the "Memory Stick PRO Duo" media into the terminal will ...damage the terminal and may in your camcorder to remove the battery pack or AC Adaptor from ...

Operating Guide
Page 8
...playback conditions. • The LCD screen and the viewfinder are manufactured using your camcorder if necessary (p. 26). On recording • Before starting to record, test the recording function to prevent the recovery of your data. DCR-DVD650 Use a DVD-RW/DVD+RW for illustrating the operating...the images recorded on -screen displays in Germany, and Sony Corporation, and produces superior images. Take images of the sun only in any problems. - Change the screen language before operating your camcorder (Continued) About menu items, LCD panel, viewfinder, and lens • A menu ...
...playback conditions. • The LCD screen and the viewfinder are manufactured using your camcorder if necessary (p. 26). On recording • Before starting to record, test the recording function to prevent the recovery of your data. DCR-DVD650 Use a DVD-RW/DVD+RW for illustrating the operating...the images recorded on -screen displays in Germany, and Sony Corporation, and produces superior images. Take images of the sun only in any problems. - Change the screen language before operating your camcorder (Continued) About menu items, LCD panel, viewfinder, and lens • A menu ...
Operating Guide
Page 9
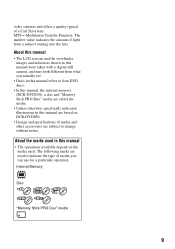
...number value indicates the amount of light from what you actually see. • Discs in this manual refers to 8cm DVD discs. • In this manual, the internal memory (DCR-DVD850), a disc and "Memory Stick PRO Duo" media are called the media. • Unless otherwise specifically indicated,... illustrations in this manual are subject to indicate the type of a Carl Zeiss lens. Internal Memory Disc "Memory Stick PRO Duo" media 9 About this manual • The LCD ...
...number value indicates the amount of light from what you actually see. • Discs in this manual refers to 8cm DVD discs. • In this manual, the internal memory (DCR-DVD850), a disc and "Memory Stick PRO Duo" media are called the media. • Unless otherwise specifically indicated,... illustrations in this manual are subject to indicate the type of a Carl Zeiss lens. Internal Memory Disc "Memory Stick PRO Duo" media 9 About this manual • The LCD ...
Operating Guide
Page 23
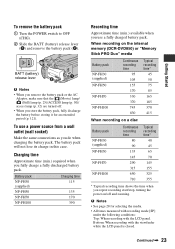
...sure that the (Movie) lamp/ (Still) lamp (p. 25)/ACCESS lamp (p. 30)/ access lamp (p. 32) are turned off and zooming. Bottom: When recording with the LCD panel. Continued , 23 b Notes • See page 28 for an extended period (p. 121). BATT (battery) release lever b Notes • When you do when ...charging the battery pack. When recording on the internal memory (DCR-DVD850) or "Memory Stick PRO Duo" media Battery pack NP-FH30 (supplied) NP-FH50 NP-FH70 NP-FH100 Continuous recording time 95 105 155 ...
...sure that the (Movie) lamp/ (Still) lamp (p. 25)/ACCESS lamp (p. 30)/ access lamp (p. 32) are turned off and zooming. Bottom: When recording with the LCD panel. Continued , 23 b Notes • See page 28 for an extended period (p. 121). BATT (battery) release lever b Notes • When you do when ...charging the battery pack. When recording on the internal memory (DCR-DVD850) or "Memory Stick PRO Duo" media Battery pack NP-FH30 (supplied) NP-FH50 NP-FH70 NP-FH100 Continuous recording time 95 105 155 ...
Operating Guide
Page 24
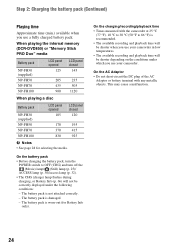
...Charging the battery pack (Continued) Playing time Approximate time (min.) available when you use your camcorder. On the charging/recording/playback time • Times measured with any metallic objects. When playing the internal memory (DCR-DVD850) or "Memory Stick PRO Duo" media Battery pack NP-FH30 (supplied) NP-FH50...closed 145 205 235 435 505 980 1120 When playing a disc Battery pack NP-FH30 (supplied) NP-FH50 NP-FH70 NP-FH100 LCD panel opened 105 LCD panel closed 120 170 195 370 415 830 925 b Notes • See page 28 for Battery Info only). The battery pack is...
...Charging the battery pack (Continued) Playing time Approximate time (min.) available when you use your camcorder. On the charging/recording/playback time • Times measured with any metallic objects. When playing the internal memory (DCR-DVD850) or "Memory Stick PRO Duo" media Battery pack NP-FH30 (supplied) NP-FH50...closed 145 205 235 435 505 980 1120 When playing a disc Battery pack NP-FH30 (supplied) NP-FH50 NP-FH70 NP-FH100 LCD panel opened 105 LCD panel closed 120 170 195 370 415 830 925 b Notes • See page 28 for Battery Info only). The battery pack is...
Operating Guide
Page 25
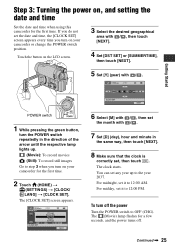
The [CLOCK SET] screen appears. 6 Select [M] with / , then set , then touch . Continued , 25 The clock starts. Touch the button on the LCD screen. 3 Select the desired geographical area with / , then touch [NEXT]. 4 Set [DST SET] or [SUMMERTIME], then touch [NEXT]. 5 Set [Y] (year) with / . 7 Set ... direction of the arrow until the respective lamp lights up to OFF (CHG). Getting Started POWER switch 1 While pressing the green button, turn on your camcorder for the first time. 2 Touch (HOME) t (SETTINGS) t [CLOCK/ LANG] t [CLOCK SET]. You can set it to 12:00 AM. Step 3:...
The [CLOCK SET] screen appears. 6 Select [M] with / , then set , then touch . Continued , 25 The clock starts. Touch the button on the LCD screen. 3 Select the desired geographical area with / , then touch [NEXT]. 4 Set [DST SET] or [SUMMERTIME], then touch [NEXT]. 5 Set [Y] (year) with / . 7 Set ... direction of the arrow until the respective lamp lights up to OFF (CHG). Getting Started POWER switch 1 While pressing the green button, turn on your camcorder for the first time. 2 Touch (HOME) t (SETTINGS) t [CLOCK/ LANG] t [CLOCK SET]. You can set it to 12:00 AM. Step 3:...

Operating Guide
Page 27
Adjust the viewfinder to the lens side, you open or adjust the LCD panel. This is displayed or hidden (display y no display) each time you press DISP. Adjusting the LCD panel Open the LCD panel 90 degrees to the camcorder (1), then rotate it until the image becomes clear. 2180 degrees (max....) DISP b Notes • Do not press the buttons on the LCD frame accidentally when you open the LCD panel 90 degrees to the camcorder, then rotate it 180 degrees to your camcorder properly. 27 Viewfinder Viewfinder lens adjustment lever Move it to the best angle to ...
Adjust the viewfinder to the lens side, you open or adjust the LCD panel. This is displayed or hidden (display y no display) each time you press DISP. Adjusting the LCD panel Open the LCD panel 90 degrees to the camcorder (1), then rotate it until the image becomes clear. 2180 degrees (max....) DISP b Notes • Do not press the buttons on the LCD frame accidentally when you open the LCD panel 90 degrees to the camcorder, then rotate it 180 degrees to your camcorder properly. 27 Viewfinder Viewfinder lens adjustment lever Move it to the best angle to ...
Operating Guide
Page 31
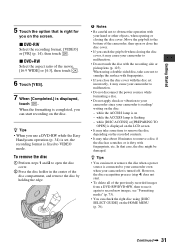
...open or close the disc cover with the disc set , the recording format is dirty with your camcorder is reading/ writing on - while [DISC ACCESS] or [PREPARING TO OPEN] is displayed on the screen. x DVD+RW Select the aspect ratio of the disc compartment, and remove the disc by holding the edge... 2 Press the disc holder in the center of the movie, [16:9 WIDE] or [4:3], then touch . 6 Touch [YES]. 7 When [Completed.] is right for you on the LCD screen • It may take care not to smudge the surface with fingerprints. • If you close the disc cover. • If you can check...
...open or close the disc cover with the disc set , the recording format is dirty with your camcorder is reading/ writing on - while [DISC ACCESS] or [PREPARING TO OPEN] is displayed on the screen. x DVD+RW Select the aspect ratio of the disc compartment, and remove the disc by holding the edge... 2 Press the disc holder in the center of the movie, [16:9 WIDE] or [4:3], then touch . 6 Touch [YES]. 7 When [Completed.] is right for you on the LCD screen • It may take care not to smudge the surface with fingerprints. • If you close the disc cover. • If you can check...

Operating Guide
Page 32
... screen if you select [MEMORY STICK] in the right direction until it on while pressing the green button. Access lamp Face the b mark towards the LCD screen. 32 Step 6: Inserting a disc or "Memory Stick PRO Duo" media (Continued) Inserting "Memory Stick PRO Duo" media This operation is necessary ...only when you insert new "Memory Stick PRO Duo" media when the camcorder is set to OFF (CHG), turn it clicks. 3 Close the "Memory Stick Duo" media cover. 3 If you select [MEMORY STICK] in "Step 5" for...
... screen if you select [MEMORY STICK] in the right direction until it on while pressing the green button. Access lamp Face the b mark towards the LCD screen. 32 Step 6: Inserting a disc or "Memory Stick PRO Duo" media (Continued) Inserting "Memory Stick PRO Duo" media This operation is necessary ...only when you insert new "Memory Stick PRO Duo" media when the camcorder is set to OFF (CHG), turn it clicks. 3 Close the "Memory Stick Duo" media cover. 3 If you select [MEMORY STICK] in "Step 5" for...
Operating Guide
Page 33
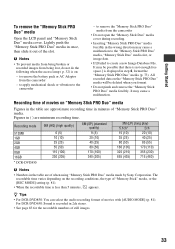
...DCR-DVD650: Sound is less than 5 minutes, appears. It may cause a malfunction. Recording time of when using "Memory Stick PRO Duo" media made by Sony Corporation. Figures in minutes of still images. 33 z Tips • For DCR... on : - Getting Started To remove the "Memory Stick PRO Duo" media Open the LCD panel and "Memory Stick Duo" media cover. Lightly push the "Memory Stick PRO Duo"...• Do not pinch and remove the "Memory Stick PRO Duo" media forcibly. to the camcorder - b Notes • To prevent media from being broken or recorded images from being lost, ...
...DCR-DVD650: Sound is less than 5 minutes, appears. It may cause a malfunction. Recording time of when using "Memory Stick PRO Duo" media made by Sony Corporation. Figures in minutes of still images. 33 z Tips • For DCR... on : - Getting Started To remove the "Memory Stick PRO Duo" media Open the LCD panel and "Memory Stick Duo" media cover. Lightly push the "Memory Stick PRO Duo"...• Do not pinch and remove the "Memory Stick PRO Duo" media forcibly. to the camcorder - b Notes • To prevent media from being broken or recorded images from being lost, ...

Operating Guide
Page 40
... zoom lever slightly for a faster zoom. z Tips • Using [DIGITAL ZOOM] (p. 81), you move your finger on the LCD frame. • The minimum possible distance between camcorder and subject while maintaining sharp focus is about 1 cm (about 13/32 in.) for wide angle and about 150 cm (about 59... your finger off the power zoom lever, the operation sound of view: (Wide angle) Recording sound with more presence (5.1ch surround recording) (DCR-DVD850) Sound picked up to 60 times the original size with the zoom buttons on the power zoom lever. Recording (Continued) Zooming You can...
... zoom lever slightly for a faster zoom. z Tips • Using [DIGITAL ZOOM] (p. 81), you move your finger on the LCD frame. • The minimum possible distance between camcorder and subject while maintaining sharp focus is about 1 cm (about 13/32 in.) for wide angle and about 150 cm (about 59... your finger off the power zoom lever, the operation sound of view: (Wide angle) Recording sound with more presence (5.1ch surround recording) (DCR-DVD850) Sound picked up to 60 times the original size with the zoom buttons on the power zoom lever. Recording (Continued) Zooming You can...
Operating Guide
Page 41
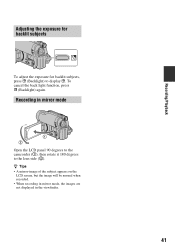
Recording/Playback Adjusting the exposure for backlit subjects To adjust the exposure for backlit subjects, press . (Backlight) to the lens side (2). To cancel the back light function, press . (Backlight) again. z Tips • A mirror-image of the subject appears on the LCD screen, but the image will be normal when recorded. • When recording in mirror mode, the images are not displayed in mirror mode Open the LCD panel 90 degrees to the camcorder (1), then rotate it 180 degrees to display .. Recording in the viewfinder. 41
Recording/Playback Adjusting the exposure for backlit subjects To adjust the exposure for backlit subjects, press . (Backlight) to the lens side (2). To cancel the back light function, press . (Backlight) again. z Tips • A mirror-image of the subject appears on the LCD screen, but the image will be normal when recorded. • When recording in mirror mode, the images are not displayed in mirror mode Open the LCD panel 90 degrees to the camcorder (1), then rotate it 180 degrees to display .. Recording in the viewfinder. 41
Operating Guide
Page 45
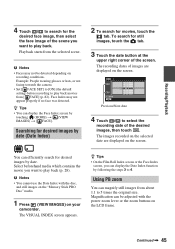
... following the steps 3 to 4. b Notes • You cannot use the Date Index with the power zoom lever or the zoom buttons on the LCD frame. z Tips • On the Film Roll Index screen or the Face Index screen, you want to play back. Magnification can efficiently search for... "Memory Stick PRO Duo" media. 1 Press (VIEW IMAGES) on recording conditions. To search for movies, touch the tab. You can be detected depending on your camcorder. Playback starts from [ FACE] (p. 82). Example: People wearing glasses or hats, or not facing towards the camera. • Set [ FACE SET] to [ON]...
... following the steps 3 to 4. b Notes • You cannot use the Date Index with the power zoom lever or the zoom buttons on the LCD frame. z Tips • On the Film Roll Index screen or the Face Index screen, you want to play back. Magnification can efficiently search for... "Memory Stick PRO Duo" media. 1 Press (VIEW IMAGES) on recording conditions. To search for movies, touch the tab. You can be detected depending on your camcorder. Playback starts from [ FACE] (p. 82). Example: People wearing glasses or hats, or not facing towards the camera. • Set [ FACE SET] to [ON]...
Operating Guide
Page 46
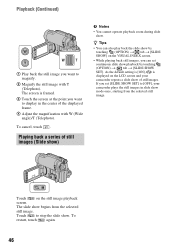
...Telephoto). Touch on the VISUAL INDEX screen. • While playing back still images, you can set [SLIDE SHOW SET] to [OFF], your camcorder repeats a slide show begins from the selected still image. The slide show of still images. Touch to stop the slide show playback by touching ... Adjust the magnification with T (Telephoto). To cancel, touch . If you set continuous slide show . The screen is displayed on the LCD screen and your camcorder plays the still images in the center of still images (Slide show) b Notes • You cannot operate playback zoom during slide show...
...Telephoto). Touch on the VISUAL INDEX screen. • While playing back still images, you can set [SLIDE SHOW SET] to [OFF], your camcorder repeats a slide show begins from the selected still image. The slide show of still images. Touch to stop the slide show playback by touching ... Adjust the magnification with T (Telephoto). To cancel, touch . If you set continuous slide show . The screen is displayed on the LCD screen and your camcorder plays the still images in the center of still images (Slide show) b Notes • You cannot operate playback zoom during slide show...
Operating Guide
Page 65
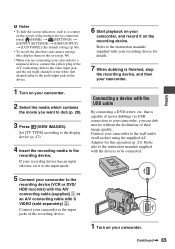
... to the instruction manuals supplied with the devices to be connected. 5 Connect your camcorder to the instruction manuals supplied with the USB cable By connecting a DVD writer, etc. Editing 1 Turn on your camcorder. 2 Select the media which contains the movie you can dub movies without the ... screen indicators, such as a counter on the screen of the monitor device connected, touch (HOME) t (SETTINGS) t [OUTPUT SETTINGS] t [DISP OUTPUT] t [LCD PANEL] (the default setting) (p. 86). • To record the date/time and camera settings data, display them on the screen (p. 84). • When you...
... to the instruction manuals supplied with the devices to be connected. 5 Connect your camcorder to the instruction manuals supplied with the USB cable By connecting a DVD writer, etc. Editing 1 Turn on your camcorder. 2 Select the media which contains the movie you can dub movies without the ... screen indicators, such as a counter on the screen of the monitor device connected, touch (HOME) t (SETTINGS) t [OUTPUT SETTINGS] t [DISP OUTPUT] t [LCD PANEL] (the default setting) (p. 86). • To record the date/time and camera settings data, display them on the screen (p. 84). • When you...

Operating Guide
Page 80
...82 VIEW IMAGES SET (p. 84) Items Page DATA CODE 84 SOUND/DISP SET*3 (p. 85) Items Page VOLUME*2 85 BEEP*2 85 LCD BRIGHT 85 LCD BL LEVEL 85 LCD COLOR 85 OUTPUT SETTINGS (p. 86) Items Page TV TYPE 86 DISP OUTPUT 86 CLOCK/ LANG (p. 86) Items Page CLOCK SET*2... 25 AREA SET 86 DST SET/SUMMERTIME 86 LANGUAGE SET*2 86 GENERAL SET (p. 87) Items Page DEMO MODE 87 CALIBRATION 124 A.SHUT OFF 87 SUB-T DATE 87 *1 DCR...
...82 VIEW IMAGES SET (p. 84) Items Page DATA CODE 84 SOUND/DISP SET*3 (p. 85) Items Page VOLUME*2 85 BEEP*2 85 LCD BRIGHT 85 LCD BL LEVEL 85 LCD COLOR 85 OUTPUT SETTINGS (p. 86) Items Page TV TYPE 86 DISP OUTPUT 86 CLOCK/ LANG (p. 86) Items Page CLOCK SET*2... 25 AREA SET 86 DST SET/SUMMERTIME 86 LANGUAGE SET*2 86 GENERAL SET (p. 87) Items Page DEMO MODE 87 CALIBRATION 124 A.SHUT OFF 87 SUB-T DATE 87 *1 DCR...
Operating Guide
Page 85
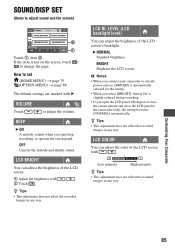
...sound and the screen) Touch 1, then 2. LCD BL LEVEL (LCD backlight level) You can adjust the color of the LCD screen's backlight. z Tips • This adjustment does not affect the recorded images in any way. b Notes • When you connect your camcorder to outside power sources, [BRIGHT] is ...], battery life is not on the screen, touch / to the camcorder body, the setting becomes [NORMAL] automatically. LCD COLOR You can adjust the brightness of the LCD screen with / . BEEP B ON A melody sounds when you open the LCD panel 180 degrees to face the screen outside and close the...
...sound and the screen) Touch 1, then 2. LCD BL LEVEL (LCD backlight level) You can adjust the color of the LCD screen's backlight. z Tips • This adjustment does not affect the recorded images in any way. b Notes • When you connect your camcorder to outside power sources, [BRIGHT] is ...], battery life is not on the screen, touch / to the camcorder body, the setting becomes [NORMAL] automatically. LCD COLOR You can adjust the brightness of the LCD screen with / . BEEP B ON A melody sounds when you open the LCD panel 180 degrees to face the screen outside and close the...
Operating Guide
Page 86
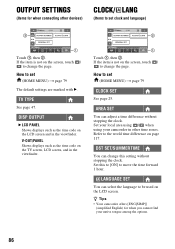
How to set (HOME MENU) t page 79 CLOCK SET See page 25. If the item is not on the LCD screen. z Tips • Your camcorder offers [ENG[SIMP]] (simplified English) for when connecting other time zones. Touch 1, then 2. How to set clock and language) Touch 1, then 2. OUTPUT... SETTINGS (Items for when you cannot find your camcorder in other devices) CLOCK/ LANG (Items to set (HOME MENU) t page 79 The default settings are marked with B. DISP OUTPUT B LCD PANEL Shows displays such as the time code on page 117. LANGUAGE SET You...
How to set (HOME MENU) t page 79 CLOCK SET See page 25. If the item is not on the LCD screen. z Tips • Your camcorder offers [ENG[SIMP]] (simplified English) for when connecting other time zones. Touch 1, then 2. How to set clock and language) Touch 1, then 2. OUTPUT... SETTINGS (Items for when you cannot find your camcorder in other devices) CLOCK/ LANG (Items to set (HOME MENU) t page 79 The default settings are marked with B. DISP OUTPUT B LCD PANEL Shows displays such as the time code on page 117. LANGUAGE SET You...


