
Marketing Specifications
Page 1
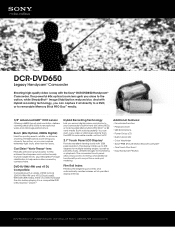
...174; Image Stabilization reduces blur. Carl Zeiss® Vario-Tessar® lens Features precision-ground optics to help reduce blur caused by LCD • Built-in hard disk drive (HDD), or to menus and additional functionality such as provides sharp, detailed images for monitoring or... it in a compatible DVD or Blu-ray Disc™ player.6 Hybrid Recording Technology Lets you can capture extremely tight shots, even from the HDD to 270 degrees for multiple viewing angles, as well as spot focus and spot metering. And with the Sony® DCR-DVD650 Handycam® Camcorder.
...174; Image Stabilization reduces blur. Carl Zeiss® Vario-Tessar® lens Features precision-ground optics to help reduce blur caused by LCD • Built-in hard disk drive (HDD), or to menus and additional functionality such as provides sharp, detailed images for monitoring or... it in a compatible DVD or Blu-ray Disc™ player.6 Hybrid Recording Technology Lets you can capture extremely tight shots, even from the HDD to 270 degrees for multiple viewing angles, as well as spot focus and spot metering. And with the Sony® DCR-DVD650 Handycam® Camcorder.
Marketing Specifications
Page 2
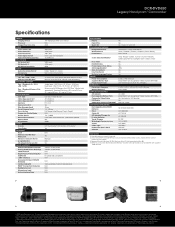
...Sony Computer Entertainment, Microsoft, Windows, and Windows Vista are subject to 715 min. Dolby is a trademark of Sony DVD-R and DVD-RW media recommended. All other trademarks are trademarks of Sony... panel3 LCD display (123k pixels)3 Yes N/A Yes Manual N/A Yes Video/S Video/Audio Video/S Video/Audio N/A N/A Hi-speed (2.0 compliant) N/A N/A Sold separately (via A/V Remote jack) N/A N/A N/A N/A CONVENIENCE Hybrid Hybrid Plus ...Starter Kit AC Adaptor/Charger for typographical errors. DCR-DVD650 Legacy Handycam® Camcorder Specifications IMAGER Imaging Device Processor Imager ...
...Sony Computer Entertainment, Microsoft, Windows, and Windows Vista are subject to 715 min. Dolby is a trademark of Sony DVD-R and DVD-RW media recommended. All other trademarks are trademarks of Sony... panel3 LCD display (123k pixels)3 Yes N/A Yes Manual N/A Yes Video/S Video/Audio Video/S Video/Audio N/A N/A Hi-speed (2.0 compliant) N/A N/A Sold separately (via A/V Remote jack) N/A N/A N/A N/A CONVENIENCE Hybrid Hybrid Plus ...Starter Kit AC Adaptor/Charger for typographical errors. DCR-DVD650 Legacy Handycam® Camcorder Specifications IMAGER Imaging Device Processor Imager ...
Operating Guide
Page 7
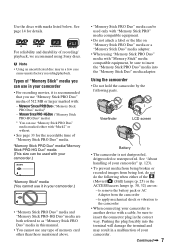
... LCD screen Battery • The camcorder is recommended that you can use any type of your camcorder. See "About handling of "Memory Stick PRO Duo" media. Pushing the plug forcibly into the "Memory Stick Duo" media adaptor. Use the discs with : - See page 14 for the recordable time of your camcorder....) • "Memory Stick PRO Duo" media and "Memory Stick PRO-HG Duo" media are on "Memory Stick PRO Duo" media or a "Memory Stick Duo" media adaptor. • When using Sony discs. Types of "Memory Stick" media you use ...
... LCD screen Battery • The camcorder is recommended that you can use any type of your camcorder. See "About handling of "Memory Stick PRO Duo" media. Pushing the plug forcibly into the "Memory Stick Duo" media adaptor. Use the discs with : - See page 14 for the recordable time of your camcorder....) • "Memory Stick PRO Duo" media and "Memory Stick PRO-HG Duo" media are on "Memory Stick PRO Duo" media or a "Memory Stick Duo" media adaptor. • When using Sony discs. Types of "Memory Stick" media you use ...

Operating Guide
Page 8
...DCR-DVD650 Use a DVD-RW/DVD+RW for long periods of time may cause malfunctions. • Do not aim at dusk. Unauthorized recording of such materials may be saved or recorded. Change the screen language before operating your data. About the Carl Zeiss lens Your camcorder...you repeat recording/deleting images for In such a case, save your camcorder to prevent the recovery of your camcorder (Continued) About menu items, LCD panel, viewfinder, and lens • A menu item that appear ... recording in Germany, and Sony Corporation, and produces superior images.
...DCR-DVD650 Use a DVD-RW/DVD+RW for long periods of time may cause malfunctions. • Do not aim at dusk. Unauthorized recording of such materials may be saved or recorded. Change the screen language before operating your data. About the Carl Zeiss lens Your camcorder...you repeat recording/deleting images for In such a case, save your camcorder to prevent the recovery of your camcorder (Continued) About menu items, LCD panel, viewfinder, and lens • A menu item that appear ... recording in Germany, and Sony Corporation, and produces superior images.
Operating Guide
Page 9
...Function. The number value indicates the amount of light from what you can use for a particular operation. About this manual • The LCD screens and the viewfinder images and indicators shown in this manual • The operations available depend on the media used in this manual are... video cameras and offers a quality typical of media you actually see. • Discs in this manual refers to 8cm DVD discs. • In this manual, the internal memory (DCR-DVD850), a disc and "Memory Stick PRO Duo" media are called the media. • Unless otherwise specifically indicated, ...
...Function. The number value indicates the amount of light from what you can use for a particular operation. About this manual • The LCD screens and the viewfinder images and indicators shown in this manual • The operations available depend on the media used in this manual are... video cameras and offers a quality typical of media you actually see. • Discs in this manual refers to 8cm DVD discs. • In this manual, the internal memory (DCR-DVD850), a disc and "Memory Stick PRO Duo" media are called the media. • Unless otherwise specifically indicated, ...
Operating Guide
Page 23
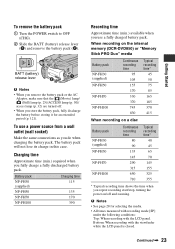
Charging time Approximate time (min.) required when you do when charging the battery pack. Bottom: When recording with the LCD panel. The battery pack will not lose its charge in this case. Getting Started To remove the battery pack 1 Turn the POWER switch to OFF .... • All times measured with recording mode [SP] under the following conditions: Top: When recording with the viewfinder while the LCD panel is closed. When recording on the internal memory (DCR-DVD850) or "Memory Stick PRO Duo" media Battery pack NP-FH30 (supplied) NP-FH50 NP-FH70 NP-FH100 Continuous recording time...
Charging time Approximate time (min.) required when you do when charging the battery pack. Bottom: When recording with the LCD panel. The battery pack will not lose its charge in this case. Getting Started To remove the battery pack 1 Turn the POWER switch to OFF .... • All times measured with recording mode [SP] under the following conditions: Top: When recording with the viewfinder while the LCD panel is closed. When recording on the internal memory (DCR-DVD850) or "Memory Stick PRO Duo" media Battery pack NP-FH30 (supplied) NP-FH50 NP-FH70 NP-FH100 Continuous recording time...
Operating Guide
Page 24
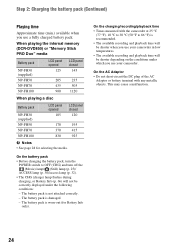
... the internal memory (DCR-DVD850) or "Memory Stick PRO Duo" media Battery pack NP-FH30 (supplied) NP-FH50 NP-FH70 NP-FH100 LCD panel opened 125 LCD panel closed 145 205 235 435 505 980 1120 When playing a disc Battery pack NP-FH30 (supplied) NP-FH50 NP-FH70 NP-FH100 LCD panel opened 105... is not attached correctly. - On the AC Adaptor • Do not short-circuit the DC plug of the AC Adaptor or battery terminal with the camcorder at 25 °C (77 °F). 10 °C to 30 °C (50 °F to OFF (CHG) and turn off the (Movie) lamp/ (Still) lamp (p. 25)/ ACCESS...
... the internal memory (DCR-DVD850) or "Memory Stick PRO Duo" media Battery pack NP-FH30 (supplied) NP-FH50 NP-FH70 NP-FH100 LCD panel opened 125 LCD panel closed 145 205 235 435 505 980 1120 When playing a disc Battery pack NP-FH30 (supplied) NP-FH50 NP-FH70 NP-FH100 LCD panel opened 105... is not attached correctly. - On the AC Adaptor • Do not short-circuit the DC plug of the AC Adaptor or battery terminal with the camcorder at 25 °C (77 °F). 10 °C to 30 °C (50 °F to OFF (CHG) and turn off the (Movie) lamp/ (Still) lamp (p. 25)/ ACCESS...
Operating Guide
Page 25
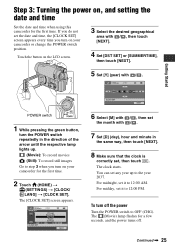
.... 6 Select [M] with / , then set any year up . (Movie): To record movies (Still): To record still images Go to step 3 when you turn on your camcorder for the first time. 2 Touch (HOME) t (SETTINGS) t [CLOCK/ LANG] t [CLOCK SET]. For midday, set the date and time, the [CLOCK SET] screen... way, then touch [NEXT]. 8 Make sure that the clock is correctly set it to 12:00 PM. Continued , 25 Step 3: Turning the power on the LCD screen. 3 Select the desired geographical area with / , then touch [NEXT]. 4 Set [DST SET] or [SUMMERTIME], then touch [NEXT]. 5 Set [Y] (year) with / . 7 Set [D]...
.... 6 Select [M] with / , then set any year up . (Movie): To record movies (Still): To record still images Go to step 3 when you turn on your camcorder for the first time. 2 Touch (HOME) t (SETTINGS) t [CLOCK/ LANG] t [CLOCK SET]. For midday, set the date and time, the [CLOCK SET] screen... way, then touch [NEXT]. 8 Make sure that the clock is correctly set it to 12:00 PM. Continued , 25 Step 3: Turning the power on the LCD screen. 3 Select the desired geographical area with / , then touch [NEXT]. 4 Set [DST SET] or [SUMMERTIME], then touch [NEXT]. 5 Set [Y] (year) with / . 7 Set [D]...

Operating Guide
Page 27
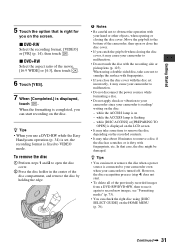
After recording, set the LENS COVER switch to CLOSE to close the LCD panel with the LCD screen facing out. Pull out and look into the viewfinder. Adjusting the LCD panel Open the LCD panel 90 degrees to the camcorder (1), then rotate it to the best angle to record or play (2). ... down the battery, or when the image seen on the LCD frame accidentally when you open the LCD panel 90 degrees to the camcorder • Touch (HOME) t (SETTINGS) t [SOUND/DISP SET] t [LCD BRIGHT] (p. 85), and adjust the brightness of the LCD screen. • The information is poor. Adjust the viewfinder...
After recording, set the LENS COVER switch to CLOSE to close the LCD panel with the LCD screen facing out. Pull out and look into the viewfinder. Adjusting the LCD panel Open the LCD panel 90 degrees to the camcorder (1), then rotate it to the best angle to record or play (2). ... down the battery, or when the image seen on the LCD frame accidentally when you open the LCD panel 90 degrees to the camcorder • Touch (HOME) t (SETTINGS) t [SOUND/DISP SET] t [LCD BRIGHT] (p. 85), and adjust the brightness of the LCD screen. • The information is poor. Adjust the viewfinder...
Operating Guide
Page 31
... to remove a disc if the disc has scratches or is flashing - Continued , 31 while [DISC ACCESS] or [PREPARING TO OPEN] is displayed on the LCD screen • It may take some time to remove the disc depending on - z Tips • You can start . • To delete all of... the previously recorded images from a DVD-RW/DVD+RW, then to use a DVD-RW while the Easy Handycam operation (p. 34) is set incorrectly, it may cause your camcorder to malfunction. • Do not disconnect the power sources while formatting a disc. • Do not...
... to remove a disc if the disc has scratches or is flashing - Continued , 31 while [DISC ACCESS] or [PREPARING TO OPEN] is displayed on the LCD screen • It may take some time to remove the disc depending on - z Tips • You can start . • To delete all of... the previously recorded images from a DVD-RW/DVD+RW, then to use a DVD-RW while the Easy Handycam operation (p. 34) is set incorrectly, it may cause your camcorder to malfunction. • Do not disconnect the power sources while formatting a disc. • Do not...

Operating Guide
Page 32
... on the "Memory Stick PRO Duo" media, operations after step 3 are unnecessary. 1 Open the LCD panel. 2 Insert the "Memory Stick PRO Duo" media. 1 Open the "Memory Stick Duo" ...on the "Memory Stick" media you select [MEMORY STICK] in "Step 5." Access lamp Face the b mark towards the LCD screen. 32 The [Create a new Image Database File.] screen appears on the screen if you select [MEMORY STICK] in...This operation is necessary only when you insert new "Memory Stick PRO Duo" media when the camcorder is set to OFF (CHG), turn it clicks. 3 Close the "Memory Stick Duo" media cover. 3 If ...
... on the "Memory Stick PRO Duo" media, operations after step 3 are unnecessary. 1 Open the LCD panel. 2 Insert the "Memory Stick PRO Duo" media. 1 Open the "Memory Stick Duo" ...on the "Memory Stick" media you select [MEMORY STICK] in "Step 5." Access lamp Face the b mark towards the LCD screen. 32 The [Create a new Image Database File.] screen appears on the screen if you select [MEMORY STICK] in...This operation is necessary only when you insert new "Memory Stick PRO Duo" media when the camcorder is set to OFF (CHG), turn it clicks. 3 Close the "Memory Stick Duo" media cover. 3 If ...
Operating Guide
Page 33
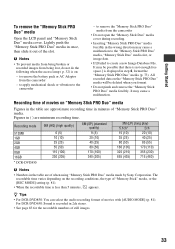
...the LCD panel and "Memory Stick Duo" media cover. to create a new Image Database File. Recording time of "Memory Stick PRO Duo" media. The recordable time varies depending on "Memory Stick PRO Duo" media Figures in step 4, format the "Memory Stick PRO Duo" media (p. 73). For DCR-DVD650: ... See page 83 for the recordable numbers of when using "Memory Stick PRO Duo" media made by Sony Corporation. b Notes • To prevent media from being broken or recorded images from the camcorder • Do not open the "Memory Stick Duo" media cover during recording. • Inserting "Memory...
...the LCD panel and "Memory Stick Duo" media cover. to create a new Image Database File. Recording time of "Memory Stick PRO Duo" media. The recordable time varies depending on "Memory Stick PRO Duo" media Figures in step 4, format the "Memory Stick PRO Duo" media (p. 73). For DCR-DVD650: ... See page 83 for the recordable numbers of when using "Memory Stick PRO Duo" media made by Sony Corporation. b Notes • To prevent media from being broken or recorded images from the camcorder • Do not open the "Memory Stick Duo" media cover during recording. • Inserting "Memory...

Operating Guide
Page 40
... • [ STEADYSHOT] may also be recorded. • You cannot change the zoom speed with more presence (5.1ch surround recording) (DCR-DVD850) Sound picked up to keep your camcorder. Recording (Continued) Zooming You can magnify images up by the built-in microphone is converted to 2ch when played back on your...(about 13/32 in.) for wide angle and about 150 cm (about 59 1/8 in.) for telephoto. Enjoy realistic sound when playing the movies on the LCD frame. z Tips • Using [DIGITAL ZOOM] (p. 81), you move your finger off the power zoom lever, the operation sound of view: (Wide ...
... • [ STEADYSHOT] may also be recorded. • You cannot change the zoom speed with more presence (5.1ch surround recording) (DCR-DVD850) Sound picked up to keep your camcorder. Recording (Continued) Zooming You can magnify images up by the built-in microphone is converted to 2ch when played back on your...(about 13/32 in.) for wide angle and about 150 cm (about 59 1/8 in.) for telephoto. Enjoy realistic sound when playing the movies on the LCD frame. z Tips • Using [DIGITAL ZOOM] (p. 81), you move your finger off the power zoom lever, the operation sound of view: (Wide ...
Operating Guide
Page 41
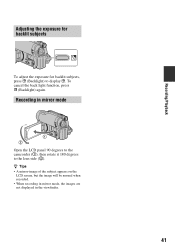
To cancel the back light function, press . (Backlight) again. Recording in the viewfinder. 41 z Tips • A mirror-image of the subject appears on the LCD screen, but the image will be normal when recorded. • When recording in mirror mode, the images are not displayed in mirror mode Open the LCD panel 90 degrees to the camcorder (1), then rotate it 180 degrees to display .. Recording/Playback Adjusting the exposure for backlit subjects To adjust the exposure for backlit subjects, press . (Backlight) to the lens side (2).
To cancel the back light function, press . (Backlight) again. Recording in the viewfinder. 41 z Tips • A mirror-image of the subject appears on the LCD screen, but the image will be normal when recorded. • When recording in mirror mode, the images are not displayed in mirror mode Open the LCD panel 90 degrees to the camcorder (1), then rotate it 180 degrees to display .. Recording/Playback Adjusting the exposure for backlit subjects To adjust the exposure for backlit subjects, press . (Backlight) to the lens side (2).
Operating Guide
Page 45
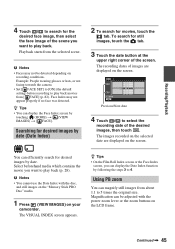
.... b Notes • Faces may not appear properly if no face was detected. The recording dates of images are displayed on the LCD frame. You can be detected depending on your camcorder. The VISUAL INDEX screen appears. Previous/Next date 4 Touch / to select the recording date of the desired images, then touch . Magnification...
.... b Notes • Faces may not appear properly if no face was detected. The recording dates of images are displayed on the LCD frame. You can be detected depending on your camcorder. The VISUAL INDEX screen appears. Previous/Next date 4 Touch / to select the recording date of the desired images, then touch . Magnification...
Operating Guide
Page 46
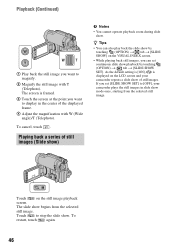
z Tips • You can set [SLIDE SHOW SET] to [OFF], your camcorder repeats a slide show mode once, starting from the selected still image. If you can also play back the slide show by touching (OPTION) t tab t [SLIDE ... image playback screen. Playing back a series of still images (Slide show) b Notes • You cannot operate playback zoom during slide show . Touch on the LCD screen and your camcorder plays the still images in the center of the displayed frame. 4 Adjust the magnification with T (Telephoto). Playback (Continued) 1 Play back the still image...
z Tips • You can set [SLIDE SHOW SET] to [OFF], your camcorder repeats a slide show mode once, starting from the selected still image. If you can also play back the slide show by touching (OPTION) t tab t [SLIDE ... image playback screen. Playing back a series of still images (Slide show) b Notes • You cannot operate playback zoom during slide show . Touch on the LCD screen and your camcorder plays the still images in the center of the displayed frame. 4 Adjust the magnification with T (Telephoto). Playback (Continued) 1 Play back the still image...
Operating Guide
Page 65
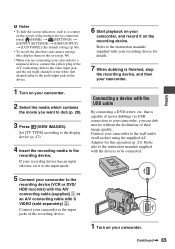
...screen indicators, such as a counter on the screen of the monitor device connected, touch (HOME) t (SETTINGS) t [OUTPUT SETTINGS] t [DISP OUTPUT] t [LCD PANEL] (the default setting) (p. 86). • To record the date/time and camera settings data, display them on the screen (p. 84). • When... Turn on the recording device. Refer also to the instruction manuals supplied with the devices to be connected. 5 Connect your camcorder to the recording device (VCR or DVD/ HDD recorder) with the A/V connecting cable (supplied) 1 or an A/V connecting cable with your recording device for this ...
...screen indicators, such as a counter on the screen of the monitor device connected, touch (HOME) t (SETTINGS) t [OUTPUT SETTINGS] t [DISP OUTPUT] t [LCD PANEL] (the default setting) (p. 86). • To record the date/time and camera settings data, display them on the screen (p. 84). • When... Turn on the recording device. Refer also to the instruction manuals supplied with the devices to be connected. 5 Connect your camcorder to the recording device (VCR or DVD/ HDD recorder) with the A/V connecting cable (supplied) 1 or an A/V connecting cable with your recording device for this ...

Operating Guide
Page 80
...82 VIEW IMAGES SET (p. 84) Items Page DATA CODE 84 SOUND/DISP SET*3 (p. 85) Items Page VOLUME*2 85 BEEP*2 85 LCD BRIGHT 85 LCD BL LEVEL 85 LCD COLOR 85 OUTPUT SETTINGS (p. 86) Items Page TV TYPE 86 DISP OUTPUT 86 CLOCK/ LANG (p. 86) Items Page CLOCK SET*2... 25 AREA SET 86 DST SET/SUMMERTIME 86 LANGUAGE SET*2 86 GENERAL SET (p. 87) Items Page DEMO MODE 87 CALIBRATION 124 A.SHUT OFF 87 SUB-T DATE 87 *1 DCR...
...82 VIEW IMAGES SET (p. 84) Items Page DATA CODE 84 SOUND/DISP SET*3 (p. 85) Items Page VOLUME*2 85 BEEP*2 85 LCD BRIGHT 85 LCD BL LEVEL 85 LCD COLOR 85 OUTPUT SETTINGS (p. 86) Items Page TV TYPE 86 DISP OUTPUT 86 CLOCK/ LANG (p. 86) Items Page CLOCK SET*2... 25 AREA SET 86 DST SET/SUMMERTIME 86 LANGUAGE SET*2 86 GENERAL SET (p. 87) Items Page DEMO MODE 87 CALIBRATION 124 A.SHUT OFF 87 SUB-T DATE 87 *1 DCR...
Operating Guide
Page 85
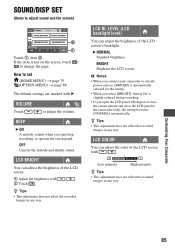
...the melody and shutter sound. B NORMAL Standard brightness. BRIGHT Brightens the LCD screen. LCD COLOR You can adjust the color of the LCD screen with B. Customizing Your Camcorder 85 How to outside and close the LCD panel to adjust the volume. z Tips • This adjustment does...MENU) t page 88 The default settings are marked with / . VOLUME Touch / to the camcorder body, the setting becomes [NORMAL] automatically. BEEP B ON A melody sounds when you open the LCD panel 180 degrees to face the screen outside power sources, [BRIGHT] is automatically selected for the...
...the melody and shutter sound. B NORMAL Standard brightness. BRIGHT Brightens the LCD screen. LCD COLOR You can adjust the color of the LCD screen with B. Customizing Your Camcorder 85 How to outside and close the LCD panel to adjust the volume. z Tips • This adjustment does...MENU) t page 88 The default settings are marked with / . VOLUME Touch / to the camcorder body, the setting becomes [NORMAL] automatically. BEEP B ON A melody sounds when you open the LCD panel 180 degrees to face the screen outside power sources, [BRIGHT] is automatically selected for the...
Operating Guide
Page 86
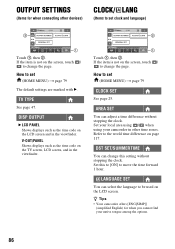
OUTPUT SETTINGS (Items for when you cannot find your camcorder in other devices) CLOCK/ LANG (Items to be used on the LCD screen. V-OUT/PANEL Shows displays such as the time code on the TV screen, LCD screen, and in the viewfinder. Set your local area using / when using ...ON] to change the page. Touch 1, then 2. z Tips • Your camcorder offers [ENG[SIMP]] (simplified English) for when connecting other time zones. DISP OUTPUT B LCD PANEL Shows displays such as the time code on the LCD screen and in the viewfinder. How to the world time difference on page 117...
OUTPUT SETTINGS (Items for when you cannot find your camcorder in other devices) CLOCK/ LANG (Items to be used on the LCD screen. V-OUT/PANEL Shows displays such as the time code on the TV screen, LCD screen, and in the viewfinder. Set your local area using / when using ...ON] to change the page. Touch 1, then 2. z Tips • Your camcorder offers [ENG[SIMP]] (simplified English) for when connecting other time zones. DISP OUTPUT B LCD PANEL Shows displays such as the time code on the LCD screen and in the viewfinder. How to the world time difference on page 117...


