Operating Guide
Page 8
... cannot dub copyright protected software on your recordings on a TV, you need a NTSC system-based TV. • Television programs, films, video tapes, and other materials may be copyrighted. It adopts the MTF* measurement system for the different DVD formats. Use a DVD-RW/DVD+RW for trial recording ...without notice. • Disc in Germany, and Sony Corporation, and produces superior images. The number value indicates the amount of light from what you record them on the countries/regions. About the Carl Zeiss lens Your camcorder is equipped with a Carl Zeiss lens, which...
... cannot dub copyright protected software on your recordings on a TV, you need a NTSC system-based TV. • Television programs, films, video tapes, and other materials may be copyrighted. It adopts the MTF* measurement system for the different DVD formats. Use a DVD-RW/DVD+RW for trial recording ...without notice. • Disc in Germany, and Sony Corporation, and produces superior images. The number value indicates the amount of light from what you record them on the countries/regions. About the Carl Zeiss lens Your camcorder is equipped with a Carl Zeiss lens, which...
Operating Guide
Page 12
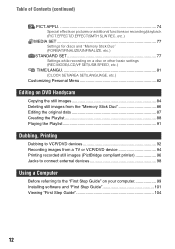
... MODE/LCD/VF SET/USB SPEED, etc.) TIME/LANGU 81 (CLOCK SET/AREA SET/LANGUAGE, etc.) Customizing Personal Menu 82 Editing on DVD Handycam Copying the still images 84 Deleting still images from the "Memory Stick Duo 86 Editing the original data 87 Creating the Playlist 88 Playing the... Playlist 91 Dubbing, Printing Dubbing to VCR/DVD devices 92 Recording images from a TV or VCR/DVD device 94 Printing recorded still images (PictBridge compliant printer 96 Jacks to connect external devices 98 Using a Computer ...
... MODE/LCD/VF SET/USB SPEED, etc.) TIME/LANGU 81 (CLOCK SET/AREA SET/LANGUAGE, etc.) Customizing Personal Menu 82 Editing on DVD Handycam Copying the still images 84 Deleting still images from the "Memory Stick Duo 86 Editing the original data 87 Creating the Playlist 88 Playing the... Playlist 91 Dubbing, Printing Dubbing to VCR/DVD devices 92 Recording images from a TV or VCR/DVD device 94 Printing recorded still images (PictBridge compliant printer 96 Jacks to connect external devices 98 Using a Computer ...
Operating Guide
Page 15
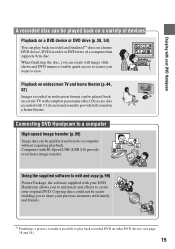
...page 38 and 54). 15 Copying discs could not be easier enabling you to share your DVD Handycam allows you to add music and effects to edit and copy (p.99) Picture Package, the software supplied with Hi-Speed USB (USB 2.0) provide even faster image transfer. Computers with your... precious moments with 5.1ch surround sound to play back recorded and finalized** discs on a wide TV with your original DVD. Using the supplied software to create your DVD Handycam A recorded disc can be quickly transferred to view. Playback on widescreen TV and home theater (p.44, 52) Images recorded...
...page 38 and 54). 15 Copying discs could not be easier enabling you to share your DVD Handycam allows you to add music and effects to edit and copy (p.99) Picture Package, the software supplied with Hi-Speed USB (USB 2.0) provide even faster image transfer. Computers with your... precious moments with 5.1ch surround sound to play back recorded and finalized** discs on a wide TV with your original DVD. Using the supplied software to create your DVD Handycam A recorded disc can be quickly transferred to view. Playback on widescreen TV and home theater (p.44, 52) Images recorded...

Operating Guide
Page 76
... Prints still images in the disc using the PictBridge compliant printer. 76 • [USB SELECT] automatically appears on a computer when connecting your camcorder to your computer with the supplied software. when you set to the PictBridge compliant printer (p.96). when you touch the screen during the demonstration. (The demonstration starts again in...
... Prints still images in the disc using the PictBridge compliant printer. 76 • [USB SELECT] automatically appears on a computer when connecting your camcorder to your computer with the supplied software. when you set to the PictBridge compliant printer (p.96). when you touch the screen during the demonstration. (The demonstration starts again in...
Operating Guide
Page 99
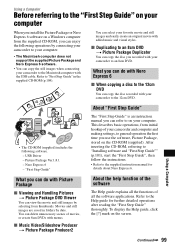
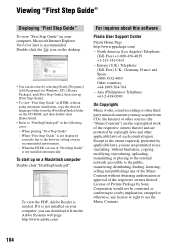
... does not support the supplied Picture Package and Nero Express 6 software. • You can copy the still images when connecting your camcorder to the Macintosh computer with Picture Package x Viewing and Handling Pictures t Picture Package DVD Viewer You can view the movie and still images by selecting ...Guide" The "First Step Guide" is an instruction manual you can enjoy the following software. - About the help function of the software The Help guide explains all the functions of your camcorder and computer and making settings, to general operation the first time you can do with ...
... does not support the supplied Picture Package and Nero Express 6 software. • You can copy the still images when connecting your camcorder to the Macintosh computer with Picture Package x Viewing and Handling Pictures t Picture Package DVD Viewer You can view the movie and still images by selecting ...Guide" The "First Step Guide" is an instruction manual you can enjoy the following software. - About the help function of the software The Help guide explains all the functions of your camcorder and computer and making settings, to general operation the first time you can do with ...

Operating Guide
Page 101
... appears. 4 Click [Install]. • Depending on the operating system on your OS. Installing software and "First Step Guide" You need to install the software to your Windows computer before connecting your camcorder to the computer. 2 Turn on the computer. • Log on as (E:)) may differ ...depending on the computer, a message appears notifying you that your camcorder is required only for the first time...
... appears. 4 Click [Install]. • Depending on the operating system on your OS. Installing software and "First Step Guide" You need to install the software to your Windows computer before connecting your camcorder to the computer. 2 Turn on the computer. • Log on as (E:)) may differ ...depending on the computer, a message appears notifying you that your camcorder is required only for the first time...

Operating Guide
Page 102
screen instructions to step 14. 1 Read [License Agreement], then click [Next]. 102 Installing software and "First Step Guide" (continued) 7 Read [License Agreement], check [I accept the terms of Picture Package starts. 13If the [Installing Microsoft (R) DirectX (R) ] screen is ... EasyStepDVD." 9 Select [NTSC], then click [Install]. 10Click [Install] on the computer, this screen may not be displayed. Depending on the [Ready to save the software, then click [Next]. 12Click [Next], then follow the on- If not, skip to install the "First Step Guide." In such a case, skip to step ...
screen instructions to step 14. 1 Read [License Agreement], then click [Next]. 102 Installing software and "First Step Guide" (continued) 7 Read [License Agreement], check [I accept the terms of Picture Package starts. 13If the [Installing Microsoft (R) DirectX (R) ] screen is ... EasyStepDVD." 9 Select [NTSC], then click [Install]. 10Click [Install] on the computer, this screen may not be displayed. Depending on the [Ready to save the software, then click [Next]. 12Click [Next], then follow the on- If not, skip to install the "First Step Guide." In such a case, skip to step ...

Operating Guide
Page 103
Close all applications running on the computer before installing the software. 3 Place the supplied CD-ROM in the disc drive of your computer. 3 Click [Finish]. 14Make sure [Yes, I ... destination Folder] (and "First Step Guide," if installed by step 11) appear on the desktop. • For connecting your camcorder to your computer. The computer turns off once, then starts up again automatically (Restart). The short-cut icons for the details on connecting... in the supplied CD-ROM. • If you have any questions about PicturePackage, see "For inquires about this software" (p.104).
Close all applications running on the computer before installing the software. 3 Place the supplied CD-ROM in the disc drive of your computer. 3 Click [Finish]. 14Make sure [Yes, I ... destination Folder] (and "First Step Guide," if installed by step 11) appear on the desktop. • For connecting your camcorder to your computer. The computer turns off once, then starts up again automatically (Restart). The short-cut icons for the details on connecting... in the supplied CD-ROM. • If you have any questions about PicturePackage, see "For inquires about this software" (p.104).
Operating Guide
Page 104
... On Copyrights Music works, sound recording or other third party musical contents you can download it is needed. License of Picture Package by Sony Corporation would not be construed as conferring to "FirstStepGuide.pdf" in the following cases: - Europe (U.K.) Telephone: (Toll-Free) U.K., Germany...without using automatic installation, copy the desired language folder from the Adobe Systems web page: http://www.adobe.com/ For inquires about this software Pixela User Support Center Pixela Home Page http://www.ppackage.com/ - North America (Los Angeles) Telephone: (Toll-Free) +1-800-458...
... On Copyrights Music works, sound recording or other third party musical contents you can download it is needed. License of Picture Package by Sony Corporation would not be construed as conferring to "FirstStepGuide.pdf" in the following cases: - Europe (U.K.) Telephone: (Toll-Free) U.K., Germany...without using automatic installation, copy the desired language folder from the Adobe Systems web page: http://www.adobe.com/ For inquires about this software Pixela User Support Center Pixela Home Page http://www.ppackage.com/ - North America (Los Angeles) Telephone: (Toll-Free) +1-800-458...

Operating Guide
Page 116
...from connected devices are not displayed on the LCD screen or the viewfinder. • Touch t [REC CTRL] (p.94). Refer to the 12cm DVD. • Use the supplied software, Nero Express 6. A movie cannot be deleted. • A scene protected on another device. A scene cannot be divided. • A ... too (p.94). to edit because of the condition of another device cannot be zoomed. • You cannot zoom scenes input from your camcorder. No sound is connected to a movie (Photomovie, p.90). Delete unnecessary scenes or add all the still images by converting them to ...
...from connected devices are not displayed on the LCD screen or the viewfinder. • Touch t [REC CTRL] (p.94). Refer to the 12cm DVD. • Use the supplied software, Nero Express 6. A movie cannot be deleted. • A scene protected on another device. A scene cannot be divided. • A ... too (p.94). to edit because of the condition of another device cannot be zoomed. • You cannot zoom scenes input from your camcorder. No sound is connected to a movie (Photomovie, p.90). Delete unnecessary scenes or add all the still images by converting them to ...
Operating Guide
Page 118
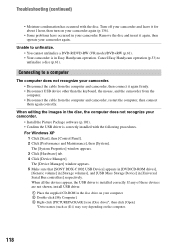
... your camcorder. • Install the Picture Package software (p.101). • Confirm the USB driver is installed correctly. When all the devices appear, the USB driver is correctly installed with the disc. Turn off your camcorder and...camcorder, restart the computer, then connect them again correctly. The [System Properties] window appears. 3 Click [Hardware] tab. 4 Click [Device Manager]. The [Device Manager] window appears. 5 Make sure that [SONY DDX-C1002 USB Device] appears in [DVD/CD-ROM drives], [Generic volume] in [Storage volumes], and [USB Mass Storage Device] in Easy Handycam...
... your camcorder. • Install the Picture Package software (p.101). • Confirm the USB driver is installed correctly. When all the devices appear, the USB driver is correctly installed with the disc. Turn off your camcorder and...camcorder, restart the computer, then connect them again correctly. The [System Properties] window appears. 3 Click [Hardware] tab. 4 Click [Device Manager]. The [Device Manager] window appears. 5 Make sure that [SONY DDX-C1002 USB Device] appears in [DVD/CD-ROM drives], [Generic volume] in [Storage volumes], and [USB Mass Storage Device] in Easy Handycam...
Operating Guide
Page 120
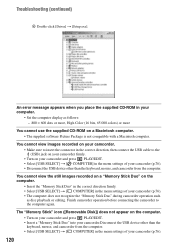
.... • Insert the "Memory Stick Duo" in the correct direction firmly. • Select [USB SELECT] t [ COMPUTER] in your camcorder (p.76). 120 An error message appears when you place the supplied CD-ROM in the menu settings of your computer. • Set the ...computer. • Turn on a Macintosh computer. • The supplied software Picture Package is not compatible with a Macintosh computer. Finish camcorder operation before connecting the camcorder to the (USB) jack on your camcorder firmly. • Turn on your camcorder and press PLAY/EDIT. • Select [USB SELECT] t [...
.... • Insert the "Memory Stick Duo" in the correct direction firmly. • Select [USB SELECT] t [ COMPUTER] in your camcorder (p.76). 120 An error message appears when you place the supplied CD-ROM in the menu settings of your computer. • Set the ...computer. • Turn on a Macintosh computer. • The supplied software Picture Package is not compatible with a Macintosh computer. Finish camcorder operation before connecting the camcorder to the (USB) jack on your camcorder firmly. • Turn on your camcorder and press PLAY/EDIT. • Select [USB SELECT] t [...

Operating Guide
Page 121
...the 12cm DVD using the USB cable. • The disc is connected. You cannot write data from your camcorder to a computer. • Set [USB SPEED] to [FULL SPEED] in your camcorder using Picture Package. • Use the supplied software, Nero Express 6. Connect your camcorder. Disconnect the... Package (p.100). The images or sound of your camcorder. • You cannot start Easy Handycam] or [Cannot cancel Easy Handycam] appears on the screen of your camcorder cannot be played back correctly. • When you connect your camcorder to a computer not compatible with Hi-Speed USB ...
...the 12cm DVD using the USB cable. • The disc is connected. You cannot write data from your camcorder to a computer. • Set [USB SPEED] to [FULL SPEED] in your camcorder using Picture Package. • Use the supplied software, Nero Express 6. Connect your camcorder. Disconnect the... Package (p.100). The images or sound of your camcorder. • You cannot start Easy Handycam] or [Cannot cancel Easy Handycam] appears on the screen of your camcorder cannot be played back correctly. • When you connect your camcorder to a computer not compatible with Hi-Speed USB ...
Operating Guide
Page 146
... Setup items ... 64 SETUP ROTATE 80 Shoulder belt 46 Slide show 47 Slide show button..... 37, 43, 47 SMTH SLW REC (Smooth Slow Rec 75 Software 101 SP 77 Speaker 47 Specifications 140 SPOTLIGHT 68 SPOT FOCUS 70 SPOT METER (Flexible spot meter) .... 68, 114 STANDARD 72 STANDARD SET 77 START...
... Setup items ... 64 SETUP ROTATE 80 Shoulder belt 46 Slide show 47 Slide show button..... 37, 43, 47 SMTH SLW REC (Smooth Slow Rec 75 Software 101 SP 77 Speaker 47 Specifications 140 SPOTLIGHT 68 SPOT FOCUS 70 SPOT METER (Flexible spot meter) .... 68, 114 STANDARD 72 STANDARD SET 77 START...
Operating Guide
Page 151
... PowerMac are trademarks of Apple Computer, Inc in the U.S. On trademarks • "Handycam" and are registered trademarks of Sony Corporation. • "Memory Stick," , "Memory Stick Duo," , "Memory Stick ... Stick Duo" are trademarks of Sony Corporation. • "InfoLITHIUM" is a trademark of Sony Corporation. • Picture Package is a trademark of Sony Corporation. • DVD-R, DVD-RW, and DVD+RW logo are trademarks. •...or registered trademark of Intel Corporation. • Nero 6 and other software products developed by Nero AG are registered trademarks of Nero AG and ...
... PowerMac are trademarks of Apple Computer, Inc in the U.S. On trademarks • "Handycam" and are registered trademarks of Sony Corporation. • "Memory Stick," , "Memory Stick Duo," , "Memory Stick ... Stick Duo" are trademarks of Sony Corporation. • "InfoLITHIUM" is a trademark of Sony Corporation. • Picture Package is a trademark of Sony Corporation. • DVD-R, DVD-RW, and DVD+RW logo are trademarks. •...or registered trademark of Intel Corporation. • Nero 6 and other software products developed by Nero AG are registered trademarks of Nero AG and ...


