Operating Instructions
Page 19
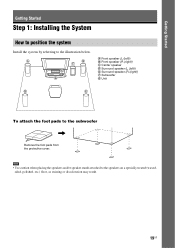
A B F C G A Front speaker (L (left)) B Front speaker (R (right)) C Center speaker D Surround speaker (L (left)) E Surround speaker (R (right)) F Subwoofer G Unit D E To attach the foot pads to the illustration below. Getting Started Getting Started Step 1: Installing the System How to ...the system by referring to the subwoofer , Remove the foot pads from the protective cover. Note • Use caution when placing the speakers and/or speaker stands attached to the speakers on a specially treated (waxed, oiled, polished, etc.) floor, as staining or discoloration may result. 19US
A B F C G A Front speaker (L (left)) B Front speaker (R (right)) C Center speaker D Surround speaker (L (left)) E Surround speaker (R (right)) F Subwoofer G Unit D E To attach the foot pads to the illustration below. Getting Started Getting Started Step 1: Installing the System How to ...the system by referring to the subwoofer , Remove the foot pads from the protective cover. Note • Use caution when placing the speakers and/or speaker stands attached to the speakers on a specially treated (waxed, oiled, polished, etc.) floor, as staining or discoloration may result. 19US
Operating Instructions
Page 20
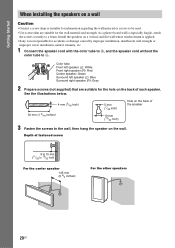
...Sony is especially fragile, attach the screws securely to be used. • Use screws that are suitable for the wall material and strength. Install the speakers on the wall. Depth of fastened screw 8 to 10 mm (11/32 to #. Color tube Front left speaker (L): White Front right speaker (R): Red Center speaker: Green Surround left speaker... (L): Blue Surround right speaker (R): Gray 2 Prepare screws (not supplied) that are suitable for the hole...
...Sony is especially fragile, attach the screws securely to be used. • Use screws that are suitable for the wall material and strength. Install the speakers on the wall. Depth of fastened screw 8 to 10 mm (11/32 to #. Color tube Front left speaker (L): White Front right speaker (R): Red Center speaker: Green Surround left speaker... (L): Blue Surround right speaker (R): Gray 2 Prepare screws (not supplied) that are suitable for the hole...
Operating Instructions
Page 21
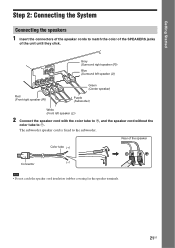
... match the color of the SPEAKERS jacks of the speaker Color tube (+) Connector (-) Note • Do not catch the speaker cord insulation (rubber covering) in the speaker terminals. 21US SPEAKERSUSR L SUR R FRONT R FRONSTPLEAKSEURBWSOOFER CENTER Red (Front right speaker (R)) Gray (Surround right speaker (R)) Blue (Surround left speaker (L)) Green (Center speaker) Purple (Subwoofer) White (Front left speaker (L)) 2 Connect the speaker cord with the color...
... match the color of the SPEAKERS jacks of the speaker Color tube (+) Connector (-) Note • Do not catch the speaker cord insulation (rubber covering) in the speaker terminals. 21US SPEAKERSUSR L SUR R FRONT R FRONSTPLEAKSEURBWSOOFER CENTER Red (Front right speaker (R)) Gray (Surround right speaker (R)) Blue (Surround left speaker (L)) Green (Center speaker) Purple (Subwoofer) White (Front left speaker (L)) 2 Connect the speaker cord with the color...
Operating Instructions
Page 27
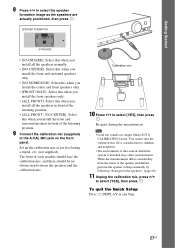
... (supplied) to the A.CAL MIC jack on the front panel. Calibration mic 10 Press C/c to select [YES], then press . NO CENTER]: Select this when you install the front and surround speakers in which the system is installed may affect measurements. You cannot turn the volume down. Give consideration to children and neighbors...
... (supplied) to the A.CAL MIC jack on the front panel. Calibration mic 10 Press C/c to select [YES], then press . NO CENTER]: Select this when you install the front and surround speakers in which the system is installed may affect measurements. You cannot turn the volume down. Give consideration to children and neighbors...
Operating Instructions
Page 44
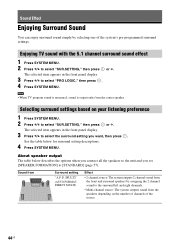
... item appears in the front panel display. 3 Press X/x to select the surround setting you set [SPEAKER FORMATION] to select "SUR.SETTING," then press or c. Sound from the center speaker. Selecting surround settings based on the number of channels of the system's pre-programmed surround settings. See... the table below describes the options when you connect all the speakers to the unit and you want, then press ....
... item appears in the front panel display. 3 Press X/x to select the surround setting you set [SPEAKER FORMATION] to select "SUR.SETTING," then press or c. Sound from the center speaker. Selecting surround settings based on the number of channels of the system's pre-programmed surround settings. See... the table below describes the options when you connect all the speakers to the unit and you want, then press ....
Operating Instructions
Page 57
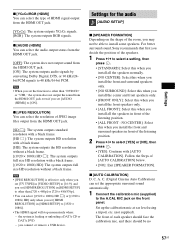
...a black frame. [(1920 × 1080i) HD]: The system outputs full size HD resolution without a black frame. NO CENTER]: Select this when you install all the speakers in front of the room, you set the appropriate surround sound automatically. 1 Connect the calibration mic (supplied) to select ...[AUTO CALIBRATION] below. • [NO]: Exit [SPEAKER FORMATION]. Settings for the audio [AUDIO SETUP] x [SPEAKER FORMATION] Depending on the front panel. For better surround sound, Sony recommends that first you decide the position of the speakers. 1 Press C/c to the A.CAL MIC jack on ...
...a black frame. [(1920 × 1080i) HD]: The system outputs full size HD resolution without a black frame. NO CENTER]: Select this when you install all the speakers in front of the room, you set the appropriate surround sound automatically. 1 Connect the calibration mic (supplied) to select ...[AUTO CALIBRATION] below. • [NO]: Exit [SPEAKER FORMATION]. Settings for the audio [AUDIO SETUP] x [SPEAKER FORMATION] Depending on the front panel. For better surround sound, Sony recommends that first you decide the position of the speakers. 1 Press C/c to the A.CAL MIC jack on ...
Operating Instructions
Page 60
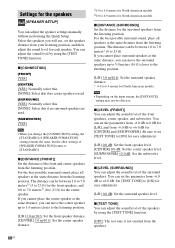
... m/10 ft: Set the front speaker distance. [CENTER] 3.0 m/10 ft: Set the center speaker distance. 1)0.9 to 6.9 meters for North American models. 2)0.0 to [ON] for the surround speakers from the speakers. 60US Select the speakers you cannot place the center speaker at the same distance from the ...to 7.0 meters1) (3 to 23 ft) for the front speakers, and 0.0 to 7.0 meters2) (0 to [STANDARD]. x [DISTANCE (SURROUND)] Set the distance for easy adjustment. [L/R] 0.0 dB: Set the front speaker level. [CENTER] 0.0 dB: Set the center speaker level. [SUBWOOFER] +2.0 dB: Set the subwoofer level....
... m/10 ft: Set the front speaker distance. [CENTER] 3.0 m/10 ft: Set the center speaker distance. 1)0.9 to 6.9 meters for North American models. 2)0.0 to [ON] for the surround speakers from the speakers. 60US Select the speakers you cannot place the center speaker at the same distance from the ...to 7.0 meters1) (3 to 23 ft) for the front speakers, and 0.0 to 7.0 meters2) (0 to [STANDARD]. x [DISTANCE (SURROUND)] Set the distance for easy adjustment. [L/R] 0.0 dB: Set the front speaker level. [CENTER] 0.0 dB: Set the center speaker level. [SUBWOOFER] +2.0 dB: Set the subwoofer level....
Operating Instructions
Page 65
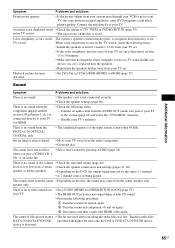
... from your TV set. • If the color irregularity persists, turn it on after 15 to your TV's speakers. There is placed near the speakers. • Reposition the speakers farther away from the DIGITAL IN OPTICAL/ COAXIAL jack. • The sampling frequency of your TV. • ...Picture noise appears. • If the picture output from the center speaker only. Connect an audio cable from a certain • Check the speaker connections and settings (pages 21, 60). Disable your TV. speaker or all the speakers. • Depending on again. 3 Disconnect and then connect ...
... from your TV set. • If the color irregularity persists, turn it on after 15 to your TV's speakers. There is placed near the speakers. • Reposition the speakers farther away from the DIGITAL IN OPTICAL/ COAXIAL jack. • The sampling frequency of your TV. • ...Picture noise appears. • If the picture output from the center speaker only. Connect an audio cable from a certain • Check the speaker connections and settings (pages 21, 60). Disable your TV. speaker or all the speakers. • Depending on again. 3 Disconnect and then connect ...
Operating Instructions
Page 71
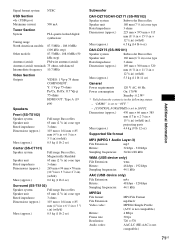
... 164 mm × 85 mm (4 1/8 in × 6 1/2 in × 3 3/8 in) (w/h/d) 0.5 kg (1 lb 2 oz) Center (SS-CT101) Speaker system Speaker unit Rated impedance Dimensions (approx.) Mass (approx.) Full range Bass reflex, Magnetically Shielded 65 mm (2 5/8 in) cone type 3 ohms 265 mm &#...1/8 in × 6 1/2 in × 3 3/ 8 in) (w/h/d) Mass (approx.) 0.5 kg (1 lb 2 oz) Additional Information Subwoofer DAV-DZ170/DAV-DZ171 (SS-WS102) Speaker system Subwoofer Bass reflex Speaker unit 180 mm (7 1/8 in) cone type Rated impedance 3 ohms Dimensions (approx.) 225 mm × 395 mm × 315 mm (8...
... 164 mm × 85 mm (4 1/8 in × 6 1/2 in × 3 3/8 in) (w/h/d) 0.5 kg (1 lb 2 oz) Center (SS-CT101) Speaker system Speaker unit Rated impedance Dimensions (approx.) Mass (approx.) Full range Bass reflex, Magnetically Shielded 65 mm (2 5/8 in) cone type 3 ohms 265 mm &#...1/8 in × 6 1/2 in × 3 3/ 8 in) (w/h/d) Mass (approx.) 0.5 kg (1 lb 2 oz) Additional Information Subwoofer DAV-DZ170/DAV-DZ171 (SS-WS102) Speaker system Subwoofer Bass reflex Speaker unit 180 mm (7 1/8 in) cone type Rated impedance 3 ohms Dimensions (approx.) 225 mm × 395 mm × 315 mm (8...

Marketing Specifications
Page 2
...Front-Mini Jack) Component Video (Y/Pb/Pr) Output(s): 1 (Rear) Composite Video Output(s): 1 (Rear) D.C.A.C. (Auto Calibration): Yes Speaker Terminal: 6 DAV Clips (Rear- 2 Front/ 2 Surround/ 1 Center/ 1 Sub) USB Port(s): 1 (Front)-See Owners Manual for devices supported Power Power Consumption (in Standby): less than 0.2 W ... trademarks are trademarks of their respective logos are trademarks of Sony. Using the iPod's USB connector. 5. All weights and measures are not universally compatible. Multi- dts is prohibited. DAV-DZ170 Features Video HDMI™ Upscaling: Yes4 (upto 1080p) ...
...Front-Mini Jack) Component Video (Y/Pb/Pr) Output(s): 1 (Rear) Composite Video Output(s): 1 (Rear) D.C.A.C. (Auto Calibration): Yes Speaker Terminal: 6 DAV Clips (Rear- 2 Front/ 2 Surround/ 1 Center/ 1 Sub) USB Port(s): 1 (Front)-See Owners Manual for devices supported Power Power Consumption (in Standby): less than 0.2 W ... trademarks are trademarks of their respective logos are trademarks of Sony. Using the iPod's USB connector. 5. All weights and measures are not universally compatible. Multi- dts is prohibited. DAV-DZ170 Features Video HDMI™ Upscaling: Yes4 (upto 1080p) ...


