Operating Instructions
Page 2
...like. DAV-DZ170/ DAVDZ171/DAV-DZ175 Serial No The following measures: - This equipment generates, uses, and can be securely attached to them whenever you call upon your safety. Connect the equipment... etc. Record the serial number in the U.S.A. Consult the dealer or an experienced radio/TV technician for replacement of uninsulated "dangerous voltage" within the product's enclosure that any changes ...registers, stoves, or other . To prevent injury, this model manufactured for your Sony dealer regarding this apparatus near any ventilation openings. This symbol is intended to alert...
...like. DAV-DZ170/ DAVDZ171/DAV-DZ175 Serial No The following measures: - This equipment generates, uses, and can be securely attached to them whenever you call upon your safety. Connect the equipment... etc. Record the serial number in the U.S.A. Consult the dealer or an experienced radio/TV technician for replacement of uninsulated "dangerous voltage" within the product's enclosure that any changes ...registers, stoves, or other . To prevent injury, this model manufactured for your Sony dealer regarding this apparatus near any ventilation openings. This symbol is intended to alert...
Operating Instructions
Page 22
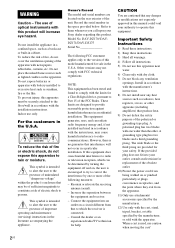
Getting Started Connecting your TV/cable box When connecting to a TV only When connecting to a TV and cable box Video 1 Video 2 Audio 1 Video 2 Audio 1 Connecting the video to Method 1. x Method 1: Video cord (supplied) connection This is supplied with DAV-DZ171 only. Method 1 (supplied) Method 3 (not supplied) Method 2* 22US x Method 2: HDMI cable* connection Picture quality will be improved compared to your TV Depending...
Getting Started Connecting your TV/cable box When connecting to a TV only When connecting to a TV and cable box Video 1 Video 2 Audio 1 Video 2 Audio 1 Connecting the video to Method 1. x Method 1: Video cord (supplied) connection This is supplied with DAV-DZ171 only. Method 1 (supplied) Method 3 (not supplied) Method 2* 22US x Method 2: HDMI cable* connection Picture quality will be improved compared to your TV Depending...
Operating Instructions
Page 23
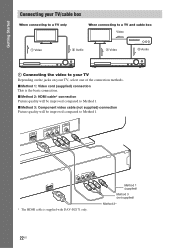
...) Method 3 (not supplied) Method 2 (not supplied) Note • The system can connect another component, such as a VCR, digital satellite receiver, or PlayStation, to the TV/CABLE jacks instead of the connection methods. x Method 1: Audio cord (not supplied) connection This is the basic connection and sends an analog audio signal. Digital signals have priority over analog...
...) Method 3 (not supplied) Method 2 (not supplied) Note • The system can connect another component, such as a VCR, digital satellite receiver, or PlayStation, to the TV/CABLE jacks instead of the connection methods. x Method 1: Audio cord (not supplied) connection This is the basic connection and sends an analog audio signal. Digital signals have priority over analog...
Operating Instructions
Page 26
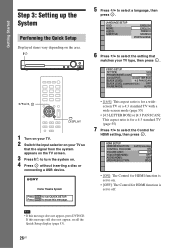
...If this message does not appear, press DVD/CD. Press CLEAR to erase this message. • [16:9]: This aspect ratio is for a widescreen TV or a 4:3 standard TV with a wide-screen mode (page 55) • [4:3 LETTER BOX] or [4:3 PAN SCAN]: This aspect ratio is set to run QUICK SETUP... vary depending on . 4 Press without inserting a disc or connecting a USB device. "/1 5 Press X/x to select the setting that matches your TV so that the signal from the system appears on the TV screen. 3 Press "/1 to select the Control for a 4:3 standard TV (page 55) 7 Press X/x to turn the system on the...
...If this message does not appear, press DVD/CD. Press CLEAR to erase this message. • [16:9]: This aspect ratio is for a widescreen TV or a 4:3 standard TV with a wide-screen mode (page 55) • [4:3 LETTER BOX] or [4:3 PAN SCAN]: This aspect ratio is set to run QUICK SETUP... vary depending on . 4 Press without inserting a disc or connecting a USB device. "/1 5 Press X/x to select the setting that matches your TV so that the signal from the system appears on the TV screen. 3 Press "/1 to select the Control for a 4:3 standard TV (page 55) 7 Press X/x to turn the system on the...
Operating Instructions
Page 28
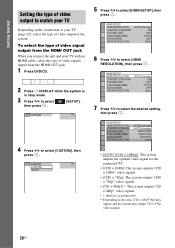
...AUTO(1920x1080p) AUTO(1920x1O08F0pF) 1920LxE1V0E8L02i 1280YxC72BC0pR 720x4O80FpF SD • [AUTO (1920 × 1080p)]: The system outputs the optimal video signal for the connected TV. • [1920 × 1080i]: The system outputs 1920 × 1080i* video signals. • [1280 × 720p]: The system ...8226; [720 × 480p]**: The system outputs 720 × 480p* video signals. * i: interlace, p: progressive ** Depending on the connection of your TV with an HDMI cable, select the type of the system. CUSTOM 4 Press X/x to select [HDMI RESOLUTION], then press . HDMI SETUP ...
...AUTO(1920x1080p) AUTO(1920x1O08F0pF) 1920LxE1V0E8L02i 1280YxC72BC0pR 720x4O80FpF SD • [AUTO (1920 × 1080p)]: The system outputs the optimal video signal for the connected TV. • [1920 × 1080i]: The system outputs 1920 × 1080i* video signals. • [1280 × 720p]: The system ...8226; [720 × 480p]**: The system outputs 720 × 480p* video signals. * i: interlace, p: progressive ** Depending on the connection of your TV with an HDMI cable, select the type of the system. CUSTOM 4 Press X/x to select [HDMI RESOLUTION], then press . HDMI SETUP ...
Operating Instructions
Page 29
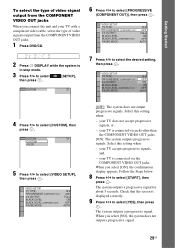
... select [PROGRESSIVE (COMPONENT OUT)], then press . CUSTOM CUSTOM QUICK 5 Press X/x to select [CUSTOM], then press . your TV accepts progressive signals, and, - your TV is connected via jacks other than the COMPONENT VIDEO OUT jacks. [ON]: The system outputs progressive signals. Follow the Steps below. 8 Press... C/c to select the desired setting, then press . your TV is connected via the COMPONENT VIDEO OUT jacks. Getting Started To select the type of video signals output from the COMPONENT VIDEO OUT jacks...
... select [PROGRESSIVE (COMPONENT OUT)], then press . CUSTOM CUSTOM QUICK 5 Press X/x to select [CUSTOM], then press . your TV accepts progressive signals, and, - your TV is connected via jacks other than the COMPONENT VIDEO OUT jacks. [ON]: The system outputs progressive signals. Follow the Steps below. 8 Press... C/c to select the desired setting, then press . your TV is connected via the COMPONENT VIDEO OUT jacks. Getting Started To select the type of video signals output from the COMPONENT VIDEO OUT jacks...
Operating Instructions
Page 40
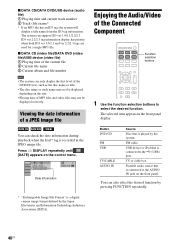
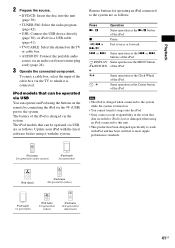
... can check the date information during playback when the Exif* tag is played by pressing FUNCTION repeatedly. 40US Button DVD/CD FM USB TV/CABLE AUDIO IN Source Disc that is a digital camera image format defined by the Japan Electronics and Information Technology Industries Association (JEITA)....files may not be displayed depending on the control menu. 5( 8) 10( 15) 18/9/2002 DATA CD Date information * "Exchangeable Image File Format" is connected to the (USB) port. x DATA CD (video file)/DATA DVD (video file)/USB device (video file) 1 Playing time of the current file 2...
... can check the date information during playback when the Exif* tag is played by pressing FUNCTION repeatedly. 40US Button DVD/CD FM USB TV/CABLE AUDIO IN Source Disc that is a digital camera image format defined by the Japan Electronics and Information Technology Industries Association (JEITA)....files may not be displayed depending on the control menu. 5( 8) 10( 15) 18/9/2002 DATA CD Date information * "Exchangeable Image File Format" is connected to the (USB) port. x DATA CD (video file)/DATA DVD (video file)/USB device (video file) 1 Playing time of the current file 2...
Operating Instructions
Page 41
... > Same operation as the N/X button of the iPod. Note • The iPod is charged when connected to the system while the system is turned on. • You cannot transfer songs onto the iPod. • Sony cannot accept responsibility in the event that data recorded to iPod is lost or damaged when... • TUNER FM: Select the radio program (page 42). • USB: Connect the USB device directly (page 30), or iPod via a USB cable (page 41). • TV/CABLE: Select the channel on the TV or cable box. • AUDIO IN: Connect the portable audio source via the (USB) port to the system. x Pause...
... > Same operation as the N/X button of the iPod. Note • The iPod is charged when connected to the system while the system is turned on. • You cannot transfer songs onto the iPod. • Sony cannot accept responsibility in the event that data recorded to iPod is lost or damaged when... • TUNER FM: Select the radio program (page 42). • USB: Connect the USB device directly (page 30), or iPod via a USB cable (page 41). • TV/CABLE: Select the channel on the TV or cable box. • AUDIO IN: Connect the portable audio source via the (USB) port to the system. x Pause...
Operating Instructions
Page 44
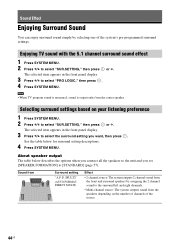
See the table below describes the options when you connect all the speakers to the unit and you want, then press . The selected item appears in the front panel display. 3 Press X/x to the surround left .... Selecting surround settings based on the number of channels of the system's pre-programmed surround settings. Note • When TV program sound is monaural, sound is output only from Surround setting "A.F.D. Enjoying TV sound with the 5.1 channel surround sound effect 1 Press SYSTEM MENU. 2 Press X/x to select "SUR.SETTING," then press or c. The...
See the table below describes the options when you connect all the speakers to the unit and you want, then press . The selected item appears in the front panel display. 3 Press X/x to the surround left .... Selecting surround settings based on the number of channels of the system's pre-programmed surround settings. Note • When TV program sound is monaural, sound is output only from Surround setting "A.F.D. Enjoying TV sound with the 5.1 channel surround sound effect 1 Press SYSTEM MENU. 2 Press X/x to select "SUR.SETTING," then press or c. The...
Operating Instructions
Page 47
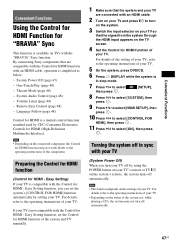
... the system may not work. Easy Setting) If your TV is compatible with an HDMI cable, operation is simplified as below: - For details of the setting of your TV, refer to the operating instructions of your TV. By connecting Sony components that the signal from the system through the HDMI input... appears on the TV screen. 4 Set the Control for HDMI function of your TV. Language Follow (page 48) Control for HDMI...
... the system may not work. Easy Setting) If your TV is compatible with an HDMI cable, operation is simplified as below: - For details of the setting of your TV, refer to the operating instructions of your TV. By connecting Sony components that the signal from the system through the HDMI input... appears on the TV screen. 4 Set the Control for HDMI function of your TV. Language Follow (page 48) Control for HDMI...
Operating Instructions
Page 48
..., the volume levels that is set to the HDMI input to the operating instructions of your TV is activated automatically. In this function, connect the system and your TV with your TV (Language Follow) When you change the language for movies, and the System Audio Control function ... system's volume, the volume level appears on the system while your TV is also activated automatically. Using the Theater Mode (Theater Mode) If your TV's speakers is connected, and the system starts playing a disc automatically. TV sound is output from the system's speakers, the volume level is ...
..., the volume levels that is set to the HDMI input to the operating instructions of your TV is activated automatically. In this function, connect the system and your TV with your TV (Language Follow) When you change the language for movies, and the System Audio Control function ... system's volume, the volume level appears on the system while your TV is also activated automatically. Using the Theater Mode (Theater Mode) If your TV's speakers is connected, and the system starts playing a disc automatically. TV sound is output from the system's speakers, the volume level is ...
Operating Instructions
Page 49
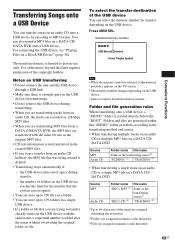
...recognize. • You can store up to 150 files in a folder. • You can transfer songs on USB transferring • Do not connect the unit and the USB device through a USB hub. • Make sure there is enough space in the USB device for transfer depending on a... Convenient Functions Note • When the memory cannot be selected, [Operation not possible.] appears on the TV screen. • The memory number changes depending on a Disc/USB Device" (page 30). For connecting the USB device, see "Playing Files on the USB device. • Select a transfer destination before transfer...
...recognize. • You can store up to 150 files in a folder. • You can transfer songs on USB transferring • Do not connect the unit and the USB device through a USB hub. • Make sure there is enough space in the USB device for transfer depending on a... Convenient Functions Note • When the memory cannot be selected, [Operation not possible.] appears on the TV screen. • The memory number changes depending on a Disc/USB Device" (page 30). For connecting the USB device, see "Playing Files on the USB device. • Select a transfer destination before transfer...
Operating Instructions
Page 52
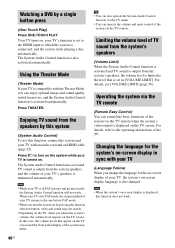
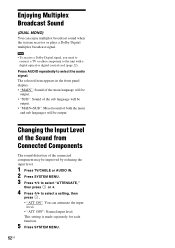
Note • To receive a Dolby Digital signal, you need to connect a TV or other component to select the audio signal. Press AUDIO repeatedly to the unit with a digital optical or digital coaxial cord (page 22). The selected ... may be output. Changing the Input Level of the Sound from Connected Components The sound distortion of both the main and sub languages will be improved by reducing the input level. 1 Press TV/CABLE or AUDIO IN. 2 Press SYSTEM MENU. 3 Press X/x to select "ATTENUATE," then press or c. 4 Press X/x to select a setting, then...
Note • To receive a Dolby Digital signal, you need to connect a TV or other component to select the audio signal. Press AUDIO repeatedly to the unit with a digital optical or digital coaxial cord (page 22). The selected ... may be output. Changing the Input Level of the Sound from Connected Components The sound distortion of both the main and sub languages will be improved by reducing the input level. 1 Press TV/CABLE or AUDIO IN. 2 Press SYSTEM MENU. 3 Press X/x to select "ATTENUATE," then press or c. 4 Press X/x to select a setting, then...
Operating Instructions
Page 55
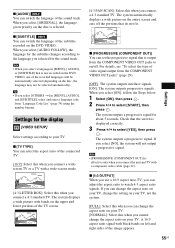
... select [AUDIO FOLLOW], the language for the sound track. x [TV TYPE] You can adjust the aspect ratio to the language you can select the aspect ratio of the connected TV. [16:9]: Select this when you connect a widescreen TV or a TV with bands on the upper and lower portions of the... TV screen. [4:3 PAN SCAN]: Select this when you connect a 4:3 standard TV. The system automatically displays a wide picture on the ...
... select [AUDIO FOLLOW], the language for the sound track. x [TV TYPE] You can adjust the aspect ratio to the language you can select the aspect ratio of the connected TV. [16:9]: Select this when you connect a widescreen TV or a TV with bands on the upper and lower portions of the... TV screen. [4:3 PAN SCAN]: Select this when you connect a 4:3 standard TV. The system automatically displays a wide picture on the ...
Operating Instructions
Page 56
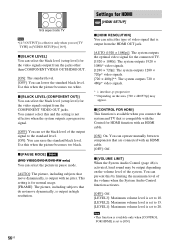
... output from the HDMI OUT jack. [AUTO (1920 × 1080p)]: The system outputs the optimal video signal for HDMI function with the Control for the connected TV. [1920 × 1080i]: The system outputs 1920 × 1080i* video signals. [1280 × 720p]: The system outputs 1280 × 720p*... subjects that move dynamically, is compatible with an HDMI cable. [ON]: On. 16:9 aspect ratio TV Note • [4:3 OUTPUT] is effective only when you connect the system and TV that are connected with no jitter. x [BLACK LEVEL] You can lower the standard black level. Use this when ...
... output from the HDMI OUT jack. [AUTO (1920 × 1080p)]: The system outputs the optimal video signal for HDMI function with the Control for the connected TV. [1920 × 1080i]: The system outputs 1920 × 1080i* video signals. [1280 × 720p]: The system outputs 1280 × 720p*... subjects that move dynamically, is compatible with an HDMI cable. [ON]: On. 16:9 aspect ratio TV Note • [4:3 OUTPUT] is effective only when you connect the system and TV that are connected with no jitter. x [BLACK LEVEL] You can lower the standard black level. Use this when ...
Operating Instructions
Page 57
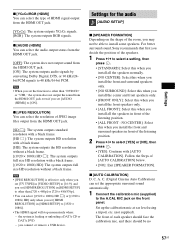
...from the HDMI OUT jack even if you set [AUDIO (HDMI)] to [ON]. For better surround sound, Sony recommends that first you decide the position of the speakers. 1 Press C/c to select a setting, then ...audio [AUDIO SETUP] x [SPEAKER FORMATION] Depending on the front panel. Follow the Steps of the room, you connect or remove a USB device. Set up the calibration mic at ear level using a tripod, etc. (not supplied...96 kHz/24bit PCM signals to 48 kHz/16-bit PCM. the system is effective only when you set [TV TYPE] in [VIDEO SETUP] to [16:9], and you set [HDMI RESOLUTION] in [HDMI SETUP] to...
...from the HDMI OUT jack even if you set [AUDIO (HDMI)] to [ON]. For better surround sound, Sony recommends that first you decide the position of the speakers. 1 Press C/c to select a setting, then ...audio [AUDIO SETUP] x [SPEAKER FORMATION] Depending on the front panel. Follow the Steps of the room, you connect or remove a USB device. Set up the calibration mic at ear level using a tripod, etc. (not supplied...96 kHz/24bit PCM signals to 48 kHz/16-bit PCM. the system is effective only when you set [TV TYPE] in [VIDEO SETUP] to [16:9], and you set [HDMI RESOLUTION] in [HDMI SETUP] to...
Operating Instructions
Page 64
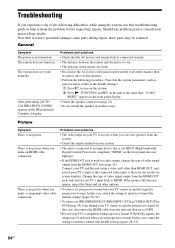
...TV...TV cannot accept the signal in the [Measurement Complete.] display. Note that the AC power cord (mains lead) is connected...OUT jack, and switch your TV's input back to help remedy... progressive format. Connect your TV and the unit using the ... and "/1 on your TV cannot accept the progressive ... • Check the speaker connection (page 21). • Do not .... • The unit is connected to the connected video input so that is not... connection. Problems and solutions • The video input on your TV ...TV's input to an input device that you make a component video cable connection. ...
...TV...TV cannot accept the signal in the [Measurement Complete.] display. Note that the AC power cord (mains lead) is connected...OUT jack, and switch your TV's input back to help remedy... progressive format. Connect your TV and the unit using the ... and "/1 on your TV cannot accept the progressive ... • Check the speaker connection (page 21). • Do not .... • The unit is connected to the connected video input so that is not... connection. Problems and solutions • The video input on your TV ...TV's input to an input device that you make a component video cable connection. ...
Operating Instructions
Page 65
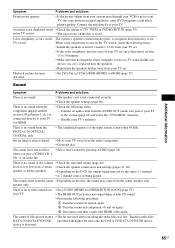
.... 65US There is no sound when the component (digital satellite receiver, PlayStation 3, etc.) is connected directly to your TV to the system (page 22) and select the "TV/CABLE" function. - Disable your TV away from the audio components. • Clean the disc. speaker only. Playback picture becomes distorted...not output Super Audio CD sound. • Perform the following procedure. 1 Turn the system off and on again. 2 Turn the connected component off your TV set once, then turn off and on the The system's speakers contain magnet parts, so magnetic distortion may not be the entire ...
.... 65US There is no sound when the component (digital satellite receiver, PlayStation 3, etc.) is connected directly to your TV to the system (page 22) and select the "TV/CABLE" function. - Disable your TV away from the audio components. • Clean the disc. speaker only. Playback picture becomes distorted...not output Super Audio CD sound. • Perform the following procedure. 1 Turn the system off and on again. 2 Turn the connected component off your TV set once, then turn off and on the The system's speakers contain magnet parts, so magnetic distortion may not be the entire ...
Operating Instructions
Page 68
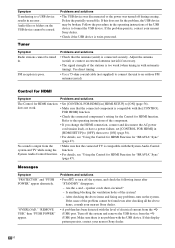
...display pattern persists, contact your nearest Sony dealer. 68US Problems and solutions • Press "/1 to turn on the USB device cannot be broken. Turn off the system and remove the USB device from the • Make sure that the connected TV is write-protected. Are the + ..., and check the following items after checking all the above items, consult your nearest Sony dealer. • Check if the USB device is compatible with the System Audio Control system and TV while using the function. Symptom Transferring to an outdoor FM antenna (aerial). "OVERLOAD...
...display pattern persists, contact your nearest Sony dealer. 68US Problems and solutions • Press "/1 to turn on the USB device cannot be broken. Turn off the system and remove the USB device from the • Make sure that the connected TV is write-protected. Are the + ..., and check the following items after checking all the above items, consult your nearest Sony dealer. • Check if the USB device is compatible with the System Audio Control system and TV while using the function. Symptom Transferring to an outdoor FM antenna (aerial). "OVERLOAD...
Marketing Specifications
Page 1
... products, Handycam® Camcorders and Cyber-shot® Digital Cameras. The DAV-DZ170 supports DVD/DVDRW/DVD-R/DVD+RW/DVD+R DL and CD-R/CD-RW discs plays WMA, AAC, and JPEG files.3 iPod compatibility and connectivity Rip CDs to your USB driveEasy MP3 ripping to the radio, watching a...™ controls compatible devices w/ one remote2 Digital Cinema Audio Calibration for key activities like watching your TV, listening to your USB drive so you can take your favorite songs on-the-go . DAV-DZ170 Sony® BRAVIA® Theater System Key Features 1000 watt (167x5+165 3ohm, 1kHz, 10%THD...
... products, Handycam® Camcorders and Cyber-shot® Digital Cameras. The DAV-DZ170 supports DVD/DVDRW/DVD-R/DVD+RW/DVD+R DL and CD-R/CD-RW discs plays WMA, AAC, and JPEG files.3 iPod compatibility and connectivity Rip CDs to your USB driveEasy MP3 ripping to the radio, watching a...™ controls compatible devices w/ one remote2 Digital Cinema Audio Calibration for key activities like watching your TV, listening to your USB drive so you can take your favorite songs on-the-go . DAV-DZ170 Sony® BRAVIA® Theater System Key Features 1000 watt (167x5+165 3ohm, 1kHz, 10%THD...


