

Operating Instructions
Page 5
...39 Enjoying the Audio/Video of the Connected Component 40 Tuner Presetting Radio Stations 42 Listening to the Radio 42 Sound Effect Enjoying Surround Sound 44 Selecting the Sound Effect 46 Convenient Functions Using the Control for HDMI Function for "BRAVIA" Sync 47 Transferring Songs onto a USB ...Device 49 Using the sleep timer 51 Adjusting the Delay Between the Picture and Sound 51 Enjoying Multiplex Broadcast Sound 52 Changing the Input Level of the Sound from Connected Components ......... 52 Settings Changing the Brightness of the Front Panel Display 53 Setting the ...
...39 Enjoying the Audio/Video of the Connected Component 40 Tuner Presetting Radio Stations 42 Listening to the Radio 42 Sound Effect Enjoying Surround Sound 44 Selecting the Sound Effect 46 Convenient Functions Using the Control for HDMI Function for "BRAVIA" Sync 47 Transferring Songs onto a USB ...Device 49 Using the sleep timer 51 Adjusting the Delay Between the Picture and Sound 51 Enjoying Multiplex Broadcast Sound 52 Changing the Input Level of the Sound from Connected Components ......... 52 Settings Changing the Brightness of the Front Panel Display 53 Setting the ...
Operating Instructions
Page 12
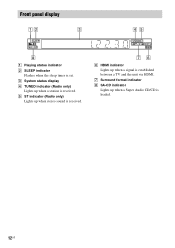
G Surround format indicator H SA-CD indicator Lights up when stereo sound is received. Front panel display A Playing status indicator B SLEEP indicator Flashes when the sleep timer is loaded. 12US E ST indicator (Radio only) Lights up when a Super Audio CD/CD is set. C System status display D TUNED indicator (Radio only) Lights up when a signal is established between a TV and the unit via HDMI. F HDMI indicator Lights up when a station is received.
G Surround format indicator H SA-CD indicator Lights up when stereo sound is received. Front panel display A Playing status indicator B SLEEP indicator Flashes when the sleep timer is loaded. 12US E ST indicator (Radio only) Lights up when a Super Audio CD/CD is set. C System status display D TUNED indicator (Radio only) Lights up when a signal is established between a TV and the unit via HDMI. F HDMI indicator Lights up when a station is received.
Operating Instructions
Page 14
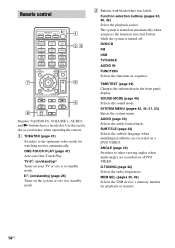
... THEATER PLAY TV BRAVIA Sync 1 2 3 DVD/CD FM USB 4 TV/ CABLE 7 TIME/ TEXT CLEAR AUDIO DVD TOP MENU 5 AUDIO IN 6 FUNCTION 8 SOUND MODE 9 SYSTEM MENU 0 TV INPUT SUBTITLE ANGLE D.TUNING MEM SEL DVD MENU MUTING VOLUME 1 2,3 4 6 RETURN PRESET TUNING SHIFT DISPLAY PRESET TUNING 5 Number 5/...IN, VOLUME +, AUDIO, and N buttons have a tactile dot. ONE-TOUCH PLAY (page 47) Activates One-Touch Play. SOUND MODE (page 46) Selects the sound mode. A THEATER (page 47) Switches to other viewing angles when multi-angles are recorded on automatically when you press the function...
... THEATER PLAY TV BRAVIA Sync 1 2 3 DVD/CD FM USB 4 TV/ CABLE 7 TIME/ TEXT CLEAR AUDIO DVD TOP MENU 5 AUDIO IN 6 FUNCTION 8 SOUND MODE 9 SYSTEM MENU 0 TV INPUT SUBTITLE ANGLE D.TUNING MEM SEL DVD MENU MUTING VOLUME 1 2,3 4 6 RETURN PRESET TUNING SHIFT DISPLAY PRESET TUNING 5 Number 5/...IN, VOLUME +, AUDIO, and N buttons have a tactile dot. ONE-TOUCH PLAY (page 47) Activates One-Touch Play. SOUND MODE (page 46) Selects the sound mode. A THEATER (page 47) Switches to other viewing angles when multi-angles are recorded on automatically when you press the function...
Operating Instructions
Page 15
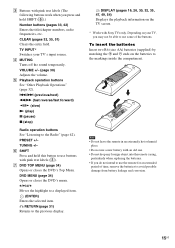
... place. • Do not use a new battery with pink text labels (3). CLEAR (pages 32, 35, 51) Clears the entry field. D MUTING Turns off the sound temporarily. PRESET +/- C Buttons with Sony TVs only. TUNING +/- TV INPUT* Switches your TV, you press and hold this button to a displayed item. (ENTER) Enters the selected item.
... place. • Do not use a new battery with pink text labels (3). CLEAR (pages 32, 35, 51) Clears the entry field. D MUTING Turns off the sound temporarily. PRESET +/- C Buttons with Sony TVs only. TUNING +/- TV INPUT* Switches your TV, you press and hold this button to a displayed item. (ENTER) Enters the selected item.
Operating Instructions
Page 18
.../all folders/all files) repeatedly or one title/chapter/track/folder/file repeatedly. [A/V SYNC] (page 51) You can adjust the delay between the picture and sound. [DISC MENU] (page 34) You can display the DVD's menu. [BROWSING] (page 31) You can display the list of your TV, and start the Auto...
.../all folders/all files) repeatedly or one title/chapter/track/folder/file repeatedly. [A/V SYNC] (page 51) You can adjust the delay between the picture and sound. [DISC MENU] (page 34) You can display the DVD's menu. [BROWSING] (page 31) You can display the list of your TV, and start the Auto...
Operating Instructions
Page 23
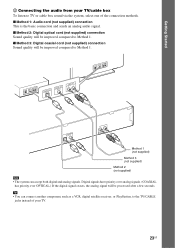
...basic connection and sends an analog audio signal. x Method 2: Digital optical cord (not supplied) connection Sound quality will be improved compared to TV or cable box sound via the system, select one of your TV/cable box To listen to Method 1. Tip • ...You can accept both digital and analog signals. x Method 3: Digital coaxial cord (not supplied) connection Sound quality will be processed after a few seconds. DIGOITPTAILCAOLUT DIGCIOTAAXLIAOLUT AUDIO OUT L R TV/CABLE DIGITAL IN OPTICAL COAXIAL R TAVU/CDAIOBILNE L Method 1 (not...
...basic connection and sends an analog audio signal. x Method 2: Digital optical cord (not supplied) connection Sound quality will be improved compared to TV or cable box sound via the system, select one of your TV/cable box To listen to Method 1. Tip • ...You can accept both digital and analog signals. x Method 3: Digital coaxial cord (not supplied) connection Sound quality will be processed after a few seconds. DIGOITPTAILCAOLUT DIGCIOTAAXLIAOLUT AUDIO OUT L R TV/CABLE DIGITAL IN OPTICAL COAXIAL R TAVU/CDAIOBILNE L Method 1 (not...
Operating Instructions
Page 27
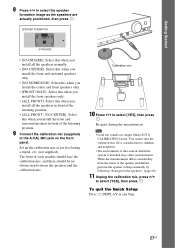
... the speakers are output when [AUTO CALIBRATION] starts. Set up the calibration mic at ear level using a tripod, etc. (not supplied). Note • Loud test sounds are actually positioned, then press . Give consideration to the A.CAL MIC jack on the front panel. To quit the Quick Setup Press DISPLAY in front...
... the speakers are output when [AUTO CALIBRATION] starts. Set up the calibration mic at ear level using a tripod, etc. (not supplied). Note • Loud test sounds are actually positioned, then press . Give consideration to the A.CAL MIC jack on the front panel. To quit the Quick Setup Press DISPLAY in front...
Operating Instructions
Page 34
...You can toggle audio format or language when the source contains multiple audio formats or multilingual audio. Note • You cannot search for the sound, select these items using DVD MENU. 1 Press DVD TOP MENU or DVD MENU. 2 Press C/X/x/c to select the item you want using...LCR LFE LS RS Currently playing program format 34US x DVD-VR You can change the sound track. • [STEREO]: The stereo sound. • [1/L]: The sound of the left channel of audio track 2 (monaural). • [2:2/R]: The sound of the right channel of the right channel (monaural). x Super VCD You can toggle...
...You can toggle audio format or language when the source contains multiple audio formats or multilingual audio. Note • You cannot search for the sound, select these items using DVD MENU. 1 Press DVD TOP MENU or DVD MENU. 2 Press C/X/x/c to select the item you want using...LCR LFE LS RS Currently playing program format 34US x DVD-VR You can change the sound track. • [STEREO]: The stereo sound. • [1/L]: The sound of the left channel of audio track 2 (monaural). • [2:2/R]: The sound of the right channel of the right channel (monaural). x Super VCD You can toggle...
Operating Instructions
Page 38
...the option you set [JPEG RESOLUTION] in separate folders. For details of making the disc, refer to Step 5. Sony recommends that cannot play JPEG image files. Selecting the slide show with sound 1 Prepare a folder on /off by pressing DVD MENU repeatedly. 6 Press X/x to select [MUSIC/PHOTO], ...then press . 5 If the folder list does not appear, press DVD MENU. When other than [SLOW 1]. If the sound still skips, reduce the size of your PC, software, etc. 2 Press DISPLAY. 3 Press X/x to select [MEDIA], then press . 4 When [MUSIC/PHOTO...
...the option you set [JPEG RESOLUTION] in separate folders. For details of making the disc, refer to Step 5. Sony recommends that cannot play JPEG image files. Selecting the slide show with sound 1 Prepare a folder on /off by pressing DVD MENU repeatedly. 6 Press X/x to select [MUSIC/PHOTO], ...then press . 5 If the folder list does not appear, press DVD MENU. When other than [SLOW 1]. If the sound still skips, reduce the size of your PC, software, etc. 2 Press DISPLAY. 3 Press X/x to select [MEDIA], then press . 4 When [MUSIC/PHOTO...
Operating Instructions
Page 44
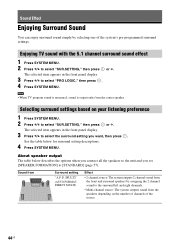
...to the unit and you want, then press . Sound Effect Enjoying Surround Sound You can enjoy surround sound simply by assigning the 2 channel sound to the surround left and right channels. • Multi-channel source: The system outputs sound from the center speaker. MULTI" (AUTO FORMAT DIRECT... MULTI) Effect • 2 channel source: The system outputs 2 channel sound from the front and surround speakers by selecting one of the source. 44US Note • When TV program sound is monaural, sound is output only from the speakers depending on your listening preference 1 Press ...
...to the unit and you want, then press . Sound Effect Enjoying Surround Sound You can enjoy surround sound simply by assigning the 2 channel sound to the surround left and right channels. • Multi-channel source: The system outputs sound from the center speaker. MULTI" (AUTO FORMAT DIRECT... MULTI) Effect • 2 channel source: The system outputs 2 channel sound from the front and surround speakers by selecting one of the source. 44US Note • When TV program sound is monaural, sound is output only from the speakers depending on your listening preference 1 Press ...
Operating Instructions
Page 45
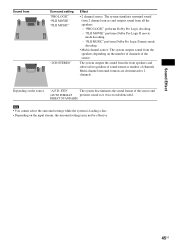
... • Depending on the number of channels of the source. "A.F.D. STD" The system discriminates the sound format of the source and (AUTO FORMAT presents sound as it was recorded/encoded. Sound from Surround setting "PRO LOGIC" "PLII MOVIE" "PLII MUSIC" "2CH STEREO" Effect • ...2 channel source: The system simulates surround sound from 2 channel sources and outputs sound from the front speakers and subwoofer regardless of sound format or number of channels. "PLII MOVIE" performs Dolby Pro Logic II movie mode decoding. -...
... • Depending on the number of channels of the source. "A.F.D. STD" The system discriminates the sound format of the source and (AUTO FORMAT presents sound as it was recorded/encoded. Sound from Surround setting "PRO LOGIC" "PLII MOVIE" "PLII MUSIC" "2CH STEREO" Effect • ...2 channel source: The system simulates surround sound from 2 channel sources and outputs sound from the front speakers and subwoofer regardless of sound format or number of channels. "PLII MOVIE" performs Dolby Pro Logic II movie mode decoding. -...
Operating Instructions
Page 46
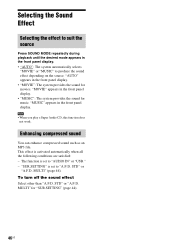
"MOVIE" appears in the front panel display. • "MUSIC": The system provides the sound for "SUR.SETTING" (page 44). 46US This effect is set to produce the sound effect depending on the source. MULTI" (page 44). MULTI" for music. "SUR.SETTING" is set to "AUDIO IN" or "...MOVIE": The system provides the sound for movies. To turn off the sound effect Select other than "A.F.D. Enhancing compressed sound You can enhance compressed sound such as an MP3 file. Selecting the Sound Effect Selecting the effect to suit the source Press SOUND MODE repeatedly during playback until the...
"MOVIE" appears in the front panel display. • "MUSIC": The system provides the sound for "SUR.SETTING" (page 44). 46US This effect is set to produce the sound effect depending on the source. MULTI" (page 44). MULTI" for music. "SUR.SETTING" is set to "AUDIO IN" or "...MOVIE": The system provides the sound for movies. To turn off the sound effect Select other than "A.F.D. Enhancing compressed sound You can enhance compressed sound such as an MP3 file. Selecting the Sound Effect Selecting the effect to suit the source Press SOUND MODE repeatedly during playback until the...
Operating Instructions
Page 48
...) When you change the language for the on-screen display of the system via the TV menu. • You can enjoy optimal image and sound quality suited for the system's on-screen display in PAP (picture and picture) mode, the System Audio Control function will not work . Limiting ... on, your TV's speakers is connected, and the system starts playing a disc automatically. Watching a DVD by pressing the function selection button, video and sound may differ. 48US Tip • You can also operate the System Audio Control function via the TV remote. In this function does not work . Using...
...) When you change the language for the on-screen display of the system via the TV menu. • You can enjoy optimal image and sound quality suited for the system's on-screen display in PAP (picture and picture) mode, the System Audio Control function will not work . Limiting ... on, your TV's speakers is connected, and the system starts playing a disc automatically. Watching a DVD by pressing the function selection button, video and sound may differ. 48US Tip • You can also operate the System Audio Control function via the TV remote. In this function does not work . Using...
Operating Instructions
Page 51
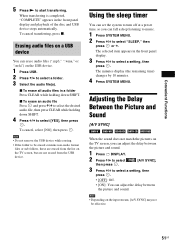
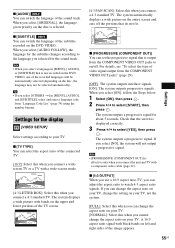
...set the system to turn off at a preset time, so you can adjust the delay between the picture and sound. Adjusting the Delay Between the Picture and Sound [A/V SYNC] When the sound does not match the pictures on the TV screen, but are erased from the list on the TV screen, you... can adjust the delay between the picture and sound. 1 Press DISPLAY. 2 Press X/x to select [A/V SYNC], then press . 3 Press X/x to select a setting, then press . • [OFF]: Off. • [ON]: You can fall asleep ...
...set the system to turn off at a preset time, so you can adjust the delay between the picture and sound. Adjusting the Delay Between the Picture and Sound [A/V SYNC] When the sound does not match the pictures on the TV screen, but are erased from the list on the TV screen, you... can adjust the delay between the picture and sound. 1 Press DISPLAY. 2 Press X/x to select [A/V SYNC], then press . 3 Press X/x to select a setting, then press . • [OFF]: Off. • [ON]: You can fall asleep ...
Operating Instructions
Page 52
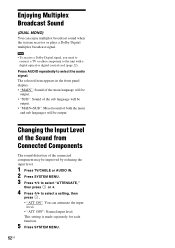
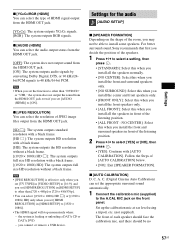
... the front panel display. • "MAIN": Sound of the main language will be output. • "SUB": Sound of the sub language will be output. • "MAIN+SUB": Mixed sound of the connected component may be output. Enjoying Multiplex Broadcast Sound (DUAL MONO) You can attenuate the input level... press . • "ATT ON": You can enjoy multiplex broadcast sound when the system receives or plays a Dolby Digital multiplex broadcast signal. Changing the Input Level of the Sound from Connected Components The sound distortion of both the main and sub languages will be improved by reducing...
... the front panel display. • "MAIN": Sound of the main language will be output. • "SUB": Sound of the sub language will be output. • "MAIN+SUB": Mixed sound of the connected component may be output. Enjoying Multiplex Broadcast Sound (DUAL MONO) You can attenuate the input level... press . • "ATT ON": You can enjoy multiplex broadcast sound when the system receives or plays a Dolby Digital multiplex broadcast signal. Changing the Input Level of the Sound from Connected Components The sound distortion of both the main and sub languages will be improved by reducing...
Operating Instructions
Page 53
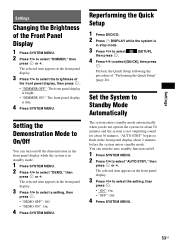
... the front panel display. 3 Press X/x to select [QUICK], then press . Reperforming the Quick Setup 1 Press DVD/CD. 2 Press DISPLAY while the system is not outputting sound for about 30 minutes and the system is in the front panel display. 3 Press X/x to select "DIMMER," then press or c. You can turn the auto...
... the front panel display. 3 Press X/x to select [QUICK], then press . Reperforming the Quick Setup 1 Press DVD/CD. 2 Press DISPLAY while the system is not outputting sound for about 30 minutes and the system is in the front panel display. 3 Press X/x to select "DIMMER," then press or c. You can turn the auto...
Operating Instructions
Page 54
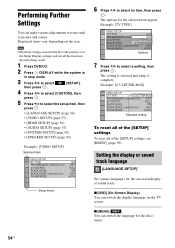
.... 2 Press DISPLAY while the system is complete. x [OSD] (On-Screen Display) You can switch the display language on -screen display or sound track. x [MENU] You can switch the language for the selected item appear. Example: [4:3 LETTER BOX] VIDEO SETUP TV TYPE: 4:3 LETTER ... BLACK LEVEL: 4:3 PAN SACUATON BLACK LEVEL (COMPONENT OUT): OFF PAUSE MODE: AUTO Options 7 Press X/x to items such as picture and sound. Displayed items vary depending on the area. Performing Further Settings You can make various adjustments to select a setting, then press . The options...
.... 2 Press DISPLAY while the system is complete. x [OSD] (On-Screen Display) You can switch the display language on -screen display or sound track. x [MENU] You can switch the language for the selected item appear. Example: [4:3 LETTER BOX] VIDEO SETUP TV TYPE: 4:3 LETTER ... BLACK LEVEL: 4:3 PAN SACUATON BLACK LEVEL (COMPONENT OUT): OFF PAUSE MODE: AUTO Options 7 Press X/x to items such as picture and sound. Displayed items vary depending on the area. Performing Further Settings You can make various adjustments to select a setting, then press . The options...
Operating Instructions
Page 55
... VIDEO OUT jacks to your TV. [NORMAL]: Select this when you connect a 4:3 standard TV. For details, see "To select the type of the sound track. x [AUDIO] You can switch the language of video signal output from the COMPONENT VIDEO OUT jacks" (page 29). [OFF]: The system outputs ... only when you connect the unit and TV with a wide-screen mode. [4:3 LETTER BOX]: Select this when you select [AUDIO FOLLOW], the language for the sound track. x [4:3 OUTPUT] When you use a 16:9 aspect ratio TV, you connect a widescreen TV or a TV with a component video cable (page 22). When...
... VIDEO OUT jacks to your TV. [NORMAL]: Select this when you connect a 4:3 standard TV. For details, see "To select the type of the sound track. x [AUDIO] You can switch the language of video signal output from the COMPONENT VIDEO OUT jacks" (page 29). [OFF]: The system outputs ... only when you connect the unit and TV with a wide-screen mode. [4:3 LETTER BOX]: Select this when you select [AUDIO FOLLOW], the language for the sound track. x [4:3 OUTPUT] When you use a 16:9 aspect ratio TV, you connect a widescreen TV or a TV with a component video cable (page 22). When...
Operating Instructions
Page 56
... FOR HDMI] is set the black level of the output signal to 20. x [VOLUME LIMIT] When the System Audio Control (page 48) is activated, loud sound may be output depending on the area, [720 × 480/576p] may appear. You cannot select this by limiting the maximum level of the system...
... FOR HDMI] is set the black level of the output signal to 20. x [VOLUME LIMIT] When the System Audio Control (page 48) is activated, loud sound may be output depending on the area, [720 × 480/576p] may appear. You cannot select this by limiting the maximum level of the system...
Operating Instructions
Page 57
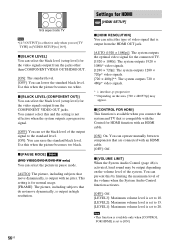
...215; 1080i) HD]: The system outputs full size HD resolution without a black frame. C. (Digital Cinema Auto Calibration) can set the appropriate surround sound automatically. 1 Connect the calibration mic (supplied) to the A.CAL MIC jack on the shape of the room, you install all the speakers normally.... set [AUDIO (HDMI)] to [ON]. Settings for the audio [AUDIO SETUP] x [SPEAKER FORMATION] Depending on the front panel. For better surround sound, Sony recommends that first you decide the position of the speakers. 1 Press C/c to select a setting, then press . • [STANDARD]: Select this...
...215; 1080i) HD]: The system outputs full size HD resolution without a black frame. C. (Digital Cinema Auto Calibration) can set the appropriate surround sound automatically. 1 Connect the calibration mic (supplied) to the A.CAL MIC jack on the shape of the room, you install all the speakers normally.... set [AUDIO (HDMI)] to [ON]. Settings for the audio [AUDIO SETUP] x [SPEAKER FORMATION] Depending on the front panel. For better surround sound, Sony recommends that first you decide the position of the speakers. 1 Press C/c to select a setting, then press . • [STANDARD]: Select this...


