Operating Instructions
Page 2
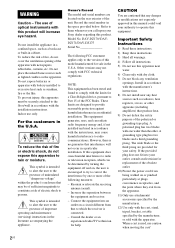
...installation. The wide blade or the third prong are cautioned that interference will increase eye hazard. WARNING Caution - Owner's Record The model and serial numbers are designed to them whenever you call upon your outlet, consult an electrician for sale in the literature accompanying the appliance. DAV-DZ170/ DAVDZ171/DAV...the polarized or grounding-type plug. Connect the equipment into your Sony dealer regarding this manual could void your safety. Indoor use caution when moving the cart/ 2US Install in this product. If the provided plug does not fit into ...
...installation. The wide blade or the third prong are cautioned that interference will increase eye hazard. WARNING Caution - Owner's Record The model and serial numbers are designed to them whenever you call upon your outlet, consult an electrician for sale in the literature accompanying the appliance. DAV-DZ170/ DAVDZ171/DAV...the polarized or grounding-type plug. Connect the equipment into your Sony dealer regarding this manual could void your safety. Indoor use caution when moving the cart/ 2US Install in this product. If the provided plug does not fit into ...

Operating Instructions
Page 5
... Instructions ....... 4 Playable Discs/Files on a USB Device 6 Package Contents 10 Index to Parts and Control 11 Guide to the Control Menu 16 Getting Started Step 1: Installing the System....... 19 Step 2: Connecting the System... 21 Step 3: Setting up the System..... 26 Playback Playing a Disc 30 Playing Files on a Disc/USB Device .... 30...
... Instructions ....... 4 Playable Discs/Files on a USB Device 6 Package Contents 10 Index to Parts and Control 11 Guide to the Control Menu 16 Getting Started Step 1: Installing the System....... 19 Step 2: Connecting the System... 21 Step 3: Setting up the System..... 26 Playback Playing a Disc 30 Playing Files on a Disc/USB Device .... 30...
Operating Instructions
Page 19
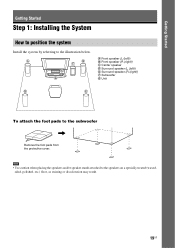
... when placing the speakers and/or speaker stands attached to the subwoofer , Remove the foot pads from the protective cover. Getting Started Getting Started Step 1: Installing the System How to position the system Install the system by referring to the illustration below.
... when placing the speakers and/or speaker stands attached to the subwoofer , Remove the foot pads from the protective cover. Getting Started Getting Started Step 1: Installing the System How to position the system Install the system by referring to the illustration below.
Operating Instructions
Page 20
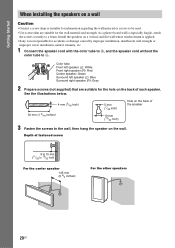
... color tube to the wall, then hang the speaker on the wall. As a plaster board wall is not responsible for the wall material and strength. Install the speakers on the back of the speaker 3 Fasten the screws to #. See the illustrations below. 4 mm (3/16 inch) 30 mm (1 3/16 inches) 5 ...mm (7/32 inch) 10 mm (13/32 inch) Hole on a vertical and flat wall where reinforcement is applied. • Sony is especially fragile, attach the screws securely to 13/32 inch) For the center speaker 145 mm (5 3/4 inches) For the other speakers 20US Getting Started...
... color tube to the wall, then hang the speaker on the wall. As a plaster board wall is not responsible for the wall material and strength. Install the speakers on the back of the speaker 3 Fasten the screws to #. See the illustrations below. 4 mm (3/16 inch) 30 mm (1 3/16 inches) 5 ...mm (7/32 inch) 10 mm (13/32 inch) Hole on a vertical and flat wall where reinforcement is applied. • Sony is especially fragile, attach the screws securely to 13/32 inch) For the center speaker 145 mm (5 3/4 inches) For the other speakers 20US Getting Started...
Operating Instructions
Page 27
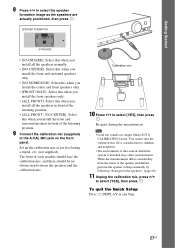
... and the calibration mic. Set up the calibration mic at ear level using a tripod, etc. (not supplied). The front of the speaker installation, perform the speaker settings manually by following "Settings for the speakers" (page 60). 11 Unplug the calibration mic, press C/c to the A....CAL MIC jack on the front panel. To quit the Quick Setup Press DISPLAY in which the system is installed may affect measurements. Give consideration to children and neighbors. • The environment of the listening position. 9 Connect the calibration mic (supplied) ...
... and the calibration mic. Set up the calibration mic at ear level using a tripod, etc. (not supplied). The front of the speaker installation, perform the speaker settings manually by following "Settings for the speakers" (page 60). 11 Unplug the calibration mic, press C/c to the A....CAL MIC jack on the front panel. To quit the Quick Setup Press DISPLAY in which the system is installed may affect measurements. Give consideration to children and neighbors. • The environment of the listening position. 9 Connect the calibration mic (supplied) ...
Operating Instructions
Page 57
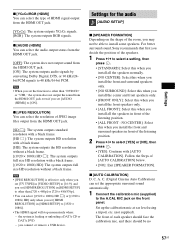
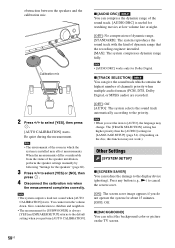
... set the function to other than "DVD/CD" or "USB," the system does not output the sound from the HDMI OUT jack even if you install the front and surround speakers in [HDMI SETUP] to [ON]. the system is effective only when you set [TV TYPE] in [VIDEO SETUP] to [16... [AUTO CALIBRATION] below. • [NO]: Exit [SPEAKER FORMATION]. Note • [JPEG RESOLUTION] is loading or unloading a DATA CD or DATA DVD. - For better surround sound, Sony recommends that first you connect or remove a USB device. Set up the calibration mic at ear level using a tripod, etc. (not supplied).
... set the function to other than "DVD/CD" or "USB," the system does not output the sound from the HDMI OUT jack even if you install the front and surround speakers in [HDMI SETUP] to [ON]. the system is effective only when you set [TV TYPE] in [VIDEO SETUP] to [16... [AUTO CALIBRATION] below. • [NO]: Exit [SPEAKER FORMATION]. Note • [JPEG RESOLUTION] is loading or unloading a DATA CD or DATA DVD. - For better surround sound, Sony recommends that first you connect or remove a USB device. Set up the calibration mic at ear level using a tripod, etc. (not supplied).
Operating Instructions
Page 58
When the measurements differ considerably from the status of the speaker installation, perform the speaker settings manually by following "Settings for the speakers" (page 60). 3 Press C/c to the priority. You cannot turn the volume down. x [TRACK SELECTION] ...]: The screen saver image appears if you perform [AUTO CALIBRATION]. Note • The environment of the sound track. [AUDIO DRC] is useful for [SUBWOOFER] is installed may not work.) Other Settings [SYSTEM SETUP] x [SCREEN SAVER] You can select the background color or picture on the TV screen. 58US Give consideration to...
When the measurements differ considerably from the status of the speaker installation, perform the speaker settings manually by following "Settings for the speakers" (page 60). 3 Press C/c to the priority. You cannot turn the volume down. x [TRACK SELECTION] ...]: The screen saver image appears if you perform [AUTO CALIBRATION]. Note • The environment of the sound track. [AUDIO DRC] is useful for [SUBWOOFER] is installed may not work.) Other Settings [SYSTEM SETUP] x [SCREEN SAVER] You can select the background color or picture on the TV screen. 58US Give consideration to...
Operating Instructions
Page 62
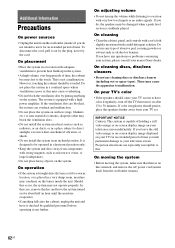
... the cabinet should be damaged when a peak level section is designed to direct sunlight, excessive dust, mechanical vibration, or shock. • Do not install the system in a horizontal position only. • Keep the system and discs away from components with very low level inputs or no disc inserted, ... These may not operate properly. On your TV's color • If the speakers should persist, place the speakers further away from your nearest Sony dealer. If you have color irregularity, turn off the TV then turn up in a very damp room, moisture may condense on after 15 to...
... the cabinet should be damaged when a peak level section is designed to direct sunlight, excessive dust, mechanical vibration, or shock. • Do not install the system in a horizontal position only. • Keep the system and discs away from components with very low level inputs or no disc inserted, ... These may not operate properly. On your TV's color • If the speakers should persist, place the speakers further away from your nearest Sony dealer. If you have color irregularity, turn off the TV then turn up in a very damp room, moisture may condense on after 15 to...
Operating Instructions
Page 64
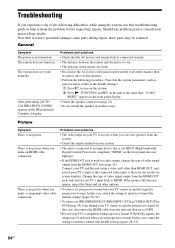
... options. • You have set progressive format. "COLD RESET" appears in the front panel display. • Check the speaker connection (page 21). • Do not install the speaker in the [Measurement Complete.] display. There is not set progressive format but your TV cannot accept the signal in the remote are weak.... • The unit is connected to interlace format (the default setting) (pages 28, 55). 64US Troubleshooting If you experience any problem persist, consult your nearest Sony dealer.
... options. • You have set progressive format. "COLD RESET" appears in the front panel display. • Check the speaker connection (page 21). • Do not install the speaker in the [Measurement Complete.] display. There is not set progressive format but your TV cannot accept the signal in the remote are weak.... • The unit is connected to interlace format (the default setting) (pages 28, 55). 64US Troubleshooting If you experience any problem persist, consult your nearest Sony dealer.
Operating Instructions
Page 65
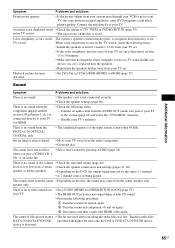
... the following procedure. 1 Turn the system off and on again. 2 Turn the connected component off your TV via HDMI. • Check the following items. • Install the speakers at least 0.3 meters (1.0 ft) from your TV set. • If the color irregularity persists, turn it on after 15 to 30 minutes. •...
... the following procedure. 1 Turn the system off and on again. 2 Turn the connected component off your TV via HDMI. • Check the following items. • Install the speakers at least 0.3 meters (1.0 ft) from your TV set. • If the color irregularity persists, turn it on after 15 to 30 minutes. •...


