
Operating Instructions
Page 5
... onto a USB Device 49 Using the sleep timer 51 Adjusting the Delay Between the Picture and Sound 51 Enjoying Multiplex Broadcast Sound 52 Changing the Input Level of the Sound from Connected Components ......... 52 Settings Changing the Brightness of the Front Panel Display 53 Setting the Demonstration Mode to On/Off...
... onto a USB Device 49 Using the sleep timer 51 Adjusting the Delay Between the Picture and Sound 51 Enjoying Multiplex Broadcast Sound 52 Changing the Input Level of the Sound from Connected Components ......... 52 Settings Changing the Brightness of the Front Panel Display 53 Setting the Demonstration Mode to On/Off...
Operating Instructions
Page 14
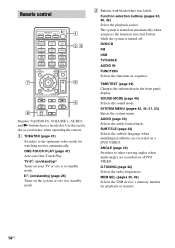
... PLAY TV BRAVIA Sync 1 2 3 DVD/CD FM USB 4 TV/ CABLE 7 TIME/ TEXT CLEAR AUDIO DVD TOP MENU 5 AUDIO IN 6 FUNCTION 8 SOUND MODE 9 SYSTEM MENU 0 TV INPUT SUBTITLE ANGLE D.TUNING MEM SEL DVD MENU MUTING VOLUME 1 2,3 4 6 RETURN PRESET TUNING SHIFT DISPLAY PRESET TUNING 5 Number 5/AUDIO IN, VOLUME +, AUDIO, and N buttons have a tactile...
... PLAY TV BRAVIA Sync 1 2 3 DVD/CD FM USB 4 TV/ CABLE 7 TIME/ TEXT CLEAR AUDIO DVD TOP MENU 5 AUDIO IN 6 FUNCTION 8 SOUND MODE 9 SYSTEM MENU 0 TV INPUT SUBTITLE ANGLE D.TUNING MEM SEL DVD MENU MUTING VOLUME 1 2,3 4 6 RETURN PRESET TUNING SHIFT DISPLAY PRESET TUNING 5 Number 5/AUDIO IN, VOLUME +, AUDIO, and N buttons have a tactile...
Operating Instructions
Page 15
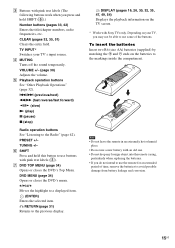
... not drop any foreign object into the remote casing, particularly when replacing the batteries. • If you do not intend to use a new battery with Sony TVs only. Note • Do not leave the remote in an extremely hot or humid place. • Do not use the remote for an extended... highlight to the Radio" (page 42). To insert the batteries Insert two R6 (size AA) batteries (supplied) by matching the 3 and # ends on your TV's input source. TUNING +/- Depending on the batteries to use buttons with pink text labels (The following buttons work when you may not be able to the...
... not drop any foreign object into the remote casing, particularly when replacing the batteries. • If you do not intend to use a new battery with Sony TVs only. Note • Do not leave the remote in an extremely hot or humid place. • Do not use the remote for an extended... highlight to the Radio" (page 42). To insert the batteries Insert two R6 (size AA) batteries (supplied) by matching the 3 and # ends on your TV's input source. TUNING +/- Depending on the batteries to use buttons with pink text labels (The following buttons work when you may not be able to the...
Operating Instructions
Page 17
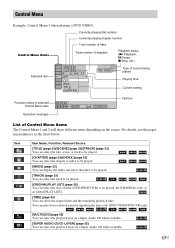
You can play from a desired point by inputting the time code (DVD VIDEO/DVD-VR only). [MULTI/2CH] (page 35) You can select the playback area on a Super Audio CD when available. [SUPER ...
You can play from a desired point by inputting the time code (DVD VIDEO/DVD-VR only). [MULTI/2CH] (page 35) You can select the playback area on a Super Audio CD when available. [SUPER ...
Operating Instructions
Page 26
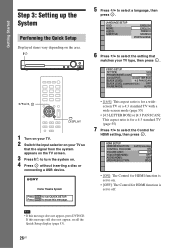
... (COMPONENT OUT): 16:9 4:3 OUTPUT: 4:3 LETTER BOX BLACK LEVEL: 4:3 PAN SCAN BLACK LEVEL (COMPONENT OUT): OFF PAUSE MODE: AUTO C/X/x/c, DISPLAY 1 Turn on your TV. 2 Switch the input selector on your TV so that matches your TV type, then press . Note • If this message still does not appear, recall the Quick Setup...
... (COMPONENT OUT): 16:9 4:3 OUTPUT: 4:3 LETTER BOX BLACK LEVEL: 4:3 PAN SCAN BLACK LEVEL (COMPONENT OUT): OFF PAUSE MODE: AUTO C/X/x/c, DISPLAY 1 Turn on your TV. 2 Switch the input selector on your TV so that matches your TV type, then press . Note • If this message still does not appear, recall the Quick Setup...
Operating Instructions
Page 33
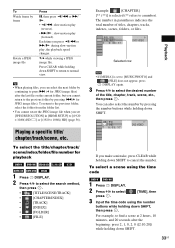
... (** refers to a number). Playing a specific title/ chapter/track/scene, etc. To select a scene using the time code 1 Press DISPLAY. 2 Press X/x to select [TIME], then press . 3 Input the time code using the number buttons while holding down SHIFT to return to cancel the number. Tip • When playing files, you cannot return...
... (** refers to a number). Playing a specific title/ chapter/track/scene, etc. To select a scene using the time code 1 Press DISPLAY. 2 Press X/x to select [TIME], then press . 3 Input the time code using the number buttons while holding down SHIFT to return to cancel the number. Tip • When playing files, you cannot return...
Operating Instructions
Page 41
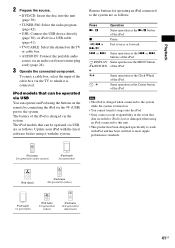
... MENU button O RETURN, of the cable box via the (USB) port to the system. DISPLAY, Same operation as the . To enjoy a cable box, select the input of the iPod. Remote buttons for operating an iPod connected to which it with iPod and has been certified to work with the system. or... models that data recorded to iPod is lost or damaged when using it is turned on. • You cannot transfer songs onto the iPod. • Sony cannot accept responsibility in the event that can be operated via USB You can be operated via USB are as follows: Press Operation N, X Same operation...
... MENU button O RETURN, of the cable box via the (USB) port to the system. DISPLAY, Same operation as the . To enjoy a cable box, select the input of the iPod. Remote buttons for operating an iPod connected to which it with iPod and has been certified to work with the system. or... models that data recorded to iPod is lost or damaged when using it is turned on. • You cannot transfer songs onto the iPod. • Sony cannot accept responsibility in the event that can be operated via USB You can be operated via USB are as follows: Press Operation N, X Same operation...
Operating Instructions
Page 45
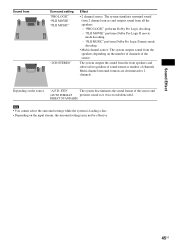
... Logic II movie mode decoding. - DIRECT STANDARD) Note • You cannot select the surround settings while the system is loading a disc. • Depending on the input stream, the surround settings may not be effective. Sound from Surround setting "PRO LOGIC" "PLII MOVIE" "PLII MUSIC" "2CH STEREO" Effect • 2 channel source: The...
... Logic II movie mode decoding. - DIRECT STANDARD) Note • You cannot select the surround settings while the system is loading a disc. • Depending on the input stream, the surround settings may not be effective. Sound from Surround setting "PRO LOGIC" "PLII MOVIE" "PLII MUSIC" "2CH STEREO" Effect • 2 channel source: The...
Operating Instructions
Page 47
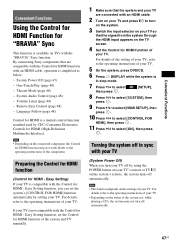
... instructions of your TV. Convenient Functions Convenient Functions Using the Control for HDMI Function for HDMI function may not turn on the system. 3 Switch the input selector on your TV and press [/1 to turn off automatically. Volume Limit (page 48) - Refer to select [ON], then press . If your TV...used by setting your TV is in sync with the "BRAVIA" Sync function. while playing a CD), the system may not work. By connecting Sony components that are connected with an HDMI cable. 2 Turn on your TV so that the system and your TV are compatible with the Control ...
... instructions of your TV. Convenient Functions Convenient Functions Using the Control for HDMI Function for HDMI function may not turn on the system. 3 Switch the input selector on your TV and press [/1 to turn off automatically. Volume Limit (page 48) - Refer to select [ON], then press . If your TV...used by setting your TV is in sync with the "BRAVIA" Sync function. while playing a CD), the system may not work. By connecting Sony components that are connected with an HDMI cable. 2 Turn on your TV so that the system and your TV are compatible with the Control ...
Operating Instructions
Page 48
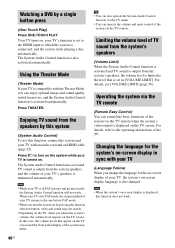
In this case, the volume levels that is set to the HDMI input to the one before PAP mode. • When you turn on the system while your TV is turned on. Changing the language for the system's ...
In this case, the volume levels that is set to the HDMI input to the one before PAP mode. • When you turn on the system while your TV is turned on. Changing the language for the system's ...
Operating Instructions
Page 51
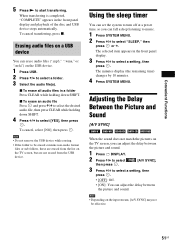
... • Do not remove the USB device while erasing. • If the folder to select a folder. 3 Select the audio file(s). Note • Depending on the input stream, [A/V SYNC] may not be erased contains non-audio format files or sub folders, these are erased from the list on the TV screen, but...
... • Do not remove the USB device while erasing. • If the folder to select a folder. 3 Select the audio file(s). Note • Depending on the input stream, [A/V SYNC] may not be erased contains non-audio format files or sub folders, these are erased from the list on the TV screen, but...
Operating Instructions
Page 52
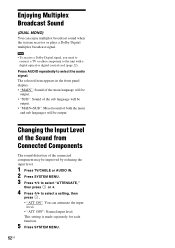
...Note • To receive a Dolby Digital signal, you need to connect a TV or other component to select the audio signal. Changing the Input Level of the Sound from Connected Components The sound distortion of both the main and sub languages will be output. • "MAIN+SUB": Mixed... panel display. • "MAIN": Sound of the main language will be output. • "SUB": Sound of the sub language will be improved by reducing the input level. 1 Press TV/CABLE or AUDIO IN. 2 Press SYSTEM MENU. 3 Press X/x to select "ATTENUATE," then press or c. 4 Press X/x to select a setting, then press . &#...
...Note • To receive a Dolby Digital signal, you need to connect a TV or other component to select the audio signal. Changing the Input Level of the Sound from Connected Components The sound distortion of both the main and sub languages will be output. • "MAIN+SUB": Mixed... panel display. • "MAIN": Sound of the main language will be output. • "SUB": Sound of the sub language will be improved by reducing the input level. 1 Press TV/CABLE or AUDIO IN. 2 Press SYSTEM MENU. 3 Press X/x to select "ATTENUATE," then press or c. 4 Press X/x to select a setting, then press . &#...

Operating Instructions
Page 59
.... If the disc does not contain a jacket picture, a preset picture stored in the system appears. [GRAPHICS]: A preset picture stored in Step 5. When you press , then input the correct number. 4 To confirm your new password. Enter your password, enter "199703" using the number buttons. 4 Press X/x to select [LEVEL], then press . 5 Press X/x to...
.... If the disc does not contain a jacket picture, a preset picture stored in the system appears. [GRAPHICS]: A preset picture stored in Step 5. When you press , then input the correct number. 4 To confirm your new password. Enter your password, enter "199703" using the number buttons. 4 Press X/x to select [LEVEL], then press . 5 Press X/x to...
Operating Instructions
Page 60
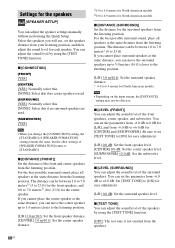
... (FRONT)] Set the distance of [SPEAKER FORMATION] return to 23 ft) for easy adjustment. [L/R] 0.0 dB: Set the surround speaker level. Note • Depending on the input stream, the [DISTANCE] setting may not be between 1.0 to 7.0 meters* (0 to [ON] for North American models. Be sure to set the parameters from -6.0 dB to...
... (FRONT)] Set the distance of [SPEAKER FORMATION] return to 23 ft) for easy adjustment. [L/R] 0.0 dB: Set the surround speaker level. Note • Depending on the input stream, the [DISTANCE] setting may not be between 1.0 to 7.0 meters* (0 to [ON] for North American models. Be sure to set the parameters from -6.0 dB to...
Operating Instructions
Page 62
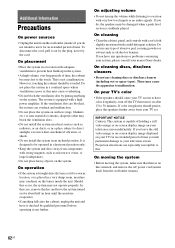
...8226; Do not install the system in an inclined position. Do not use any questions or problems concerning your system, please consult your nearest Sony dealer. If color irregularity should persist, place the speakers further away from the wall outlet (mains) if you have it checked by qualified ...system on the system. The system is not a malfunction. On operation • If the system is brought directly from components with very low level inputs or no disc inserted, and remove the AC power cord (mains lead) from the wall outlet (mains). 62US On cleaning • Clean the ...
...8226; Do not install the system in an inclined position. Do not use any questions or problems concerning your system, please consult your nearest Sony dealer. If color irregularity should persist, place the speakers further away from the wall outlet (mains) if you have it checked by qualified ...system on the system. The system is not a malfunction. On operation • If the system is brought directly from components with very low level inputs or no disc inserted, and remove the AC power cord (mains lead) from the wall outlet (mains). 62US On cleaning • Clean the ...
Operating Instructions
Page 64
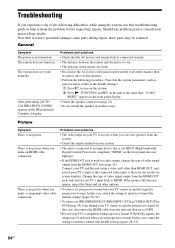
...is connected to interlace format (the default setting) (pages 28, 55). 64US Troubleshooting If you experience any problem persist, consult your nearest Sony dealer. After performing [AUTO CALIBRATION], [NONE] appears in another room. There is no picture. In this case, disconnect the HDMI cable... have set [PROGRESSIVE (COMPONENT OUT)] in [VIDEO SETUP] to turn on the system. 2 Press N, FUNCTION, and "/1 on your TV's input to HDMI. The remote does not function. Note that you can see the onscreen displays. In this troubleshooting guide to interlace format (the default ...
...is connected to interlace format (the default setting) (pages 28, 55). 64US Troubleshooting If you experience any problem persist, consult your nearest Sony dealer. After performing [AUTO CALIBRATION], [NONE] appears in another room. There is no picture. In this case, disconnect the HDMI cable... have set [PROGRESSIVE (COMPONENT OUT)] in [VIDEO SETUP] to turn on the system. 2 Press N, FUNCTION, and "/1 on your TV's input to HDMI. The remote does not function. Note that you can see the onscreen displays. In this troubleshooting guide to interlace format (the default ...
Operating Instructions
Page 65
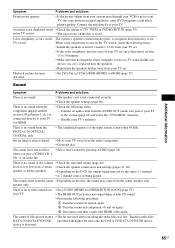
... the TV screen, check the following status. - Sound Symptom Problems and solutions There is no sound from the AUDIO OUT (audio out) jack of the input stream is placed near the speakers. • Reposition the speakers farther away from the center speaker only. There is no sound or the volume •...
... the TV screen, check the following status. - Sound Symptom Problems and solutions There is no sound from the AUDIO OUT (audio out) jack of the input stream is placed near the speakers. • Reposition the speakers farther away from the center speaker only. There is no sound or the volume •...
Operating Instructions
Page 70
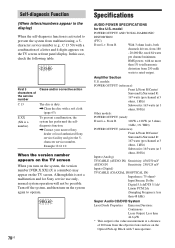
... 250 milli watts to rated output. To prevent a malfunction, the system has performed the selfdiagnosis function. ,Contact your nearest Sony dealer or local authorized Sony service facility and give the 5character service number. Although this case, check the following table. VER.X.XX 70US Specifications AUDIO POWER... turn on the system, the version number [VER.X.XX] (X is a number) may appear on the TV screen or front panel display. Input Stream: Dolby Digital 5.1ch/DTS 5.1ch/ Linear PCM 2ch (Sampling Frequency: less than 48 kHz) Super Audio CD/DVD System Laser Diode ...
... 250 milli watts to rated output. To prevent a malfunction, the system has performed the selfdiagnosis function. ,Contact your nearest Sony dealer or local authorized Sony service facility and give the 5character service number. Although this case, check the following table. VER.X.XX 70US Specifications AUDIO POWER... turn on the system, the version number [VER.X.XX] (X is a number) may appear on the TV screen or front panel display. Input Stream: Dolby Digital 5.1ch/DTS 5.1ch/ Linear PCM 2ch (Sampling Frequency: less than 48 kHz) Super Audio CD/DVD System Laser Diode ...

Marketing Specifications
Page 2
...approximate. All weights and measures are subject to change without written permission is a trademark of Apple Computers, Inc. Sleep Inputs and Outputs Coaxial Audio Digital Input(s): 1 (Rear) Optical Audio Input(s): 1 (Rear) Antenna Terminal (FM 75 Ohm): Yes HDMI™ Connection Output(s): 1 (rear)- Works with ... Yes Audio Tuner Type: FM Station Preset(s): 20 FM Audio Power Output: Amplifier: 1000W (167 x 5 at www.sony.com/dn Last Updated: 02/24/2010 Multi- DAV-DZ170 Features Video HDMI™ Upscaling: Yes4 (upto 1080p) DVD (VR Mode) Playback: Yes2 DVD Playback: Yes2 DVD+R DL...
...approximate. All weights and measures are subject to change without written permission is a trademark of Apple Computers, Inc. Sleep Inputs and Outputs Coaxial Audio Digital Input(s): 1 (Rear) Optical Audio Input(s): 1 (Rear) Antenna Terminal (FM 75 Ohm): Yes HDMI™ Connection Output(s): 1 (rear)- Works with ... Yes Audio Tuner Type: FM Station Preset(s): 20 FM Audio Power Output: Amplifier: 1000W (167 x 5 at www.sony.com/dn Last Updated: 02/24/2010 Multi- DAV-DZ170 Features Video HDMI™ Upscaling: Yes4 (upto 1080p) DVD (VR Mode) Playback: Yes2 DVD Playback: Yes2 DVD+R DL...


