
XL-UH240 Operation Manual
Page 2
Important Instruction XL-UH240 SPECIAL NOTES CAUTION: TO REDUCE THE RISK OF ELECTRIC SHOCK, DO NOT REMOVE COVER (OR BACK). REFER SERVICING TO QUALIFIED SERVICE PERSONNEL. WARNING: TO REDUCE ... harmful interference to the presence of the unit. use of controls or adjustments or performance of U.S. This equipment generates, uses, and can be determined by turning the equipment off and on a circuit different from that may result in the literature accompanying the appliance. Note: Licensed under one or more of procedures...
Important Instruction XL-UH240 SPECIAL NOTES CAUTION: TO REDUCE THE RISK OF ELECTRIC SHOCK, DO NOT REMOVE COVER (OR BACK). REFER SERVICING TO QUALIFIED SERVICE PERSONNEL. WARNING: TO REDUCE ... harmful interference to the presence of the unit. use of controls or adjustments or performance of U.S. This equipment generates, uses, and can be determined by turning the equipment off and on a circuit different from that may result in the literature accompanying the appliance. Note: Licensed under one or more of procedures...
XL-UH240 Operation Manual
Page 6
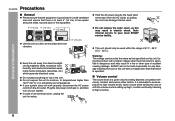
XL-UH240 Precautions General Please ensure that the equipment is positioned in a well-ventilated area and...any damage resulting from use of accident causing damage. Plug the AC power cord back in, and then turn on your local SHARP service facility. Warning: The voltage used within the range of the unit. If your system does not ... The sound level at high volumes. 6 It is advisable to avoid exposure to high volume levels, which occurs while turning the unit on speaker efficiency, location and various other than that which generate electrical noise. ment (home computers, facsimiles,...
XL-UH240 Precautions General Please ensure that the equipment is positioned in a well-ventilated area and...any damage resulting from use of accident causing damage. Plug the AC power cord back in, and then turn on your local SHARP service facility. Warning: The voltage used within the range of the unit. If your system does not ... The sound level at high volumes. 6 It is advisable to avoid exposure to high volume levels, which occurs while turning the unit on speaker efficiency, location and various other than that which generate electrical noise. ment (home computers, facsimiles,...
XL-UH240 Operation Manual
Page 11
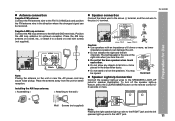
...). The right speaker is the one on the speakers. SPEAKERS RATED SPEAKER IMPEDANCE: 6 OHMS MIN. XL-UH240 Preparation for Use Antenna connection Supplied FM antenna: Connect the FM antenna wire to the AM and GND terminals. To turn off the speaker light-up feature, press the CLEAR/DIMMER button on a shelf, etc., or...
...). The right speaker is the one on the speakers. SPEAKERS RATED SPEAKER IMPEDANCE: 6 OHMS MIN. XL-UH240 Preparation for Use Antenna connection Supplied FM antenna: Connect the FM antenna wire to the AM and GND terminals. To turn off the speaker light-up feature, press the CLEAR/DIMMER button on a shelf, etc., or...
XL-UH240 Operation Manual
Page 13
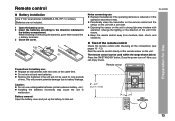
... interfere with a soft cloth. Battery removal: Open the battery cover and pull up the battery to the direction indicated in the battery compartment. Remote control XL-UH240 Battery installation Use 2 "AA" size batteries (UM/SUM-3, R6, HP-7 or similar). Batteries are not included. 1 Open the battery cover. 2 Insert...to take out. 13 When inserting or removing the batteries, push them toward the battery terminals. 3 Close the cover. Does the power turn on the unit to strong light may cause the unit to battery leakage. Preparation for Use Precautions for long periods of the unit if ...
... interfere with a soft cloth. Battery removal: Open the battery cover and pull up the battery to the direction indicated in the battery compartment. Remote control XL-UH240 Battery installation Use 2 "AA" size batteries (UM/SUM-3, R6, HP-7 or similar). Batteries are not included. 1 Open the battery cover. 2 Insert...to take out. 13 When inserting or removing the batteries, push them toward the battery terminals. 3 Close the cover. Does the power turn on the unit to strong light may cause the unit to battery leakage. Preparation for Use Precautions for long periods of the unit if ...

XL-UH240 Operation Manual
Page 14
... starts at 16 and fades in If you turn on/off the light, hold down the CLEAR/DIMMER button on the remote control for 2 seconds or more than 2 seconds. For pop music. Basic Operation To turn the power on. For jazz. XL-UH240 General control POWER ON/STANDBY Volume control Main ...unit operation: When the VOLUME control is first turned on, the unit will enter the extra bass mode which emphasizes the bass frequencies, ...
... starts at 16 and fades in If you turn on/off the light, hold down the CLEAR/DIMMER button on the remote control for 2 seconds or more than 2 seconds. For pop music. Basic Operation To turn the power on. For jazz. XL-UH240 General control POWER ON/STANDBY Volume control Main ...unit operation: When the VOLUME control is first turned on, the unit will enter the extra bass mode which emphasizes the bass frequencies, ...
XL-UH240 Operation Manual
Page 15
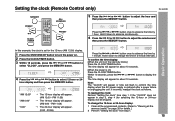
...firm the time display: [When the unit is set for the 12-hour (AM 12:00) display. 1 Press the ON/STAND-BY button to turn the power on. 2 Press the CLOCK/TIMER button. 3 Within 10 seconds, press the or button to select "CLOCK", and press the MEMORY button. 4 Press ...-hour display) will appear for about 10 seconds. To readjust the clock: Perform "Setting the clock" from step 1. 15 Setting the clock (Remote Control only) XL-UH240 5 Press the or button to "Clearing all the programmed contents. [Refer to adjust the hour and then press the MEMORY button. Hold it down to...
...firm the time display: [When the unit is set for the 12-hour (AM 12:00) display. 1 Press the ON/STAND-BY button to turn the power on. 2 Press the CLOCK/TIMER button. 3 Within 10 seconds, press the or button to select "CLOCK", and press the MEMORY button. 4 Press ...-hour display) will appear for about 10 seconds. To readjust the clock: Perform "Setting the clock" from step 1. 15 Setting the clock (Remote Control only) XL-UH240 5 Press the or button to "Clearing all the programmed contents. [Refer to adjust the hour and then press the MEMORY button. Hold it down to...
XL-UH240 Operation Manual
Page 16
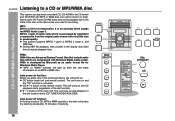
... files that was used for recording. CD button (main unit and remote control): The unit turns on . Auto power on function: When you press any of the following buttons, the unit turns on and the "CD" function is processed by significant compression from its actual playback time....starts (regardless of the last function). / button on the main unit: The unit turns on an MP3 or WMA disc. It is developed by mode after the unit reads information on and playback of compression. XL-UH240 Listening to the state of the disc or the device that include audio fi...
... files that was used for recording. CD button (main unit and remote control): The unit turns on . Auto power on function: When you press any of the following buttons, the unit turns on and the "CD" function is processed by significant compression from its actual playback time....starts (regardless of the last function). / button on the main unit: The unit turns on an MP3 or WMA disc. It is developed by mode after the unit reads information on and playback of compression. XL-UH240 Listening to the state of the disc or the device that include audio fi...

XL-UH240 Operation Manual
Page 17
...tracks on the disc time of the disc of files Due to the structure of the 1 - 5 buttons and within 5 seconds, press the OPEN/CLOSE button. XL-UH240 Playback will be skipped. After that disc finishes playing, the next disc will stop mode, press the 1 - 5 button and within 5 seconds, press the... (CD ) button. It may cause malfunctions. 1 Press the ON/STAND-BY button to turn the power on again. Be sure to place 3" (8 cm) disc in one of the disc information, it is damaged, dirty, or loaded upside down, the...
...tracks on the disc time of the disc of files Due to the structure of the 1 - 5 buttons and within 5 seconds, press the OPEN/CLOSE button. XL-UH240 Playback will be skipped. After that disc finishes playing, the next disc will stop mode, press the 1 - 5 button and within 5 seconds, press the... (CD ) button. It may cause malfunctions. 1 Press the ON/STAND-BY button to turn the power on again. Be sure to place 3" (8 cm) disc in one of the disc information, it is damaged, dirty, or loaded upside down, the...

XL-UH240 Operation Manual
Page 27
Listening to the radio POWER ON/STANDBY XL-UH240 Tuning 1 Press the ON/STAND-BY button to turn the power on. 2 Press the TUNER (BAND) button repeatedly to select the desired frequency band (FM or AM). 3 Press the TUNING ( or ) button on and ... function: When you press any of the last function starts (CD,TUNER,VIDEO/AUX/USB). TUNER (BAND) button (main unit and remote control): The unit turns on the remote control to tune in to extinguish the "ST" indicator. To receive an FM stereo transmission: Press the TUNER (BAND) button to monaural...
Listening to the radio POWER ON/STANDBY XL-UH240 Tuning 1 Press the ON/STAND-BY button to turn the power on. 2 Press the TUNER (BAND) button repeatedly to select the desired frequency band (FM or AM). 3 Press the TUNING ( or ) button on and ... function: When you press any of the last function starts (CD,TUNER,VIDEO/AUX/USB). TUNER (BAND) button (main unit and remote control): The unit turns on the remote control to tune in to extinguish the "ST" indicator. To receive an FM stereo transmission: Press the TUNER (BAND) button to monaural...
XL-UH240 Operation Manual
Page 29
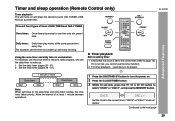
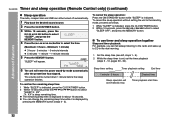
... playback: Load discs to select "ONCE" or "DAILY", and press the MEMORY button. Timer and sleep operation (Remote Control only) Timer playback: The unit turns on . 2 Press the CLOCK/TIMER button. 3 Within 10 seconds, press the or button to be played. 1 minute or more Daily timer Once timer ... wake-up . 1 Set the daily timer (pages 29 - 31). 2 Set the once timer (pages 29 - 31). Set the clock to the next page 29 XL-UH240 Once timer: Once timer play works at a preset time. Advanced Features Daily timer: Daily timer play works for the daily timer and once timer overlap...
... playback: Load discs to select "ONCE" or "DAILY", and press the MEMORY button. Timer and sleep operation (Remote Control only) Timer playback: The unit turns on . 2 Press the CLOCK/TIMER button. 3 Within 10 seconds, press the or button to be played. 1 minute or more Daily timer Once timer ... wake-up . 1 Set the daily timer (pages 29 - 31). 2 Set the once timer (pages 29 - 31). Set the clock to the next page 29 XL-UH240 Once timer: Once timer play works at a preset time. Advanced Features Daily timer: Daily timer play works for the daily timer and once timer overlap...
XL-UH240 Operation Manual
Page 30
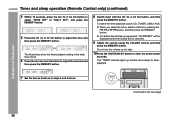
... then press the MEMORY button. 8 Switch input with the or press the MEMORY button. Continued to adjust the hour and then press the MEMORY button. XL-UH240 Timer and sleep operation (Remote Control only) (continued) 4 Within 10 seconds, press the or button to select "ONCE SET" or "DAILY SET", and press .... Advanced Features 7 Set the time to finish as in the daily timer mode. 6 Press the or button to enter the power stand- Do not turn the volume up and the unit is ready for timer playback. If a station has not been programmed, "NO PRESET" will be displayed and timer setting...
... then press the MEMORY button. 8 Switch input with the or press the MEMORY button. Continued to adjust the hour and then press the MEMORY button. XL-UH240 Timer and sleep operation (Remote Control only) (continued) 4 Within 10 seconds, press the or button to select "ONCE SET" or "DAILY SET", and press .... Advanced Features 7 Set the time to finish as in the daily timer mode. 6 Press the or button to enter the power stand- Do not turn the volume up and the unit is ready for timer playback. If a station has not been programmed, "NO PRESET" will be displayed and timer setting...
XL-UH240 Operation Manual
Page 31
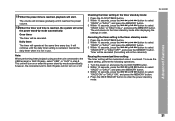
... or button to enter the power stand-by mode after displaying the settings in step 8. Reusing the memorized timer setting: The timer setting will not turn on and press the CLOCK/TIMER button. 2 Within 10 seconds, press the or button to select "ONCE" or "DAILY", and press the MEMORY ..., select "USB" or "AUX" in order. Note: When performing timer playback using another unit connected to the timer stand-by mode. 31 XL-UH240 Advanced Features 11When the preset time is reached, playback will continue until it reaches the preset volume. 12When the timer end time is reached, the...
... or button to enter the power stand-by mode after displaying the settings in step 8. Reusing the memorized timer setting: The timer setting will not turn on and press the CLOCK/TIMER button. 2 Within 10 seconds, press the or button to select "ONCE" or "DAILY", and press the MEMORY ..., select "USB" or "AUX" in order. Note: When performing timer playback using another unit connected to the timer stand-by mode. 31 XL-UH240 Advanced Features 11When the preset time is reached, playback will continue until it reaches the preset volume. 12When the timer end time is reached, the...
XL-UH240 Operation Manual
Page 32
...will be turned off automatically. 1 Play back the desired sound source. 2 Press the CLOCK/TIMER button. 3 Within 10 seconds, press the or button to select "SLEEP", and press the MEMORY button. 4 Press the or button to select "SLEEP OFF", and press the MEMORY button. XL-UH240 Timer ... sleep time: 1 While "SLEEP" is set, set the timer playback (steps 2 - 10, pages 29 - 30). You can all be turned down 1 minute before the sleep operation finishes. Advanced Features 6 The unit will automatically stop. The volume will appear. Sleep timer setting Timer playback ...
...will be turned off automatically. 1 Play back the desired sound source. 2 Press the CLOCK/TIMER button. 3 Within 10 seconds, press the or button to select "SLEEP", and press the MEMORY button. 4 Press the or button to select "SLEEP OFF", and press the MEMORY button. XL-UH240 Timer ... sleep time: 1 While "SLEEP" is set, set the timer playback (steps 2 - 10, pages 29 - 30). You can all be turned down 1 minute before the sleep operation finishes. Advanced Features 6 The unit will automatically stop. The volume will appear. Sleep timer setting Timer playback ...
XL-UH240 Operation Manual
Page 33
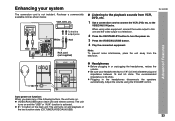
...BAND) Headphones Before plugging in the headphones disconnects the speakers automatically. Be sure your system XL-UH240 SUBWOOFER PRE-OUT The connection cord is not included. VIDEO/AUX/USB button (main unit and remote control): The unit turns on and the "USB" or "AUX" function is 32 ohms. Plugging in or ... using video equipment, connect the audio output to this unit and the video output to a television. 2 Press the ON/STAND-BY button to turn the power on . Auto power on function: When you press any of the last function starts (CD,TUNER,VIDEO/AUX/USB). 33 Enhancing your...
...BAND) Headphones Before plugging in the headphones disconnects the speakers automatically. Be sure your system XL-UH240 SUBWOOFER PRE-OUT The connection cord is not included. VIDEO/AUX/USB button (main unit and remote control): The unit turns on and the "USB" or "AUX" function is 32 ohms. Plugging in or ... using video equipment, connect the audio output to this unit and the video output to a television. 2 Press the ON/STAND-BY button to turn the power on . Auto power on function: When you press any of the last function starts (CD,TUNER,VIDEO/AUX/USB). 33 Enhancing your...
XL-UH240 Operation Manual
Page 34
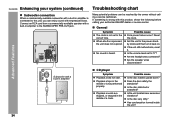
... time. Playback stops in amplifier CD player Symptom Playback does not start. Possible cause Is the disc loaded upside down? XL-UH240 Enhancing your authorized SHARP dealer or service center. SPEAKERS RATED SPEAKER IMPEDANCE: 6 OHMS MIN. If the unit still malfunctions, reset it back on... chart SUBWOOFER PRE-OUT Subwoofer connection When a commercially available subwoofer with a built-in amplifier to the power standby mode and then turn it . Is the disc distorted or scratched? Is the disc very dirty? Is the unit located near excessive vibrations? Has condensation...
... time. Playback stops in amplifier CD player Symptom Playback does not start. Possible cause Is the disc loaded upside down? XL-UH240 Enhancing your authorized SHARP dealer or service center. SPEAKERS RATED SPEAKER IMPEDANCE: 6 OHMS MIN. If the unit still malfunctions, reset it back on... chart SUBWOOFER PRE-OUT Subwoofer connection When a commercially available subwoofer with a built-in amplifier to the power standby mode and then turn it . Is the disc distorted or scratched? Is the disc very dirty? Is the unit located near excessive vibrations? Has condensation...
XL-UH240 Operation Manual
Page 35
...press the POWER ON/STANDBY button until normal playback is not restored in the previous operation, unplug and plug in the unit, and then turn the power on . If this product is subjected to strong external interference (mechanical shock, excessive static electricity, abnormal supply voltage due to... turn the power on again. 2 If the unit is possible (about 1 hour). Is the battery polarity correct? POWER ON/STANDBY Caution: This operation will erase all the memory (reset) 1 Press the ON/STAND-BY button to lightning, etc.) or if it is operated incorrectly, it . XL-UH240 ...
...press the POWER ON/STANDBY button until normal playback is not restored in the previous operation, unplug and plug in the unit, and then turn the power on . If this product is subjected to strong external interference (mechanical shock, excessive static electricity, abnormal supply voltage due to... turn the power on again. 2 If the unit is possible (about 1 hour). Is the battery polarity correct? POWER ON/STANDBY Caution: This operation will erase all the memory (reset) 1 Press the ON/STAND-BY button to lightning, etc.) or if it is operated incorrectly, it . XL-UH240 ...


