
XL-UH240 Operation Manual
Page 3
... you are not sure of the type of power source indicated on the product and in a wet basement; This plug will fit into the outlet, contact your electrician to . 11 Power Sources - IMPORTANT SAFETY INSTRUCTIONS XL-UH240 Important Instruction 1 Read Instructions - lation and... to ensure reliable operation of the product and to protect it from the type of power supply to overturn. 10 Ventilation - The product ...
... you are not sure of the type of power source indicated on the product and in a wet basement; This plug will fit into the outlet, contact your electrician to . 11 Power Sources - IMPORTANT SAFETY INSTRUCTIONS XL-UH240 Important Instruction 1 Read Instructions - lation and... to ensure reliable operation of the product and to protect it from the type of power supply to overturn. 10 Ventilation - The product ...
XL-UH240 Operation Manual
Page 4
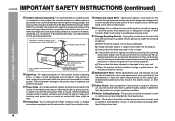
...contact with regard to grounding electrodes, and requirements for the grounding electrode. The product should be situated away from touching such power lines or circuits as they may result in proper operating condition. 24 Wall or Ceiling Mounting - NATIONAL ELECTRICAL CODE S2898A...NFPA 70, provides information with them might be sure the service technician has used replacement parts specified by the manufacturer. 25 Heat - XL-UH240 IMPORTANT SAFETY INSTRUCTIONS (continued) Important Instruction 15 Outdoor Antenna Grounding - Article 810 of time, unplug it can result in a risk...
...contact with regard to grounding electrodes, and requirements for the grounding electrode. The product should be situated away from touching such power lines or circuits as they may result in proper operating condition. 24 Wall or Ceiling Mounting - NATIONAL ELECTRICAL CODE S2898A...NFPA 70, provides information with them might be sure the service technician has used replacement parts specified by the manufacturer. 25 Heat - XL-UH240 IMPORTANT SAFETY INSTRUCTIONS (continued) Important Instruction 15 Outdoor Antenna Grounding - Article 810 of time, unplug it can result in a risk...
XL-UH240 Operation Manual
Page 6
...Information Keep the unit away from use of this unit with a voltage other factors. Plug the AC power cord back in electric shock. Do not remove the outer cover, as this unit. SHARP will not be held responsible for safety. Volume control The sound level at high volumes. 6 In case...cord can damage internal wires. Hold the AC power plug by the head when removing it from the AC outlet. ONP/SOTW ANERDBY CD (TBUANNEDR) VIDEO /AUX USB COLPOESNE/ Do not place anything on top of accident causing damage. XL-UH240 Precautions General Please ensure that the equipment is ...
...Information Keep the unit away from use of this unit with a voltage other factors. Plug the AC power cord back in electric shock. Do not remove the outer cover, as this unit. SHARP will not be held responsible for safety. Volume control The sound level at high volumes. 6 In case...cord can damage internal wires. Hold the AC power plug by the head when removing it from the AC outlet. ONP/SOTW ANERDBY CD (TBUANNEDR) VIDEO /AUX USB COLPOESNE/ Do not place anything on top of accident causing damage. XL-UH240 Precautions General Please ensure that the equipment is ...
XL-UH240 Operation Manual
Page 7
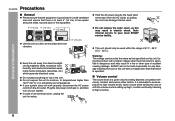
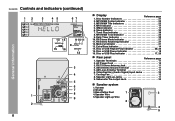
Disc or USB Stop Button 18 5. USB Terminal 24 11. Volume Control 14 13. Disc Tray Open/Close Button 16 General Information 7 Disc Trays 17 2. Remote Sensor 13 4. Disc or USB Play or Repeat Button 16, 20 6. Video/Auxiliary/USB Button 33 10. Disc Number Select Buttons 16 14. Timer Indicator 30 3. CD Button 16 8. Controls and indicators XL-UH240 Front panel Reference page 1. Tuner (Band) Button 27 9. Power ON/STANDBY Button 14 7. Headphone Jack 33 12.
Disc or USB Stop Button 18 5. USB Terminal 24 11. Volume Control 14 13. Disc Tray Open/Close Button 16 General Information 7 Disc Trays 17 2. Remote Sensor 13 4. Disc or USB Play or Repeat Button 16, 20 6. Video/Auxiliary/USB Button 33 10. Disc Number Select Buttons 16 14. Timer Indicator 30 3. CD Button 16 8. Controls and indicators XL-UH240 Front panel Reference page 1. Tuner (Band) Button 27 9. Power ON/STANDBY Button 14 7. Headphone Jack 33 12.
XL-UH240 Operation Manual
Page 8
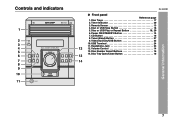
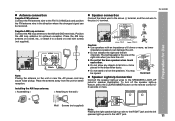
...18 16. Speaker Light-up Wire 2 4 5 Daily Timer Indicator 30 10. Extra Bass Indicator 14 14. FM 75 Ohms Antenna Jack 11 4. XL-UH240 Controls and indicators (continued) 12 3 45 67 General Information 13 14 15 16 9 10 11 8 12 3 4 ANTENNA FM GND AM 75 ... Indicator 27 12. Disc or USB Play Indicator 17, 26 Rear panel Reference page 1. Disc Number Indicators 21 2. MP3/WMA Title Indicators 23 4. AC Power Cord 12 3. MP3 Indicator 17 5. Timer Play Indicator 30 8. SPEAKERS LIGHT-UP LEFT RIGHT 8 1 AC INPUT RIGHT LEFT 9 SUBWOOFER PRE-OUT 2...
...18 16. Speaker Light-up Wire 2 4 5 Daily Timer Indicator 30 10. Extra Bass Indicator 14 14. FM 75 Ohms Antenna Jack 11 4. XL-UH240 Controls and indicators (continued) 12 3 45 67 General Information 13 14 15 16 9 10 11 8 12 3 4 ANTENNA FM GND AM 75 ... Indicator 27 12. Disc or USB Play Indicator 17, 26 Rear panel Reference page 1. Disc Number Indicators 21 2. MP3/WMA Title Indicators 23 4. AC Power Cord 12 3. MP3 Indicator 17 5. Timer Play Indicator 30 8. SPEAKERS LIGHT-UP LEFT RIGHT 8 1 AC INPUT RIGHT LEFT 9 SUBWOOFER PRE-OUT 2...
XL-UH240 Operation Manual
Page 9
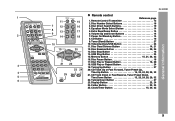
... 23. Remote Control Transmitter 13 2. Power On/Stand-by Button 14 8. CD Button 16 9. Memory Button 15, 21, 28, 32 16. Equalizer Mode Select Button 14 17 5. Volume Up and Down Buttons 14 2 14 18 7. Disc Play or Repeat Button 16, 20 3 21 22 18. XL-UH240 General Information Remote control 1 Reference page...
... 23. Remote Control Transmitter 13 2. Power On/Stand-by Button 14 8. CD Button 16 9. Memory Button 15, 21, 28, 32 16. Equalizer Mode Select Button 14 17 5. Volume Up and Down Buttons 14 2 14 18 7. Disc Play or Repeat Button 16, 20 3 21 22 18. XL-UH240 General Information Remote control 1 Reference page...
XL-UH240 Operation Manual
Page 11
SPEAKERS RATED SPEAKER IMPEDANCE: 6 OHMS MIN. The right speaker is the one on the unit or near the AC power cord may be injured. Do not allow any objects to fall into or to be received. To turn off the speaker light-up wires to ... can damage the unit. RIGHT LEFT Incorrect Speaker Light-Up Connection Connect the speaker light-up feature, press the CLEAR/DIMMER button on the speakers. XL-UH240 Preparation for Use Antenna connection Supplied FM antenna: Connect the FM antenna wire to the FM 75 OHMS jack and position the FM antenna wire...
SPEAKERS RATED SPEAKER IMPEDANCE: 6 OHMS MIN. The right speaker is the one on the unit or near the AC power cord may be injured. Do not allow any objects to fall into or to be received. To turn off the speaker light-up wires to ... can damage the unit. RIGHT LEFT Incorrect Speaker Light-Up Connection Connect the speaker light-up feature, press the CLEAR/DIMMER button on the speakers. XL-UH240 Preparation for Use Antenna connection Supplied FM antenna: Connect the FM antenna wire to the FM 75 OHMS jack and position the FM antenna wire...
XL-UH240 Operation Manual
Page 12
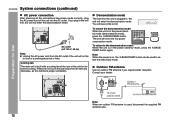
... IN RIGHT LEFT SPEAKERS LIGHT-UP LEFT RIGHT SUBWOOFER PRE-OUT AC outlet (AC 120 V, 60 Hz) Note: Unplug the AC power cord from the AC outlet if the unit will not be used , disconnect the supplied FM antenna wire. 12 Note: When the...the unit will enter the demonstration mode. SPEAKERS RATED SPEAKER IMPEDANCE: 6 OHMS MIN. XL-UH240 System connections (continued) Preparation for Use AC power connection After checking all the connections have been made correctly, plug the AC power cord of this will block proper ventilation. AACCIINNPPUUTT RRIIGGHHTT LLEEFFTT ANTENNA FM GND AM 75...
... IN RIGHT LEFT SPEAKERS LIGHT-UP LEFT RIGHT SUBWOOFER PRE-OUT AC outlet (AC 120 V, 60 Hz) Note: Unplug the AC power cord from the AC outlet if the unit will not be used , disconnect the supplied FM antenna wire. 12 Note: When the...the unit will enter the demonstration mode. SPEAKERS RATED SPEAKER IMPEDANCE: 6 OHMS MIN. XL-UH240 System connections (continued) Preparation for Use AC power connection After checking all the connections have been made correctly, plug the AC power cord of this will block proper ventilation. AACCIINNPPUUTT RRIIGGHHTT LLEEFFTT ANTENNA FM GND AM 75...
XL-UH240 Operation Manual
Page 13
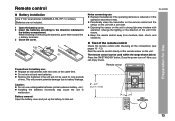
Keep the remote control away from moisture, heat, shock, and vibrations. Does the power turn on the unit. Now, you can be used within the range shown below: Press the ON/STAND-BY button. Do not mix old and ... the remote control directly at the same time. Remove the batteries if the unit will prevent potential damage due to take out. 13 Remote control XL-UH240 Battery installation Use 2 "AA" size batteries (UM/SUM-3, R6, HP-7 or similar). Exposing the sensor on the unit with new ones at the remote sensor...
Keep the remote control away from moisture, heat, shock, and vibrations. Does the power turn on the unit. Now, you can be used within the range shown below: Press the ON/STAND-BY button. Do not mix old and ... the remote control directly at the same time. Remove the batteries if the unit will prevent potential damage due to take out. 13 Remote control XL-UH240 Battery installation Use 2 "AA" size batteries (UM/SUM-3, R6, HP-7 or similar). Exposing the sensor on the unit with new ones at the remote sensor...

XL-UH240 Operation Manual
Page 14
... the EQUALIZER MODE button is turned counterclockwise, the volume will decrease. For pop music. Vocals are enhanced. Basic Operation To turn the power on Press the ON/STAND-BY button to increase or decrease the volume. 0 ..... 30 MAXIMUM Bass control When the...EQUALIZER MODE button repeatedly until the desired sound mode appears. Illumination light control When the power is turned clockwise, the volume will light up . To change to enter the power stand-by mode. XL-UH240 General control POWER ON/STANDBY Volume control Main unit operation: When the VOLUME control is turned on, ...
... the EQUALIZER MODE button is turned counterclockwise, the volume will decrease. For pop music. Vocals are enhanced. Basic Operation To turn the power on Press the ON/STAND-BY button to increase or decrease the volume. 0 ..... 30 MAXIMUM Bass control When the...EQUALIZER MODE button repeatedly until the desired sound mode appears. Illumination light control When the power is turned clockwise, the volume will light up . To change to enter the power stand-by mode. XL-UH240 General control POWER ON/STANDBY Volume control Main unit operation: When the VOLUME control is turned on, ...
XL-UH240 Operation Manual
Page 15
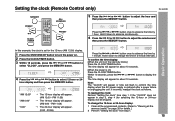
... seconds. Hold it down to advance the time by 1 minute. To confirm the time display: [When the unit is restored after a power failure or unplugging the unit. If incorrect, readjust the clock as follows. Basic Operation Press the or button once to change the 12-hour or... display when the AC power supply is in the stand-by mode] Press the CLOCK/TIMER button. "AM 12:00" "AM 0:00" "0:00" The 12-hour display will appear. (AM 0:00 - If the "CLOCK" does not appear in 5-minute intervals. Setting the clock (Remote Control only) XL-UH240 5 Press the or...
... seconds. Hold it down to advance the time by 1 minute. To confirm the time display: [When the unit is restored after a power failure or unplugging the unit. If incorrect, readjust the clock as follows. Basic Operation Press the or button once to change the 12-hour or... display when the AC power supply is in the stand-by mode] Press the CLOCK/TIMER button. "AM 12:00" "AM 0:00" "0:00" The 12-hour display will appear. (AM 0:00 - If the "CLOCK" does not appear in 5-minute intervals. Setting the clock (Remote Control only) XL-UH240 5 Press the or...
XL-UH240 Operation Manual
Page 16
... CD, CD-R/RW in the CD format and CD-R/RW with Windows Media Audio codec. Auto power on . "MP3" or "WMA" indicator will light up after 15 minutes of the last function... of the following buttons, the unit turns on function: When you press any of compression. POWER ON/STANDBY CD CD or MP3/WMA disc Playback WMA: WMA files are Advanced System...power off function: In the stop mode of CD, MP3 or WMA operation, the main unit enters the stand-by mode after the unit reads information on and the "CD" function is a type of audio code which stands for MPEG Audio Layer 3. XL-UH240...
... CD, CD-R/RW in the CD format and CD-R/RW with Windows Media Audio codec. Auto power on . "MP3" or "WMA" indicator will light up after 15 minutes of the last function... of the following buttons, the unit turns on function: When you press any of compression. POWER ON/STANDBY CD CD or MP3/WMA disc Playback WMA: WMA files are Advanced System...power off function: In the stop mode of CD, MP3 or WMA operation, the main unit enters the stand-by mode after the unit reads information on and the "CD" function is a type of audio code which stands for MPEG Audio Layer 3. XL-UH240...

XL-UH240 Operation Manual
Page 17
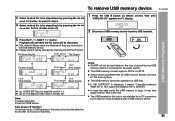
...place discs on the trays 2 - 5 by mode and then turn the power on. 2 Press the CD button. 3 Press the 1 button and within 5 seconds, press the OPEN/CLOSE button and exchange discs. If the disc tray is moving. XL-UH240 Playback will not function. It may cause malfunctions. If TV or radio ...interference occurs during CD operation, move the unit away from track 1 on DISC 1. 1 Press the ON/STAND-BY button to turn the power on again. When there is damaged, dirty,...
...place discs on the trays 2 - 5 by mode and then turn the power on. 2 Press the CD button. 3 Press the 1 button and within 5 seconds, press the OPEN/CLOSE button and exchange discs. If the disc tray is moving. XL-UH240 Playback will not function. It may cause malfunctions. If TV or radio ...interference occurs during CD operation, move the unit away from track 1 on DISC 1. 1 Press the ON/STAND-BY button to turn the power on again. When there is damaged, dirty,...
XL-UH240 Operation Manual
Page 25
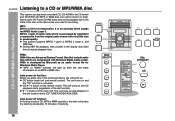
...Artist & Album name are displayed if they are recorded in this audio system. Note: To pause playback: Press the CD button. Auto power off ) To remove USB memory device XL-UH240 1 Press the USB button on FL display. 2 Disconnect USB memory device from the USB terminal. 5 Press the / (USB / )...with a USB memory device. File Name Display TITLE-1 Indicator Title Display USB Memory Playback Function Display ( 1) TITLE-2 Indicator Artist Display Notes: SHARP will not be played back by pressing the or button. (Folder mode off function: In the stop mode of USB operation, the main unit...
...Artist & Album name are displayed if they are recorded in this audio system. Note: To pause playback: Press the CD button. Auto power off ) To remove USB memory device XL-UH240 1 Press the USB button on FL display. 2 Disconnect USB memory device from the USB terminal. 5 Press the / (USB / )...with a USB memory device. File Name Display TITLE-1 Indicator Title Display USB Memory Playback Function Display ( 1) TITLE-2 Indicator Artist Display Notes: SHARP will not be played back by pressing the or button. (Folder mode off function: In the stop mode of USB operation, the main unit...

XL-UH240 Operation Manual
Page 27
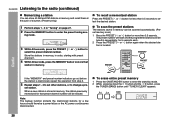
Listening to the radio POWER ON/STANDBY XL-UH240 Tuning 1 Press the ON/STAND-BY button to turn the power on. 2 Press the TUNER (BAND) button repeatedly to select the desired frequency band (FM or AM). 3 Press the TUNING ( or ) button on function: When you ... ) button again. To stop automatically at the first receivable broadcast station. " " will stop at that point. Auto scan tuning will skip weak signal stations. Auto power on the remote control to tune in to the desired station. Radio TUNER (BAND) Manual tuning: Press the TUNING ( or ) button as many times as...
Listening to the radio POWER ON/STANDBY XL-UH240 Tuning 1 Press the ON/STAND-BY button to turn the power on. 2 Press the TUNER (BAND) button repeatedly to select the desired frequency band (FM or AM). 3 Press the TUNING ( or ) button on function: When you ... ) button again. To stop automatically at the first receivable broadcast station. " " will stop at that point. Auto scan tuning will skip weak signal stations. Auto power on the remote control to tune in to the desired station. Radio TUNER (BAND) Manual tuning: Press the TUNING ( or ) button as many times as...
XL-UH240 Operation Manual
Page 28
... a button. (Preset tuning) 1 Perform steps 1 - 3 in "Tuning" on page 27. 2 Press the MEMORY button to enter the preset tuning sav- XL-UH240 Listening to the radio (continued) Memorizing a station You can be scanned automatically. (Preset memory scan) 1 Press the PRESET ( or ) button for more than... 2. 5 Repeat steps 1 - 4 to set station. set other stations, or to store that preset channel number will be a power failure or the AC power cord become disconnected. Radio If the "MEMORY" and preset number indicators go out before the station is stored in memory. ing mode....
... a button. (Preset tuning) 1 Perform steps 1 - 3 in "Tuning" on page 27. 2 Press the MEMORY button to enter the preset tuning sav- XL-UH240 Listening to the radio (continued) Memorizing a station You can be scanned automatically. (Preset memory scan) 1 Press the PRESET ( or ) button for more than... 2. 5 Repeat steps 1 - 4 to set station. set other stations, or to store that preset channel number will be a power failure or the AC power cord become disconnected. Radio If the "MEMORY" and preset number indicators go out before the station is stored in memory. ing mode....
XL-UH240 Operation Manual
Page 29
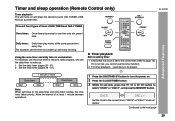
.... Timer playback Before setting timer: 1 Check that the clock is not set, you cannot use the daily timer to wake up call every morning. XL-UH240 Once timer: Once timer play works at a preset time. Timer and sleep operation (Remote Control only) Timer playback: The unit turns on and plays... the desired source (CD, TUNER, USB, AUX) at least 1 minute between operations. 1 Press the ON/STAND-BY button to turn the power on. 2 Press the CLOCK/TIMER button. 3 Within 10 seconds, press the or button to select "ONCE" or "DAILY", and press the MEMORY button. ...
.... Timer playback Before setting timer: 1 Check that the clock is not set, you cannot use the daily timer to wake up call every morning. XL-UH240 Once timer: Once timer play works at a preset time. Timer and sleep operation (Remote Control only) Timer playback: The unit turns on and plays... the desired source (CD, TUNER, USB, AUX) at least 1 minute between operations. 1 Press the ON/STAND-BY button to turn the power on. 2 Press the CLOCK/TIMER button. 3 Within 10 seconds, press the or button to select "ONCE" or "DAILY", and press the MEMORY button. ...
XL-UH240 Operation Manual
Page 30
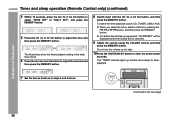
... by pressing the or button, and then press the MEMORY button. button, and then To select the timer playback source: CD, TUNER, USB or AUX. XL-UH240 Timer and sleep operation (Remote Control only) (continued) 4 Within 10 seconds, press the or button to select "ONCE SET" or "DAILY SET", and ...press the MEMORY button. 5 Press the or button to enter the power stand- When you select the tuner, select a station by mode. If a station has not been programmed, "NO PRESET" will be displayed and timer ...
... by pressing the or button, and then press the MEMORY button. button, and then To select the timer playback source: CD, TUNER, USB or AUX. XL-UH240 Timer and sleep operation (Remote Control only) (continued) 4 Within 10 seconds, press the or button to select "ONCE SET" or "DAILY SET", and ...press the MEMORY button. 5 Press the or button to enter the power stand- When you select the tuner, select a station by mode. If a station has not been programmed, "NO PRESET" will be displayed and timer ...
XL-UH240 Operation Manual
Page 31
... button to select "ONCE ON" or "DAILY ON", and press the MEMORY button. 4 Press the ON/STAND-BY button to enter the power stand-by mode automatically. XL-UH240 Advanced Features 11When the preset time is not in use. Cancel the daily timer when it is canceled. This unit will turn on... or enter the power stand-by mode: 1 Press the CLOCK/TIMER button. 2 Within 10 seconds, press the or button to select "ONCE" or "DAILY...
... button to select "ONCE ON" or "DAILY ON", and press the MEMORY button. 4 Press the ON/STAND-BY button to enter the power stand-by mode automatically. XL-UH240 Advanced Features 11When the preset time is not in use. Cancel the daily timer when it is canceled. This unit will turn on... or enter the power stand-by mode: 1 Press the CLOCK/TIMER button. 2 Within 10 seconds, press the or button to select "ONCE" or "DAILY...
XL-UH240 Operation Manual
Page 32
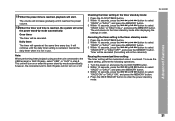
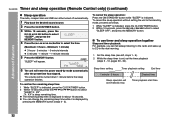
...1 While "SLEEP" is displayed for about 10 seconds. Sleep timer setting Timer playback setting End time 1 minute - 3 hours Sleep operation will enter the power stand-by mode, proceed as follows. 1 While "SLEEP" is indicated, press the CLOCK/TIMER button. 2 Within 10 seconds, press the or button to...to CD in the next morning. 1 Set the sleep time (see left, steps 1 - 5). 2 While the sleep timer is sleep remaining time. XL-UH240 Timer and sleep operation (Remote Control only) (continued) Sleep operation The radio, compact disc and USB can all be turned down 1 minute before the ...
...1 While "SLEEP" is displayed for about 10 seconds. Sleep timer setting Timer playback setting End time 1 minute - 3 hours Sleep operation will enter the power stand-by mode, proceed as follows. 1 While "SLEEP" is indicated, press the CLOCK/TIMER button. 2 Within 10 seconds, press the or button to...to CD in the next morning. 1 Set the sleep time (see left, steps 1 - 5). 2 While the sleep timer is sleep remaining time. XL-UH240 Timer and sleep operation (Remote Control only) (continued) Sleep operation The radio, compact disc and USB can all be turned down 1 minute before the ...


