
XL-UH240 Operation Manual
Page 1
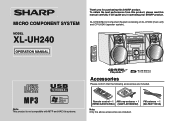
... manual carefully. To obtain the best performance from this product, please read this SHARP product. XL-UH240 Micro Component System consisting of XL-UH240 (main unit) and CP-UH240 (speaker system). Note: This product is not compatible with MTP and AAC file systems. Remote control 1 AM loop antenna 1 FM antenna 1 (RRMCGA081AWSA) (QANTL0010AWZZ) (92LFANT1535A) Note: Only the above...
... manual carefully. To obtain the best performance from this product, please read this SHARP product. XL-UH240 Micro Component System consisting of XL-UH240 (main unit) and CP-UH240 (speaker system). Note: This product is not compatible with MTP and AAC file systems. Remote control 1 AM loop antenna 1 FM antenna 1 (RRMCGA081AWSA) (QANTL0010AWZZ) (92LFANT1535A) Note: Only the above...
XL-UH240 Operation Manual
Page 5
... Maintenance 36 Specifications 37 CONSUMER LIMITED WARRANTY Back cover 5 registered mark. 0312 Contents XL-UH240 Page General Information Precautions 6 Controls and indicators 7 - 9 Preparation for Use System connections 10 - 12 Remote control 13 Basic Operation General control 14 Setting the clock (Remote Control only 15 Important Instruction CD or MP3/WMA disc Playback Listening to...
... Maintenance 36 Specifications 37 CONSUMER LIMITED WARRANTY Back cover 5 registered mark. 0312 Contents XL-UH240 Page General Information Precautions 6 Controls and indicators 7 - 9 Preparation for Use System connections 10 - 12 Remote control 13 Basic Operation General control 14 Setting the clock (Remote Control only 15 Important Instruction CD or MP3/WMA disc Playback Listening to...
XL-UH240 Operation Manual
Page 7
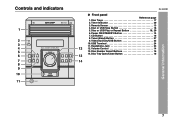
Disc Tray Open/Close Button 16 General Information 7 Disc Trays 17 2. Disc or USB Play or Repeat Button 16, 20 6. Remote Sensor 13 4. Disc or USB Stop Button 18 5. CD Button 16 8. Power ON/STANDBY Button 14 7. USB Terminal 24 11. Timer Indicator 30 3. Tuner (Band) Button 27 9. Headphone Jack 33 12. Disc Number Select Buttons 16 14. Controls and indicators XL-UH240 Front panel Reference page 1. Volume Control 14 13. Video/Auxiliary/USB Button 33 10.
Disc Tray Open/Close Button 16 General Information 7 Disc Trays 17 2. Disc or USB Play or Repeat Button 16, 20 6. Remote Sensor 13 4. Disc or USB Stop Button 18 5. CD Button 16 8. Power ON/STANDBY Button 14 7. USB Terminal 24 11. Timer Indicator 30 3. Tuner (Band) Button 27 9. Headphone Jack 33 12. Disc Number Select Buttons 16 14. Controls and indicators XL-UH240 Front panel Reference page 1. Volume Control 14 13. Video/Auxiliary/USB Button 33 10.
XL-UH240 Operation Manual
Page 9
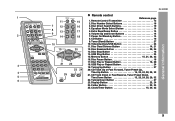
..., 26 13. Disc Clear/Dimmer Button 14, 21 19 20 12. USB Play or Repeat Button 24 19. Tuning Down Button 27 23. Remote Control Transmitter 13 2. Display Button 23, 24 24. XL-UH240 General Information Remote control 1 Reference page 11 15 1. Equalizer Mode Select Button 14 17 5. Power On/Stand-by Button 14 8.
..., 26 13. Disc Clear/Dimmer Button 14, 21 19 20 12. USB Play or Repeat Button 24 19. Tuning Down Button 27 23. Remote Control Transmitter 13 2. Display Button 23, 24 24. XL-UH240 General Information Remote control 1 Reference page 11 15 1. Equalizer Mode Select Button 14 17 5. Power On/Stand-by Button 14 8.
XL-UH240 Operation Manual
Page 11
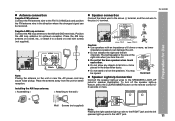
... is the one on the speakers. You may cause noise pickup. RATED S6SPPOEAEHKAMEKSREMIRMISNP.EDANCE: Do not let the bare speaker wires touch each other. XL-UH240 Preparation for Use Antenna connection Supplied FM antenna: Connect the FM antenna wire to the FM 75 OHMS jack and position the FM antenna wire...-OUT SPEAKERS LIGHT-UP LEFT RIGHT RIGHT LEFT Red Black Caution: Use speakers with screws (not supplied). Place the AM loop antenna on the remote control for optimum reception. Wall Screws (not supplied) Note: Placing the right speaker light-up wire to the LEFT jack. 11
... is the one on the speakers. You may cause noise pickup. RATED S6SPPOEAEHKAMEKSREMIRMISNP.EDANCE: Do not let the bare speaker wires touch each other. XL-UH240 Preparation for Use Antenna connection Supplied FM antenna: Connect the FM antenna wire to the FM 75 OHMS jack and position the FM antenna wire...-OUT SPEAKERS LIGHT-UP LEFT RIGHT RIGHT LEFT Red Black Caution: Use speakers with screws (not supplied). Place the AM loop antenna on the remote control for optimum reception. Wall Screws (not supplied) Note: Placing the right speaker light-up wire to the LEFT jack. 11
XL-UH240 Operation Manual
Page 13
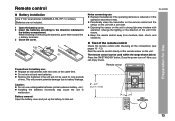
... the range shown below: Press the ON/STAND-BY button. Notes concerning use rechargeable batteries (nickel-cadmium battery, etc.). The remote control can enjoy music. Exposing the sensor on ? Does the power turn on the unit to strong light may cause the unit... Replace all the connections (see pages 10 - 12). Periodically clean the transmitter on the remote control and the sensor on the unit. Installing the batteries incorrectly may interfere with a soft cloth. Remote control XL-UH240 Battery installation Use 2 "AA" size batteries (UM/SUM-3, R6, HP-7 or similar...
... the range shown below: Press the ON/STAND-BY button. Notes concerning use rechargeable batteries (nickel-cadmium battery, etc.). The remote control can enjoy music. Exposing the sensor on ? Does the power turn on the unit to strong light may cause the unit... Replace all the connections (see pages 10 - 12). Periodically clean the transmitter on the remote control and the sensor on the unit. Installing the batteries incorrectly may interfere with a soft cloth. Remote control XL-UH240 Battery installation Use 2 "AA" size batteries (UM/SUM-3, R6, HP-7 or similar...

XL-UH240 Operation Manual
Page 14
... mode appears. Volume auto fade-in to increase or decrease the volume. 0 ..... 30 MAXIMUM Bass control When the power is first turned on the remote control. XL-UH240 General control POWER ON/STANDBY Volume control Main unit operation: When the VOLUME control is turned counterclockwise, the volume will decrease. To cancel the extra...
... mode appears. Volume auto fade-in to increase or decrease the volume. 0 ..... 30 MAXIMUM Bass control When the power is first turned on the remote control. XL-UH240 General control POWER ON/STANDBY Volume control Main unit operation: When the VOLUME control is turned counterclockwise, the volume will decrease. To cancel the extra...
XL-UH240 Operation Manual
Page 15
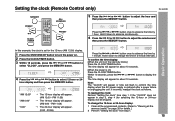
...:00 - To readjust the clock: Perform "Setting the clock" from step 1. 15 To change the time in the stand-by 1 minute. Setting the clock (Remote Control only) XL-UH240 5 Press the or button to advance the time by 1 hour. Basic Operation Press the or button once to adjust the hour and then press...
...:00 - To readjust the clock: Perform "Setting the clock" from step 1. 15 To change the time in the stand-by 1 minute. Setting the clock (Remote Control only) XL-UH240 5 Press the or button to advance the time by 1 hour. Basic Operation Press the or button once to adjust the hour and then press...
XL-UH240 Operation Manual
Page 16
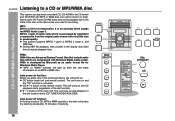
...(CD,TUNER,VIDEO/AUX/USB). It is a form of compression. "MP3" or "WMA" indicator will light up after 15 minutes of inactivity. 16 OPEN/ CLOSE XL-UH240 Listening to the state of the disc or the device that include audio files which is developed by significant compression from its...). / button on the main unit: The unit turns on an MP3 or WMA disc. CD button (main unit and remote control): The unit turns on . CD / button on the remote control: The unit turns on and CD playback starts (regardless of audio code which are compressed with MP3 or WMA fi...
...(CD,TUNER,VIDEO/AUX/USB). It is a form of compression. "MP3" or "WMA" indicator will light up after 15 minutes of inactivity. 16 OPEN/ CLOSE XL-UH240 Listening to the state of the disc or the device that include audio files which is developed by significant compression from its...). / button on the main unit: The unit turns on an MP3 or WMA disc. CD button (main unit and remote control): The unit turns on . CD / button on the remote control: The unit turns on and CD playback starts (regardless of audio code which are compressed with MP3 or WMA fi...
XL-UH240 Operation Manual
Page 18
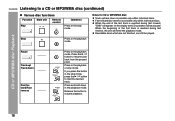
... a CD or MP3/WMA disc (continued) Various disc functions Function Play Main unit Remote control Operation Press in the stop mode, press the / button to resume playback from the paused point. CD or MP3/WMA disc Playback Pause Track up /track down in the playback mode. XL-UH240 Listening to resume playback. 18
... a CD or MP3/WMA disc (continued) Various disc functions Function Play Main unit Remote control Operation Press in the stop mode, press the / button to resume playback from the paused point. CD or MP3/WMA disc Playback Pause Track up /track down in the playback mode. XL-UH240 Listening to resume playback. 18
XL-UH240 Operation Manual
Page 19
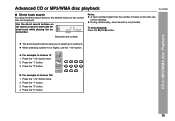
When selecting number 10 or higher, use the "+10" button. Use the direct search buttons on the remote control to number 9. The direct search buttons allow you to select up to select the desired track while playing the selected disc. During random play, ..." button twice. 2 Press the "1" button. 3 Press the "3" button. 4 Press the "0" button. 19 CD or MP3/WMA disc Playback Advanced CD or MP3/WMA disc playback XL-UH240 Direct track search By using the direct search buttons, the desired tracks on the current disc can be selected. B. A. To stop playback: Press the (CD...
When selecting number 10 or higher, use the "+10" button. Use the direct search buttons on the remote control to number 9. The direct search buttons allow you to select up to select the desired track while playing the selected disc. During random play, ..." button twice. 2 Press the "1" button. 3 Press the "3" button. 4 Press the "0" button. 19 CD or MP3/WMA disc Playback Advanced CD or MP3/WMA disc playback XL-UH240 Direct track search By using the direct search buttons, the desired tracks on the current disc can be selected. B. A. To stop playback: Press the (CD...
XL-UH240 Operation Manual
Page 20
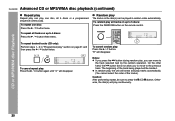
... of the tracks.) Caution: After performing repeat, be sure to the previous track. Otherwise, the disc(s) will disappear. To repeat all tracks on the remote control. To cancel repeat play , you press the button during random play : Press the / button again until " " will play tracks automatically. (... to 5 discs: Press the / button three times. Random play " section on the disc(s) can be located. CD or MP3/WMA disc Playback XL-UH240 Advanced CD or MP3/WMA disc playback (continued) Repeat play Repeat play can play one disc: Press the / button twice. To repeat desired tracks ...
... of the tracks.) Caution: After performing repeat, be sure to the previous track. Otherwise, the disc(s) will disappear. To repeat all tracks on the remote control. To cancel repeat play , you press the button during random play : Press the / button again until " " will play tracks automatically. (... to 5 discs: Press the / button three times. Random play " section on the disc(s) can be located. CD or MP3/WMA disc Playback XL-UH240 Advanced CD or MP3/WMA disc playback (continued) Repeat play Repeat play can play one disc: Press the / button twice. To repeat desired tracks ...
XL-UH240 Operation Manual
Page 21
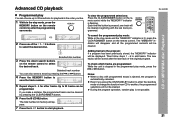
... will be stored after the last track of the 1 - 5 buttons to select the desired disc. 3 Press the direct search buttons on the remote control to select the desired track. Each time the button is flashing. To cancel the programmed play You can be cleared. Adding tracks to the.... The new tracks will appear. 7 Press the / button to start playback. Advanced CD playback XL-UH240 CD or MP3/WMA disc Playback Programmed play mode: While in the stop mode, press the MEMORY button on the remote control to enter the programming save the track number. 5 Repeat steps 2 - 4 for playback...
... will be stored after the last track of the 1 - 5 buttons to select the desired disc. 3 Press the direct search buttons on the remote control to select the desired track. Each time the button is flashing. To cancel the programmed play You can be cleared. Adding tracks to the.... The new tracks will appear. 7 Press the / button to start playback. Advanced CD playback XL-UH240 CD or MP3/WMA disc Playback Programmed play mode: While in the stop mode, press the MEMORY button on the remote control to enter the programming save the track number. 5 Repeat steps 2 - 4 for playback...
XL-UH240 Operation Manual
Page 22
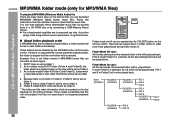
...the next folder will be set folder number if MP3/WMA format files are for folders inside ROOT folder will be set as folder 4. 5. XL-UH240 MP3/WMA folder mode (only for MP3/WMA files) To playback MP3/WMA (Windows Media Audio) file There are many music... information which is no supported file formats inside Folder D will playback the files not according to our expected playback order. Folder mode on the remote control. Follow the instructions from the website on differ from file 3 will be played back. Your downloaded song/files are recorded as folder 5....
...the next folder will be set folder number if MP3/WMA format files are for folders inside ROOT folder will be set as folder 4. 5. XL-UH240 MP3/WMA folder mode (only for MP3/WMA files) To playback MP3/WMA (Windows Media Audio) file There are many music... information which is no supported file formats inside Folder D will playback the files not according to our expected playback order. Folder mode on the remote control. Follow the instructions from the website on differ from file 3 will be played back. Your downloaded song/files are recorded as folder 5....
XL-UH240 Operation Manual
Page 25
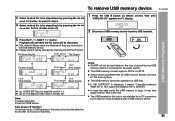
...device. 3 Select desired file to the audio system. Wait until "UNPLUG OK" appears on remote control. Display content can be operated via USB hub. This USB memory's format supports FAT16 or FAT32. (...TITLE-1 Indicator Title Display USB Memory Playback Function Display ( 1) TITLE-2 Indicator Artist Display Notes: SHARP will not be held liable for the loss of inactivity. 25 This USB memory cannot be changed ... to be read. Auto power off ) To remove USB memory device XL-UH240 1 Press the USB button on FL display. 2 Disconnect USB memory device from the USB terminal. 5 Press the ...
...device. 3 Select desired file to the audio system. Wait until "UNPLUG OK" appears on remote control. Display content can be operated via USB hub. This USB memory's format supports FAT16 or FAT32. (...TITLE-1 Indicator Title Display USB Memory Playback Function Display ( 1) TITLE-2 Indicator Artist Display Notes: SHARP will not be held liable for the loss of inactivity. 25 This USB memory cannot be changed ... to be read. Auto power off ) To remove USB memory device XL-UH240 1 Press the USB button on FL display. 2 Disconnect USB memory device from the USB terminal. 5 Press the ...

XL-UH240 Operation Manual
Page 26
... sequence continuously. Copyright protected WMA files cannot be displayed correctly when playing back a variable bitrate file. USB Memory Playback XL-UH240 Advanced USB playback Repeat play Repeat play can be displayed by pressing the DISPLAY button during file playback or pause mode. To ...repeat all tracks: Press the RANDOM button on the remote control. To cancel repeat play : Press the / button. Random play The tracks can be located. "R" will be used during file...
... sequence continuously. Copyright protected WMA files cannot be displayed correctly when playing back a variable bitrate file. USB Memory Playback XL-UH240 Advanced USB playback Repeat play Repeat play can be displayed by pressing the DISPLAY button during file playback or pause mode. To ...repeat all tracks: Press the RANDOM button on the remote control. To cancel repeat play : Press the / button. Random play The tracks can be located. "R" will be used during file...

XL-UH240 Operation Manual
Page 27
...any of the last function starts (CD,TUNER,VIDEO/AUX/USB). The reception changes to the desired station. TUNER (BAND) button (main unit and remote control): The unit turns on and the "TUNER" function is in stereo. FM stereo mode indicator FM stereo receiving indicator 27 " " will appear... pressed for more than 0.5 seconds, scanning will start automatically and the tuner will skip weak signal stations. Listening to the radio POWER ON/STANDBY XL-UH240 Tuning 1 Press the ON/STAND-BY button to turn the power on. 2 Press the TUNER (BAND) button repeatedly to select the desired frequency...
...any of the last function starts (CD,TUNER,VIDEO/AUX/USB). The reception changes to the desired station. TUNER (BAND) button (main unit and remote control): The unit turns on and the "TUNER" function is in stereo. FM stereo mode indicator FM stereo receiving indicator 27 " " will appear... pressed for more than 0.5 seconds, scanning will start automatically and the tuner will skip weak signal stations. Listening to the radio POWER ON/STANDBY XL-UH240 Tuning 1 Press the ON/STAND-BY button to turn the power on. 2 Press the TUNER (BAND) button repeatedly to select the desired frequency...
XL-UH240 Operation Manual
Page 29
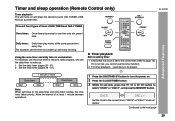
Timer and sleep operation (Remote Control only) Timer playback: The unit turns on . 2 Press the CLOCK/TIMER button. 3 Within 10 seconds, press the or button to select "ONCE" or "DAILY", and press the MEMORY button. XL-UH240 Once timer: Once timer play works at least 1 minute between operations. 1 Press the ON/STAND-BY button...
Timer and sleep operation (Remote Control only) Timer playback: The unit turns on . 2 Press the CLOCK/TIMER button. 3 Within 10 seconds, press the or button to select "ONCE" or "DAILY", and press the MEMORY button. XL-UH240 Once timer: Once timer play works at least 1 minute between operations. 1 Press the ON/STAND-BY button...
XL-UH240 Operation Manual
Page 30
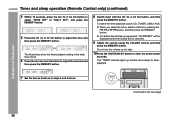
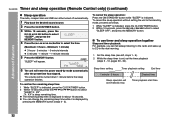
XL-UH240 Timer and sleep operation (Remote Control only) (continued) 4 Within 10 seconds, press the or button to select "ONCE SET" or "DAILY SET", and press the MEMORY button. 5 Press the or ...
XL-UH240 Timer and sleep operation (Remote Control only) (continued) 4 Within 10 seconds, press the or button to select "ONCE SET" or "DAILY SET", and press the MEMORY button. 5 Press the or ...
XL-UH240 Operation Manual
Page 32
... cancel the sleep operation: Press the ON/STAND-BY button while "SLEEP" is sleep remaining time. Desired time Timer playback start time 32 XL-UH240 Timer and sleep operation (Remote Control only) (continued) Sleep operation The radio, compact disc and USB can all be turned down 1 minute before the sleep operation finishes. "X : XX...
... cancel the sleep operation: Press the ON/STAND-BY button while "SLEEP" is sleep remaining time. Desired time Timer playback start time 32 XL-UH240 Timer and sleep operation (Remote Control only) (continued) Sleep operation The radio, compact disc and USB can all be turned down 1 minute before the sleep operation finishes. "X : XX...


