Assembly and Owner's Manual
Page 2
Owner's 19 Features 20 Console Features 21 Contact Heart Rate (CHR) 23 Operations 25 Adjustments 25 Initial Setup 26 Quick Start / Manual Program 26 Workout Program Selection 26 User Setup Mode 26 Custom Workout 29 Profile Programs 29 Fitness ... Moving the Bike 18 Important Safety Instructions - If you have questions or problems with your product warranty, go to: www.SchwinnFitness.com/register Or call 1 (800) NAUTILUS (628-8458). Nautilus, Inc. (www.NautilusInc.com) trademarks include NAUTILUS®, BOWFLEX®, SCHWINN® and UNIVERSAL® and respective...
Owner's 19 Features 20 Console Features 21 Contact Heart Rate (CHR) 23 Operations 25 Adjustments 25 Initial Setup 26 Quick Start / Manual Program 26 Workout Program Selection 26 User Setup Mode 26 Custom Workout 29 Profile Programs 29 Fitness ... Moving the Bike 18 Important Safety Instructions - If you have questions or problems with your product warranty, go to: www.SchwinnFitness.com/register Or call 1 (800) NAUTILUS (628-8458). Nautilus, Inc. (www.NautilusInc.com) trademarks include NAUTILUS®, BOWFLEX®, SCHWINN® and UNIVERSAL® and respective...
Assembly and Owner's Manual
Page 17
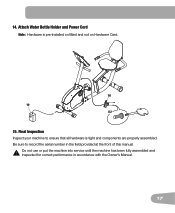
Do not use or put the machine into service until the machine has been fully assembled and inspected for correct performance in the field provided at the front of this manual. ! 14. Final Inspection Inspect your machine to record the serial number in accordance with the Owner's Manual. 17 Be sure to ensure that all hardware is pre-installed on Mast and not on Hardware Card. 16 10 X2 15. Attach Water Bottle Holder and Power Cord Note: Hardware is tight and components are properly assembled.
Do not use or put the machine into service until the machine has been fully assembled and inspected for correct performance in the field provided at the front of this manual. ! 14. Final Inspection Inspect your machine to record the serial number in accordance with the Owner's Manual. 17 Be sure to ensure that all hardware is pre-installed on Mast and not on Hardware Card. 16 10 X2 15. Attach Water Bottle Holder and Power Cord Note: Hardware is tight and components are properly assembled.


