Owners Manual
Page 4
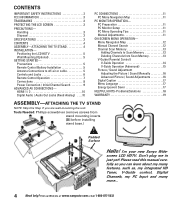
...- Handling 3 Disposal 3 SPECIFICATIONS 3 CONTENTS 4 ASSEMBLY-ATTACHING THE TV STAND 4 INSTALLATION- Menu Navigation Map 12 Manual Channel Search 12 Channel Scan Memory 13 Adding Channels to off-air or cable 5 Controls and Jacks 6 Remote Control Operation 7 Connections 8 Power Connection / Initial Channel Search ...TV STAND NOTE: Skip this manual carefully so you are wall-mounting the unit. HDMI 1 / 2 10 Digital Audio / Audio Out Jacks (Fixed Analog) . . . .10 PC CONNECTIONS 11 PC Menu Navigation Map 11 PC MONITOR OPERATION- I'm your new Sanyo Wide- screen LCD...
...- Handling 3 Disposal 3 SPECIFICATIONS 3 CONTENTS 4 ASSEMBLY-ATTACHING THE TV STAND 4 INSTALLATION- Menu Navigation Map 12 Manual Channel Search 12 Channel Scan Memory 13 Adding Channels to off-air or cable 5 Controls and Jacks 6 Remote Control Operation 7 Connections 8 Power Connection / Initial Channel Search ...TV STAND NOTE: Skip this manual carefully so you are wall-mounting the unit. HDMI 1 / 2 10 Digital Audio / Audio Out Jacks (Fixed Analog) . . . .10 PC CONNECTIONS 11 PC Menu Navigation Map 11 PC MONITOR OPERATION- I'm your new Sanyo Wide- screen LCD...
Owners Manual
Page 5
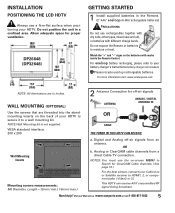
... -air signals from a direct Cable TV connection. This HDTV can receive ANY ...POSITIONING THE LCD HDTV Always use rechargeables together with dry cells, other types, mixed new and old, or batteries with marks inside the Remote Control. ...at www.sanyoctv.com or Call 1-800-877-5032 5 DP26648 (DP32648) GETTING STARTED 1 Install supplied batteries in the Remote. (2 "AAA" eneloop Ni-MH rechargeable batteries) PRECAUTIONS...standmounting inserts on -screen MENU to Search for proper ventilation. Analog or ClearQAM cable channels from an antenna. Do not expose the Remote or batteries to HDMI1,...
... -air signals from a direct Cable TV connection. This HDTV can receive ANY ...POSITIONING THE LCD HDTV Always use rechargeables together with dry cells, other types, mixed new and old, or batteries with marks inside the Remote Control. ...at www.sanyoctv.com or Call 1-800-877-5032 5 DP26648 (DP32648) GETTING STARTED 1 Install supplied batteries in the Remote. (2 "AAA" eneloop Ni-MH rechargeable batteries) PRECAUTIONS...standmounting inserts on -screen MENU to Search for proper ventilation. Analog or ClearQAM cable channels from an antenna. Do not expose the Remote or batteries to HDMI1,...
Owners Manual
Page 7
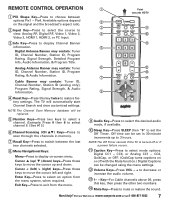
...-Press SLEEP then "0" to set in memory. ’ Recall Key-Press to switch between options Pix1 ~ Pix4. NOTE:The Off Timer cancels if the TV is turned off or if a power failure occurs. 11 Caption Key-Press to select mode options: Digital CC1 ~ CC6, or Analog CC1 ~ CC4, ...-Press to scan through the channels in 30-minute increments up and down. REMOTE CONTROL OPERATION Œ PIX Shape Key-Press to choose between the last two channels selected. “ Menu Navigational Keys: Menu-Press to display on-screen menu. Available options depend on the signal and the broadcast's aspect ratio. ...
...-Press SLEEP then "0" to set in memory. ’ Recall Key-Press to switch between options Pix1 ~ Pix4. NOTE:The Off Timer cancels if the TV is turned off or if a power failure occurs. 11 Caption Key-Press to select mode options: Digital CC1 ~ CC6, or Analog CC1 ~ CC4, ...-Press to scan through the channels in 30-minute increments up and down. REMOTE CONTROL OPERATION Œ PIX Shape Key-Press to choose between the last two channels selected. “ Menu Navigational Keys: Menu-Press to display on-screen menu. Available options depend on the signal and the broadcast's aspect ratio. ...
Owners Manual
Page 12
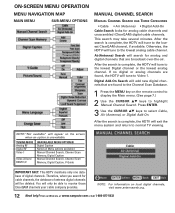
...search is unavailable. NOTE:"Not available" will add new digital channels that are found to the Channel Scan Database. 1 Press the MENU key on the remote control to display the Main menu. (See page 7.) 2 Use the CURSOR LM keys to the lowest Digital channel or the lowest analog channel. NOTE: For ...information on the screen when an option is complete, the HDTV will search for analog and digital channels that are found , the HDTV will tune to normal TV viewing....
...search is unavailable. NOTE:"Not available" will add new digital channels that are found to the Channel Scan Database. 1 Press the MENU key on the remote control to display the Main menu. (See page 7.) 2 Use the CURSOR LM keys to the lowest Digital channel or the lowest analog channel. NOTE: For ...information on the screen when an option is complete, the HDTV will search for analog and digital channels that are found , the HDTV will tune to normal TV viewing....
Owners Manual
Page 13
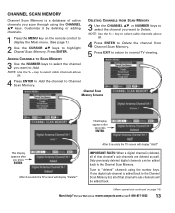
... at www.sanyoctv.com or Call 1-800-877-5032 13 Only previously deleted digital channels can be added back. (Menu operations continued on the remote control to display the Main menu. (See page 7.) 2 Use the CURSOR LM keys to highlight Chanel Scan Memory. Channel Scan Memory Screens This ...Press ENTER to Delete the channel from Channel Scan Memory. 5 Press EXIT to return to normal TV viewing. 4 Press ENTER to Add the channel to select cable channels above 99. After 3 seconds the TV screen will display "Delete?" IMPORTANT FACTS: When a digital channel is added back to the Channel ...
... at www.sanyoctv.com or Call 1-800-877-5032 13 Only previously deleted digital channels can be added back. (Menu operations continued on the remote control to display the Main menu. (See page 7.) 2 Use the CURSOR LM keys to highlight Chanel Scan Memory. Channel Scan Memory Screens This ...Press ENTER to Delete the channel from Channel Scan Memory. 5 Press EXIT to return to normal TV viewing. 4 Press ENTER to Add the channel to select cable channels above 99. After 3 seconds the TV screen will display "Delete?" IMPORTANT FACTS: When a digital channel is added back to the Channel ...
Service Manual
Page 1
in the Service Manual. Contents SAFETY INSTRUCTIONS 2 SERVICE ADJUSTMENTS 3 ON-SCREEN SERVICE MENU 4 POWER FAILURE CIRCUIT 5 MECHANICAL DISASSEMBLY 6-8 CHASSIS ELECTRICAL PARTS LIST 9-23 CABINET PARTS LIST 24 COMPONENT AND TESTPOINT LOCATIONS . . . . 25-27 ... 32 KEY REMOTE CONTROL SOUND OUTPUT 3.0 W/CH INTERMEDIATE FREQUENCY PICTURE IF CARRIER 45.75MHz SOUND IF CARRIER 41.25MHz COLOR SUB CARRIEr 42.17MHz CABINET DIMENSIONS WIDTH 665.5mm HEIGHT 515.6mm DEPTH INCLUDING BASE 177.8mm © Sanyo Manufacturing Corporation 2008 DP26648, N6CE, PRODUCT CODE 113013904 REFERENCE ...
in the Service Manual. Contents SAFETY INSTRUCTIONS 2 SERVICE ADJUSTMENTS 3 ON-SCREEN SERVICE MENU 4 POWER FAILURE CIRCUIT 5 MECHANICAL DISASSEMBLY 6-8 CHASSIS ELECTRICAL PARTS LIST 9-23 CABINET PARTS LIST 24 COMPONENT AND TESTPOINT LOCATIONS . . . . 25-27 ... 32 KEY REMOTE CONTROL SOUND OUTPUT 3.0 W/CH INTERMEDIATE FREQUENCY PICTURE IF CARRIER 45.75MHz SOUND IF CARRIER 41.25MHz COLOR SUB CARRIEr 42.17MHz CABINET DIMENSIONS WIDTH 665.5mm HEIGHT 515.6mm DEPTH INCLUDING BASE 177.8mm © Sanyo Manufacturing Corporation 2008 DP26648, N6CE, PRODUCT CODE 113013904 REFERENCE ...
Service Manual
Page 3
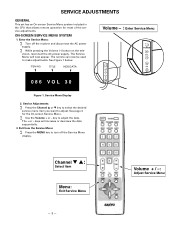
...adjust the data. See Figure 1 below. ITEM NO. Channel M L: Select Item Menu: Exit Service Menu - 3 - Volume + / -: Adjust Service Menu Exit from the Service Menu: ∑ Press the MENU key to make adjustments. The remote can now be used to turn off the receiver and disconnect the AC power supply... Volume (-) button on the tele- SERVICE ADJUSTMENTS GENERAL This set has an On-screen Service Menu system included in the CPU that allows remote operation for the On-screen Service Menu. ∑ Use the Volume + or - The Service Menu will increase or decrease the data sequentially. 3.
...adjust the data. See Figure 1 below. ITEM NO. Channel M L: Select Item Menu: Exit Service Menu - 3 - Volume + / -: Adjust Service Menu Exit from the Service Menu: ∑ Press the MENU key to make adjustments. The remote can now be used to turn off the receiver and disconnect the AC power supply... Volume (-) button on the tele- SERVICE ADJUSTMENTS GENERAL This set has an On-screen Service Menu system included in the CPU that allows remote operation for the On-screen Service Menu. ∑ Use the Volume + or - The Service Menu will increase or decrease the data sequentially. 3.


