
User Manual
Page 7
... the text when a function is available in this manual Icon Function Additional information Safety warnings and precautions [ ] Camera buttons. Indicators used in a mode. for all scenes or modes. See the example below. Note: The s Smart Mode or g Magic Plus mode may not support functions for → example: Select Face Detection → Normal...
... the text when a function is available in this manual Icon Function Additional information Safety warnings and precautions [ ] Camera buttons. Indicators used in a mode. for all scenes or modes. See the example below. Note: The s Smart Mode or g Magic Plus mode may not support functions for → example: Select Face Detection → Normal...
User Manual
Page 9
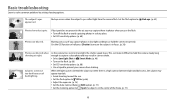
... frame. (p. 77) 8 This can occur if you capture photos in low light conditions or hold the camera steady long enough to capture a clear photo and may result in camera shake. • Select Low Light Shot in s Smart Mode. (p. 46) • Turn on the flash. (p. 66) • Set ISO sensitivity options. (p. 68) • Use...
... frame. (p. 77) 8 This can occur if you capture photos in low light conditions or hold the camera steady long enough to capture a clear photo and may result in camera shake. • Select Low Light Shot in s Smart Mode. (p. 46) • Turn on the flash. (p. 66) • Set ISO sensitivity options. (p. 68) • Use...
User Manual
Page 10
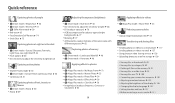
...83 9 Applying effects to videos • g Magic Plus mode > Movie Filter f 55 Reducing camera shake • Optical Image Stabilization (OIS) f 35 Transferring and sharing files • Sending photos or videos to a smart phone f 117 • Sending photos or videos via email f 127 • Using photo or... all files on the memory f 91 • Viewing files as a slide show f 93 • Viewing files on a TV f 100 • Connecting your camera to a computer f 101 • Adjusting sound and volume f 135 • Adjusting the brightness of the display f 136 • Changing the display language f...
...83 9 Applying effects to videos • g Magic Plus mode > Movie Filter f 55 Reducing camera shake • Optical Image Stabilization (OIS) f 35 Transferring and sharing files • Sending photos or videos to a smart phone f 117 • Sending photos or videos via email f 127 • Using photo or... all files on the memory f 91 • Viewing files as a slide show f 93 • Viewing files on a TV f 100 • Connecting your camera to a computer f 101 • Adjusting sound and volume f 135 • Adjusting the brightness of the display f 136 • Changing the display language f...
User Manual
Page 11
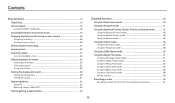
... or menus 26 Selecting with buttons 26 Selecting by touch 27 Using Smart Panel 29 Setting the display and sound 30 Setting the display type 30 Setting the sound 31 Capturing photos ...32 Zooming ...33 Reducing camera shake (OIS 35 Tips for getting a clearer photo 36 Extended functions... ...38 Using the Smart Auto mode 39 Using the Program mode 41 Using the Aperture Priority, Shutter Priority, or Manual...
... or menus 26 Selecting with buttons 26 Selecting by touch 27 Using Smart Panel 29 Setting the display and sound 30 Setting the display type 30 Setting the sound 31 Capturing photos ...32 Zooming ...33 Reducing camera shake (OIS 35 Tips for getting a clearer photo 36 Extended functions... ...38 Using the Smart Auto mode 39 Using the Program mode 41 Using the Aperture Priority, Shutter Priority, or Manual...
User Manual
Page 15
... Charging the battery 20 Turning on your camera 20 Performing the initial setup 21 Learning icons 23 Selecting modes 24 Icons on the Mode screen 24 Selecting options or menus 26 Selecting with buttons 26 Selecting by touch 27 Using Smart Panel 29 Setting the display and sound 30 ...Setting the display type 30 Setting the sound 31 Capturing photos 32 Zooming 33 Reducing camera shake (OIS 35 Tips for getting a clearer photo 36
... Charging the battery 20 Turning on your camera 20 Performing the initial setup 21 Learning icons 23 Selecting modes 24 Icons on the Mode screen 24 Selecting options or menus 26 Selecting with buttons 26 Selecting by touch 27 Using Smart Panel 29 Setting the display and sound 30 ...Setting the display type 30 Setting the sound 31 Capturing photos 32 Zooming 33 Reducing camera shake (OIS 35 Tips for getting a clearer photo 36
User Manual
Page 19
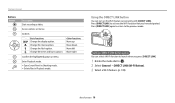
... you press [DIRECT LINK]. 1 Rotate the mode dial to n. 2 Select General → DIRECT LINK (Wi-Fi Button). 3 Select a Wi-Fi feature. (p. 138) Basic functions 18 Camera layout Buttons Button Description Start recording a video. Setting a DIRECT LINK button option You can turn on the Wi-Fi feature conveniently with [DIRECT LINK]. Go... back. D c F t Basic functions Change the display option. Change the timer and burst options. Enter Playback mode. • Open Smart Panel in Shooting mode. • Delete files in Playback mode.
... you press [DIRECT LINK]. 1 Rotate the mode dial to n. 2 Select General → DIRECT LINK (Wi-Fi Button). 3 Select a Wi-Fi feature. (p. 138) Basic functions 18 Camera layout Buttons Button Description Start recording a video. Setting a DIRECT LINK button option You can turn on the Wi-Fi feature conveniently with [DIRECT LINK]. Go... back. D c F t Basic functions Change the display option. Change the timer and burst options. Enter Playback mode. • Open Smart Panel in Shooting mode. • Delete files in Playback mode.

User Manual
Page 24
... of photos Icon Description Memory card inserted • : Fully charged • : Partially charged • : Empty (Recharge) • : Charging (Connected with the charger) Auto focus frame Camera shake Zoom indicator Photo resolution when the Intelli zoom is on Zoom ratio Histogram (p. 30) 2 Shooting option Icon Description ISO sensitivity Flash Flash intensity adjustment... Image adjustment (sharpness, contrast, and saturation) Focus area Focus option Face detection 3 Shooting option (touch) Icon Description AutoShare On Touch AF option Shooting options Open Smart Panel
... of photos Icon Description Memory card inserted • : Fully charged • : Partially charged • : Empty (Recharge) • : Charging (Connected with the charger) Auto focus frame Camera shake Zoom indicator Photo resolution when the Intelli zoom is on Zoom ratio Histogram (p. 30) 2 Shooting option Icon Description ISO sensitivity Flash Flash intensity adjustment... Image adjustment (sharpness, contrast, and saturation) Focus area Focus option Face detection 3 Shooting option (touch) Icon Description AutoShare On Touch AF option Shooting options Open Smart Panel

User Manual
Page 25
...access the mode. • Touch an icon to another mode screen. The camera automatically selects an appropriate aperture value. (p. 44) Manual: Adjust both the aperture value and the shutter speed manually. (p. 45) s Smart Mode: Capture a photo with settings you select My Magic Frame in some ... select a shooting mode or function. You can also select an icon on the Mode screen Icon T p Description Smart Auto: Capture a photo with a Scene mode selected automatically by the camera. (p. 39) Program: Capture a photo with options that are preset for a specific scene. (p. 46) i Selfie...
...access the mode. • Touch an icon to another mode screen. The camera automatically selects an appropriate aperture value. (p. 44) Manual: Adjust both the aperture value and the shutter speed manually. (p. 45) s Smart Mode: Capture a photo with settings you select My Magic Frame in some ... select a shooting mode or function. You can also select an icon on the Mode screen Icon T p Description Smart Auto: Capture a photo with a Scene mode selected automatically by the camera. (p. 39) Program: Capture a photo with options that are preset for a specific scene. (p. 46) i Selfie...

User Manual
Page 26
...Photo: Capture and combine a series of an image from your camera on your smart phone. (p. 119) Baby Monitor: Connect the camera to a smart phone and monitor a location. (p. 121) Auto Backup: Send photos or videos that you captured with the camera to a PC wirelessly. (p. 123) Email: Send photos ...or videos stored on the camera via email. (p. 125) SNS & Cloud: Upload photos or videos to file sharing services. (p. 128) Samsung...
...Photo: Capture and combine a series of an image from your camera on your smart phone. (p. 119) Baby Monitor: Connect the camera to a smart phone and monitor a location. (p. 121) Auto Backup: Send photos or videos that you captured with the camera to a PC wirelessly. (p. 123) Email: Send photos ...or videos stored on the camera via email. (p. 125) SNS & Cloud: Upload photos or videos to file sharing services. (p. 128) Samsung...
User Manual
Page 35
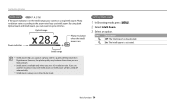
If you set a 4:3 resolution ratio. Capturing photos Intelli zoom T p A h M If the zoom indicator is in the Intelli range, your camera is using both Optical zoom and Intelli zoom, you can zoom in Smart Auto mode. Optical range Zoom indicator Photo resolution when the Intelli zoom is deactivated. Icon Description Off: The Intelli zoom...
If you set a 4:3 resolution ratio. Capturing photos Intelli zoom T p A h M If the zoom indicator is in the Intelli range, your camera is using both Optical zoom and Intelli zoom, you can zoom in Smart Auto mode. Optical range Zoom indicator Photo resolution when the Intelli zoom is deactivated. Icon Description Off: The Intelli zoom...
User Manual
Page 40
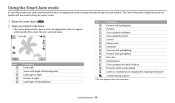
Using the Smart Auto mode In Smart Auto mode, your subject in the dark)* Actively moving subjects* * This icon appears next to T. 2 Align your camera automatically chooses the appropriate camera settings based on a tripod (when shooting in the frame. • The camera automatically selects a scene. The icons are... of text Sunsets Indoors, dark Partially lit Close-up with spot lighting Portraits with the camera settings for various scenes. 1 Rotate the mode dial to the scene icon. The Smart Auto mode is stabilized or on the type of colorful subjects Fireworks (when using a ...
Using the Smart Auto mode In Smart Auto mode, your subject in the dark)* Actively moving subjects* * This icon appears next to T. 2 Align your camera automatically chooses the appropriate camera settings based on a tripod (when shooting in the frame. • The camera automatically selects a scene. The icons are... of text Sunsets Indoors, dark Partially lit Close-up with spot lighting Portraits with the camera settings for various scenes. 1 Rotate the mode dial to the scene icon. The Smart Auto mode is stabilized or on the type of colorful subjects Fireworks (when using a ...

User Manual
Page 41
...to focus. 4 Press [Shutter] to capture the photo. • If the camera does not recognize an appropriate scene mode, it uses the default settings for the Smart Auto mode. • Even if it detects a face, the camera may not select a portrait mode depending on the subject's position or lighting. ...• The camera may not select the correct scene depending on the shooting conditions, such as camera shake, lighting, or distance...
...to focus. 4 Press [Shutter] to capture the photo. • If the camera does not recognize an appropriate scene mode, it uses the default settings for the Smart Auto mode. • Even if it detects a face, the camera may not select a portrait mode depending on the subject's position or lighting. ...• The camera may not select the correct scene depending on the shooting conditions, such as camera shake, lighting, or distance...
User Manual
Page 47
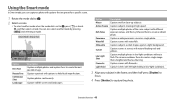
...shapes against a light background. Capture scenes with the light trailing in low-light conditions. 3 Align your subject in a single photo. Smart Mode : Beauty Face Set Option Best Face Beauty Face Continuous Shot Landscape Description Capture multiple photos and replace faces to s, press [b] ...touch , and then select a mode. Capture multiple photos in low light conditions without a flash. The camera combines them to hide facial imperfections. Using the Smart mode In Smart mode, you can also select another mode when the mode dial is brighter and has less blurring. ...
...shapes against a light background. Capture scenes with the light trailing in low-light conditions. 3 Align your subject in a single photo. Smart Mode : Beauty Face Set Option Best Face Beauty Face Continuous Shot Landscape Description Capture multiple photos and replace faces to s, press [b] ...touch , and then select a mode. Capture multiple photos in low light conditions without a flash. The camera combines them to hide facial imperfections. Using the Smart mode In Smart mode, you can also select another mode when the mode dial is brighter and has less blurring. ...
User Manual
Page 48
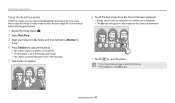
...and then half-press [Shutter] to focus. 4 Press [Shutter] to capture the photo. • The camera captures 5 photos consecutively. • The first photo is set as the background image. • The camera automatically detects faces after shooting. 5 Touch a face to replace. 6 Touch the best image from the 5 ...8226; The icon will appear on the image that the camera recommends. 7 Touch to save the photo. • Use a tripod to prevent your camera from shaking. • The resolution is set to create the best possible image. Using the Smart mode Using the Best Face mode In Best Face mode...
...and then half-press [Shutter] to focus. 4 Press [Shutter] to capture the photo. • The camera captures 5 photos consecutively. • The first photo is set as the background image. • The camera automatically detects faces after shooting. 5 Touch a face to replace. 6 Touch the best image from the 5 ...8226; The icon will appear on the image that the camera recommends. 7 Touch to save the photo. • Use a tripod to prevent your camera from shaking. • The resolution is set to create the best possible image. Using the Smart mode Using the Best Face mode In Best Face mode...
User Manual
Page 49
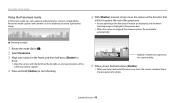
Extended functions 48 Using the Smart mode Using the Panorama mode In Panorama mode, you have captured all the necessary shots, the camera combines them into one panoramic photo. Stability: A flatter line represents less camera shake. 6 When you are aligned, the camera captures the next photo automatically. Panorama mode ... mode dial to s. 2 Select Panorama. 3 Align your subject in the frame, and then half-press [Shutter] to focus. • Align the camera with the far left or the far right, or very top or bottom, of the scene you want to capture. 4 Press and hold [Shutter] to...
Extended functions 48 Using the Smart mode Using the Panorama mode In Panorama mode, you have captured all the necessary shots, the camera combines them into one panoramic photo. Stability: A flatter line represents less camera shake. 6 When you are aligned, the camera captures the next photo automatically. Panorama mode ... mode dial to s. 2 Select Panorama. 3 Align your subject in the frame, and then half-press [Shutter] to focus. • Align the camera with the far left or the far right, or very top or bottom, of the scene you want to capture. 4 Press and hold [Shutter] to...

User Manual
Page 50
... • Photos taken are automatically saved, and shooting is zoomed in, the camera automatically zooms out to the default position. • Some shooting options are not available. • The camera may stop moving the camera exactly where you want the scene to end. if you change the shooting direction... to capture the next image - If you select Panorama mode while the lens is stopped under the following : - capturing moving the camera too quickly or too slowly - Using the Smart mode • For best results when capturing panoramic photos, avoid the following conditions: -
... • Photos taken are automatically saved, and shooting is zoomed in, the camera automatically zooms out to the default position. • Some shooting options are not available. • The camera may stop moving the camera exactly where you want the scene to end. if you change the shooting direction... to capture the next image - If you select Panorama mode while the lens is stopped under the following : - capturing moving the camera too quickly or too slowly - Using the Smart mode • For best results when capturing panoramic photos, avoid the following conditions: -

User Manual
Page 116
Samsung SMART CAMERA App is compatible with Samsung camera models manufactured in 2013 or later. • To read a tag from an NFC-enabled device. (p. 116, 119) Preset to launch the Wi-Fi function by NFC-enabled smart phones running Android OS. You can also transfer files to the smart phone automatically when you use the latest ... tag for using this feature. This feature is not available for iOS devices. • You should install Samsung SMART CAMERA App on an NFC-enabled device. (p. 138) Using NFC features in Wi-Fi mode Select MobileLink or Remote Viewfinder from the pop-up ...
Samsung SMART CAMERA App is compatible with Samsung camera models manufactured in 2013 or later. • To read a tag from an NFC-enabled device. (p. 116, 119) Preset to launch the Wi-Fi function by NFC-enabled smart phones running Android OS. You can also transfer files to the smart phone automatically when you use the latest ... tag for using this feature. This feature is not available for iOS devices. • You should install Samsung SMART CAMERA App on an NFC-enabled device. (p. 138) Using NFC features in Wi-Fi mode Select MobileLink or Remote Viewfinder from the pop-up ...
User Manual
Page 117
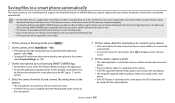
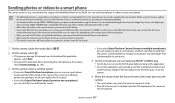
... to download the application appears, select Next. • To require PIN verification when connecting the smart phone to the camera, select Security Settings. (p. 139) 3 On the smart phone, turn on Samsung SMART CAMERA App. • For iOS devices, turn on the Wi-Fi feature before turning on the ...This feature may not perform properly. • You should install Samsung SMART CAMERA App on the camera to the smart phone. 5 On the camera, allow the smart phone to connect to your camera. • If the smart phone has been connected to only one camera at a time. • If the Wi-Fi Privacy ...
... to download the application appears, select Next. • To require PIN verification when connecting the smart phone to the camera, select Security Settings. (p. 139) 3 On the smart phone, turn on Samsung SMART CAMERA App. • For iOS devices, turn on the Wi-Fi feature before turning on the ...This feature may not perform properly. • You should install Samsung SMART CAMERA App on the camera to the smart phone. 5 On the camera, allow the smart phone to connect to your camera. • If the smart phone has been connected to only one camera at a time. • If the Wi-Fi Privacy ...
User Manual
Page 118
...one device. 4 On the smart phone, turn on Samsung SMART CAMERA App. • For iOS devices, turn on the function and place the smart phone near the NFC tag (p. 17) on the camera. 5 Select the camera from the list and connect the smart phone to the camera. • The smart phone can connect to only...; If you select Select Files from Smartphone, you may not perform properly. • You should install Samsung SMART CAMERA App on the smart phone for 30 seconds. 1 On the camera, rotate the mode dial to w. 2 On the camera, select . • If the pop-up to 1,000 files at a time. • If ...
...one device. 4 On the smart phone, turn on Samsung SMART CAMERA App. • For iOS devices, turn on the function and place the smart phone near the NFC tag (p. 17) on the camera. 5 Select the camera from the list and connect the smart phone to the camera. • The smart phone can connect to only...; If you select Select Files from Smartphone, you may not perform properly. • You should install Samsung SMART CAMERA App on the smart phone for 30 seconds. 1 On the camera, rotate the mode dial to w. 2 On the camera, select . • If the pop-up to 1,000 files at a time. • If ...
User Manual
Page 120
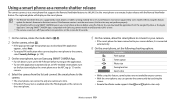
Some features may not perform properly. • You should install Samsung SMART CAMERA App on your smart phone or device before , it is connected automatically. 6 On the smart phone, set the following shooting options. Samsung SMART CAMERA App is not the most recent, this function may not be supported ... download the application appears, select Next. • To require PIN verification when connecting the smart phone to the camera, select Security Settings. (p. 139) 3 On the smart phone, turn on Samsung SMART CAMERA App. • For iOS devices, turn on the Wi-Fi feature before turning on ...
Some features may not perform properly. • You should install Samsung SMART CAMERA App on your smart phone or device before , it is connected automatically. 6 On the smart phone, set the following shooting options. Samsung SMART CAMERA App is not the most recent, this function may not be supported ... download the application appears, select Next. • To require PIN verification when connecting the smart phone to the camera, select Security Settings. (p. 139) 3 On the smart phone, turn on Samsung SMART CAMERA App. • For iOS devices, turn on the Wi-Fi feature before turning on ...


