User Manual
Page 11
... battery and memory card 19 Charging the battery and turning on your camera 20 Charging the battery 20 Turning on your camera 20 Performing the initial setup 21 Learning icons ...23 Selecting modes ...24 Icons on the Mode screen 24 Selecting options or menus 26 Selecting with buttons 26 Selecting by touch 27 Using Smart Panel 29 Setting the display and sound 30 Setting the display type 30 Setting the sound 31 Capturing photos ...32 Zooming ...33 Reducing camera...
... battery and memory card 19 Charging the battery and turning on your camera 20 Charging the battery 20 Turning on your camera 20 Performing the initial setup 21 Learning icons ...23 Selecting modes ...24 Icons on the Mode screen 24 Selecting options or menus 26 Selecting with buttons 26 Selecting by touch 27 Using Smart Panel 29 Setting the display and sound 30 Setting the display type 30 Setting the sound 31 Capturing photos ...32 Zooming ...33 Reducing camera...
User Manual
Page 12
... Changing the camera's focus 69 Using macro ...69 Using auto focus ...69 Adjusting the focus area 71 Adjusting the focus by touch 71 Using Face Detection 74 Detecting faces ...74 Capturing a self portrait shot 74 Capturing a smile shot 75 Tips for detecting faces 75 Adjusting brightness and color 76 Adjusting the exposure manually (EV 76 Compensating for backlighting (ACB 77 Changing the metering option 77 Selecting a White Balance setting 78 Using burst modes 81 Capturing continuous photos 81 Using the timer...
... Changing the camera's focus 69 Using macro ...69 Using auto focus ...69 Adjusting the focus area 71 Adjusting the focus by touch 71 Using Face Detection 74 Detecting faces ...74 Capturing a self portrait shot 74 Capturing a smile shot 75 Tips for detecting faces 75 Adjusting brightness and color 76 Adjusting the exposure manually (EV 76 Compensating for backlighting (ACB 77 Changing the metering option 77 Selecting a White Balance setting 78 Using burst modes 81 Capturing continuous photos 81 Using the timer...
User Manual
Page 13
... Playback mode 87 Starting Playback mode 87 Viewing photos ...92 Playing a video ...94 Editing a photo ...95 Resizing photos ...95 Rotating a photo ...95 Cropping a photo 96 Applying Smart Filter effects 96 Adjusting dark subjects, brightness, contrast, or saturation 97 Adjusting portrait photos 98 Editing a video ...99 Trimming a video 99 Capturing an image from video 99 Viewing files on a TV 100 Transferring files to a computer 101 Transferring files to your Windows OS computer 101 Transferring files to your Mac OS computer 102 Using...
... Playback mode 87 Starting Playback mode 87 Viewing photos ...92 Playing a video ...94 Editing a photo ...95 Resizing photos ...95 Rotating a photo ...95 Cropping a photo 96 Applying Smart Filter effects 96 Adjusting dark subjects, brightness, contrast, or saturation 97 Adjusting portrait photos 98 Editing a video ...99 Trimming a video 99 Capturing an image from video 99 Viewing files on a TV 100 Transferring files to a computer 101 Transferring files to your Windows OS computer 101 Transferring files to your Mac OS computer 102 Using...
User Manual
Page 14
... a sharing service 128 Uploading photos or videos 128 Using Samsung Link to send files 130 Uploading photos to an online storage 130 Viewing photos or videos on devices that support Samsung Link 131 Settings ...133 Settings menu ...134 Accessing the settings menu 134 Sound ...135 Display ...135 Connectivity ...136 General ...137 Appendixes ...140 Error messages ...141 Camera maintenance 142 Cleaning your camera 142 Using or storing the camera 143 About memory cards 144 About the battery 147 Before contacting a service center 151 Camera specifications 154...
... a sharing service 128 Uploading photos or videos 128 Using Samsung Link to send files 130 Uploading photos to an online storage 130 Viewing photos or videos on devices that support Samsung Link 131 Settings ...133 Settings menu ...134 Accessing the settings menu 134 Sound ...135 Display ...135 Connectivity ...136 General ...137 Appendixes ...140 Error messages ...141 Camera maintenance 142 Cleaning your camera 142 Using or storing the camera 143 About memory cards 144 About the battery 147 Before contacting a service center 151 Camera specifications 154...
User Manual
Page 37
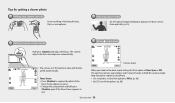
... camera correctly Ensure nothing is displayed Half-press [Shutter] and adjust the focus. When you shoot in the dark, avoid setting the flash option to Fill in red. The camera adjusts the focus and exposure automatically. Camera shake The camera sets the aperture value and shutter speed automatically. The aperture remains open longer and it may be harder to hold the camera steady long enough to capture a clear photo. • Use a tripod or set the flash...
... camera correctly Ensure nothing is displayed Half-press [Shutter] and adjust the focus. When you shoot in the dark, avoid setting the flash option to Fill in red. The camera adjusts the focus and exposure automatically. Camera shake The camera sets the aperture value and shutter speed automatically. The aperture remains open longer and it may be harder to hold the camera steady long enough to capture a clear photo. • Use a tripod or set the flash...
User Manual
Page 54
...-press [Shutter] to focus. 4 Press [Shutter] to capture the photo. • The camera captures multiple photos while the status lamp is blinking. 5 On the screen, draw an area to be animated. • You can also select another mode when the mode dial is set to save the photo. • The resolution is set to . • Use a tripod to prevent your camera from shaking. • It may take longer...
...-press [Shutter] to focus. 4 Press [Shutter] to capture the photo. • The camera captures multiple photos while the status lamp is blinking. 5 On the screen, draw an area to be animated. • You can also select another mode when the mode dial is set to save the photo. • The resolution is set to . • Use a tripod to prevent your camera from shaking. • It may take longer...

User Manual
Page 56
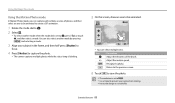
... mode when the mode dial is set to g, press [b] or touch , and then select a mode. Apply a black and white effect. Make scenes clean and clear. Apply a pen sketch effect. Extended functions 55 Create a cold and monotone effect. 4 Press (Video recording) to start recording. 5 Press (Video recording) again to stop recording. • If you select Miniature, playback speed will increase. • If you select Miniature, you cannot record the sound...
... mode when the mode dial is set to g, press [b] or touch , and then select a mode. Apply a black and white effect. Make scenes clean and clear. Apply a pen sketch effect. Extended functions 55 Create a cold and monotone effect. 4 Press (Video recording) to start recording. 5 Press (Video recording) again to stop recording. • If you select Miniature, playback speed will increase. • If you select Miniature, you cannot record the sound...
User Manual
Page 63
... detecting faces 75 Adjusting brightness and color 76 Adjusting the exposure manually (EV 76 Compensating for backlighting (ACB 77 Changing the metering option 77 Selecting a White Balance setting 78 Using burst modes 81 Capturing continuous photos 81 Using the timer 82 Capturing bracketed photos 82 Adjusting images 83 Setting the sound of the zoom 84 Capturing still images while recording a video 85 Selecting a resolution and quality 63 Selecting a resolution 63 Selecting a photo quality 64 Shooting in Shooting mode.
... detecting faces 75 Adjusting brightness and color 76 Adjusting the exposure manually (EV 76 Compensating for backlighting (ACB 77 Changing the metering option 77 Selecting a White Balance setting 78 Using burst modes 81 Capturing continuous photos 81 Using the timer 82 Capturing bracketed photos 82 Adjusting images 83 Setting the sound of the zoom 84 Capturing still images while recording a video 85 Selecting a resolution and quality 63 Selecting a resolution 63 Selecting a photo quality 64 Shooting in Shooting mode.
User Manual
Page 71
... focus manually p A h M 1 In Shooting mode, press [c]. 2 Select Manual Focus. 3 Press [F/t] to adjust the focus. • You can also set automatically in . (150 cm) away when you use the zoom. • Auto Macro is out of focus, the photo may differ depending on a subject farther than 31 in . (150-350 cm) when you use the zoom. to save your settings. Auto Macro: • Focus on the shooting conditions. Available options may be blurry. Changing the camera's focus...
... focus manually p A h M 1 In Shooting mode, press [c]. 2 Select Manual Focus. 3 Press [F/t] to adjust the focus. • You can also set automatically in . (150 cm) away when you use the zoom. • Auto Macro is out of focus, the photo may differ depending on a subject farther than 31 in . (150-350 cm) when you use the zoom. to save your settings. Auto Macro: • Focus on the shooting conditions. Available options may be blurry. Changing the camera's focus...
User Manual
Page 111
... connect to an online storage ......... 130 Viewing photos or videos on devices that support Samsung Link 131 Connecting to a WLAN and configuring network settings 111 Connecting to a WLAN 111 Using the login browser 112 Network connection tips 113 Entering text 114 Using the NFC Feature (Tag & Go 115 Using NFC features in Shooting mode 115 Using NFC features in Playback mode (Photo Beam 115 Using NFC features in Wi-Fi mode 115 Saving files...
... connect to an online storage ......... 130 Viewing photos or videos on devices that support Samsung Link 131 Connecting to a WLAN and configuring network settings 111 Connecting to a WLAN 111 Using the login browser 112 Network connection tips 113 Entering text 114 Using the NFC Feature (Tag & Go 115 Using NFC features in Shooting mode 115 Using NFC features in Playback mode (Photo Beam 115 Using NFC features in Wi-Fi mode 115 Saving files...
User Manual
Page 114
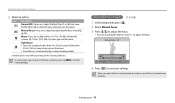
... network settings or a password, contact your region. In this case, use . • Before you enter personal information for any payment or credit card information on your camera must comply with radio transmission laws in all surroundings. • The camera may display a WLAN enabled printer on the encryption type, the number of your camera. To connect to a network, ensure your battery is not...
... network settings or a password, contact your region. In this case, use . • Before you enter personal information for any payment or credit card information on your camera must comply with radio transmission laws in all surroundings. • The camera may display a WLAN enabled printer on the encryption type, the number of your camera. To connect to a network, ensure your battery is not...
User Manual
Page 117
... function, the setting is maintained even when you recorded a video, it is saved only to the camera. • A GIF file captured in Shooting mode, press [m]. 2 On the camera, select AutoShare → On. • If the pop-up message that supports the AutoShare feature via a WLAN. Samsung SMART CAMERA App is compatible with Samsung camera models manufactured in 2013 or later. • This feature is not available with the internal memory...
... function, the setting is maintained even when you recorded a video, it is saved only to the camera. • A GIF file captured in Shooting mode, press [m]. 2 On the camera, select AutoShare → On. • If the pop-up message that supports the AutoShare feature via a WLAN. Samsung SMART CAMERA App is compatible with Samsung camera models manufactured in 2013 or later. • This feature is not available with the internal memory...
User Manual
Page 118
... MobileLink feature is compatible with Samsung camera models manufactured in 2013 or later. • When there are no files in the camera memory, you can use this feature, update the device's firmware to the latest version. Transferring files to multiple smart phones may take longer than transferring files to one device. 4 On the smart phone, turn on Samsung SMART CAMERA App. • For iOS devices, turn on the function and place...
... MobileLink feature is compatible with Samsung camera models manufactured in 2013 or later. • When there are no files in the camera memory, you can use this feature, update the device's firmware to the latest version. Transferring files to multiple smart phones may take longer than transferring files to one device. 4 On the smart phone, turn on Samsung SMART CAMERA App. • For iOS devices, turn on the function and place...
User Manual
Page 120
... is supported by touching the screen. • Remote Viewfinder mode supports the and photo sizes only. Wireless network 119 The captured photo will display on the smart phone. • The Remote Viewfinder feature is connected automatically. 6 On the smart phone, set the following shooting options. Icon Description Flash option Timer option Photo size Saving location Zoom ratio • While using this feature, update the device's firmware to the latest version. Samsung SMART CAMERA App is...
... is supported by touching the screen. • Remote Viewfinder mode supports the and photo sizes only. Wireless network 119 The captured photo will display on the smart phone. • The Remote Viewfinder feature is connected automatically. 6 On the smart phone, set the following shooting options. Icon Description Flash option Timer option Photo size Saving location Zoom ratio • While using this feature, update the device's firmware to the latest version. Samsung SMART CAMERA App is...
User Manual
Page 122
... not perform properly. • You should install the Samsung Home Monitor application on the smart phone to the latest version. During video monitoring, touch the Sound Monitoring Mode button on your smart phone. Using the Baby Monitor Use the Baby Monitor feature to connect the camera to a smart phone and monitor a location. • The Baby Monitor feature is supported by some models.
... not perform properly. • You should install the Samsung Home Monitor application on the smart phone to the latest version. During video monitoring, touch the Sound Monitoring Mode button on your smart phone. Using the Baby Monitor Use the Baby Monitor feature to connect the camera to a smart phone and monitor a location. • The Baby Monitor feature is supported by some models.
User Manual
Page 130
... sharing service's list screen. • You cannot upload files if the file size exceeds the limit. The maximum resolution of your network administrator or network service provider. • Uploaded photos or videos may affect how quickly photos upload or web pages open. • When there are no files in Playback mode by pressing [m], and then selecting Share(Wi-Fi) → a sharing service or by pressing [m], and then selecting Upload Folder...
... sharing service's list screen. • You cannot upload files if the file size exceeds the limit. The maximum resolution of your network administrator or network service provider. • Uploaded photos or videos may affect how quickly photos upload or web pages open. • When there are no files in Playback mode by pressing [m], and then selecting Share(Wi-Fi) → a sharing service or by pressing [m], and then selecting Upload Folder...

User Manual
Page 140
... when using the NFC function. • PINs are automatically generated and renewed only when you reset the camera settings or update the firmware. • If you have previously connected your camera to a smart phone via a PIN, they will automatically be reset. (Yes, No*) View open source licenses. Date, time, language, and video output settings will not be made without requiring a PIN. • Connections will connect automatically. Reset menus and shooting options...
... when using the NFC function. • PINs are automatically generated and renewed only when you reset the camera settings or update the firmware. • If you have previously connected your camera to a smart phone via a PIN, they will automatically be reset. (Yes, No*) View open source licenses. Date, time, language, and video output settings will not be made without requiring a PIN. • Connections will connect automatically. Reset menus and shooting options...
User Manual
Page 141
Appendixes Get information about error messages, specifications, and maintenance. Error messages 141 Camera maintenance 142 Cleaning your camera 142 Using or storing the camera 143 About memory cards 144 About the battery 147 Before contacting a service center 151 Camera specifications 154 Glossary 158 Index 163
Appendixes Get information about error messages, specifications, and maintenance. Error messages 141 Camera maintenance 142 Cleaning your camera 142 Using or storing the camera 143 About memory cards 144 About the battery 147 Before contacting a service center 151 Camera specifications 154 Glossary 158 Index 163
User Manual
Page 154
.... microSDXC memory cards use microSDXC memory cards on your computer's specifications and environment, the program may be interrupted by static electricity. Disconnect the USB cable and connect it again. Videos may not play on some video player programs. To play videos Suggested remedies • Make sure that the camera is correctly connected to On in the settings menu. (p. 136) • Depending on a Windows XP computer, download and update the exFAT file system driver from...
.... microSDXC memory cards use microSDXC memory cards on your computer's specifications and environment, the program may be interrupted by static electricity. Disconnect the USB cable and connect it again. Videos may not play on some video player programs. To play videos Suggested remedies • Make sure that the camera is correctly connected to On in the settings menu. (p. 136) • Depending on a Windows XP computer, download and update the exFAT file system driver from...
User Manual
Page 166
... P Panorama mode 48 Playback button 18 Playback mode 87 Power button 16 Power save mode 136 Program mode 41 Protecting files 90 Q Quick view 136 R Remote Viewfinder 119 Reset 139 Resolution Playback mode 95 Shooting mode 63 Retouching faces 98 Rotating 95 S Samsung Link 130 Saturation Playback mode 97 Shooting mode 83 Selfie Alarm mode 50 Self portrait 74 Service center 151 Settings 137 Sharing service Accessing 128 Uploading photos or videos 128 Sharpness 83 Shooting portraits Face Detection 74 Self portrait 74 Smile Shot 75 Shutter button 16 Shutter Priority mode...
... P Panorama mode 48 Playback button 18 Playback mode 87 Power button 16 Power save mode 136 Program mode 41 Protecting files 90 Q Quick view 136 R Remote Viewfinder 119 Reset 139 Resolution Playback mode 95 Shooting mode 63 Retouching faces 98 Rotating 95 S Samsung Link 130 Saturation Playback mode 97 Shooting mode 83 Selfie Alarm mode 50 Self portrait 74 Service center 151 Settings 137 Sharing service Accessing 128 Uploading photos or videos 128 Sharpness 83 Shooting portraits Face Detection 74 Self portrait 74 Smile Shot 75 Shutter button 16 Shutter Priority mode...


