
Owner Instructions
Page 1
Register your product at www.samsung.com/global/register Picture In Picture (PIP) My Colour Control SRS TruSurroundXT Digital Natural Image engine This device is a Class B digital apparatus. DLP TV SP42L6HX SP46L6HX SP50L6HX SP61L6HX SP67L6HX Owner's Instructions Before operating the unit, please read this manual thoroughly, and retain it for future reference.
Register your product at www.samsung.com/global/register Picture In Picture (PIP) My Colour Control SRS TruSurroundXT Digital Natural Image engine This device is a Class B digital apparatus. DLP TV SP42L6HX SP46L6HX SP50L6HX SP61L6HX SP67L6HX Owner's Instructions Before operating the unit, please read this manual thoroughly, and retain it for future reference.
Owner Instructions
Page 3
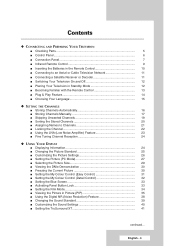
... Remote Control 13 ■ Plug & Play Feature 14 ■ Choosing Your Language 15 ◆ SETTING THE CHANNELS ■ Storing Channels Automatically 16 ■ Storing Channels Manually 17 ■ Skipping Unwanted Channels 19 ■ Sorting the Stored Channels 20 ■ Assigning Names to Channels 21 ■ Locking the Channel 22 ■ Using...
... Remote Control 13 ■ Plug & Play Feature 14 ■ Choosing Your Language 15 ◆ SETTING THE CHANNELS ■ Storing Channels Automatically 16 ■ Storing Channels Manually 17 ■ Skipping Unwanted Channels 19 ■ Sorting the Stored Channels 20 ■ Assigning Names to Channels 21 ■ Locking the Channel 22 ■ Using...
Owner Instructions
Page 5
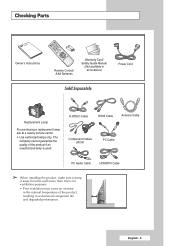
... purchasing a replacement lamp, ask at a nearby service center. • Use authorized lamps only. Checking Parts Owner's Instructions Remote Control/ AAA Batteries Warranty Card/ Safety Guide Manual (Not available in a shortened component life and degraded performance.
... purchasing a replacement lamp, ask at a nearby service center. • Use authorized lamps only. Checking Parts Owner's Instructions Remote Control/ AAA Batteries Warranty Card/ Safety Guide Manual (Not available in a shortened component life and degraded performance.
Owner Instructions
Page 11
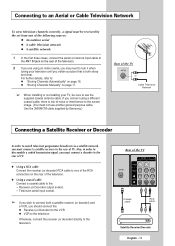
...◆ "Storing Channels Manually" on page 17. ➢ When installing or re-installing your television until you obtain a picture that is risk of the television. ◆ Using a coaxial cable Connect a coaxial cable to the: - Receiver (or Decoder) output socket. - Rear of TV. Connecting to an Aerial... sharp and clear. If you connect using an indoor aerial, you may need to turn it when tuning your TV, be received by Samsung.) Rear of the TV or Cable Television Network Connecting a Satellite Receiver or Decoder In order to watch television programmes broadcast via a satellite ...
...◆ "Storing Channels Manually" on page 17. ➢ When installing or re-installing your television until you obtain a picture that is risk of the television. ◆ Using a coaxial cable Connect a coaxial cable to the: - Receiver (or Decoder) output socket. - Rear of TV. Connecting to an Aerial... sharp and clear. If you connect using an indoor aerial, you may need to turn it when tuning your TV, be received by Samsung.) Rear of the TV or Cable Television Network Connecting a Satellite Receiver or Decoder In order to watch television programmes broadcast via a satellite ...
Owner Instructions
Page 12
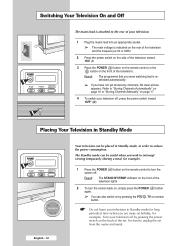
...: The programme that you were watching last is 50 or 60Hz. 2 Press the power switch on...the set from the mains and aerial. Turn your television off by pressing the P / , TV or numeric button. ☛ Do not leave your television in order to reduce the power ... Refer to "Storing Channels Automatically" on page 16 or "Storing Channels Manually" on page 17. 4 To switch your television off . Switching Your Television On and Off ... into an appropriate socket. ➢ The main voltage is indicated on the rear of the television and the frequency is re- selected automatically. ➢ If...
...: The programme that you were watching last is 50 or 60Hz. 2 Press the power switch on...the set from the mains and aerial. Turn your television off by pressing the P / , TV or numeric button. ☛ Do not leave your television in order to reduce the power ... Refer to "Storing Channels Automatically" on page 16 or "Storing Channels Manually" on page 17. 4 To switch your television off . Switching Your Television On and Off ... into an appropriate socket. ➢ The main voltage is indicated on the rear of the television and the frequency is re- selected automatically. ➢ If...
Owner Instructions
Page 16
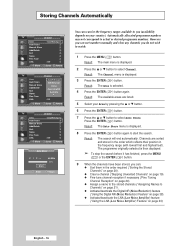
...Press the ENTER ( ) button. 7 Press the ... Storing Channels Automatically TV Channel Area Auto Store Manual Store Add/Delete Sort Name Fine Tune LNA : Asia/W.Europe : Off Move Enter Return TV Channel Area Auto Store Manual Store Add/Delete Sort Name Fine Tune LNA : AAssiaia/W/W.E.Euurrooppee CIS/E.Europe ...China Hong kong/UK Australia : Off Move Enter Return TV Channel Area Auto Store Manual Store Add/Delete Sort Name Fine Tune LNA : Asia/W.Europe : Off Move Enter Return Auto Store P 1 C -Start ...
...Press the ENTER ( ) button. 7 Press the ... Storing Channels Automatically TV Channel Area Auto Store Manual Store Add/Delete Sort Name Fine Tune LNA : Asia/W.Europe : Off Move Enter Return TV Channel Area Auto Store Manual Store Add/Delete Sort Name Fine Tune LNA : AAssiaia/W/W.E.Euurrooppee CIS/E.Europe ...China Hong kong/UK Australia : Off Move Enter Return TV Channel Area Auto Store Manual Store Add/Delete Sort Name Fine Tune LNA : Asia/W.Europe : Off Move Enter Return Auto Store P 1 C -Start ...
Owner Instructions
Page 17
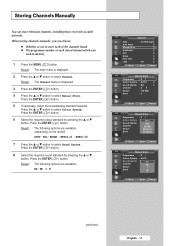
.... Press the ... PAL - BG - I - or † button to select Sound System. or † button. Move Enter Return TV Manual Store Programme Colour System Sound System Channel Search Store :P 1 : AUTAOUTO : BG PAL : C SE2CAM : 48NTMSHCz4.43 : ? NTSC3.58 Move Enter Return... System Channel Search Store :P 1 : AUTO : BG BG : C D2K : 48 MHIz :? M TV Channel Area Auto Store Manual Store Add/Delete Sort Name Fine Tune LNA : Asia/W.Europe : Off Move Enter Return TV Manual Store Programme Colour System Sound System Channel Search Store :P 1 : AUTO : BG :C 5 : 175 ...
.... Press the ... PAL - BG - I - or † button to select Sound System. or † button. Move Enter Return TV Manual Store Programme Colour System Sound System Channel Search Store :P 1 : AUTAOUTO : BG PAL : C SE2CAM : 48NTMSHCz4.43 : ? NTSC3.58 Move Enter Return... System Channel Search Store :P 1 : AUTO : BG BG : C D2K : 48 MHIz :? M TV Channel Area Auto Store Manual Store Add/Delete Sort Name Fine Tune LNA : Asia/W.Europe : Off Move Enter Return TV Manual Store Programme Colour System Sound System Channel Search Store :P 1 : AUTO : BG :C 5 : 175 ...

Owner Instructions
Page 18
... ... Press the ENTER ( ) button. ➢ You can select the programme directly by pressing the ENTER ( ) button. 14 Repeat steps 9 to P99. TV Manual Store Programme Colour System Sound System Channel Search Store :P 1 : AUTO : BG : C 05 : 175 MHz :? Press the ENTER ( ) button. Press ...there is received on the remote control. 13 To store the channel and associated programme number, select Store by pressing the ... Adjust Enter Return TV Manual Store Programme Colour System Sound System Channel Search Store :P 1 : AUTO : BG :C 5 : 175 MHz :? or † button to ...
... ... Press the ENTER ( ) button. ➢ You can select the programme directly by pressing the ENTER ( ) button. 14 Repeat steps 9 to P99. TV Manual Store Programme Colour System Sound System Channel Search Store :P 1 : AUTO : BG : C 05 : 175 MHz :? Press the ENTER ( ) button. Press ...there is received on the remote control. 13 To store the channel and associated programme number, select Store by pressing the ... Adjust Enter Return TV Manual Store Programme Colour System Sound System Channel Search Store :P 1 : AUTO : BG :C 5 : 175 MHz :? or † button to ...
Owner Instructions
Page 19
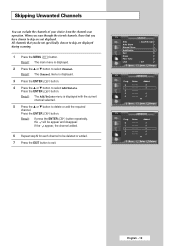
... to delete or add the required channel. or † button to exit. \ TV Channel Area Auto Store Manual Store Add/Delete Sort Name Fine Tune LNA : Asia/W.Europe : Off Move Enter Return TV Add/Delete Prog. 0 1 2 3 4 Name Added Move Enter Return TV Add/Delete Prog. 0 1 2 3 4 Name Added Move Enter Return English - 19 If the...
... to delete or add the required channel. or † button to exit. \ TV Channel Area Auto Store Manual Store Add/Delete Sort Name Fine Tune LNA : Asia/W.Europe : Off Move Enter Return TV Add/Delete Prog. 0 1 2 3 4 Name Added Move Enter Return TV Add/Delete Prog. 0 1 2 3 4 Name Added Move Enter Return English - 19 If the...
Owner Instructions
Page 20
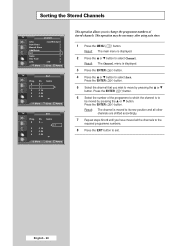
...: The Channel menu is displayed. 2 Press the ... Sorting the Stored Channels TV Channel Area Auto Store Manual Store Add/Delete Sort Name Fine Tune LNA : Asia/W.Europe : Off Move Enter Return TV Sort Prog. 0 1 2 3 4 Ch. C -C 7 C 19 C 25 C 26 Name Move Enter Return TV Sort Prog. 0 2 3 4 Ch. Press the ENTER ( ) button. 6 Select the number of...
...: The Channel menu is displayed. 2 Press the ... Sorting the Stored Channels TV Channel Area Auto Store Manual Store Add/Delete Sort Name Fine Tune LNA : Asia/W.Europe : Off Move Enter Return TV Sort Prog. 0 1 2 3 4 Ch. C -C 7 C 19 C 25 C 26 Name Move Enter Return TV Sort Prog. 0 2 3 4 Ch. Press the ENTER ( ) button. 6 Select the number of...
Owner Instructions
Page 21
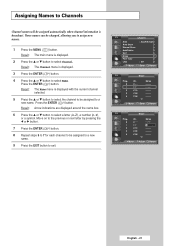
... 7 for each channel to be assigned to a new name. or † button to select Name. C -C 7 C 19 C 25 C 26 Name Move Enter Return TV Name Prog. 0 1 2 3 4 Ch. Press the ENTER ( ) button. Result: The main menu is displayed. 3 Press the ENTER ( ) button. 4 Press... the ... Result: The Name menu is broadcast. TV Channel Area Auto Store Manual Store Add/Delete Sort Name Fine Tune LNA Move : Asia/W.Europe : Off Enter Return TV Name Prog. 0 1 2 3 4 Ch. or † button to select a letter (A~Z), a number (0~9), or...
... 7 for each channel to be assigned to a new name. or † button to select Name. C -C 7 C 19 C 25 C 26 Name Move Enter Return TV Name Prog. 0 1 2 3 4 Ch. Press the ENTER ( ) button. Result: The main menu is displayed. 3 Press the ENTER ( ) button. 4 Press... the ... Result: The Name menu is broadcast. TV Channel Area Auto Store Manual Store Add/Delete Sort Name Fine Tune LNA Move : Asia/W.Europe : Off Enter Return TV Name Prog. 0 1 2 3 4 Ch. or † button to select a letter (A~Z), a number (0~9), or...

Owner Instructions
Page 23
...LNA setting is displayed. 3 Press the ENTER ( ) button. 4 Press the ... TV Channel Area Auto Store Manual Store Add/Delete Sort Name Fine Tune LNA : Asia/W.Europe : Off Move Enter Return TV Channel Area Auto Store Manual Store Add/Delete Sort Name Fine Tune LNA : Asia/W.Europe Off : Off On ...Move Enter Return English - 23 Using the LNA (Low Noise Amplifier) Feature This function is very useful in the situation that the TV is displayed. 2 Press...
...LNA setting is displayed. 3 Press the ENTER ( ) button. 4 Press the ... TV Channel Area Auto Store Manual Store Add/Delete Sort Name Fine Tune LNA : Asia/W.Europe : Off Move Enter Return TV Channel Area Auto Store Manual Store Add/Delete Sort Name Fine Tune LNA : Asia/W.Europe Off : Off On ...Move Enter Return English - 23 Using the LNA (Low Noise Amplifier) Feature This function is very useful in the situation that the TV is displayed. 2 Press...
Owner Instructions
Page 24
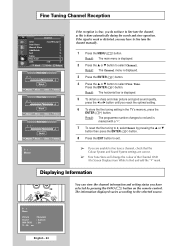
...picture and good sound quality, press the œ or √ button until you reach the optimal setting. 6 To store the fine tuning setting in the TV's memory, press the ENTER ( ) button. Result: The horizontal bar is displayed. 3 Press the ENTER ( ) button. 4 Press the ... The ...Displaying Information You can view the channel information and setting status you have to fine tune the channel manually. 1 Press the MENU ( ) button. Fine Tuning Channel Reception TV Channel Area Auto Store Manual Store Add/Delete Sort Name Fine Tune LNA Move : Asia/W.Europe : Off Enter Return P 1 ...
...picture and good sound quality, press the œ or √ button until you reach the optimal setting. 6 To store the fine tuning setting in the TV's memory, press the ENTER ( ) button. Result: The horizontal bar is displayed. 3 Press the ENTER ( ) button. 4 Press the ... The ...Displaying Information You can view the channel information and setting status you have to fine tune the channel manually. 1 Press the MENU ( ) button. Fine Tuning Channel Reception TV Channel Area Auto Store Manual Store Add/Delete Sort Name Fine Tune LNA Move : Asia/W.Europe : Off Enter Return P 1 ...

Owner Instructions
Page 57
... speaker to enjoy the rich sound through separate speakers, cancel the internal amplifier. To Display the DVD Home Theater ! Rear of the TV ① Connecting the Home Theater System ① Connect the monitoring audio out L and R jacks of the AV OUT on and press the SOURCE ( ) button to ... IN 2 or AV IN 3) or Component (1, 2) cannot be sure to match the colour coded input terminals and cable jacks. ☛ ◆ Refer to corresponding user's manual from the manufacturer for Home Theater System Connections.
... speaker to enjoy the rich sound through separate speakers, cancel the internal amplifier. To Display the DVD Home Theater ! Rear of the TV ① Connecting the Home Theater System ① Connect the monitoring audio out L and R jacks of the AV OUT on and press the SOURCE ( ) button to ... IN 2 or AV IN 3) or Component (1, 2) cannot be sure to match the colour coded input terminals and cable jacks. ☛ ◆ Refer to corresponding user's manual from the manufacturer for Home Theater System Connections.


