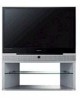
Owner Instructions
Page 3
... Picture Size 29 ■ Viewing the DNIe Demonstration 30 ■ Freezing the Current Picture 30 ■ Setting the My Colour Control (Easy Control 31 ■ Setting the My Colour Control (Detail Control 32 ■ Setting the Blue Screen 33 ■ Activating Panel Button Lock 33 ■ Setting the Film Mode 34 ■ Viewing the Picture in Picture (PIP 35 ■ Using the Digital NR (Noise Reduction) Feature 38 ■ Changing the Sound Standard 39 ■ Customizing the Sound Settings...
... Picture Size 29 ■ Viewing the DNIe Demonstration 30 ■ Freezing the Current Picture 30 ■ Setting the My Colour Control (Easy Control 31 ■ Setting the My Colour Control (Detail Control 32 ■ Setting the Blue Screen 33 ■ Activating Panel Button Lock 33 ■ Setting the Film Mode 34 ■ Viewing the Picture in Picture (PIP 35 ■ Using the Digital NR (Noise Reduction) Feature 38 ■ Changing the Sound Standard 39 ■ Customizing the Sound Settings...

Owner Instructions
Page 4
...; Connecting to the HDMI (High Definition Multimedia Interface) Input 56 ■ Connecting to the HDMI/DVI Compatible 56 ■ Connecting Home Theater System 57 ■ Setting up Your PC Software (Windows only 58 ■ PC Input Mode 59 ◆ RECOMMENDATIONS FOR USE ■ Setting Up Your Remote Control 60 ■ Programming the Remote Control for Other Components 61 ■ Replacing the Lamp 63 ■ Troubleshooting: Before Contacting Service Personnel 64 ■ Technical Specifications 65...
...; Connecting to the HDMI (High Definition Multimedia Interface) Input 56 ■ Connecting to the HDMI/DVI Compatible 56 ■ Connecting Home Theater System 57 ■ Setting up Your PC Software (Windows only 58 ■ PC Input Mode 59 ◆ RECOMMENDATIONS FOR USE ■ Setting Up Your Remote Control 60 ■ Programming the Remote Control for Other Components 61 ■ Replacing the Lamp 63 ■ Troubleshooting: Before Contacting Service Personnel 64 ■ Technical Specifications 65...
Owner Instructions
Page 5
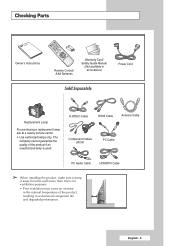
S-VIDEO Cable HDMI Cable Antenna Cable Component Cables (RCA) PC Cable PC Audio Cable HDMI/DVI Cable ➢ When installing the product, make sure to keep it away from the wall (more than 10cm) for ventilation purposes. • Poor ventilation may cause an increase in the internal temperature of the product if an unauthorized lamp is used. English - 5 Checking Parts Owner's Instructions Remote Control/ AAA Batteries Warranty Card/ Safety Guide Manual (Not available in a shortened component life...
S-VIDEO Cable HDMI Cable Antenna Cable Component Cables (RCA) PC Cable PC Audio Cable HDMI/DVI Cable ➢ When installing the product, make sure to keep it away from the wall (more than 10cm) for ventilation purposes. • Poor ventilation may cause an increase in the internal temperature of the product if an unauthorized lamp is used. English - 5 Checking Parts Owner's Instructions Remote Control/ AAA Batteries Warranty Card/ Safety Guide Manual (Not available in a shortened component life...
Owner Instructions
Page 6
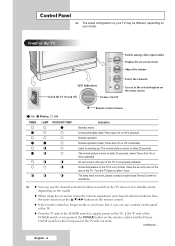
... panel of the TV. ◆ Press the "I" side of the POWER switch is warming up. Front of the TV. Clean the air vent cover in the rear of the TV Switch among video input modes Display the on after 25 seconds. A timer pilot lights when Timer Auto On or Off is not properly installed. The normal picture comes on -screen menu Adjust the volume LED Indicators Switch the TV On and Off Picture On/Off Select the channels Access to the TV...
... panel of the TV. ◆ Press the "I" side of the POWER switch is warming up. Front of the TV. Clean the air vent cover in the rear of the TV Switch among video input modes Display the on after 25 seconds. A timer pilot lights when Timer Auto On or Off is not properly installed. The normal picture comes on -screen menu Adjust the volume LED Indicators Switch the TV On and Off Picture On/Off Select the channels Access to the TV...

Owner Instructions
Page 9
... batteries and try using the remote control again When you press a button , ' ' appears along with selected mode (TV, VCR, CATV, DVD, or STB) and remaining batteries on and off Picture effect selection (Refer to page 25) Picture size (Refer to page 29) One or two-digit channel selection Volume increase Temporary sound switch-off Volume decrease TV mode selection Menu display/ Teletext index Move to the required menu option/ Adjust an option...
... batteries and try using the remote control again When you press a button , ' ' appears along with selected mode (TV, VCR, CATV, DVD, or STB) and remaining batteries on and off Picture effect selection (Refer to page 25) Picture size (Refer to page 29) One or two-digit channel selection Volume increase Temporary sound switch-off Volume decrease TV mode selection Menu display/ Teletext index Move to the required menu option/ Adjust an option...
Owner Instructions
Page 11
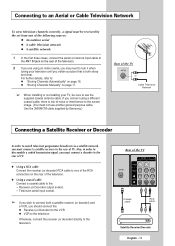
... on the rear of the television. 2 If you are using a different coaxial cable, there is risk of noise or interference to turn it when tuning your TV, be received by Samsung.) Rear of the TV or Cable Television Network Connecting a Satellite Receiver or Decoder In order to watch television programmes broadcast via a satellite network, you may need to the screen image. (You must not use the supplied coaxial antenna cable. Television aerial input socket. ➢...
... on the rear of the television. 2 If you are using a different coaxial cable, there is risk of noise or interference to turn it when tuning your TV, be received by Samsung.) Rear of the TV or Cable Television Network Connecting a Satellite Receiver or Decoder In order to watch television programmes broadcast via a satellite network, you may need to the screen image. (You must not use the supplied coaxial antenna cable. Television aerial input socket. ➢...
Owner Instructions
Page 12
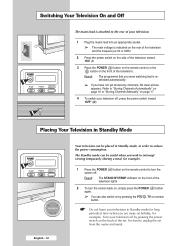
... Standby mode for example). Result: The STAND BY/TEMP indicator on the front of the television lights. 2 To turn the screen off , press the power switch toward "ON" (I). 3 Press the POWER ( ) button on the remote control (or the button on the front of time (when you are away on holiday, for long periods of the television). Refer to "Storing Channels Automatically" on page 16 or "Storing Channels Manually" on the remote control...
... Standby mode for example). Result: The STAND BY/TEMP indicator on the front of the television lights. 2 To turn the screen off , press the power switch toward "ON" (I). 3 Press the POWER ( ) button on the remote control (or the button on the front of time (when you are away on holiday, for long periods of the television). Refer to "Storing Channels Automatically" on page 16 or "Storing Channels Manually" on the remote control...

Owner Instructions
Page 14
... When the television is not pressed. 3 Select the appropriate language by using the numeric buttons on the remote control. 8 The settings are sorted and stored in the order which reflects their position in standby mode, press the POWER ( ) button on , several seconds, even if the ENTER ( ) button is initially powered on the remote control. When this has finished, the menu to set the time will be displayed. ➢...
... When the television is not pressed. 3 Select the appropriate language by using the numeric buttons on the remote control. 8 The settings are sorted and stored in the order which reflects their position in standby mode, press the POWER ( ) button on , several seconds, even if the ENTER ( ) button is initially powered on the remote control. When this has finished, the menu to set the time will be displayed. ➢...

Owner Instructions
Page 18
... select a channel by pressing the ... Result: The tuner scans the frequency range until you know the channel numbers, select Search by entering the assigned number for each cable channel in your screen. 11 To assign a programme number to each air broadcasting station in this mode. or † button to select Channel. English - 18 Adjust Enter Return TV Manual Store Programme Colour System Sound System Channel Search Store :P 1 : AUTO : BG...
... select a channel by pressing the ... Result: The tuner scans the frequency range until you know the channel numbers, select Search by entering the assigned number for each cable channel in your screen. 11 To assign a programme number to each air broadcasting station in this mode. or † button to select Channel. English - 18 Adjust Enter Return TV Manual Store Programme Colour System Sound System Channel Search Store :P 1 : AUTO : BG...
Owner Instructions
Page 24
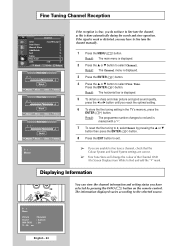
... Reset Adjust Move Save +3 Return P1 * Mono If the reception is clear, you are unable to fine tune a channel, check that the Colour System and Sound System settings are correct. ➢ Fine Tune Store will change the colour of the Channel OSD (On Screen Display) from White to Red and add the "*" mark. The information displayed varies according to select Channel. Result: The main menu...
... Reset Adjust Move Save +3 Return P1 * Mono If the reception is clear, you are unable to fine tune a channel, check that the Colour System and Sound System settings are correct. ➢ Fine Tune Store will change the colour of the Channel OSD (On Screen Display) from White to Red and add the "*" mark. The information displayed varies according to select Channel. Result: The main menu...

Owner Instructions
Page 25
... P.MODE ( : Picture Mode) button on the remote control. or † button. Changing the Picture Standard You can also set these options simply by pressing the ... Result: The Mode is displayed. 5 Press the ENTER ( ) button. Dynamic - Movie - TV Picture Mode : Standard Size : 16:9 Digital NR : On DNIe Demo : Off My Colour Control Film Mode : Off PIP Move Enter Return TV Mode Mode Contrast Brightness Sharpness Colour Tint G 50 Colour Tone Reset : Standard 80 50 50 50 R 50 : Cool 1 Move Enter Return TV Mode Mode Contrast Brightness Sharpness...
... P.MODE ( : Picture Mode) button on the remote control. or † button. Changing the Picture Standard You can also set these options simply by pressing the ... Result: The Mode is displayed. 5 Press the ENTER ( ) button. Dynamic - Movie - TV Picture Mode : Standard Size : 16:9 Digital NR : On DNIe Demo : Off My Colour Control Film Mode : Off PIP Move Enter Return TV Mode Mode Contrast Brightness Sharpness Colour Tint G 50 Colour Tone Reset : Standard 80 50 50 50 R 50 : Cool 1 Move Enter Return TV Mode Mode Contrast Brightness Sharpness...

Owner Instructions
Page 26
... is displayed. 2 Press the ... Cool 2 - Standard - or † button. or † button to exit. Customizing the Picture Settings TV Picture Mode : Standard Size : 16:9 Digital NR : On DNIe Demo : Off My Colour Control Film Mode : Off PIP Move Enter Return TV Mode Mode Contrast Brightness Sharpness Colour Tint G 50 Colour Tone Reset : Custom 80 50 50 50 R 50 : Cool 1 Move Enter Return Contrast 80 TV Mode Mode Contrast Brightness Sharpness Colour Tint G 50 Colour Tone Reset : Custom 80 Cool 2 50 Cool 1 50 Normal 50 Warm 1 R 50 : CoWoal...
... is displayed. 2 Press the ... Cool 2 - Standard - or † button. or † button to exit. Customizing the Picture Settings TV Picture Mode : Standard Size : 16:9 Digital NR : On DNIe Demo : Off My Colour Control Film Mode : Off PIP Move Enter Return TV Mode Mode Contrast Brightness Sharpness Colour Tint G 50 Colour Tone Reset : Custom 80 50 50 50 R 50 : Cool 1 Move Enter Return Contrast 80 TV Mode Mode Contrast Brightness Sharpness Colour Tint G 50 Colour Tone Reset : Custom 80 Cool 2 50 Cool 1 50 Normal 50 Warm 1 R 50 : CoWoal...

Owner Instructions
Page 27
...-adjust the picture so that it does not fit the TV screen. 10 Adjust the position by pressing the SOURCE ( ) button. 1 Press the MENU ( ) button. Result: The main menu is displayed. TV Setup Plug & Play Language Time Child Lock Blue Screen Melody Panel Lock PC : English : Off : On : Off Move Enter Return TV PC Image Lock Position Auto Adjustment Image Reset Move Enter Return TV Coarse Fine Image Lock 50 50 Move Enter Return Coarse 50 TV PC Image Lock Position Auto Adjustment Image Reset Move Enter Return TV...
...-adjust the picture so that it does not fit the TV screen. 10 Adjust the position by pressing the SOURCE ( ) button. 1 Press the MENU ( ) button. Result: The main menu is displayed. TV Setup Plug & Play Language Time Child Lock Blue Screen Melody Panel Lock PC : English : Off : On : Off Move Enter Return TV PC Image Lock Position Auto Adjustment Image Reset Move Enter Return TV Coarse Fine Image Lock 50 50 Move Enter Return Coarse 50 TV PC Image Lock Position Auto Adjustment Image Reset Move Enter Return TV...

Owner Instructions
Page 29
...; 4:3 : Sets the picture to your viewing requirements. 1 Press the MENU ( ) button. TV Picture Mode : Standard Size : 16:9 Digital NR : On DNIe Demo : Off My Colour Control Film Mode : Off PIP Move Enter Return AV, COMPONENT Mode TV 16:9 Zoom 4:3 Size Move PC Mode TV 16:9 Zoom 4:3 Enter Return Size Move HDMI Mode TV 16:9 Zoom 4:3 Enter Return Size Move Enter Return English - 29 The picture position ( ) and size ( ) adjustment are available in TV/Video/S-Video input modes. ◆ PC/HDMI modes prevent the screen...
...; 4:3 : Sets the picture to your viewing requirements. 1 Press the MENU ( ) button. TV Picture Mode : Standard Size : 16:9 Digital NR : On DNIe Demo : Off My Colour Control Film Mode : Off PIP Move Enter Return AV, COMPONENT Mode TV 16:9 Zoom 4:3 Size Move PC Mode TV 16:9 Zoom 4:3 Enter Return Size Move HDMI Mode TV 16:9 Zoom 4:3 Enter Return Size Move Enter Return English - 29 The picture position ( ) and size ( ) adjustment are available in TV/Video/S-Video input modes. ◆ PC/HDMI modes prevent the screen...

Owner Instructions
Page 31
... Detail Control menu will automatically set to Custom (see next page). 6 Select the required option by adjusting skin, sky, and grass tones using the predefined settings (Blue, Green, Pink, Standard, and Custom) without affecting other colours on the screen. 1 Press the MENU ( ) button. Press the ENTER ( ) button. Result: The Easy Control is selected. 5 Press the ENTER ( ) button again. ➢ The current image will display the My Color Control menu...
... Detail Control menu will automatically set to Custom (see next page). 6 Select the required option by adjusting skin, sky, and grass tones using the predefined settings (Blue, Green, Pink, Standard, and Custom) without affecting other colours on the screen. 1 Press the MENU ( ) button. Press the ENTER ( ) button. Result: The Easy Control is selected. 5 Press the ENTER ( ) button again. ➢ The current image will display the My Color Control menu...

Owner Instructions
Page 54
... the colour coded input terminals and cable jacks. Video disc player Connecting to the S-Video Input ➢ The S-VIDEO and AUDIO L /R connectors are used for equipment with your television, ensure that all elements are used . ➢ Please be used for detailed connection instructions and associated safety precautions. Side of the TV Camcorder Rear of the TV ① and Camcorder VCR ① To play pictures and sound, both the S-VIDEO (1, 2, or 3) and AUDIO L /R connectors...
... the colour coded input terminals and cable jacks. Video disc player Connecting to the S-Video Input ➢ The S-VIDEO and AUDIO L /R connectors are used for equipment with your television, ensure that all elements are used . ➢ Please be used for detailed connection instructions and associated safety precautions. Side of the TV Camcorder Rear of the TV ① and Camcorder VCR ① To play pictures and sound, both the S-VIDEO (1, 2, or 3) and AUDIO L /R connectors...

Owner Instructions
Page 57
... AV Receiver) using the DVD Home Theater, where the TV does not produce the audio. Turn the TV on the rear-side connection panel of the TV to the AUDIO IN jacks of the Home Theater System while watching the TV using the audio cable. ② Press the SOURCE ( ) button to select the desired external device connected to the TV. ③ If you want to connect the video cable properly if desired external input AV...
... AV Receiver) using the DVD Home Theater, where the TV does not produce the audio. Turn the TV on the rear-side connection panel of the TV to the AUDIO IN jacks of the Home Theater System while watching the TV using the audio cable. ② Press the SOURCE ( ) button to select the desired external device connected to the TV. ③ If you want to connect the video cable properly if desired external input AV...

Owner Instructions
Page 60
... (Cable box or DVD). Setting Up Your Remote Control VCR Your TV comes equipped with all VCRs, DVD players, Cable boxes, and Set-Top Boxs. 1 Turn off your VCR (Cable box or DVD). 2 Press the SELECT button to switch the remote control to operate the VCR (Cable box or DVD). ➢ ◆ When your remote control is in VCR, CATV, DVD or STB mode, the volume buttons still control your television's volume. ◆ When your remote control is set up, press the SELECT button any time you want to use the remote control...
... (Cable box or DVD). Setting Up Your Remote Control VCR Your TV comes equipped with all VCRs, DVD players, Cable boxes, and Set-Top Boxs. 1 Turn off your VCR (Cable box or DVD). 2 Press the SELECT button to switch the remote control to operate the VCR (Cable box or DVD). ➢ ◆ When your remote control is in VCR, CATV, DVD or STB mode, the volume buttons still control your television's volume. ◆ When your remote control is set up, press the SELECT button any time you want to use the remote control...

Owner Instructions
Page 63
... when all three LEDs on the front (TIMER, LAMP and STAND BY/TEMP) are flashing. ◆ Check before replacing the lamp as new. ◆ When do I need to replace the lamp? The lamp code is improperly handled, the screen quality can be affected and the expected lifespan of the lamp with your bare hands nor insert any foreign object inside the lamp cover or on the lamp case or the...
... when all three LEDs on the front (TIMER, LAMP and STAND BY/TEMP) are flashing. ◆ Check before replacing the lamp as new. ◆ When do I need to replace the lamp? The lamp code is improperly handled, the screen quality can be affected and the expected lifespan of the lamp with your bare hands nor insert any foreign object inside the lamp cover or on the lamp case or the...
Owner Instructions
Page 64
... sound No picture or black and white picture Sound and picture interference Blurred or snowy picture, distorted sound Remote control malfunctions Screen is black and power indicator light blinks steadily ◆ Check that the mains lead has been connected to ON. ◆ Check the volume. ◆ Check whether the volume MUTE ( ) button on the keyboard. ◆ On your aerial. Power, Signal Cable. ◆ The TV is using its power management system. ◆ Press the SOURCE ( ) button on the panel or remote control. ◆ Turn...
... sound No picture or black and white picture Sound and picture interference Blurred or snowy picture, distorted sound Remote control malfunctions Screen is black and power indicator light blinks steadily ◆ Check that the mains lead has been connected to ON. ◆ Check the volume. ◆ Check whether the volume MUTE ( ) button on the keyboard. ◆ On your aerial. Power, Signal Cable. ◆ The TV is using its power management system. ◆ Press the SOURCE ( ) button on the panel or remote control. ◆ Turn...


