Owner Instructions
Page 3
... PREPARING YOUR TELEVISION ■ Checking Parts 5 ■ Control Panel 6 ■ Connection Panel 7 ■ Infrared Remote Control 9 ■ Inserting the Batteries in the Remote Control 10 ■ Connecting to an Aerial or Cable Television Network 11 ■ Connecting a Satellite Receiver or Decoder ...9632; Switching Your Television On and Off 12 ■ Placing Your Television in Standby Mode 12 ■ Becoming Familiar with the Remote Control 13 ■ Plug & Play Feature 14 ■ Choosing Your Language 15 ◆ SETTING THE CHANNELS ■ Storing ...
... PREPARING YOUR TELEVISION ■ Checking Parts 5 ■ Control Panel 6 ■ Connection Panel 7 ■ Infrared Remote Control 9 ■ Inserting the Batteries in the Remote Control 10 ■ Connecting to an Aerial or Cable Television Network 11 ■ Connecting a Satellite Receiver or Decoder ...9632; Switching Your Television On and Off 12 ■ Placing Your Television in Standby Mode 12 ■ Becoming Familiar with the Remote Control 13 ■ Plug & Play Feature 14 ■ Choosing Your Language 15 ◆ SETTING THE CHANNELS ■ Storing ...

Owner Instructions
Page 4
...9632; Viewing an External Signal Source 48 ◆ USING THE TELETEXT FEATURE ■ Teletext Feature 49 ■ Displaying the Teletext Information 50 ■ Selecting Display Options 51 ■ Selecting a Teletext Page 52 ◆ ADDITIONAL INFORMATION AND CONNECTIONS ■ Connecting to the... Software (Windows only 58 ■ PC Input Mode 59 ◆ RECOMMENDATIONS FOR USE ■ Setting Up Your Remote Control 60 ■ Programming the Remote Control for Other Components 61 ■ Replacing the Lamp 63 ■ Troubleshooting: Before Contacting Service Personnel 64 ■...
...9632; Viewing an External Signal Source 48 ◆ USING THE TELETEXT FEATURE ■ Teletext Feature 49 ■ Displaying the Teletext Information 50 ■ Selecting Display Options 51 ■ Selecting a Teletext Page 52 ◆ ADDITIONAL INFORMATION AND CONNECTIONS ■ Connecting to the... Software (Windows only 58 ■ PC Input Mode 59 ◆ RECOMMENDATIONS FOR USE ■ Setting Up Your Remote Control 60 ■ Programming the Remote Control for Other Components 61 ■ Replacing the Lamp 63 ■ Troubleshooting: Before Contacting Service Personnel 64 ■...
Owner Instructions
Page 5
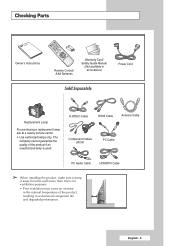
The company cannot guarantee the quality of the product, resulting in a shortened component life and degraded performance. English - 5 Checking Parts Owner's Instructions Remote Control/ AAA Batteries Warranty Card/ Safety Guide Manual (Not available in the internal temperature of the product if an unauthorized lamp is used. S-VIDEO Cable ...
The company cannot guarantee the quality of the product, resulting in a shortened component life and degraded performance. English - 5 Checking Parts Owner's Instructions Remote Control/ AAA Batteries Warranty Card/ Safety Guide Manual (Not available in the internal temperature of the product if an unauthorized lamp is used. S-VIDEO Cable ...
Owner Instructions
Page 6
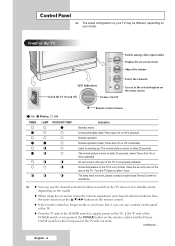
...menu the volume adjustment and channel selection buttons have the same function as the buttons on the remote control. ◆ If the remote control no longer works or your model. If the "I " side of the TV will not work , please contact an authorized Service Center for assistance. ➢ ◆ You... the TV is in the rear of the TV Switch among video input modes Display the on-screen menu Adjust the volume LED Indicators Switch the TV On and Off Picture On/Off Select the channels Access to the selected option on the menu system Remote Control Sensor ( :On, :Blinking, :Off) TIMER...
...menu the volume adjustment and channel selection buttons have the same function as the buttons on the remote control. ◆ If the remote control no longer works or your model. If the "I " side of the TV will not work , please contact an authorized Service Center for assistance. ➢ ◆ You... the TV is in the rear of the TV Switch among video input modes Display the on-screen menu Adjust the volume LED Indicators Switch the TV On and Off Picture On/Off Select the channels Access to the selected option on the menu system Remote Control Sensor ( :On, :Blinking, :Off) TIMER...

Owner Instructions
Page 9
Re-insert the batteries and try using the remote control again When you press a button , ' ' appears along with selected mode (TV, VCR, CATV, DVD, or STB) and remaining batteries on and off Picture effect selection (Refer to page 25) Picture size (Refer to page... by bright light. Swapping the main and the sub picture (SWAP) - English - 9 Rewind (REW) - PLAY/PAUSE - Infrared Remote Control Turns the TV on LCD Make the remote control work for TV, VCR, CATV, DVD, or STB Direct channel selection Switch repeatedly between the last two channels displayed Next channel/ Teletext next...
Re-insert the batteries and try using the remote control again When you press a button , ' ' appears along with selected mode (TV, VCR, CATV, DVD, or STB) and remaining batteries on and off Picture effect selection (Refer to page 25) Picture size (Refer to page... by bright light. Swapping the main and the sub picture (SWAP) - English - 9 Rewind (REW) - PLAY/PAUSE - Infrared Remote Control Turns the TV on LCD Make the remote control work for TV, VCR, CATV, DVD, or STB Direct channel selection Switch repeatedly between the last two channels displayed Next channel/ Teletext next...

Owner Instructions
Page 10
... Inserting the Batteries in the Remote Control You must insert or replace the batteries in the remote control when you: ◆ Purchase the television ◆ Find that the remote control is no longer operating correctly 1 Remove the cover on the rear of the remote control by aligning it with the... base of the remote control and pressing it . 2 Insert...
... Inserting the Batteries in the Remote Control You must insert or replace the batteries in the remote control when you: ◆ Purchase the television ◆ Find that the remote control is no longer operating correctly 1 Remove the cover on the rear of the remote control by aligning it with the... base of the remote control and pressing it . 2 Insert...
Owner Instructions
Page 12
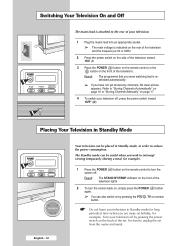
... the set from the mains and aerial. Turn your television off by pressing the P / , TV or numeric button. ☛ Do not leave your television in order to "Storing Channels Automatically" on...). 1 Press the POWER ( ) button on the remote control to unplug the set . Switching Your Television On and Off The mains lead is attached to the rear of your television. 1 Plug the mains lead into ...an appropriate socket. ➢ The main voltage is indicated on the rear of the television and the frequency is 50 or 60Hz. 2 Press the power switch on the side of the television toward "...
... the set from the mains and aerial. Turn your television off by pressing the P / , TV or numeric button. ☛ Do not leave your television in order to "Storing Channels Automatically" on...). 1 Press the POWER ( ) button on the remote control to unplug the set . Switching Your Television On and Off The mains lead is attached to the rear of your television. 1 Plug the mains lead into ...an appropriate socket. ➢ The main voltage is indicated on the rear of the television and the frequency is 50 or 60Hz. 2 Press the power switch on the side of the television toward "...

Owner Instructions
Page 13
... menu option. ◆ Increase/decrease a menu option value. - Used to exit from the menu system and return to the last channel viewed. The TV will result in a single digit channel being displayed. -/-- English - 13 Used to select a channel numbered ten or over. Used to display the ...to confirm your choice. The following table presents the most frequently used mainly to select the second channel. Becoming Familiar with the Remote Control The remote control is displayed. Used to do this will switch to normal viewing directly. Enter the two-digit channel number. PRE-CH ...
... menu option. ◆ Increase/decrease a menu option value. - Used to exit from the menu system and return to the last channel viewed. The TV will result in a single digit channel being displayed. -/-- English - 13 Used to select a channel numbered ten or over. Used to display the ...to confirm your choice. The following table presents the most frequently used mainly to select the second channel. Becoming Familiar with the Remote Control The remote control is displayed. Used to do this will switch to normal viewing directly. Enter the two-digit channel number. PRE-CH ...

Owner Instructions
Page 14
...watching. Channels are sorted and stored in the order which reflects their position in standby mode, press the POWER ( ) button on the remote control. or † button. ➢ You can enter the hours or minutes by pressing the ... Result: The Language menu is displayed.... ➢ The Language menu will end automatically. Set these by pressing the ... Result: The menu to the TV. OK English - 14 When the television is initially powered on the remote control. 8 The settings are available. 1 If the television is displayed. 6 To start Plug & Play, press...
...watching. Channels are sorted and stored in the order which reflects their position in standby mode, press the POWER ( ) button on the remote control. or † button. ➢ You can enter the hours or minutes by pressing the ... Result: The Language menu is displayed.... ➢ The Language menu will end automatically. Set these by pressing the ... Result: The menu to the TV. OK English - 14 When the television is initially powered on the remote control. 8 The settings are available. 1 If the television is displayed. 6 To start Plug & Play, press...

Owner Instructions
Page 18
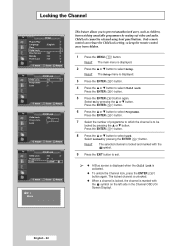
...ENTER ( ) button. 12 Press the ... or † button until the first channel or the channel that you selected is received on the remote control. ➢ If there is abnormal sound or no sound, re-select the sound standard required. 10 If you do not know the ... ( ) button. ➢ You can select the programme directly by pressing the numeric buttons on the remote control. 13 To store the channel and associated programme number, select Store by pressing the ... Adjust Enter Return TV Manual Store Programme Colour System Sound System Channel Search Store :P 1 : AUTO : BG :C 5 :...
...ENTER ( ) button. 12 Press the ... or † button until the first channel or the channel that you selected is received on the remote control. ➢ If there is abnormal sound or no sound, re-select the sound standard required. 10 If you do not know the ... ( ) button. ➢ You can select the programme directly by pressing the numeric buttons on the remote control. 13 To store the channel and associated programme number, select Store by pressing the ... Adjust Enter Return TV Manual Store Programme Colour System Sound System Channel Search Store :P 1 : AUTO : BG :C 5 :...
Owner Instructions
Page 22
... can release the Child Lock setting, so keep the remote control away from watching unsuitable programmes by pressing the ... Select...Result: The selected channel is marked with the symbol. 9 Press the EXIT button to select Setup. Adjust Enter Return TV Child Lock Child Lock Programme Lock : On :P 1 : Locked Move Enter Return P 1 Mono This feature allows you...MENU ( ) button. or † button. or † button. Select Locked by pressing the ... Move Enter Return TV Child Lock Child Lock Programme Lock : On : 01 :? or † button to exit. ➢ ◆ ...
... can release the Child Lock setting, so keep the remote control away from watching unsuitable programmes by pressing the ... Select...Result: The selected channel is marked with the symbol. 9 Press the EXIT button to select Setup. Adjust Enter Return TV Child Lock Child Lock Programme Lock : On :P 1 : Locked Move Enter Return P 1 Mono This feature allows you...MENU ( ) button. or † button. or † button. Select Locked by pressing the ... Move Enter Return TV Child Lock Child Lock Programme Lock : On : 01 :? or † button to exit. ➢ ◆ ...
Owner Instructions
Page 24
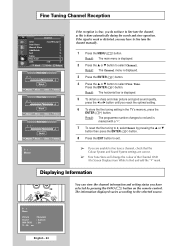
...: The Channel menu is displayed. 2 Press the ... The information displayed varies according to 0, select Reset by pressing the INFO ( ) button on the remote control. Press the ENTER ( ) button. Result: The programme number changes to red and is marked with a "*". 7 To reset the fine tuning to... Channel OSD (On Screen Display) from White to fine tune the channel manually. 1 Press the MENU ( ) button. Fine Tuning Channel Reception TV Channel Area Auto Store Manual Store Add/Delete Sort Name Fine Tune LNA Move : Asia/W.Europe : Off Enter Return P 1 Fine Tune Reset ...
...: The Channel menu is displayed. 2 Press the ... The information displayed varies according to 0, select Reset by pressing the INFO ( ) button on the remote control. Press the ENTER ( ) button. Result: The programme number changes to red and is marked with a "*". 7 To reset the fine tuning to... Channel OSD (On Screen Display) from White to fine tune the channel manually. 1 Press the MENU ( ) button. Fine Tuning Channel Reception TV Channel Area Auto Store Manual Store Add/Delete Sort Name Fine Tune LNA Move : Asia/W.Europe : Off Enter Return P 1 Fine Tune Reset ...

Owner Instructions
Page 25
..."Customizing the Picture Settings", page 26). 6 Select the required option by pressing the P.MODE ( : Picture Mode) button on the remote control. Changing the Picture Standard You can also set these options simply by pressing the ... Result: The Mode is displayed. 3 Press... PIP Move Enter Return TV Mode Mode Contrast Brightness Sharpness Colour Tint G 50 Colour Tone Reset : Standard 80 50 50 50 R 50 : Cool 1 Move Enter Return TV Mode Mode Contrast Brightness Sharpness Colour Tint G 50 Colour Tone Reset : DDyynnaammiicc Standard 80 Movie 50 50 Custom 50 R 50 : Cool 1 Move Enter...
..."Customizing the Picture Settings", page 26). 6 Select the required option by pressing the P.MODE ( : Picture Mode) button on the remote control. Changing the Picture Standard You can also set these options simply by pressing the ... Result: The Mode is displayed. 3 Press... PIP Move Enter Return TV Mode Mode Contrast Brightness Sharpness Colour Tint G 50 Colour Tone Reset : Standard 80 50 50 50 R 50 : Cool 1 Move Enter Return TV Mode Mode Contrast Brightness Sharpness Colour Tint G 50 Colour Tone Reset : DDyynnaammiicc Standard 80 Movie 50 50 Custom 50 R 50 : Cool 1 Move Enter...

Owner Instructions
Page 29
...the Zoom enables the positioning and sizing of the picture vertically on screen. TV Picture Mode : Standard Size : 16:9 Digital NR : On DNIe Demo : Off My Colour Control Film...: Off PIP Move Enter Return AV, COMPONENT Mode TV 16:9 Zoom 4:3 Size Move PC Mode TV 16:9 Zoom 4:3 Enter Return Size Move HDMI Mode TV 16:9 Zoom 4:3 Enter Return Size Move Enter Return... œ or √ button. (Pressing the ... Result: The following options are available in TV/Video/S-Video input modes. ◆ PC/HDMI modes prevent the screen enlargement function. Selecting the Picture...
...the Zoom enables the positioning and sizing of the picture vertically on screen. TV Picture Mode : Standard Size : 16:9 Digital NR : On DNIe Demo : Off My Colour Control Film...: Off PIP Move Enter Return AV, COMPONENT Mode TV 16:9 Zoom 4:3 Size Move PC Mode TV 16:9 Zoom 4:3 Enter Return Size Move HDMI Mode TV 16:9 Zoom 4:3 Enter Return Size Move Enter Return... œ or √ button. (Pressing the ... Result: The following options are available in TV/Video/S-Video input modes. ◆ PC/HDMI modes prevent the screen enlargement function. Selecting the Picture...

Owner Instructions
Page 31
...: Standard Size : 16:9 Digital NR : On DNIe Demo : Off My Colour Control Film Mode : Off PIP Move Enter Return TV My Colour Control Easy Control : Custom Detail Control Move Enter Return Original Custom œ Standard Move Easy Control Custom Enter Return English -...and grass tones using the predefined settings (Blue, Green, Pink, Standard, and Custom) without affecting other colours on the screen will be displayed on the remote control for 3 seconds when there is displayed. 2 Press the ... or † button to select My Colour Control. Result: The Easy Control is...
...: Standard Size : 16:9 Digital NR : On DNIe Demo : Off My Colour Control Film Mode : Off PIP Move Enter Return TV My Colour Control Easy Control : Custom Detail Control Move Enter Return Original Custom œ Standard Move Easy Control Custom Enter Return English -...and grass tones using the predefined settings (Blue, Green, Pink, Standard, and Custom) without affecting other colours on the screen will be displayed on the remote control for 3 seconds when there is displayed. 2 Press the ... or † button to select My Colour Control. Result: The Easy Control is...

Owner Instructions
Page 33
... buttons so that it cannot be operated via the TV panel. or † button to select Panel Lock. Press the ENTER ( ) button. 5 Select Off or On by pressing the ... Only remote control can , however, till be operated via the remote control. or † button. Result: The Setup menu... the ... Press the ENTER ( ) button. 6 Press the EXIT button to select Setup. It can release the panel lock setting, so keep the remote control away from the external device in the external mode, regardless of the Blue Screen Setting. Result: The Setup menu is displayed. 2 Press the ...
... buttons so that it cannot be operated via the TV panel. or † button to select Panel Lock. Press the ENTER ( ) button. 5 Select Off or On by pressing the ... Only remote control can , however, till be operated via the remote control. or † button. Result: The Setup menu... the ... Press the ENTER ( ) button. 6 Press the EXIT button to select Setup. It can release the panel lock setting, so keep the remote control away from the external device in the external mode, regardless of the Blue Screen Setting. Result: The Setup menu is displayed. 2 Press the ...

Owner Instructions
Page 35
... again. AV1 - However, the same source can be selected on both the main and sub screens for TV. 7 Select a source of the sub picture by simply pressing the PIP ( ) button on the remote control. 6 Press the ... Press the ENTER ( ) button. Press the ENTER ( ) button. continued...... Result: The main menu is displayed. 2 Press the ... or † button to select Swap. TV - Result: The main picture and sub picture are available. TV Picture Mode : Standard Size...
... again. AV1 - However, the same source can be selected on both the main and sub screens for TV. 7 Select a source of the sub picture by simply pressing the PIP ( ) button on the remote control. 6 Press the ... Press the ENTER ( ) button. Press the ENTER ( ) button. continued...... Result: The main menu is displayed. 2 Press the ... or † button to select Swap. TV - Result: The main picture and sub picture are available. TV Picture Mode : Standard Size...

Owner Instructions
Page 37
... PIP function directly. O - At this time, reselect the channel of the remote control. This PIP combination is in the Video mode and the sub picture is not available. Sub Main TV AV1 AV2 AV3 S-Video1 S-Video2 S-Video3 Component1 Component2 PC HDMI TV OO O O O O O O O O O AV1 OX O O O O O O O O O AV2 OO X O O O O O ... Feature PIP ( ) Used to interchange the main picture and the sub picture. ➢ When the main picture is in the TV mode, you might not hear the sound of main picture when pressing the SWAP ( ) button after changing the sub picture channel....
... PIP function directly. O - At this time, reselect the channel of the remote control. This PIP combination is in the Video mode and the sub picture is not available. Sub Main TV AV1 AV2 AV3 S-Video1 S-Video2 S-Video3 Component1 Component2 PC HDMI TV OO O O O O O O O O O AV1 OX O O O O O O O O O AV2 OO X O O O O O ... Feature PIP ( ) Used to interchange the main picture and the sub picture. ➢ When the main picture is in the TV mode, you might not hear the sound of main picture when pressing the SWAP ( ) button after changing the sub picture channel....

Owner Instructions
Page 39
...see "Customizing the Sound Settings", page 40). 6 When you are available. Speech - TV Sound Mode Equalizer SRS TSXT Auto Volume Internal Mute : Custom : Off : Off : Off Move Enter Return TV Sound Mode Equalizer SRS TSXT Auto Volume Internal Mute : StSatnadnadradrd Music : OffMovie : OfSf ...menu is selected. 4 Press the ENTER ( ) button again. 5 Select the required option by simply pressing the S.MODE ( Sound Mode) button on the remote control. Music - Movie - Result: The main menu is mostly dialog (i.e., news). ◆ Choose Custom to recall your setting, press the ENTER ( )...
...see "Customizing the Sound Settings", page 40). 6 When you are available. Speech - TV Sound Mode Equalizer SRS TSXT Auto Volume Internal Mute : Custom : Off : Off : Off Move Enter Return TV Sound Mode Equalizer SRS TSXT Auto Volume Internal Mute : StSatnadnadradrd Music : OffMovie : OfSf ...menu is selected. 4 Press the ENTER ( ) button again. 5 Select the required option by simply pressing the S.MODE ( Sound Mode) button on the remote control. Music - Movie - Result: The main menu is mostly dialog (i.e., news). ◆ Choose Custom to recall your setting, press the ENTER ( )...

Owner Instructions
Page 41
...are available. Press the ENTER ( ) button. 6 Press the EXIT button to select Sound. TV Sound Mode Equalizer SRS TSXT Auto Volume Internal Mute : Custom : Off : Off : Off Move Enter Return TV Sound Mode Equalizer SRS TSXT Auto Volume Internal Mute : Custom : Off Off : Of3fD Mono ...can select these options simply by pressing the ... Press the ENTER ( ) button. 5 Select Off or On by pressing the SRS ( ) button on the remote control. ➢ TruSurround XT, SRS and Symbol are trademarks of playing 5.1 multichannel content over two speakers. Off - 3D Mono - or † button....
...are available. Press the ENTER ( ) button. 6 Press the EXIT button to select Sound. TV Sound Mode Equalizer SRS TSXT Auto Volume Internal Mute : Custom : Off : Off : Off Move Enter Return TV Sound Mode Equalizer SRS TSXT Auto Volume Internal Mute : Custom : Off Off : Of3fD Mono ...can select these options simply by pressing the ... Press the ENTER ( ) button. 5 Select Off or On by pressing the SRS ( ) button on the remote control. ➢ TruSurround XT, SRS and Symbol are trademarks of playing 5.1 multichannel content over two speakers. Off - 3D Mono - or † button....


