Owners Instructions
Page 1
Register your product at www.samsung.com/global/register DLP TV SP42L6HX SP46L6HX SP50L6HX SP56L6HX SP61L6HX SP67L6HX Owner's Instructions Before operating the unit, please read this manual thoroughly, and retain it for future reference. Picture In Picture (PIP) Color Weakness Enhancement Mode My Color Control SRS TruSurroundXT Digital Natural Image engine This device is a Class B digital apparatus.
Register your product at www.samsung.com/global/register DLP TV SP42L6HX SP46L6HX SP50L6HX SP56L6HX SP61L6HX SP67L6HX Owner's Instructions Before operating the unit, please read this manual thoroughly, and retain it for future reference. Picture In Picture (PIP) Color Weakness Enhancement Mode My Color Control SRS TruSurroundXT Digital Natural Image engine This device is a Class B digital apparatus.
Owners Instructions
Page 3
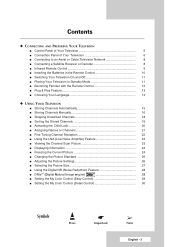
... Remote Control 12 ■ Plug & Play Feature 13 ■ Choosing Your Language 14 ◆ USING YOUR TELEVISION ■ Storing Channels Automatically 15 ■ Storing Channels Manually 16 ■ Skipping Unwanted Channels 18 ■ Sorting the Stored Channels 19 ■ Activating the Child Lock 20 ■ Assigning Names to Channels 21 ■...
... Remote Control 12 ■ Plug & Play Feature 13 ■ Choosing Your Language 14 ◆ USING YOUR TELEVISION ■ Storing Channels Automatically 15 ■ Storing Channels Manually 16 ■ Skipping Unwanted Channels 18 ■ Sorting the Stored Channels 19 ■ Activating the Child Lock 20 ■ Assigning Names to Channels 21 ■...
Owners Instructions
Page 8
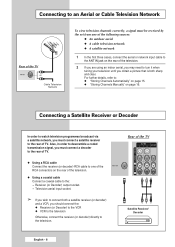
...wish to connect both sharp and clear. For further details, refer to: ◆ "Storing Channels Automatically" on page 15. ◆ "Storing Channels Manually" on the rear of the television. ◆ Using a coaxial cable Connect a coaxial cable to the: - Connecting to an Aerial or Cable Television Network...Network To view television channels correctly, a signal must be received by the set from one of the RCA connectors on page 16. English - 8 Rear of TV. Television aerial input socket. ➢ If you should connect the: ◆ Receiver (or Decoder) to the VCR ◆ VCR to the ...
...wish to connect both sharp and clear. For further details, refer to: ◆ "Storing Channels Automatically" on page 15. ◆ "Storing Channels Manually" on the rear of the television. ◆ Using a coaxial cable Connect a coaxial cable to the: - Connecting to an Aerial or Cable Television Network...Network To view television channels correctly, a signal must be received by the set from one of the RCA connectors on page 16. English - 8 Rear of TV. Television aerial input socket. ➢ If you should connect the: ◆ Receiver (or Decoder) to the VCR ◆ VCR to the ...
Owners Instructions
Page 11
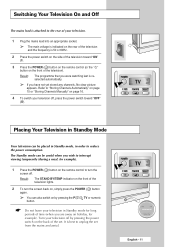
..." on page 15 or "Storing Channels Manually" on page 16. 4 To switch your television off by pressing the P / , TV or numeric button. ☛ Do not leave your television. 1 Plug the mains lead into an appropriate socket. ➢ The main voltage is indicated on the rear of the television and the frequency is... were watching last is re- It is best to unplug the set . Switching Your Television On and Off The mains lead is attached to the rear of your television in Standby mode for long periods of time (when you are away on holiday, for example). 1 Press the POWER ( ) button on...
..." on page 15 or "Storing Channels Manually" on page 16. 4 To switch your television off by pressing the P / , TV or numeric button. ☛ Do not leave your television. 1 Plug the mains lead into an appropriate socket. ➢ The main voltage is indicated on the rear of the television and the frequency is... were watching last is re- It is best to unplug the set . Switching Your Television On and Off The mains lead is attached to the rear of your television in Standby mode for long periods of time (when you are away on holiday, for example). 1 Press the POWER ( ) button on...

Owners Instructions
Page 15
... 22) ◆ Activate/deactivate the LNA (Low Noise Amplifier) feature (see page 23) ◆ Activate/deactivate the Digital NR (Noise Reduction) feature (see page 28) TV Channel Auto Store √ Manual Store √ Add/Delete √ Sort √ Child Lock √ Name √ Fine Tune √ † More Move Enter Return...
... 22) ◆ Activate/deactivate the LNA (Low Noise Amplifier) feature (see page 23) ◆ Activate/deactivate the Digital NR (Noise Reduction) feature (see page 28) TV Channel Auto Store √ Manual Store √ Add/Delete √ Sort √ Child Lock √ Name √ Fine Tune √ † More Move Enter Return...
Owners Instructions
Page 16
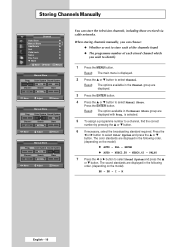
...16 Result: The options available in the following order. (depending on the model). I - The color standards are displayed in the Manual Store group are displayed. 3 Press the ENTER button. 4 Press the ▲ or ▼ button to select Channel. BG -...√ button to select Color System and press the ... or † button. Storing Channels Manually TV Channel Auto Store √ Manual Store √ Add/Delete √ Sort √ Child Lock √ Name √ Fine Tune √ † More Move Enter Return Manual Store Prog. 1 Channel C --
...16 Result: The options available in the following order. (depending on the model). I - The color standards are displayed in the Manual Store group are displayed. 3 Press the ENTER button. 4 Press the ▲ or ▼ button to select Channel. BG -...√ button to select Color System and press the ... or † button. Storing Channels Manually TV Channel Auto Store √ Manual Store √ Add/Delete √ Sort √ Child Lock √ Name √ Fine Tune √ † More Move Enter Return Manual Store Prog. 1 Channel C --

Owners Instructions
Page 17
...Color System Sound System AUTO BG Search Store 887MHz ? œ √ Move Adjust Return Manual Store Prog. 1 Channel C 02 Color System Sound System AUTO BG Search Store 887MHz ? œ √ Move Adjust Return Manual Store Prog. 1 Channel C 02 Color System Sound System AUTO BG Search Store 887MHz OK &#...number, select the Store by pressing the œ or √ button. or † button to start the search. Storing Channels Manually (continued) 8 If you know the channel numbers, select the Search by pressing the œ or √ button. Press the ...
...Color System Sound System AUTO BG Search Store 887MHz ? œ √ Move Adjust Return Manual Store Prog. 1 Channel C 02 Color System Sound System AUTO BG Search Store 887MHz ? œ √ Move Adjust Return Manual Store Prog. 1 Channel C 02 Color System Sound System AUTO BG Search Store 887MHz OK &#...number, select the Store by pressing the œ or √ button. or † button to start the search. Storing Channels Manually (continued) 8 If you know the channel numbers, select the Search by pressing the œ or √ button. Press the ...
Owners Instructions
Page 18
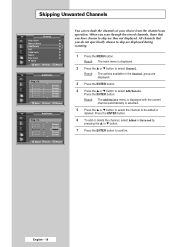
... by pressing the ▲ or ▼ button. 7 Press the ENTER button to be added or deleted. Skipping Unwanted Channels TV Channel Auto Store √ Manual Store √ Add/Delete √ Sort √ Child Lock √ Name √ Fine Tune √ † More Move... Enter Return TV Add/Delete Prog. Result: The Add/Delete menu is displayed with the current channel automatically is displayed. 2 Press the...
... by pressing the ▲ or ▼ button. 7 Press the ENTER button to be added or deleted. Skipping Unwanted Channels TV Channel Auto Store √ Manual Store √ Add/Delete √ Sort √ Child Lock √ Name √ Fine Tune √ † More Move... Enter Return TV Add/Delete Prog. Result: The Add/Delete menu is displayed with the current channel automatically is displayed. 2 Press the...

Owners Instructions
Page 19
... auto store. Press the ENTER button. 6 Select the number of stored channels. Ch. 1 ----- * 2 ----- * 3 ----- * 4 ----- * 5 ----- * Move Enter Return TV Sort Prog. You can delete those channels you to change the programme numbers of the programme to which the channel is displayed. 2 Press the ▲... to select Sort. Press the ENTER button. This operation may be moved by pressing the ▲ or ▼ button. TV Channel Auto Store √ Manual Store √ Add/Delete √ Sort √ Child Lock √ Name √ Fine Tune √ † More ...
... auto store. Press the ENTER button. 6 Select the number of stored channels. Ch. 1 ----- * 2 ----- * 3 ----- * 4 ----- * 5 ----- * Move Enter Return TV Sort Prog. You can delete those channels you to change the programme numbers of the programme to which the channel is displayed. 2 Press the ▲... to select Sort. Press the ENTER button. This operation may be moved by pressing the ▲ or ▼ button. TV Channel Auto Store √ Manual Store √ Add/Delete √ Sort √ Child Lock √ Name √ Fine Tune √ † More ...
Owners Instructions
Page 20
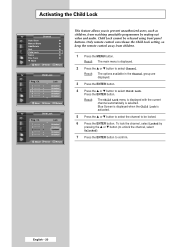
...when the Child Lock is selected. Ch. 1 ----- * 2 ----- * 3 ----- * 4 ----- * 5 ----- * Lock Unlocked Unlocked Unlocked Unlocked Unlocked Move Enter Return TV Child Lock Prog. Result: The Child Lock menu is displayed with the current channel automatically is activated. 5 Press the ... Ch. 1 ----- * 2 ----- * 3 ...† button to select the channel to be released using front panel buttons. Activating the Child Lock TV Channel Auto Store √ Manual Store √ Add/Delete √ Sort √ Child Lock √ Name √ Fine Tune √...
...when the Child Lock is selected. Ch. 1 ----- * 2 ----- * 3 ----- * 4 ----- * 5 ----- * Lock Unlocked Unlocked Unlocked Unlocked Unlocked Move Enter Return TV Child Lock Prog. Result: The Child Lock menu is displayed with the current channel automatically is activated. 5 Press the ... Ch. 1 ----- * 2 ----- * 3 ...† button to select the channel to be released using front panel buttons. Activating the Child Lock TV Channel Auto Store √ Manual Store √ Add/Delete √ Sort √ Child Lock √ Name √ Fine Tune √...

Owners Instructions
Page 21
...you have finished entering the name, press the ENTER button to confirm the name. Result: The main menu is broadcast. TV Channel Auto Store √ Manual Store √ Add/Delete √ Sort √ Child Lock √ Name √ Fine Tune √ †... More Move Enter Return TV Name Prog. Ch. 2 ----3 ----4 ----5 ----6 ----- Result: The Name menu is displayed with the current channel automatically is selected. 5 If...
...you have finished entering the name, press the ENTER button to confirm the name. Result: The main menu is broadcast. TV Channel Auto Store √ Manual Store √ Add/Delete √ Sort √ Child Lock √ Name √ Fine Tune √ †... More Move Enter Return TV Name Prog. Ch. 2 ----3 ----4 ----5 ----6 ----- Result: The Name menu is displayed with the current channel automatically is selected. 5 If...
Owners Instructions
Page 22
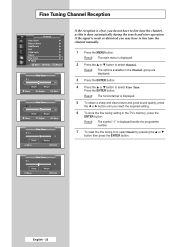
Fine Tuning Channel Reception TV Channel Auto Store √ Manual Store √ Add/Delete √ Sort √ Child Lock √ Name √ Fine Tune √ † More Move Enter Return Fine Tune P 1 Reset Return Move &#... P 1 ✻ 3 Reset Return Move Enter Fine Tune P 1 0 Reset Return Move Enter If the reception is clear, you do not have to fine tune the channel manually. 1 Press the MENU button. Result: The main menu is done automatically during the search and store operation. Result: The horizontal bar is weak or distorted...
Fine Tuning Channel Reception TV Channel Auto Store √ Manual Store √ Add/Delete √ Sort √ Child Lock √ Name √ Fine Tune √ † More Move Enter Return Fine Tune P 1 Reset Return Move &#... P 1 ✻ 3 Reset Return Move Enter Fine Tune P 1 0 Reset Return Move Enter If the reception is clear, you do not have to fine tune the channel manually. 1 Press the MENU button. Result: The main menu is done automatically during the search and store operation. Result: The horizontal bar is weak or distorted...


