
User Manual (ENGLISH)
Page 14
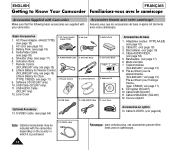
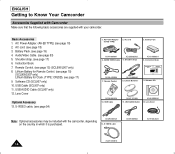
...SSTTOAPRT/ TIMSEERLF DISPLAY STILL RETZUERRNO CROESUENTTER WIDE 11. AC cord 5. Instruction Book Video Camcorder 8mm COLOR Caméscope 8mm ÉCRAN LCD COULEUR 9. Adaptateur secteur. (TYPE AA-E8) (voir page 18) 2. Mode d'emploi. 7. Basic Accessories 1. AC Power Adapter 1. Remote Control 9. Shoulder Strap 8. Lens Cover ...caméscope Assurez-vous que les accessoires de base ci-après ont été livrés avec votre caméscope. AC Power Adapter. (AA-E8 TYPE) (AA-E8 TYPE) (see page 17) 4. Câble AUDIO/VIDEO. (voir page 53) 5. S-VIDEO...
...SSTTOAPRT/ TIMSEERLF DISPLAY STILL RETZUERRNO CROESUENTTER WIDE 11. AC cord 5. Instruction Book Video Camcorder 8mm COLOR Caméscope 8mm ÉCRAN LCD COULEUR 9. Adaptateur secteur. (TYPE AA-E8) (voir page 18) 2. Mode d'emploi. 7. Basic Accessories 1. AC Power Adapter 1. Remote Control 9. Shoulder Strap 8. Lens Cover ...caméscope Assurez-vous que les accessoires de base ci-après ont été livrés avec votre caméscope. AC Power Adapter. (AA-E8 TYPE) (AA-E8 TYPE) (see page 17) 4. Câble AUDIO/VIDEO. (voir page 53) 5. S-VIDEO...
User Manual (ENGLISH)
Page 18
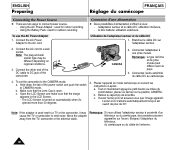
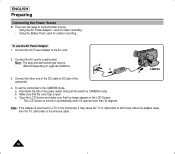
...caméscope ou du câble de l'antenne. 18 Note: If the adapter is turned on 2 regional conditions. 1 3. Connect the AC cord to CAMERA mode. a. a. Tout en maintenant appuyé le petit bouton au milieu du commutateur, placez ce dernier sur la position CAMERA. b. ...The LCD Screen is used next to emit noise. Using the AC Power Adapter : used for indoor recording. - l'adaptateur secteur et le câble DC: utilisation intérieure, - c. Ouvrez l'écran LCD...
...caméscope ou du câble de l'antenne. 18 Note: If the adapter is turned on 2 regional conditions. 1 3. Connect the AC cord to CAMERA mode. a. a. Tout en maintenant appuyé le petit bouton au milieu du commutateur, placez ce dernier sur la position CAMERA. b. ...The LCD Screen is used next to emit noise. Using the AC Power Adapter : used for indoor recording. - l'adaptateur secteur et le câble DC: utilisation intérieure, - c. Ouvrez l'écran LCD...
User Manual (ENGLISH)
Page 19
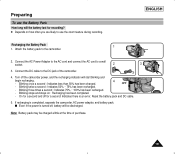
... seconde, cela signifie qu'un incident s'est produit. I Even if the power is turned off, battery will start blinking and begin recharging. - Connect the AC Power Adapter to the AC cord and connect the AC cord to the camcorder. 1 2. If recharging is an error. si le voyant...224; un câble d'alimentation et branchez ce câble sur une prise murale. 3 3. Turn off for a second and off the camcorder power, and the recharging indicator will be charged a little at the time of the camcorder. 4. On for a second: Indicates there is completed, separate the...
... seconde, cela signifie qu'un incident s'est produit. I Even if the power is turned off, battery will start blinking and begin recharging. - Connect the AC Power Adapter to the AC cord and connect the AC cord to the camcorder. 1 2. If recharging is an error. si le voyant...224; un câble d'alimentation et branchez ce câble sur une prise murale. 3 3. Turn off for a second and off the camcorder power, and the recharging indicator will be charged a little at the time of the camcorder. 4. On for a second: Indicates there is completed, separate the...
User Manual (ENGLISH)
Page 3
... have been adhered to. 10. See figure below. Never place your appliance dealer or local power company. If you are not likely to insert the plug fully into the outlet, try reversing the plug. POWER-CORD PROTECTION: Power-supply cords should be walked on or near a radiator or heat register. VENTILATION: Slots and openings in...
... have been adhered to. 10. See figure below. Never place your appliance dealer or local power company. If you are not likely to insert the plug fully into the outlet, try reversing the plug. POWER-CORD PROTECTION: Power-supply cords should be walked on or near a radiator or heat register. VENTILATION: Slots and openings in...
User Manual (ENGLISH)
Page 4
... 21. Never spill liquids of any kind onto the CAMCORDER. c. OBJECTS AND LIQUIDS: Never push objects of any kind into such power lines or circuits. Opening or removing covers may result in performance, this CAMCORDER, ask the service technician to perform safety checks to ...before use. 18. OVERLOADING: Do not overload wall outlets and extension cords as they may result in a fire or electric shock. Should spillage occur, unplug unit and have fallen into the CAMCORDER. When the power-supply cord or plug is left unattended and unused for service. 20. d. If...
... 21. Never spill liquids of any kind onto the CAMCORDER. c. OBJECTS AND LIQUIDS: Never push objects of any kind into such power lines or circuits. Opening or removing covers may result in performance, this CAMCORDER, ask the service technician to perform safety checks to ...before use. 18. OVERLOADING: Do not overload wall outlets and extension cords as they may result in a fire or electric shock. Should spillage occur, unplug unit and have fallen into the CAMCORDER. When the power-supply cord or plug is left unattended and unused for service. 20. d. If...
User Manual (ENGLISH)
Page 18
...13. Battery Pack AD44-00090A 4. AUDIO/VIDEO Cable AD39-00076A 5. Remote Control SSTTOAPRT/ TIMSEERLF DISPLAY STILL RETZUERRNO CROESUENTTER WIDE TELE AD72-00054A 8. AC Power Adapter. (AA-E8 TYPE) (see page 19) 4. Audio/Video Cable. (see page 17) 9. Lithium Battery for Remote Control. (see page...only) 8. Remote Control. (see page 18) 3. Software CD (SCL907 only) 10. USB Cable (SCL907 only) 11. AC Power Adapter (AA-E8 TYPE) 2. AC cord 3. Shoulder Strap AD43-00065A 6. Software CD AD59-00062A 10. USB Cable AD43-10130H 11. Lens Cover AD39-00073A Note: Optional ...
...13. Battery Pack AD44-00090A 4. AUDIO/VIDEO Cable AD39-00076A 5. Remote Control SSTTOAPRT/ TIMSEERLF DISPLAY STILL RETZUERRNO CROESUENTTER WIDE TELE AD72-00054A 8. AC Power Adapter. (AA-E8 TYPE) (see page 19) 4. Audio/Video Cable. (see page 17) 9. Lithium Battery for Remote Control. (see page...only) 8. Remote Control. (see page 18) 3. Software CD (SCL907 only) 10. USB Cable (SCL907 only) 11. AC Power Adapter (AA-E8 TYPE) 2. AC cord 3. Shoulder Strap AD43-00065A 6. Software CD AD59-00062A 10. USB Cable AD43-10130H 11. Lens Cover AD39-00073A Note: Optional ...
User Manual (ENGLISH)
Page 22
... automatically when it's opened more than 30 degrees. a. Make sure that the image appears in the LCD Screen. - To use the AC Power Adapter 1. To set the camcorder to the AC cord. 2. Connect the AC Power Adapter to the CAMERA mode. Note: If the adapter is open. Hold down the tab of the... power switch and push the switch to a wall socket. Connect the AC cord to CAMERA mode. Open the LCD Screen and make sure that the Lens Cap is used next to emit noise. b. Connect the other...
... automatically when it's opened more than 30 degrees. a. Make sure that the image appears in the LCD Screen. - To use the AC Power Adapter 1. To set the camcorder to the AC cord. 2. Connect the AC Power Adapter to the CAMERA mode. Note: If the adapter is open. Hold down the tab of the... power switch and push the switch to a wall socket. Connect the AC cord to CAMERA mode. Open the LCD Screen and make sure that the Lens Cap is used next to emit noise. b. Connect the other...
User Manual (ENGLISH)
Page 23
... the recharging indicator will be charged a little at the time of the camcorder. 4. Connect the AC Power Adapter to the AC cord and connect the AC cord to the camcorder. 2. Blinking three times a second : Indicates 75% ~ 100% has been recharged. - Blinking stops and stays on how often you are likely to the ...
... the recharging indicator will be charged a little at the time of the camcorder. 4. Connect the AC Power Adapter to the AC cord and connect the AC cord to the camcorder. 2. Blinking three times a second : Indicates 75% ~ 100% has been recharged. - Blinking stops and stays on how often you are likely to the ...


