

User Manual (ENGLISH)
Page 4
... inside of LCD screen Please rotate the LCD screen carefully as illustrated. Notices regarding rotation of the hinge that connects the LCD screen to the Camcorder. 1) LCD screen closed . 5) ➔ 90° ➔ 90° 2) Enregistrement standard lors de l'utilisation de l'écran LCD. 3) Enregistrement en regardant l'écran LCD d'en...
... inside of LCD screen Please rotate the LCD screen carefully as illustrated. Notices regarding rotation of the hinge that connects the LCD screen to the Camcorder. 1) LCD screen closed . 5) ➔ 90° ➔ 90° 2) Enregistrement standard lors de l'utilisation de l'écran LCD. 3) Enregistrement en regardant l'écran LCD d'en...
User Manual (ENGLISH)
Page 9
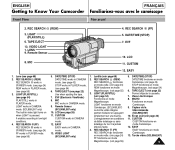
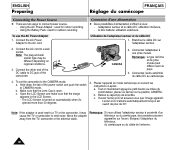
... page 22) Permet d'éjecter la cassette. 7. It enables recording in low-light conditions. 4. Remote Sensor 8. MIC 4. ENGLISH FRANÇAIS Getting to Know Your Camcorder Familiarisez-vous avec le caméscope Front View Vue avant 2. REC SEARCH (REW) 3.
... page 22) Permet d'éjecter la cassette. 7. It enables recording in low-light conditions. 4. Remote Sensor 8. MIC 4. ENGLISH FRANÇAIS Getting to Know Your Camcorder Familiarisez-vous avec le caméscope Front View Vue avant 2. REC SEARCH (REW) 3.
User Manual (ENGLISH)
Page 11
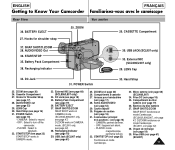
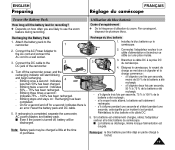
... 17) 28. Compartiment du bloc batterie (voir page 19) 36. Éjection du bloc batterie 37. ENGLISH FRANÇAIS Getting to turn off the camcorder. - BATTERY EJECT 27. ZOOM 26. Recharging Indicator 39. Hand Strap 33. Compartiment à cassette 27. Commutateur principal : trois positions : (voir page ...- SNAP SHOT/D.ZOOM SNAP SHOT fonctionne en mode Caméscope. (SCL903/L906/L907, voir page 47) D.ZOOM fonctionne en mode Caméscope. (SCL901, voir page 32) 38. AUDIO/VIDEO Out 32. External MIC (SCL906/L907 only) 29. ZOOM (see page 18) - USB Jack (SCL907 only...
... 17) 28. Compartiment du bloc batterie (voir page 19) 36. Éjection du bloc batterie 37. ENGLISH FRANÇAIS Getting to turn off the camcorder. - BATTERY EJECT 27. ZOOM 26. Recharging Indicator 39. Hand Strap 33. Compartiment à cassette 27. Commutateur principal : trois positions : (voir page ...- SNAP SHOT/D.ZOOM SNAP SHOT fonctionne en mode Caméscope. (SCL903/L906/L907, voir page 47) D.ZOOM fonctionne en mode Caméscope. (SCL901, voir page 32) 38. AUDIO/VIDEO Out 32. External MIC (SCL906/L907 only) 29. ZOOM (see page 18) - USB Jack (SCL907 only...
User Manual (ENGLISH)
Page 13
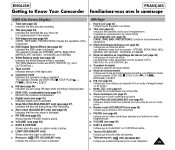
ENGLISH FRANÇAIS Getting to Know Your Camcorder Familiarisez-vous avec le caméscope OSD (On Screen Display) j. k. l. White Balance mode (see page 47) Indicates the time left during Snap Shot Recording. ... différents modes sont les suivants: STBY, REC , STOP, PLAY( ), FF( ), REW( ) et EJECT. VOLUME (voir page 56) x. Tape counter Indicates amount of the Camcorder. PB DSE (see page 31) Indicates digital zoom is activated. Heure (voir page 42) Indique l'heure à laquelle vous filmez. l. p. s. t. Remise à zéro (SCL906...
ENGLISH FRANÇAIS Getting to Know Your Camcorder Familiarisez-vous avec le caméscope OSD (On Screen Display) j. k. l. White Balance mode (see page 47) Indicates the time left during Snap Shot Recording. ... différents modes sont les suivants: STBY, REC , STOP, PLAY( ), FF( ), REW( ) et EJECT. VOLUME (voir page 56) x. Tape counter Indicates amount of the Camcorder. PB DSE (see page 31) Indicates digital zoom is activated. Heure (voir page 42) Indique l'heure à laquelle vous filmez. l. p. s. t. Remise à zéro (SCL906...
User Manual (ENGLISH)
Page 14
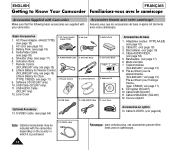
Battery Pack. (see page 17) 7. Instruction Book. 7. Remote Control 9. Lens Cover 2. AC cord 5. Instruction Book Video Camcorder 8mm COLOR Caméscope 8mm ÉCRAN LCD COULEUR 9. Software CD 10. USB Cable 11. Bandoulière. (voir page 17)...VIDEO. (voir page 53) 5. Couvre-objectif Optional Accessory 13. Câble S-VIDEO. (voir page 54) Note: Optional accessories may be included with your camcorder. S-VIDEO cable 14 Remarque: dans certains pays, ces accessoires peuvent être livrés avec le caméscope. Basic Accessories 1. Câble DC...
Battery Pack. (see page 17) 7. Instruction Book. 7. Remote Control 9. Lens Cover 2. AC cord 5. Instruction Book Video Camcorder 8mm COLOR Caméscope 8mm ÉCRAN LCD COULEUR 9. Software CD 10. USB Cable 11. Bandoulière. (voir page 17)...VIDEO. (voir page 53) 5. Couvre-objectif Optional Accessory 13. Câble S-VIDEO. (voir page 54) Note: Optional accessories may be included with your camcorder. S-VIDEO cable 14 Remarque: dans certains pays, ces accessoires peuvent être livrés avec le caméscope. Basic Accessories 1. Câble DC...
User Manual (ENGLISH)
Page 16
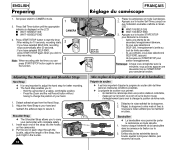
.../STOP again when you wish to stop recording. 3 Note: When recording with the timer, you can press START/STOP button again to carry your camcorder with complete safety. 1. Appuyez sur la touche START/STOP pour démarrer la minuterie. : Après une attente de dix secondes,l'enregistrement dé... fonction. Detach adhesive tape from the Hand Strap. 2. Adjusting the Hand Strap and Shoulder Strap Hand Strap ✤ It is displayed on the camcorder. 2. Insert each strap through the buckle, adjust the length of the strap, then pull it . d'appuyer sur le bouton du zoom et ...
.../STOP again when you wish to stop recording. 3 Note: When recording with the timer, you can press START/STOP button again to carry your camcorder with complete safety. 1. Appuyez sur la touche START/STOP pour démarrer la minuterie. : Après une attente de dix secondes,l'enregistrement dé... fonction. Detach adhesive tape from the Hand Strap. 2. Adjusting the Hand Strap and Shoulder Strap Hand Strap ✤ It is displayed on the camcorder. 2. Insert each strap through the buckle, adjust the length of the strap, then pull it . d'appuyer sur le bouton du zoom et ...
User Manual (ENGLISH)
Page 18
...;ble DC 1. Connect the other end of the DC cable to DC jack of the power switch and push the switch to a TV or the camcorder, it 's opened more than 30 degrees. 4. b. c. Note: If the adapter is used next to CAMERA mode. l'adaptateur secteur et le câble DC: ...make sure that the Lens Cap is turned on automatically when it may be different depending on 2 regional conditions. 1 3. Hold down the tab of the camcorder. 2. Tout en maintenant appuyé le petit bouton au milieu du commutateur, placez ce dernier sur la position CAMERA. Placez l'appareil en mode cam&#...
...;ble DC 1. Connect the other end of the DC cable to DC jack of the power switch and push the switch to a TV or the camcorder, it 's opened more than 30 degrees. 4. b. c. Note: If the adapter is used next to CAMERA mode. l'adaptateur secteur et le câble DC: ...make sure that the Lens Cap is turned on automatically when it may be different depending on 2 regional conditions. 1 3. Hold down the tab of the camcorder. 2. Tout en maintenant appuyé le petit bouton au milieu du commutateur, placez ce dernier sur la position CAMERA. Placez l'appareil en mode cam&#...
User Manual (ENGLISH)
Page 19
... le bloc batterie et le câble DC. 5. I Even if the power is turned off, battery will be charged a little at the time of the camcorder. 4. Blinking twice a second : Indicates 50% ~ 75% has been recharged. - I La batterie se décharge, même lorsque l'alimentation est coupée. s'il ... bloc batterie du caméscope. Connect the AC Power Adapter to the AC cord and connect the AC cord to the camcorder. 1 2. On for a second and off the camcorder power, and the recharging indicator will the battery last for a second: Indicates there is completed, separate the...
... le bloc batterie et le câble DC. 5. I Even if the power is turned off, battery will be charged a little at the time of the camcorder. 4. Blinking twice a second : Indicates 50% ~ 75% has been recharged. - I La batterie se décharge, même lorsque l'alimentation est coupée. s'il ... bloc batterie du caméscope. Connect the AC Power Adapter to the AC cord and connect the AC cord to the camcorder. 1 2. On for a second and off the camcorder power, and the recharging indicator will the battery last for a second: Indicates there is completed, separate the...
User Manual (ENGLISH)
Page 24
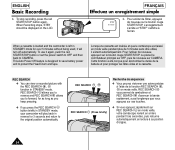
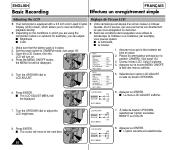
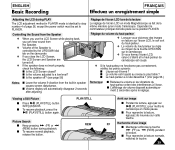
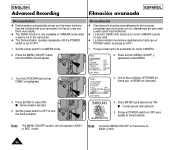
Pour arrêter de filmer, appuyez de nouveau sur le bouton rouge START/STOP. When a cassette is loaded and the camcorder is designed to save battery power and to CAMERA. This Auto Power Off feature is left in STANDBY mode for 3 seconds and return to forward, ...for as long as you keep pressing. ✤ If you press the REC SEARCH button briefly in STANDBY mode, your camcorder will turn off automatically. REC SEARCH allows you to reverse and REC SEARCH allows you to the original position automatically. ENGLISH Basic Recording b. To use...
Pour arrêter de filmer, appuyez de nouveau sur le bouton rouge START/STOP. When a cassette is loaded and the camcorder is designed to save battery power and to CAMERA. This Auto Power Off feature is left in STANDBY mode for 3 seconds and return to forward, ...for as long as you keep pressing. ✤ If you press the REC SEARCH button briefly in STANDBY mode, your camcorder will turn off automatically. REC SEARCH allows you to reverse and REC SEARCH allows you to the original position automatically. ENGLISH Basic Recording b. To use...
User Manual (ENGLISH)
Page 26
... the UP/DOWN dial to LCD ADJUST. ENGLISH Basic Recording FRANÇAIS Effectuez un enregistrement simple Adjusting the LCD ✤ Your camcorder is in which you are using the camcorder (indoors or outdoors for example), you can adjust: I Brightness I The LCD ADJUST MENU will move to the next item. 26 LCD...
... the UP/DOWN dial to LCD ADJUST. ENGLISH Basic Recording FRANÇAIS Effectuez un enregistrement simple Adjusting the LCD ✤ Your camcorder is in which you are using the camcorder (indoors or outdoors for example), you can adjust: I Brightness I The LCD ADJUST MENU will move to the next item. 26 LCD...
User Manual (ENGLISH)
Page 29
... sound from the built-in PLAYER mode is identical to step number 4 of the Speaker is controlled by the UP/DOWN dial tab on the camcorder. ✤ If you close the LCD Screen, the LCD Screen and Speaker are turned off ? (see page 56) Notes: I Keep pressing (FF) or (REW) button...
... sound from the built-in PLAYER mode is identical to step number 4 of the Speaker is controlled by the UP/DOWN dial tab on the camcorder. ✤ If you close the LCD Screen, the LCD Screen and Speaker are turned off ? (see page 56) Notes: I Keep pressing (FF) or (REW) button...
User Manual (ENGLISH)
Page 35
... and walking at the same time I Recording through the window of the dans des limites raisonables, le léger tremblement qui peut hand holding the camcorder (within reasonable limits). It is a handshake compensation ✤ La fonction de stabilisation d'images (touche DIS) compense, function that compensates for any shaking or moving of...
... and walking at the same time I Recording through the window of the dans des limites raisonables, le léger tremblement qui peut hand holding the camcorder (within reasonable limits). It is a handshake compensation ✤ La fonction de stabilisation d'images (touche DIS) compense, function that compensates for any shaking or moving of...
User Manual (ENGLISH)
Page 43
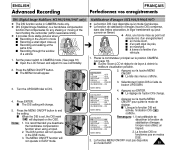
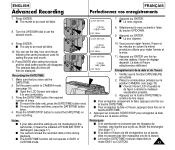
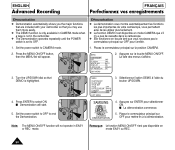
... Enregistrement de la date et de l'heure 1. ENGLISH Advanced Recording FRANÇAIS Perfectionnez vos enregistrements 7. I The DATE/TIME function will not operate in the camcorder, it to be reset will disappear. Press the START/STOP button to record the DATE/TIME on à obtenir la meilleure visualisation possible. 3. La date...
... Enregistrement de la date et de l'heure 1. ENGLISH Advanced Recording FRANÇAIS Perfectionnez vos enregistrements 7. I The DATE/TIME function will not operate in the camcorder, it to be reset will disappear. Press the START/STOP button to record the DATE/TIME on à obtenir la meilleure visualisation possible. 3. La date...
User Manual (ENGLISH)
Page 50
...OFF D/TITLE COLOR ..WHITE C.RESET 0:00:00 DEMO OFF EXIT: MENU 3. Sélectionnez l'option DEMO à l'aide du bouton UP/DOWN. 4. SAMSUNG DEMONSTRATION 4. Press ENTER to end the Demonstration. I Demonstration will start. 5. La liste des menus s'affiche. 3. Appuyez sur ENTER pour sélectionner ON...Appuyez sur la touche MENU ON/OFF. Turn the UP/DOWN dial so that you the major functions that are included with your camcorder so that DEMO is set to OFF. I La démonstration commence. 5. Placez le commutateur principal sur OFF pour mettre fin à...
...OFF D/TITLE COLOR ..WHITE C.RESET 0:00:00 DEMO OFF EXIT: MENU 3. Sélectionnez l'option DEMO à l'aide du bouton UP/DOWN. 4. SAMSUNG DEMONSTRATION 4. Press ENTER to end the Demonstration. I Demonstration will start. 5. La liste des menus s'affiche. 3. Appuyez sur ENTER pour sélectionner ON...Appuyez sur la touche MENU ON/OFF. Turn the UP/DOWN dial so that you the major functions that are included with your camcorder so that DEMO is set to OFF. I La démonstration commence. 5. Placez le commutateur principal sur OFF pour mettre fin à...

User Manual (ENGLISH)
Page 53
...; There are two ways to see page 63) Connecting to a TV which has no Audio and Video input jack ✤ You can connect your camcorder. ENGLISH Playing back a Tape FRANÇAIS Visionnez une cassette ✤ To view a tape that you have recorded. ✤ Playback function works ... monitor to view tapes indoors. ✤ To play a tape back, the TV must feature a compatible color system. (see a tape; I To watch with your camcorder to a TV through a VCR. I To watch with TV monitor: recommended for indoor use . Lecture à l'écran LCD ✤ L'écran LCD s'...
...; There are two ways to see page 63) Connecting to a TV which has no Audio and Video input jack ✤ You can connect your camcorder. ENGLISH Playing back a Tape FRANÇAIS Visionnez une cassette ✤ To view a tape that you have recorded. ✤ Playback function works ... monitor to view tapes indoors. ✤ To play a tape back, the TV must feature a compatible color system. (see a tape; I To watch with your camcorder to a TV through a VCR. I To watch with TV monitor: recommended for indoor use . Lecture à l'écran LCD ✤ L'écran LCD s'...

User Manual (ENGLISH)
Page 59
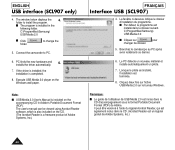
... sur pour installer le programme. 3. ENGLISH USB interface (SCL907 only) FRANÇAIS Interface USB (SCL907) Installing USB Media 2.0 Program ✤ Do not connect the camcorder to PC before installing the program. ✤ If another camera or scanner is connected, please disconnect it in CD-ROM Drive. 2. le programme d'installation s'ex...
... sur pour installer le programme. 3. ENGLISH USB interface (SCL907 only) FRANÇAIS Interface USB (SCL907) Installing USB Media 2.0 Program ✤ Do not connect the camcorder to PC before installing the program. ✤ If another camera or scanner is connected, please disconnect it in CD-ROM Drive. 2. le programme d'installation s'ex...
User Manual (ENGLISH)
Page 60
... Reader, qui est également inclus dans le CD. (Acrobat Reader est un logiciel gratuit de Adobe Systems, Inc.) 60 Connect the camcorder to install the program. Execute USB Media 2.0 player on the CD. (The Acrobat Reader is completed. 8. The user's manual can be... viewed using Acrobat Reader software, which is also included on the Windows wall paper. C:\Programfiles\Samsung\ USB Media 2.0 I Par défaut, le programme est installé dans le dossier suivant. I Click folder. Remarque: I Cliquez sur pour changer...
... Reader, qui est également inclus dans le CD. (Acrobat Reader est un logiciel gratuit de Adobe Systems, Inc.) 60 Connect the camcorder to install the program. Execute USB Media 2.0 player on the CD. (The Acrobat Reader is completed. 8. The user's manual can be... viewed using Acrobat Reader software, which is also included on the Windows wall paper. C:\Programfiles\Samsung\ USB Media 2.0 I Par défaut, le programme est installé dans le dossier suivant. I Click folder. Remarque: I Cliquez sur pour changer...
User Manual (ENGLISH)
Page 72
...ÇAIS THIS CAMCORDER IS MANUFACTURED BY: CE CAMESCOPE EST DISTRIBUÉ PAR : ELECTRONICS ELECTRONICS *Samsung Electronics' Internet Home Page United States http://www.samsungusa.com United Kingdom http://www.samsungelectronics.co.uk France http://www.samsung.fr Australia http://www.samsung.com.au Germany http://www.samsung.de Sweden http://www.samsung.se Poland http...
...ÇAIS THIS CAMCORDER IS MANUFACTURED BY: CE CAMESCOPE EST DISTRIBUÉ PAR : ELECTRONICS ELECTRONICS *Samsung Electronics' Internet Home Page United States http://www.samsungusa.com United Kingdom http://www.samsungelectronics.co.uk France http://www.samsung.fr Australia http://www.samsung.com.au Germany http://www.samsung.de Sweden http://www.samsung.se Poland http...

User Manual (ENGLISH)
Page 45
.../PYCCK».... 7. C.RESET 0:00:00 DEMO OFF I Puede seleccionar ENGLISH/FRANÇAIS/DEUTSCH/ ITALIANO/ESPAÑOL/PYCCK».... 7. At the same time, the camcorder will appear in EASY or REC mode. 6. I Abra el LCD Screen y ajustelo a su EXIT: MENU gusto. 2. ANNIVERSARY CONGRATULATIONS GRADUATION HAPPY BIRTHDAY HAPPY NEW YEAR HAVING...
.../PYCCK».... 7. C.RESET 0:00:00 DEMO OFF I Puede seleccionar ENGLISH/FRANÇAIS/DEUTSCH/ ITALIANO/ESPAÑOL/PYCCK».... 7. At the same time, the camcorder will appear in EASY or REC mode. 6. I Abra el LCD Screen y ajustelo a su EXIT: MENU gusto. 2. ANNIVERSARY CONGRATULATIONS GRADUATION HAPPY BIRTHDAY HAPPY NEW YEAR HAVING...
User Manual (ENGLISH)
Page 50
...to select ON. Turn the UP/DOWN dial so that you the major functions that are included with your camcorder so that DEMO is set to end the Demonstration. Press ENTER to CAMERA mode. 1. I Comenzara la ...C.RESET 0:00:00 DEMO OFF EXIT: MENU 3. Note: The MENU ON/OFF function will not operate in the camcorder. ✤ The Demonstration operates repeatedly until the POWER switch is highlighted. Demostración ✤ Demostración muestra... I Demonstration will appear. Ponga el interruptor de encendido en modo CAMERA. 2. SAMSUNG DEMONSTRATION 4.
...to select ON. Turn the UP/DOWN dial so that you the major functions that are included with your camcorder so that DEMO is set to end the Demonstration. Press ENTER to CAMERA mode. 1. I Comenzara la ...C.RESET 0:00:00 DEMO OFF EXIT: MENU 3. Note: The MENU ON/OFF function will not operate in the camcorder. ✤ The Demonstration operates repeatedly until the POWER switch is highlighted. Demostración ✤ Demostración muestra... I Demonstration will appear. Ponga el interruptor de encendido en modo CAMERA. 2. SAMSUNG DEMONSTRATION 4.


