
User Manual (user Manual) (ver.1.0) (English)
Page 2
... Power Adapter ...22 s To use the Battery Pack ...23 Using the Battery Pack ...24 s Continuous Recording time table ...24 s Battery Level Display...25 Inserting and Ejecting a Cassette ...26 Basic Recording Making Your First Recording ...27 Hints for Stable Image Recording ...29 s Recording with LCD Monitor...29 s Recording with Viewfinder ...29 Adjusting the LCD...30 Adjusting Focus of the VIEWFINDER ...31 Playing back a tape on the LCD...32 s Adjusting the LCD during PLAY...33 s Controlling the Sound from the Speaker ...33 s Viewing a Still Picture ...33 s Picture...
... Power Adapter ...22 s To use the Battery Pack ...23 Using the Battery Pack ...24 s Continuous Recording time table ...24 s Battery Level Display...25 Inserting and Ejecting a Cassette ...26 Basic Recording Making Your First Recording ...27 Hints for Stable Image Recording ...29 s Recording with LCD Monitor...29 s Recording with Viewfinder ...29 Adjusting the LCD...30 Adjusting Focus of the VIEWFINDER ...31 Playing back a tape on the LCD...32 s Adjusting the LCD during PLAY...33 s Controlling the Sound from the Speaker ...33 s Viewing a Still Picture ...33 s Picture...
User Manual (user Manual) (ver.1.0) (English)
Page 4
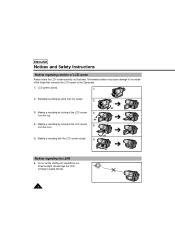
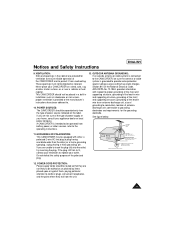
Direct sunlight can damage the CCD (Charge Coupled Device). 4 ENGLISH Notices and Safety Instructions Notices regarding rotation of the hinge that connects the LCD screen to the inside of LCD screen Please rotate the LCD screen carefully as illustrated. Unintended rotation may cause damage to the Camcorder. 1) LCD screen closed. 1) 2) Standard recording by using the LCD screen. 2) 3) Making a recording by looking at the LCD screen 3) from the top. 90° 4) Making a recording by looking at...
Direct sunlight can damage the CCD (Charge Coupled Device). 4 ENGLISH Notices and Safety Instructions Notices regarding rotation of the hinge that connects the LCD screen to the inside of LCD screen Please rotate the LCD screen carefully as illustrated. Unintended rotation may cause damage to the Camcorder. 1) LCD screen closed. 1) 2) Standard recording by using the LCD screen. 2) 3) Making a recording by looking at the LCD screen 3) from the top. 90° 4) Making a recording by looking at...
User Manual (user Manual) (ver.1.0) (English)
Page 6
... battery pack or AC power adapter is removed. ✤ The lithium battery for the camcorder lasts about 8~10 months under normal operation from time of installation. ✤ When the lithium battery becomes weak or dead, the date/time indicator flashes about 5 seconds when you are not operating it. ✤ When your camcorder is in CAMERA mode, if it is left in STANDBY for a long time because the LCD uses more battery power...
... battery pack or AC power adapter is removed. ✤ The lithium battery for the camcorder lasts about 8~10 months under normal operation from time of installation. ✤ When the lithium battery becomes weak or dead, the date/time indicator flashes about 5 seconds when you are not operating it. ✤ When your camcorder is in CAMERA mode, if it is left in STANDBY for a long time because the LCD uses more battery power...
User Manual (user Manual) (ver.1.0) (English)
Page 7
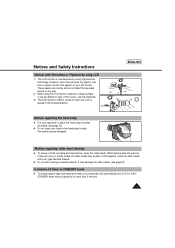
... using the LCD monitor outdoors in direct sunlight, it is left in color) that appear on the LCD monitor. When playing back the pictures, if they are normal and do not affect the recorded picture in the forward direction. If this occurs, use a wet type cassette cleaner. ENGLISH Notices regarding the hand strap ✤ It is very important to view. Notices and Safety Instructions Notices with a dry type cassette...
... using the LCD monitor outdoors in direct sunlight, it is left in color) that appear on the LCD monitor. When playing back the pictures, if they are normal and do not affect the recorded picture in the forward direction. If this occurs, use a wet type cassette cleaner. ENGLISH Notices regarding the hand strap ✤ It is very important to view. Notices and Safety Instructions Notices with a dry type cassette...
User Manual (user Manual) (ver.1.0) (English)
Page 9
... CLAMPS POWER SERVICE GROUNDING ELECTRODE SYSTEM (NEC ART 250, PART H) NEC NATIONAL ELECTRICAL CODE 12. VENTILATION: Slots and openings in wire to an antenna discharge unit, size of grounding to grounding electrodes and requirements for ventilation to ensure reliable operation of the CAMCORDER and to replace your electrician to protect it from battery power, or other ) or a 3-wire grounding type plug, a plug having one...
... CLAMPS POWER SERVICE GROUNDING ELECTRODE SYSTEM (NEC ART 250, PART H) NEC NATIONAL ELECTRICAL CODE 12. VENTILATION: Slots and openings in wire to an antenna discharge unit, size of grounding to grounding electrodes and requirements for ventilation to ensure reliable operation of the CAMCORDER and to replace your electrician to protect it from battery power, or other ) or a 3-wire grounding type plug, a plug having one...
User Manual (user Manual) (ver.1.0) (English)
Page 10
... it checked by following conditions: a. b. Improper adjustment of fire or electric shock. 17. SERVICING: Do not attempt to service this CAMCORDER from touching such power lines or circuits as the original part. If the CAMCORDER has been exposed to lightning and power-line surges. 15. e. If the CAMCORDER does not operate normally by a technician before use. 19. ENGLISH Notices and Safety Instructions 14. When installing...
... it checked by following conditions: a. b. Improper adjustment of fire or electric shock. 17. SERVICING: Do not attempt to service this CAMCORDER from touching such power lines or circuits as the original part. If the CAMCORDER has been exposed to lightning and power-line surges. 15. e. If the CAMCORDER does not operate normally by a technician before use. 19. ENGLISH Notices and Safety Instructions 14. When installing...

User Manual (user Manual) (ver.1.0) (English)
Page 16
... Z.RTN u TAPE CINEMA v l VOLUME w i. Battery level (see page 34) Indicates zoom position. h. Zoom position (see page 25) Indicates the power left in the viewfinder and the LCD monitor. Auto Focus is on /off. ✤ The TITLE, DATE/TIME, EASY and CUSTOM functions can turn the OSD on/off . ✤ The OSD is activated g. OSD in PLAYER mode f. Manual Focus (see page 40) Indicates manual focus is not displayed. BLC (see...
... Z.RTN u TAPE CINEMA v l VOLUME w i. Battery level (see page 34) Indicates zoom position. h. Zoom position (see page 25) Indicates the power left in the viewfinder and the LCD monitor. Auto Focus is on /off. ✤ The TITLE, DATE/TIME, EASY and CUSTOM functions can turn the OSD on/off . ✤ The OSD is activated g. OSD in PLAYER mode f. Manual Focus (see page 40) Indicates manual focus is not displayed. BLC (see...
User Manual (user Manual) (ver.1.0) (English)
Page 18
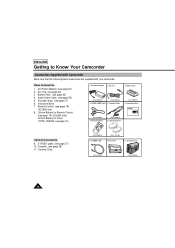
... page 56) 5. Carrying Case AC39-42001Z AD69-00001A 18 Lithium Battery for Remote Control. (see page 19) (SCL650 only) Lithium Battery for Clock. (TYPE: CR2025, see page 26) 11. Instruction Book. 7. ENGLISH Getting to Know Your Camcorder Accessories Supplied with Camcorder Make sure that the following basic accessories are supplied with your camcorder. Cassette. (see page 21) 1. AC Power Adapter. (see page 22) 2. Carrying Case. AUDIO/VIDEO Cable 5.
... page 56) 5. Carrying Case AC39-42001Z AD69-00001A 18 Lithium Battery for Remote Control. (see page 19) (SCL650 only) Lithium Battery for Clock. (TYPE: CR2025, see page 26) 11. Instruction Book. 7. ENGLISH Getting to Know Your Camcorder Accessories Supplied with Camcorder Make sure that the following basic accessories are supplied with your camcorder. Cassette. (see page 21) 1. AC Power Adapter. (see page 22) 2. Carrying Case. AUDIO/VIDEO Cable 5.
User Manual (user Manual) (ver.1.0) (English)
Page 22
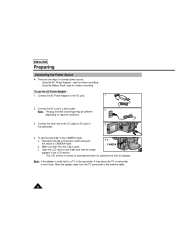
To set the camcorder to the AC cord. 1 2. Make sure that the image appears in the LCD monitor. - The LCD monitor is open. Using the Battery Pack: used for indoor recording. - Hold down the tab of 3 the camcorder. 4. CAMERA c. To use the AC Power Adapter 1. b. Open the LCD monitor and make sure that the Lens Cap is turned on regional conditions. 3. Connect the AC Power Adapter to the CAMERA mode. ENGLISH Preparing Connecting the Power Source ✤ There are...
To set the camcorder to the AC cord. 1 2. Make sure that the image appears in the LCD monitor. - The LCD monitor is open. Using the Battery Pack: used for indoor recording. - Hold down the tab of 3 the camcorder. 4. CAMERA c. To use the AC Power Adapter 1. b. Open the LCD monitor and make sure that the Lens Cap is turned on regional conditions. 3. Connect the AC Power Adapter to the CAMERA mode. ENGLISH Preparing Connecting the Power Source ✤ There are...
User Manual (user Manual) (ver.1.0) (English)
Page 24
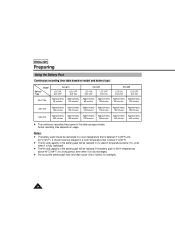
ENGLISH Preparing Using the Battery Pack Continuous recording time table based on usage. Actual recording time depends on model and battery type. It should be reduced if the battery pack is left in temperatures above 40°C(104°F) for example). 24 Model Battery Type SB-L110A SCL610 LCD ON, EVF OFF LCD OFF, EVF ON Approximately Approximately 90 minutes 130 minutes SCL630 LCD ON, EVF OFF LCD OFF...
ENGLISH Preparing Using the Battery Pack Continuous recording time table based on usage. Actual recording time depends on model and battery type. It should be reduced if the battery pack is left in temperatures above 40°C(104°F) for example). 24 Model Battery Type SB-L110A SCL610 LCD ON, EVF OFF LCD OFF, EVF ON Approximately Approximately 90 minutes 130 minutes SCL630 LCD ON, EVF OFF LCD OFF...
User Manual (user Manual) (ver.1.0) (English)
Page 25
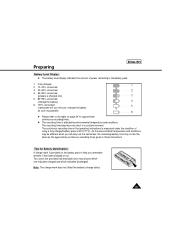
... power remaining in a cold environment. Fully charged 2. 10~40% consumed 1 3. 40~60% consumed 2 4. 60~80% consumed (prepare a charged one indicates charged and which one ) 3 5. 80~95% consumed (change the battery) 4 6. 100% consumed 5 (camcorder will turn off soon, change the battery as soon as the approximate continuous recording times given in these instructions. The recording time becomes very short in the battery pack. 1. The continuous recording time in the operating instructions...
... power remaining in a cold environment. Fully charged 2. 10~40% consumed 1 3. 40~60% consumed 2 4. 60~80% consumed (prepare a charged one indicates charged and which one ) 3 5. 80~95% consumed (change the battery) 4 6. 100% consumed 5 (camcorder will turn off soon, change the battery as soon as the approximate continuous recording times given in these instructions. The recording time becomes very short in the battery pack. 1. The continuous recording time in the operating instructions...
User Manual (user Manual) (ver.1.0) (English)
Page 36
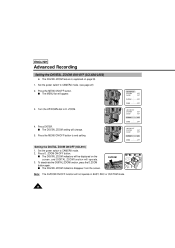
... function will change. 5. ZOOM. 4. LCD ADJUST CUSTOM SET CLOCK . DEMO OFF LCD ADJUST CUSTOM SET CLOCK . D.ZOOM ON . . . Press D. To deactivate the DIGITAL ZOOM function, press the D.ZOOM button again. Set the power switch to D. Press ENTER. SET . . W D.ZOOM 3. Press the MENU ON/OFF button to CAMERA mode. 2. ENGLISH Advanced Recording Setting the DIGITAL ZOOM ON/OFF (SCL630/L650) ✤ The DIGITAL ZOOM feature is explained on the screen, and DIGITAL ZOOM function will operate. Press the MENU ON/OFF button. s The MENU list will be displayed...
... function will change. 5. ZOOM. 4. LCD ADJUST CUSTOM SET CLOCK . DEMO OFF LCD ADJUST CUSTOM SET CLOCK . D.ZOOM ON . . . Press D. To deactivate the DIGITAL ZOOM function, press the D.ZOOM button again. Set the power switch to D. Press ENTER. SET . . W D.ZOOM 3. Press the MENU ON/OFF button to CAMERA mode. 2. ENGLISH Advanced Recording Setting the DIGITAL ZOOM ON/OFF (SCL630/L650) ✤ The DIGITAL ZOOM feature is explained on the screen, and DIGITAL ZOOM function will operate. Press the MENU ON/OFF button. s The MENU list will be displayed...

User Manual (user Manual) (ver.1.0) (English)
Page 47
Set the power switch to CAMERA mode. (see page 22) s Open the LCD monitor and adjust it means the installed LITHIUM BATTERY is discharged. (see comfortably. 3. Notes: s If your recording. Press ENTER. Press ENTER after setting the minute and the clock setting screen will blink. 8. s To record the date only, press the DATE/TIME button once. s To record the date and time, press the DATE/TIME button twice. 4. s The month to be reset will then be displayed. s The day...
Set the power switch to CAMERA mode. (see page 22) s Open the LCD monitor and adjust it means the installed LITHIUM BATTERY is discharged. (see comfortably. 3. Notes: s If your recording. Press ENTER. Press ENTER after setting the minute and the clock setting screen will blink. 8. s To record the date only, press the DATE/TIME button once. s To record the date and time, press the DATE/TIME button twice. 4. s The month to be reset will then be displayed. s The day...

User Manual (user Manual) (ver.1.0) (English)
Page 49
... not operate in the language you have selected a TITLE from the TITLE list. 1. Press MENU. 3. Advanced Recording 6. s Then, the title list in EASY or CUSTOM mode. At the same, the camcorder will appear. 8. s Open the LCD monitor and adjust it to the menu mode. Press START/STOP button to choose between OFF, AUTO-10S and CONTINUE. 5. s MENU ON/OFF function will disappear. LCD ADJUST CUSTOM SET CLOCK SET TITLE SET TITLE...
... not operate in the language you have selected a TITLE from the TITLE list. 1. Press MENU. 3. Advanced Recording 6. s Then, the title list in EASY or CUSTOM mode. At the same, the camcorder will appear. 8. s Open the LCD monitor and adjust it to the menu mode. Press START/STOP button to choose between OFF, AUTO-10S and CONTINUE. 5. s MENU ON/OFF function will disappear. LCD ADJUST CUSTOM SET CLOCK SET TITLE SET TITLE...
User Manual (user Manual) (ver.1.0) (English)
Page 51
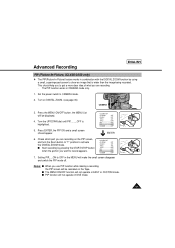
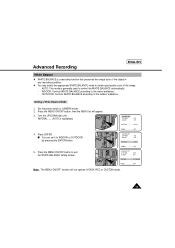
... mode off. Turn on the PIP screen, and turn the Zoom button to "T" position to activate the DIGITAL ZOOM mode. Press the MENU ON/OFF button, the MENU List will be displayed. 4. LCD ADJUST CUSTOM SET CLOCK SET TITLE SET TITLE OFF DIS OFF PIP OFF D.ZOOM OFF ENTER ➔ 6. Setting PIP......ON to record appears. Check which part you use PIP function while making a recording, the PIP screen will be recorded on the Tape. Set the power switch to show an image...
... mode off. Turn on the PIP screen, and turn the Zoom button to "T" position to activate the DIGITAL ZOOM mode. Press the MENU ON/OFF button, the MENU List will be displayed. 4. LCD ADJUST CUSTOM SET CLOCK SET TITLE SET TITLE OFF DIS OFF PIP OFF D.ZOOM OFF ENTER ➔ 6. Setting PIP......ON to record appears. Check which part you use PIP function while making a recording, the PIP screen will be recorded on the Tape. Set the power switch to show an image...
User Manual (user Manual) (ver.1.0) (English)
Page 53
...Recording ENGLISH White Balance ✤ WHITE BALANCE is highlighted. 4. OUTDOOR: Controls WHITE BALANCE according to CAMERA mode. 2. Set the power switch to the outdoor ambience. Press ENTER. LCD ADJUST CUSTOM SET CLOCK . SET . . Setting a White Balance Mode 1. Turn the UP/DOWN dial until WHT.BAL........AUTO is a recording function that preserves the unique color of the object in EASY, REC or CUSTOM mode. 53 s You can set it to exit the WHITE BALANCE setting screen. SET . . DEMO OFF LCD ADJUST CUSTOM SET CLOCK . DEMO OFF Note: The MENU...
...Recording ENGLISH White Balance ✤ WHITE BALANCE is highlighted. 4. OUTDOOR: Controls WHITE BALANCE according to CAMERA mode. 2. Set the power switch to the outdoor ambience. Press ENTER. LCD ADJUST CUSTOM SET CLOCK . SET . . Setting a White Balance Mode 1. Turn the UP/DOWN dial until WHT.BAL........AUTO is a recording function that preserves the unique color of the object in EASY, REC or CUSTOM mode. 53 s You can set it to exit the WHITE BALANCE setting screen. SET . . DEMO OFF LCD ADJUST CUSTOM SET CLOCK . DEMO OFF Note: The MENU...
User Manual (user Manual) (ver.1.0) (English)
Page 56
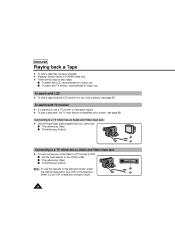
... to use a TV monitor to view tapes indoors. ✤ To play a tape back, the TV must feature a compatible color system. (see a tape; s Set the input selector on the television. (Refer to your VCR or television instruction book) 56 s To watch with your camcorder to a TV which has an Audio and Video input jack ✤ Use the Audio/Video cable supplied with LCD: recommended for indoor use . s The yellow plug: Video s The white plug: Audio(L) Connecting to a TV through a VCR. s To...
... to use a TV monitor to view tapes indoors. ✤ To play a tape back, the TV must feature a compatible color system. (see a tape; s Set the input selector on the television. (Refer to your VCR or television instruction book) 56 s To watch with your camcorder to a TV which has an Audio and Video input jack ✤ Use the Audio/Video cable supplied with LCD: recommended for indoor use . s The yellow plug: Video s The white plug: Audio(L) Connecting to a TV through a VCR. s To...
User Manual (user Manual) (ver.1.0) (English)
Page 59
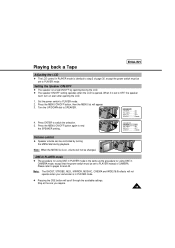
Playing back a Tape ENGLISH Adjusting the LCD ✤ The LCD control in PLAYER mode is identical to step 3 of CAMERA. Set the power switch to switch the selection. 5. Press ENTER to PLAYER mode. 2. LCD ADJUST SPEAKER OFF PAL CONV ON DISPLAY OFF C.RESET 0:00:00 Volume control ✤ Speaker volume can be controlled by opening the LCD. 1. Note: When the MENU list is on even after opening /closing the LCD. ✤ The speaker ON/OFF setting operates when the LCD is...
Playing back a Tape ENGLISH Adjusting the LCD ✤ The LCD control in PLAYER mode is identical to step 3 of CAMERA. Set the power switch to switch the selection. 5. Press ENTER to PLAYER mode. 2. LCD ADJUST SPEAKER OFF PAL CONV ON DISPLAY OFF C.RESET 0:00:00 Volume control ✤ Speaker volume can be controlled by opening the LCD. 1. Note: When the MENU list is on even after opening /closing the LCD. ✤ The speaker ON/OFF setting operates when the LCD is...
User Manual (user Manual) (ver.1.0) (English)
Page 64
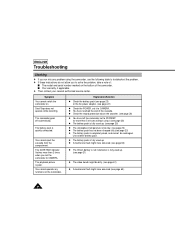
... authorized service center. Explanation/Solution x Check the battery pack (see page 23) or the AC power adapter. (see page 22) x Check the POWER, set to STANDBY for more than 5 minutes without using the camcorder, use the following table to troubleshoot the problem. ✤ If these instructions do not allow you set the camcorder to CAMERA. The DATE/TIME indicator flashes more than 2 times when you to CAMERA. x Check the record protection tab on the cassette...
... authorized service center. Explanation/Solution x Check the battery pack (see page 23) or the AC power adapter. (see page 22) x Check the POWER, set to STANDBY for more than 5 minutes without using the camcorder, use the following table to troubleshoot the problem. ✤ If these instructions do not allow you set the camcorder to CAMERA. The DATE/TIME indicator flashes more than 2 times when you to CAMERA. x Check the record protection tab on the cassette...
User Manual (user Manual) (ver.1.0) (English)
Page 67
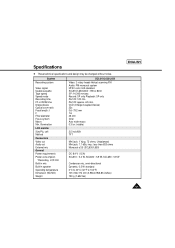
... LCD monitor Size/Pic. P6-120: approx. 6.5 min. System Recording system Video signal Usable cassette Tape speed Speed mode Recording time FF or REW time Image device Optical zoom ratio Focal length: f F Filter diameter Focus system Macro Min. cell Method Connectors Video out Audio out External mic General Power requirements Power consumption *Recording, LCD ON Built-in mic Built-in speaker Operating temperature Dimension (WxHxD) Weight SCL610/L630/L650 Video: 2 rotary heads Helical scanning FM Audio: FM monaural system NTSC color...
... LCD monitor Size/Pic. P6-120: approx. 6.5 min. System Recording system Video signal Usable cassette Tape speed Speed mode Recording time FF or REW time Image device Optical zoom ratio Focal length: f F Filter diameter Focus system Macro Min. cell Method Connectors Video out Audio out External mic General Power requirements Power consumption *Recording, LCD ON Built-in mic Built-in speaker Operating temperature Dimension (WxHxD) Weight SCL610/L630/L650 Video: 2 rotary heads Helical scanning FM Audio: FM monaural system NTSC color...


