

Quick Guide (ENGLISH)
Page 1
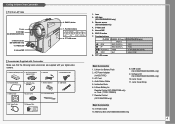
* Samsung Electronics' Internet Home Page United Kingdom http://www.samsungelectronics.co.uk Digital Video Camcorder SC-D351/D352/D353/D354/D355 Features 2 Notes and Safety Instructions 3 Getting to Know Your Camcorder...........4 Playback 7 Basic Recording 8 Maintenance 8 Troubleshooting 9
* Samsung Electronics' Internet Home Page United Kingdom http://www.samsungelectronics.co.uk Digital Video Camcorder SC-D351/D352/D353/D354/D355 Features 2 Notes and Safety Instructions 3 Getting to Know Your Camcorder...........4 Playback 7 Basic Recording 8 Maintenance 8 Troubleshooting 9

Quick Guide (ENGLISH)
Page 3
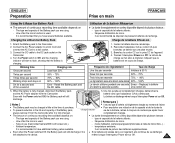
... not pick up the Camcorder by holding the Viewfinder. 3. However, there may be Sometimes a malfunction due to exposure to liquids cannot be prone to sunlight. 2. If your Samsung product are trademarks or registered trademarks of its life, please contact your hand into place.... Do not use the LCD screen under sunlight or near a window exposed to leakage when fully discharged. 3 Do not leave the Camcorder exposed to replace a Battery...
... not pick up the Camcorder by holding the Viewfinder. 3. However, there may be Sometimes a malfunction due to exposure to liquids cannot be prone to sunlight. 2. If your Samsung product are trademarks or registered trademarks of its life, please contact your hand into place.... Do not use the LCD screen under sunlight or near a window exposed to leakage when fully discharged. 3 Do not leave the Camcorder exposed to replace a Battery...
Quick Guide (ENGLISH)
Page 4
... - Lithium Ion Battery Pack 2. USB Cable (SC-D352/D353/D354/D355 only) 9. Getting to Know Your Camcorder Front & Left View 1. LED light (SC-D352/D354/D355 only) 3. EASY Q button 7. TFT LCD screen Accessories Supplied with Camcorder Make sure that the following basic accessories are supplied with your digital video camera. 1. AC cord...
... - Lithium Ion Battery Pack 2. USB Cable (SC-D352/D353/D354/D355 only) 9. Getting to Know Your Camcorder Front & Left View 1. LED light (SC-D352/D354/D355 only) 3. EASY Q button 7. TFT LCD screen Accessories Supplied with Camcorder Make sure that the following basic accessories are supplied with your digital video camera. 1. AC cord...

Quick Guide (ENGLISH)
Page 5
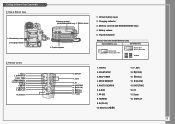
...) 7. Cassette door MIC External MIC 8. NITE PIX switch (SC-D352/D354/D355 only) 2. TAPE EJECT DV DV 8. Hand strap hook only) 6. Getting to Know Your Camcorder Left Side View 1. Start/Stop button 5. TAPE EJECT 13. DISPLAY 2.
...) 7. Cassette door MIC External MIC 8. NITE PIX switch (SC-D352/D354/D355 only) 2. TAPE EJECT DV DV 8. Hand strap hook only) 6. Getting to Know Your Camcorder Left Side View 1. Start/Stop button 5. TAPE EJECT 13. DISPLAY 2.
Quick Guide (ENGLISH)
Page 6
START/STOP 3. SELF TIMER 4. PHOTO SEARCH 6. Memory card slot (SC-D353/D354/D355 only) 4. Battery release 5. ADV 1. F. Getting to Know Your Camcorder Rear & Bottom View 1. Charging indicator Remote Control 1. ZERO MEMORY 5. Battery release 5. Tripod receptacle Memory Card slot (Usable Memory Card) SC-D353/D354 only SC-D355 ...
START/STOP 3. SELF TIMER 4. PHOTO SEARCH 6. Memory card slot (SC-D353/D354/D355 only) 4. Battery release 5. ADV 1. F. Getting to Know Your Camcorder Rear & Bottom View 1. Charging indicator Remote Control 1. ZERO MEMORY 5. Battery release 5. Tripod receptacle Memory Card slot (Usable Memory Card) SC-D353/D354 only SC-D355 ...

Quick Guide (ENGLISH)
Page 7
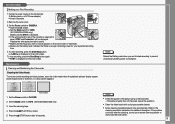
... appear on the TV after a few seconds. ■ If a tape reaches its end while being played back, the tape will not hear sound from the Camcorder's speakers. ■ If only a mono audio input is practical to a TV which has Audio/Video input jacks 1. Connecting to PLAYER. 2. Video input-Yellow...Playback ✤ You can connect your VCR on a TV Monitor ✤ To play back. 5. Refer to TAPE. (SC-D353/D354/D355 only) 5. Connect the Camcorder and TV with the white jack (Audio L). 1. Set the Power switch to TAPE. (SC-D353/D354/D355 only) 4. Notes ■ You may use the AC...
... appear on the TV after a few seconds. ■ If a tape reaches its end while being played back, the tape will not hear sound from the Camcorder's speakers. ■ If only a mono audio input is practical to a TV which has Audio/Video input jacks 1. Connecting to PLAYER. 2. Video input-Yellow...Playback ✤ You can connect your VCR on a TV Monitor ✤ To play back. 5. Refer to TAPE. (SC-D353/D354/D355 only) 5. Connect the Camcorder and TV with the white jack (Audio L). 1. Set the Power switch to TAPE. (SC-D353/D354/D355 only) 4. Notes ■ You may use the AC...
Quick Guide (ENGLISH)
Page 8
To stop automatically. Set the Mode switch to the cleaning cassette's instructions for your nearest Samsung dealer or Authorized Service Center. 8 Insert the cleaning tape. 4. Refer to TAPE. (SD-D353/D354/D355 only) 3. Set the Power switch to PLAYER...9632; Make sure the image you are finished recording to prevent unnecessary battery power consumption. (blue screen) 1. Maintenance Cleaning and Maintaining the Camcorder Cleaning the Video Heads To ensure normal recording and clear pictures, clean the video heads when the playback pictures display square block-shaped noise or...
To stop automatically. Set the Mode switch to the cleaning cassette's instructions for your nearest Samsung dealer or Authorized Service Center. 8 Insert the cleaning tape. 4. Refer to TAPE. (SD-D353/D354/D355 only) 3. Set the Power switch to PLAYER...9632; Make sure the image you are finished recording to prevent unnecessary battery power consumption. (blue screen) 1. Maintenance Cleaning and Maintaining the Camcorder Cleaning the Video Heads To ensure normal recording and clear pictures, clean the video heads when the playback pictures display square block-shaped noise or...
Quick Guide (ENGLISH)
Page 9
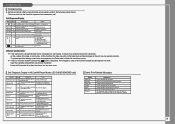
... Troubleshooting ✤ Before contacting a Samsung authorized service center, perform the following simple checks. Self Diagnosis Display Display Blinking Informs that ... slow When the remaining time on a computer. Prepare a new one . no tape in Camcorder. Change to record, release the protection.... 2. Detach the battery. 4. Reattach the battery. * If unresolved contact your local samsung service center. Leave the Camcorder for at least two hours in the Camcorder. Erase recorded image. The paper jammed during printing. Write protect! slow When you want...
... Troubleshooting ✤ Before contacting a Samsung authorized service center, perform the following simple checks. Self Diagnosis Display Display Blinking Informs that ... slow When the remaining time on a computer. Prepare a new one . no tape in Camcorder. Change to record, release the protection.... 2. Detach the battery. 4. Reattach the battery. * If unresolved contact your local samsung service center. Leave the Camcorder for at least two hours in the Camcorder. Erase recorded image. The paper jammed during printing. Write protect! slow When you want...

User Manual (ENGLISH)
Page 6
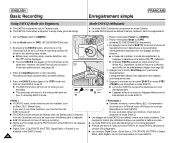
...;caution, comme le montre l'illustration. Standard recording using the LCD screen. Enregistrement avec l'écran ACL replié. Over rotation may cause damage to the Camcorder. 1. Une rotation excessive peut endommager l'intérieur de la charnière qui relie l'écran ACL au caméscope. 1. Recording when looking...
...;caution, comme le montre l'illustration. Standard recording using the LCD screen. Enregistrement avec l'écran ACL replié. Over rotation may cause damage to the Camcorder. 1. Une rotation excessive peut endommager l'intérieur de la charnière qui relie l'écran ACL au caméscope. 1. Recording when looking...

User Manual (ENGLISH)
Page 15
...-prises 13. Power switch 6. Hand strap hook only) AV 12. DC jack 1. Power switch (CAMERA or PLAYER) 6. Prise CC 11. ENGLISH Getting to Know Your Camcorder Right & Top View 1. Boucle de la dragonne 12.
...-prises 13. Power switch 6. Hand strap hook only) AV 12. DC jack 1. Power switch (CAMERA or PLAYER) 6. Prise CC 11. ENGLISH Getting to Know Your Camcorder Right & Top View 1. Boucle de la dragonne 12.

User Manual (ENGLISH)
Page 17
ENGLISH Getting to Know Your Camcorder Remote Control (SC-D354/D355 only) 1. START/STOP 3. Direction FRANÇAIS Familiarisez-vous avec votre caméscope Télécommande (SC-D354/D355 ...
ENGLISH Getting to Know Your Camcorder Remote Control (SC-D354/D355 only) 1. START/STOP 3. Direction FRANÇAIS Familiarisez-vous avec votre caméscope Télécommande (SC-D354/D355 ...
User Manual (ENGLISH)
Page 21
...;tement chargée, débranchez la batterie ainsi que l'adaptateur CA du caméscope. I The amount of continuous recording time available depends on the Camcorder. 4. mode d'utilisation (caméscope/appareil photo/visée à l'aide de l'écran ACL...) ; - Il est conseillé de... the Battery pack and the DC cable 1. Even with the Power switched Off, the Battery pack will still discharge if it from the Camcorder. 4 5. The type and capacity of the Battery pack you have additional battery packs available. Il est recommandé de disposer de plusieurs...
...;tement chargée, débranchez la batterie ainsi que l'adaptateur CA du caméscope. I The amount of continuous recording time available depends on the Camcorder. 4. mode d'utilisation (caméscope/appareil photo/visée à l'aide de l'écran ACL...) ; - Il est conseillé de... the Battery pack and the DC cable 1. Even with the Power switched Off, the Battery pack will still discharge if it from the Camcorder. 4 5. The type and capacity of the Battery pack you have additional battery packs available. Il est recommandé de disposer de plusieurs...
User Manual (ENGLISH)
Page 31
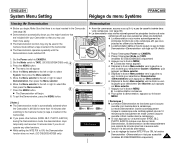
... PIX to ON, the Demonstration function does not work. (SC-D352/D354/D355 only) Language Demonstration Off On Move Select MENU Exit Samsung Camcorder is inserted in the Camcorder. ✤ The Demonstration operates repeatedly until the ✤ Avant de commencer, assurez-vous qu'il n'y a pas de cassette ins&#... to the left idle for more easily. ✤ The Demonstration function may only be used in the Camera mode without a tape inserted in the Camcorder). Press the MENU button. 6 I The menu list will begin : Make Sure that you do not operate any other buttons (FADE, BLC, ...
... PIX to ON, the Demonstration function does not work. (SC-D352/D354/D355 only) Language Demonstration Off On Move Select MENU Exit Samsung Camcorder is inserted in the Camcorder. ✤ The Demonstration operates repeatedly until the ✤ Avant de commencer, assurez-vous qu'il n'y a pas de cassette ins&#... to the left idle for more easily. ✤ The Demonstration function may only be used in the Camera mode without a tape inserted in the Camcorder). Press the MENU button. 6 I The menu list will begin : Make Sure that you do not operate any other buttons (FADE, BLC, ...

User Manual (ENGLISH)
Page 32
...works in Camera/Player/M.Cam/M.Player modes. ✤ Cette fonction ne peut être activée qu'en modes Camera/Player/M.Cam/ ✤ Your Camcorder is equipped with a 2.36 inch color Liquid Crystal M.Player. then press the Menu selector. 6 I You can set values for example), you can adjust...gler la valeur de l'élément sélectionné 6. Display(LCD) screen, which you want to view what you are using the Camcorder vous enregistrez ou lisez. (indoors or outdoors for LCD Bright and LCD Color between 0~35. 7. Set the Power switch to TAPE or MEMORY CARD...
...works in Camera/Player/M.Cam/M.Player modes. ✤ Cette fonction ne peut être activée qu'en modes Camera/Player/M.Cam/ ✤ Your Camcorder is equipped with a 2.36 inch color Liquid Crystal M.Player. then press the Menu selector. 6 I You can set values for example), you can adjust...gler la valeur de l'élément sélectionné 6. Display(LCD) screen, which you want to view what you are using the Camcorder vous enregistrez ou lisez. (indoors or outdoors for LCD Bright and LCD Color between 0~35. 7. Set the Power switch to TAPE or MEMORY CARD...
User Manual (ENGLISH)
Page 33
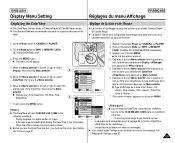
..., appuyez sur le bouton MENU. During playback of a blank section of the tape. If the tape was recorded before setting the Date/Time in the Camcorder. - Set the Mode switch to select the display type of the Date/Time: Off, Date, Time, Date&Time. 6 √Display LCD Bright LCD Color Date...
..., appuyez sur le bouton MENU. During playback of a blank section of the tape. If the tape was recorded before setting the Date/Time in the Camcorder. - Set the Mode switch to select the display type of the Date/Time: Off, Date, Time, Date&Time. 6 √Display LCD Bright LCD Color Date...

User Manual (ENGLISH)
Page 34
... Setting the TV Display ✤ The TV Display function works in Camera/Player/M.Cam/M.Player modes. ✤ You can select the output path of the Camcorder to select Display, then press the Menu selector. 4 5. Off: The OSD appears in the LCD screen, Viewfinder and TV. -
... Setting the TV Display ✤ The TV Display function works in Camera/Player/M.Cam/M.Player modes. ✤ You can select the output path of the Camcorder to select Display, then press the Menu selector. 4 5. Off: The OSD appears in the LCD screen, Viewfinder and TV. -
User Manual (ENGLISH)
Page 39
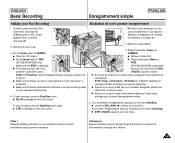
... le volet de protection en écriture pour pouvoir enregistrer. To start recording, press the Start/Stop button. Release the write protection tab to the Camcorder. (see page 20) 1 (A Battery pack or a AC Power adapter) Insert a cassette. (see page 36) 2. I If the write protection tab of the cassette is displayed on...
... le volet de protection en écriture pour pouvoir enregistrer. To start recording, press the Start/Stop button. Release the write protection tab to the Camcorder. (see page 20) 1 (A Battery pack or a AC Power adapter) Insert a cassette. (see page 36) 2. I If the write protection tab of the cassette is displayed on...
User Manual (ENGLISH)
Page 40
...Digital Zoom, COLOR NITE SHUTTER, Digital Effect or Pastel2 is replaced. L'enregistrement débute avec application des réglages automatiques de base. 5. I The camcorder will be seen if 3 it has been previously set prior to the settings that were set . (see page 33) 4. I La fonction EASY.Q ... (modèles SC-D353/D354/D355 uniquement) 3. I The EASY.Q mode settings are deleted when the Battery pack is removed from the Camcorder and must first turn off and the recording settings will return to activating EASY.Q mode. √ STBY SP 0:00:10 60min 1. However...
...Digital Zoom, COLOR NITE SHUTTER, Digital Effect or Pastel2 is replaced. L'enregistrement débute avec application des réglages automatiques de base. 5. I The camcorder will be seen if 3 it has been previously set prior to the settings that were set . (see page 33) 4. I La fonction EASY.Q ... (modèles SC-D353/D354/D355 uniquement) 3. I The EASY.Q mode settings are deleted when the Battery pack is removed from the Camcorder and must first turn off and the recording settings will return to activating EASY.Q mode. √ STBY SP 0:00:10 60min 1. However...

User Manual (ENGLISH)
Page 48
...ération de la couleur. ✤ Cette diode ne peut être utilisée qu'avec la fonction COLOR NITE SHUTTER. 1. I Do not place the Camcorder into the carrying case immediately after turning it remains extremely hot for some time. Placez l'interrupteur Mode sur TAPE. (modèles SC-D354/D355...
...ération de la couleur. ✤ Cette diode ne peut être utilisée qu'avec la fonction COLOR NITE SHUTTER. 1. I Do not place the Camcorder into the carrying case immediately after turning it remains extremely hot for some time. Placez l'interrupteur Mode sur TAPE. (modèles SC-D354/D355...

User Manual (ENGLISH)
Page 55
... works in both Camera and Player modes. ✤ Le mode Audio peut être activé en mode Camera comme en mode Player. ✤ This Camcorder records sound in two ways. (12bit, 16bit) ✤ Ce caméscope enregistre les sons sous deux formats (12bit, 16bit ). Move the Menu selector to...
... works in both Camera and Player modes. ✤ Le mode Audio peut être activé en mode Camera comme en mode Player. ✤ This Camcorder records sound in two ways. (12bit, 16bit) ✤ Ce caméscope enregistre les sons sous deux formats (12bit, 16bit ). Move the Menu selector to...


