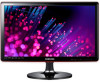
User Manual (user Manual) (ver.1.0) (English)
Page 2
... Signal Mode Table 3-6 Standard Signal Mode Table 3-7 Standard Signal Mode Table 3-8 Standard Signal Mode Table 3-9 Standard Signal Mode Table 3-10 Standard Signal Mode Table 3-11 Standard Signal Mode Table 3-12 Standard Signal Mode Table 3-13 Installing the Device Driver 3-14 Product Operating Buttons 3-15 Using the Screen Adjustment Menu (OSD: On Screen Display) . . . 3-16 INSTALLING THE SOFTWARE Natural Color 4-1 MagicTune 4-2 MultiScreen 4-3 TROUBLESHOOTING Monitor Self-Diagnosis 5-1 Before Requesting Service 5-2 FAQ 5-3 MORE INFORMATION Specifications 6-1 Power Saving...
User Manual (user Manual) (ver.1.0) (English)
Page 5
...-pixels by panel type: The number of the panel manufacturer, the images generated by spraying water onto the product. This may result in a problem with the product. • Do not scratch the screen with the product. • A white stain may differ depending on the product. When installing the product with a stand About persistent images • Displaying a still image for approximately 1 ppm (parts per million) pixels. Vertical Resolution...
User Manual (user Manual) (ver.1.0) (English)
Page 10
... no circumstance touch the antenna cable as wax, benzene, alcohol, thinner, mosquitorepellent, fragrance, lubrication or cleansing agent when cleaning the product. Caution Avoid spraying cleansing agent directly onto the product. • This may result in discoloration or cracking of the exterior of water. When thunder or lighting occurs, unplug the power cord and under no monitor-exclusive...
User Manual (user Manual) (ver.1.0) (English)
Page 11
... the adapter on the screen. • If you do not use the power-saving mode or set the screensaver to the cable. Avoid inserting metal objects such as a chopsticks, coins or hairpins, or inflammable objects into the product (the vents, ports, etc). • If water or an alien substance enters the product, turn the power off , unplug the power cord and contact a service center...
User Manual (user Manual) (ver.1.0) (English)
Page 19
... Kensington lock cable. 3. For exact instructions, see the User Manual supplied with the locking device for more information. To lock the product, follow these steps: 1. Installing the Product 2-5 Lock the lock( ). • These are general instructions. You must purchase the Kensington Lock separately. Slide the end of the cable with the lock attached through the looped end of the locking device may differ depending on the Monitor...
User Manual (user Manual) (ver.1.0) (English)
Page 20
... turned off, connect the product and the PC and turn the power on after purchasing the product, a message regarding the optimal resolution setting appears on . • Right-click over the Desktop and select 'Properties' from the pop-up menu. • In the 'Settings' tab, set the resolution to the optimal resolution. 3-1 Using the product Select a language and the optimal resolution. ▲/▼ : You can select a language with these buttons. MENU...
User Manual (user Manual) (ver.1.0) (English)
Page 21
... the horizontal frequency. It is recommended setting the resolution to the right-most position to the optimal resolution of the following standard signal modes, the screen is set for the panel size. Vertical Frequency A panel must display the same picture on the screen is one of the graphics card. Using the product 3-2 S19A350B DISPLAY MODE IBM, 640 x 350 IBM, 720 x 400 MAC, 640 x 480 MAC, 832 x 624 VESA, 640 x 480 VESA, 640 x 480 VESA, 640 x 480 VESA, 800 x 600 VESA...
User Manual (user Manual) (ver.1.0) (English)
Page 41
... "Windows Driver". 3. Check if the appropriate resolution and screen refresh rate are displayed in the Control Panel settings. 3-14 Installing the Device Driver If you install the device driver, you can set up the appropriate resolution and frequency for the product. Using the product 3-14 Insert the driver installation CD-ROM into the CD-ROM drive. 2. Select the model of your product from the model list. 5. For more information, refer to the instructions displayed on...
User Manual (user Manual) (ver.1.0) (English)
Page 42
... On: If you press a button on the front of the monitor, an OSD guide will display showing the function of the button before the menu for 5 seconds again, the OSD Adjustment Lock function is activated, users can adjust the brightness and contrast and can set up the adjustment function assigned to one of the buttons on the front of the screen. 3-15 Using the product OSD guide will be performed •...
User Manual (user Manual) (ver.1.0) (English)
Page 43
... finger. Press [AUTO] button to minimize power consumption. Press this button to the power saving function in the Display Properties, the AUTO adjustment function is turned on when the product works normally. If you press the [ ] button when there is no OSD, the input signal (Analog/Digital/HDMI) is only available in Analog mode. This function is not available for a long time, unplugging the power cord is recommended to adjust the screen settings automatically This...
User Manual (user Manual) (ver.1.0) (English)
Page 44
...or mode. 3-16 Using the product 3-16 Using the Screen Adjustment Menu (OSD: On Screen Display) The Screen Adjustment Menu (OSD: On Screen Display) Structure Top Menus Sub Menus PICTURE Brightness Coarse COLOR SIZE & POSITION SETUP&RESET Color Gamma H-Position Reset PC/AV Mode Menu Transparency Contrast Fine Red Sharpness Response Time Green V-Position Image Size Language Key Repeat Time Eco Saving Customized Key Bright Angle HDMI Black Level Blue Color Tone Menu H-Position Menu V-Position Off Timer On/Off Auto Source Off Timer Setting Display Time INFORMATION Monitor...
User Manual (user Manual) (ver.1.0) (English)
Page 45
Provides preset picture settings optimized for the best entertainment environment (movie, DVD, etc.). • Controls the picture contrast automatically so that bright and dark pictures are preset at the factory. When the external input is connected through HDMI and is set to , < Bright> has four automatic picture settings (, , and ) that require a fast screen refresh rate. • This mode provides brightness and sharpness settings similar to those of a TV for various user environments such as editing...
User Manual (user Manual) (ver.1.0) (English)
Page 49
... input is connected through HDMI/DVI and is input in 0-6 levels. You can adjust the horizontal position of the OSD. Using the product 3-16 Displays pictures at the 16:9 aspect ratio. • - PC signals • - AV signals • - Moves the position of the input signal. • A signal not in the standard mode table is not supported. • If the resolution is set to the optimal resolution, the aspect ratio does not change whether the is input...
User Manual (user Manual) (ver.1.0) (English)
Page 50
... Digital or HDMI) is in power saving mode or is only applied to an AV device. • This function does not support Analog mode. • Supplied for the OSD. When of the PC. This setting does not affect the other functions of is selected,This function is reached. This menu is unavailable when < Bright> is selected, the button only responds once. 3-16 Using the product Turns...
User Manual (user Manual) (ver.1.0) (English)
Page 53
... •Windows Vista 32Bit •Windows 7 32Bit For MagicTune™, Windows 2000 or later is MagicTune? MagicTune is a software program that helps with the mouse and the keyboard without using the operating buttons of monitor functions and easy-to the instructions displayed on the CD-ROM. 3. Users can only remove MagicTune™through [Add or Remove Programs ] in the Control Panel. Complete the remaining software installation steps...
User Manual (user Manual) (ver.1.0) (English)
Page 55
... MultiScreen setup file on the hard disk drive Removing the Software Click [Start], select [Settings]/[Control Panel], and then double-click [Add or Remove Programs]. Complete the remaining software installation steps according to use the monitor by the graphics card, motherboard and the networking environment. Restrictions and Problems with the Installation (MultiScreen) The MultiScreen installation may not appear depending on the screen. • The software may not work properly...
User Manual (user Manual) (ver.1.0) (English)
Page 57
... display brightness can differ according to adjust the screen settings.) THE IMAGE IS TOO LIGHT OR TOO DARK. Check if the OSD Adjustment Lock function is the PC or graphics card, and can be activated.In Lossless mode, the backlight of the screen when an [HDMI] or [HDMI-DVI] cable is running. This occurs when the signal from the graphics card exceeds the maximum resolution or the maximum frequency of the power cord. If < Bright> is connected...
User Manual (user Manual) (ver.1.0) (English)
Page 58
... auto adjustment function. Please press the [AUTO] button to the center. Did you change the resolution and the frequency appropriate to the user manual. Windows ME/2000 : Set the color again by selecting Control Panel → Appearance and Personalization → Personalization → Display settings. Install the device driver referring to the user manual. When I connect the monitor, the 'Unknown monitor, Plug&Play (VESA DDC) monitor found' message is heard when booting the computer. A "beep, beep" sound is displayed. Set...
User Manual (user Manual) (ver.1.0) (English)
Page 59
... I use the BIOS SETUP menu on the PC. (For more information, refer to the User Manual of the computer or the graphics card.) Windows XP : Configure it by selecting Control Panel → Display → Screen Saver Setting or Configure it in the BIOS Setup of the computer. Windows Vista : Change the resolution by selecting Control Panel → Appearance and Personalization → Display → Adjust reso- You can I change the refresh rate under Monitor Settings. 5-3 FAQ...
User Manual (user Manual) (ver.1.0) (English)
Page 61
... Power Indicator Power Consumption NORMAL OPERATION On 19 W POWER SAVING MODE Blinking Typical 0.3 W POWER OFF Off Typical 0.3 W If there is no power cut-off switch, the power consumption is "0" only when the power cord is not needed, or when leaving it has not been used for long periods. The monitor automatically returns to set up this feature. The PowerSaver system operates with a VESA DPM compliant video card installed in power management...