
User Guide
Page 3
... 2: Install the Toner Cartridge 2.2 STEP 3: Loading Paper 2.4 STEP 4: Connect to the Computer with a Parallel Cable - 2.6 STEP 5: Turn on the Printer 2.7 STEP 6: Print a Demo Page 2.7 STEP 7: Install the Printer Software 2.8 Installing USB driver in Windows 2.13 3 Using Control Panel Control Panel Buttons 3.1 Control Panel Lights 3.3 4 Print Media Choosing Paper and Other Media 4.1 Selecting...
... 2: Install the Toner Cartridge 2.2 STEP 3: Loading Paper 2.4 STEP 4: Connect to the Computer with a Parallel Cable - 2.6 STEP 5: Turn on the Printer 2.7 STEP 6: Print a Demo Page 2.7 STEP 7: Install the Printer Software 2.8 Installing USB driver in Windows 2.13 3 Using Control Panel Control Panel Buttons 3.1 Control Panel Lights 3.3 4 Print Media Choosing Paper and Other Media 4.1 Selecting...

User Guide
Page 4
... Graphic Properties 5.11 Printing Watermarks 5.13 Using Page Overlay 5.16 Reprinting the Last Page 5.20 Printing in a Network Environment 5.21 6 Maintaining Your Printer Maintaining the Toner Cartridge 6.1 Cleaning the Printer 6.4 7 Problem Solving Troubleshooting Checklist 7.1 Solving General Printing Problems 7.2 Clearing Paper Jams 7.6 Solving Print Quality Problems 7.11 Troubleshooting Error Messages 7.17 Common Windows...
... Graphic Properties 5.11 Printing Watermarks 5.13 Using Page Overlay 5.16 Reprinting the Last Page 5.20 Printing in a Network Environment 5.21 6 Maintaining Your Printer Maintaining the Toner Cartridge 6.1 Cleaning the Printer 6.4 7 Problem Solving Troubleshooting Checklist 7.1 Solving General Printing Problems 7.2 Clearing Paper Jams 7.6 Solving Print Quality Problems 7.11 Troubleshooting Error Messages 7.17 Common Windows...

User Guide
Page 5
..., or prescribed service condition. The laser system and printer are designed so there is never any human access to laser radiation above a Class I laser products are not considered to be hazardous. WARNING Never operate or service the printer with the protective cover removed from Laser/Scanner assembly. UNSICHTBARE LASERSTRAHLUNG, WENN ABDECKUNG.... NICHT DEM STRAHL AUSSETZEN. ATTENTION - ADVARSEL. - Caution! Hot Surface. STRÅLEN ÄR FARLIG. IV VARO! - Environmental and Safety Consideration Laser Safety Statement The printer is certified as a Class I STRÅLEN.
..., or prescribed service condition. The laser system and printer are designed so there is never any human access to laser radiation above a Class I laser products are not considered to be hazardous. WARNING Never operate or service the printer with the protective cover removed from Laser/Scanner assembly. UNSICHTBARE LASERSTRAHLUNG, WENN ABDECKUNG.... NICHT DEM STRAHL AUSSETZEN. ATTENTION - ADVARSEL. - Caution! Hot Surface. STRÅLEN ÄR FARLIG. IV VARO! - Environmental and Safety Consideration Laser Safety Statement The printer is certified as a Class I STRÅLEN.

User Guide
Page 6
Environmental and Safety Consideration Ozone Safety During normal operation, the Samsung ML-1430 Series printer produces ozone. When the printer does not receive data for an extended period of any product or service. Power Saver This printer contains advanced energy conservation technology that the machine be operated in active use. However, it is advisable that reduces power...
Environmental and Safety Consideration Ozone Safety During normal operation, the Samsung ML-1430 Series printer produces ozone. When the printer does not receive data for an extended period of any product or service. Power Saver This printer contains advanced energy conservation technology that the machine be operated in active use. However, it is advisable that reduces power...

User Guide
Page 9
This chapter provides information on the purchase of Samsung ML-1430 Series printer! 1CHAPTER Introduction Congratulations on the following topics: N Special Features N Printer Components
This chapter provides information on the purchase of Samsung ML-1430 Series printer! 1CHAPTER Introduction Congratulations on the following topics: N Special Features N Printer Components

User Guide
Page 10
... consumption when not printing. • This product meets Energy Star guidelines for the most convenient access. INTRODUCTION 1.1 Special Features Samsung ML-1430 Series is allowed in the Ready mode. See page 5.7. • One-touch last page printing is a versatile, productive printer equipped with excellent quality and high speed • You can use less toner.
... consumption when not printing. • This product meets Energy Star guidelines for the most convenient access. INTRODUCTION 1.1 Special Features Samsung ML-1430 Series is allowed in the Ready mode. See page 5.7. • One-touch last page printing is a versatile, productive printer equipped with excellent quality and high speed • You can use less toner.

User Guide
Page 11
.... After the document has printed, trim off the white edges of paper. See page 5.9. Print in Windows 95/98/Me/NT 4.0/2000/XP. • Your printer is compatible with Linux and Macintosh. • The ML-1430 Series printer comes with both Parallel and USB interfaces. 1.2 INTRODUCTION
.... After the document has printed, trim off the white edges of paper. See page 5.9. Print in Windows 95/98/Me/NT 4.0/2000/XP. • Your printer is compatible with Linux and Macintosh. • The ML-1430 Series printer comes with both Parallel and USB interfaces. 1.2 INTRODUCTION

User Guide
Page 12
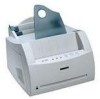
Printer Components Front View Paper output support Paper support Automatic input tray Face-down output tray Output lever Face-up output slot Control panel Paper guides Manual input tray Front cover INTRODUCTION 1.3
Printer Components Front View Paper output support Paper support Automatic input tray Face-down output tray Output lever Face-up output slot Control panel Paper guides Manual input tray Front cover INTRODUCTION 1.3

User Guide
Page 14
Memo Printer Components INTRODUCTION 1.5
Memo Printer Components INTRODUCTION 1.5

User Guide
Page 15
N STEP 7: Install the Printer Software Installing USB driver in this chapter are: N STEP 1: Unpack Your Printer N STEP 2: Install the Toner Cartridge N STEP 3: Load Paper N STEP 4: Connect to the Computer with a Parallel Cable N STEP 5: Turn on setting up your printer. 2CHAPTER Setting Up Your Printer This chapter provides step by step information on the Printer N STEP 6: Print a Demo Page! Topics included in Windows
N STEP 7: Install the Printer Software Installing USB driver in this chapter are: N STEP 1: Unpack Your Printer N STEP 2: Install the Toner Cartridge N STEP 3: Load Paper N STEP 4: Connect to the Computer with a Parallel Cable N STEP 5: Turn on setting up your printer. 2CHAPTER Setting Up Your Printer This chapter provides step by step information on the Printer N STEP 6: Print a Demo Page! Topics included in Windows

User Guide
Page 16
... CD-ROM Power cord Paper Output Support Setup Guide 2 Carefully remove all accessories from the packing carton. SETTING UP YOUR PRINTER 2.1 Make sure that your printer has been packed with the following items: Notes: • If any items are missing or damaged, notify your dealer immediately.... • Components may differ from one country to another. • The CD-ROM contains the printer driver, the User's Guide, the Adobe Acrobat Reader program. Unpack Your Printer 1 Remove the printer and all packing tapes from the printer. 3 Attach the supplied paper output support as shown.
... CD-ROM Power cord Paper Output Support Setup Guide 2 Carefully remove all accessories from the packing carton. SETTING UP YOUR PRINTER 2.1 Make sure that your printer has been packed with the following items: Notes: • If any items are missing or damaged, notify your dealer immediately.... • Components may differ from one country to another. • The CD-ROM contains the printer driver, the User's Guide, the Adobe Acrobat Reader program. Unpack Your Printer 1 Remove the printer and all packing tapes from the printer. 3 Attach the supplied paper output support as shown.

User Guide
Page 17
Hot water sets toner into fabric. 2.2 SETTING UP YOUR PRINTER Install the Toner Cartridge 1 Grasp the front cover by both sides of the cover and pull it toward you to light for more than a few ...
Hot water sets toner into fabric. 2.2 SETTING UP YOUR PRINTER Install the Toner Cartridge 1 Grasp the front cover by both sides of the cover and pull it toward you to light for more than a few ...

User Guide
Page 18
Note: When printing text at 5% coverage, you can expect a toner cartridge life of approximately 2,500 pages (1,000 pages for the toner cartridge that the cover is shipped with the printer). Make sure that is securely closed. SETTING UP YOUR PRINTER 2.3 4 Locate the cartridge slots inside the printer, one on each side. Install the Toner Cartridge 5 Grasp the handle and insert the cartridge in the printer until it snaps into place. 6 Close the front cover.
Note: When printing text at 5% coverage, you can expect a toner cartridge life of approximately 2,500 pages (1,000 pages for the toner cartridge that the cover is shipped with the printer). Make sure that is securely closed. SETTING UP YOUR PRINTER 2.3 4 Locate the cartridge slots inside the printer, one on each side. Install the Toner Cartridge 5 Grasp the handle and insert the cartridge in the printer until it snaps into place. 6 Close the front cover.

User Guide
Page 19
Loading Paper 1 Pull the paper support on the automatic input tray up, until it stops. 2 Before loading the paper, flex the sheets back and forth to prevent paper jams. 3 Load a stack of the stack on a table top to straighten them to loosen them, then fan them. Tap the edges of paper into the automatic input tray with the print side facing up. 2.4 SETTING UP YOUR PRINTER
Loading Paper 1 Pull the paper support on the automatic input tray up, until it stops. 2 Before loading the paper, flex the sheets back and forth to prevent paper jams. 3 Load a stack of the stack on a table top to straighten them to loosen them, then fan them. Tap the edges of paper into the automatic input tray with the print side facing up. 2.4 SETTING UP YOUR PRINTER

User Guide
Page 20
... much. Then, reinsert them with the new paper. Keep the paper below this height mark. 5 Adjust the paper guides to 150 sheets. SETTING UP YOUR PRINTER 2.5 Load Paper Notes: • Do not push the width guide far enough to cause the media to warp. • If you do not adjust the...
... much. Then, reinsert them with the new paper. Keep the paper below this height mark. 5 Adjust the paper guides to 150 sheets. SETTING UP YOUR PRINTER 2.5 Load Paper Notes: • Do not push the width guide far enough to cause the media to warp. • If you do not adjust the...

User Guide
Page 21
... to "Installing USB driver in Windows" on page 2.13. 2.6 SETTING UP YOUR PRINTER Connect to the Computer with a Parallel Cable Note: To connect the printer to buy the IEEE1284 compliant cable. 1 Make sure both the printer and the computer are using a USB interface Go to the parallel interface port on ...your computer, and tighten the screws. You will need help. ➜ To the parallel port on PC If you are turned off. 2 Plug the parallel printer cable into the connector on ...
... to "Installing USB driver in Windows" on page 2.13. 2.6 SETTING UP YOUR PRINTER Connect to the Computer with a Parallel Cable Note: To connect the printer to buy the IEEE1284 compliant cable. 1 Make sure both the printer and the computer are using a USB interface Go to the parallel interface port on ...your computer, and tighten the screws. You will need help. ➜ To the parallel port on PC If you are turned off. 2 Plug the parallel printer cable into the connector on ...

User Guide
Page 22
... light remains on briefly. Hold down the button for about 2 seconds until all the printer control panel lights turn on , press and hold the Demo button. ML-1430 Laser Beam Printer Excellent Performance Saving & Convenience SETTING UP YOUR PRINTER 2.7 Turn on the Printer 1 Plug the power cord into the power receptacle on the back of the print...
... light remains on briefly. Hold down the button for about 2 seconds until all the printer control panel lights turn on , press and hold the Demo button. ML-1430 Laser Beam Printer Excellent Performance Saving & Convenience SETTING UP YOUR PRINTER 2.7 Turn on the Printer 1 Plug the power cord into the power receptacle on the back of the print...
User Guide
Page 23
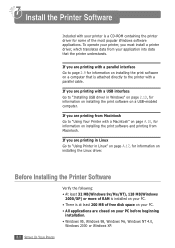
...PC before beginning installation. • Windows 95, Windows 98, Windows Me, Windows NT 4.0, Windows 2000 or Windows XP. 2.8 SETTING UP YOUR PRINTER Before Installing the Printer Software Verify the following: • At least 32 MB(Windows 9x/Me/NT), 128 MB(Windows 2000/XP) or more of RAM is ...your PC. • There is at least 200 MB of the most popular Windows software applications. To operate your printer, you are printing with a USB interface Go to the printer with a parallel cable. If you are printing from Macintosh Go to page 2.9 for information on installing the print software...
...PC before beginning installation. • Windows 95, Windows 98, Windows Me, Windows NT 4.0, Windows 2000 or Windows XP. 2.8 SETTING UP YOUR PRINTER Before Installing the Printer Software Verify the following: • At least 32 MB(Windows 9x/Me/NT), 128 MB(Windows 2000/XP) or more of RAM is ...your PC. • There is at least 200 MB of the most popular Windows software applications. To operate your printer, you are printing with a USB interface Go to the printer with a parallel cable. If you are printing from Macintosh Go to page 2.9 for information on installing the print software...

User Guide
Page 24
...will start automatically. If the CD-ROM drive does not automatically run: Select Run from the CD-ROM SAMSUNG ML-143 0 1 Place the CD-ROM in the CD-ROM drive. SETTING UP YOUR PRINTER 2.9 Note: If the New Hardware Found box appears during the installation procedure, click the x in the ...of the box, or click Cancel. 2 When the opening screen appears, select the appropriate language. 3 Click Install the Samsung Software on your PC. Install the Printer Software Installing the Printer Software from the Start menu, and type x:\cdsetup.exe in the Open box (where x is the drive letter for ...
...will start automatically. If the CD-ROM drive does not automatically run: Select Run from the CD-ROM SAMSUNG ML-143 0 1 Place the CD-ROM in the CD-ROM drive. SETTING UP YOUR PRINTER 2.9 Note: If the New Hardware Found box appears during the installation procedure, click the x in the ...of the box, or click Cancel. 2 When the opening screen appears, select the appropriate language. 3 Click Install the Samsung Software on your PC. Install the Printer Software Installing the Printer Software from the Start menu, and type x:\cdsetup.exe in the Open box (where x is the drive letter for ...

User Guide
Page 25
Click Next. 5 The files are copied into the appropriate directory. 6 Click Finish. 2.10 SETTING UP YOUR PRINTER Install the Printer Software 4 The Welcome window opens.
Click Next. 5 The files are copied into the appropriate directory. 6 Click Finish. 2.10 SETTING UP YOUR PRINTER Install the Printer Software 4 The Welcome window opens.


