Samsung MD230X6 Research
Related Manual Pages


Related Videos

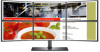
Futurelooks Unboxes the Massive Samsung SyncMaster MD230X6 Six LCD Monitor Display
Duration: 13:21
Total Views: 89,354
Duration: 13:21
Total Views: 89,354
Super PC, Samsung, MD230X, MD230X3, MD230X6,Technology, And ATI Eyefinity Work Together!
Duration: 2:50
Total Views: 2,052
Duration: 2:50
Total Views: 2,052
Amber and Alan Build Samsung's New SynchMaster MD230x6
Duration: 4:52
Total Views: 1,334
Duration: 4:52
Total Views: 1,334
Samsung MD230X6 vadný displej
Duration: 1:23
Total Views: 111
Duration: 1:23
Total Views: 111
Similar Questions

Setting Problem
plz send the detail setting we have to set in our system.we are unable to set the setting.so pz send...
plz send the detail setting we have to set in our system.we are unable to set the setting.so pz send...
(Posted by soumyajeetrath 10 years ago)

Monitor Is Getting Power But Display Screen Is Not Working,it Remains Black.
my samsung 920 NW monitor remains black evev if the power supply is there as indicated by the power ...
my samsung 920 NW monitor remains black evev if the power supply is there as indicated by the power ...
(Posted by abhijitroy4u 11 years ago)

What Is The Power Consumption Of This 713n Model.
(Posted by svsivanatarajan 11 years ago)
Related Terms
The following terms were also used when searching for Samsung MD230X6 Research:- samsung md230x6
- buy md230x6
- syncmaster md230x6
- md230x6 samsung
- md230x6 review
- md230x6 price
- md230x6 23 lcd monitor
- md230x6 lcd monitor
- md230x6 6 way monitors
- samsung md230x6 lcd monitor - 23
- samsung md230x6 monitor
- samsung md230x6 lcd monitor
- samsung md230x6 how to adjust height of stand
- samsung md230x6 gaming
- samsung md230x6 for sale
- samsung md230x6 eyefinity
- samsung md230x6 buy
- samsung md230x6 black 23
- samsung md230x6 6 way monitors
- samsung md230x6 23.0 monitor
- samsung md230x6 23.0
- samsung md230x6 23 lcd monitor
- samsung md230x6 23
- samsung md230x3 eyefinity monitor
- samsung md230x3
- samsung md230x6 review
- syncmaster md230x6 price
- samsung syncmaster md230x6 price
- samsung syncmaster md230x6
- samsung professional md230x6
- samsung monitor md230x6
- samsung md230x6 user manual
- samsung md230x6 stand
- samsung md230x6 setup
- samsung md230x6 reviews
- samsung md230x6 lcd monitor 23
- samsung md230x6 replacement
- samsung md230x6 price
- samsung md230x6 multi-monitor
- samsung md230x6 multi-display monitor
- samsung md230x6 multi-display
- samsung md230x6 multi display
- md230x6 stand
- samsung md230x6 manual
- md230x6 black 23
- md230x6 lcd monitor - 23
- md230x6 how to adjust height of stand
- md230x6 graphics card
- md230x6 gaming
- md230x6 for sale
- md230x6 eyefinity
- md230x6 dimensions
- md230x6 buy
- md230x6 business monitor
- md230x6 lcd monitor 23
- md230x6 australia
- md230x6 23.0 monitor
- md230x6 23.0
- md230x6 23
- md230x6
- md230x3 eyefinity monitor
- buy samsung md230x6
- 23 samsung md230x6
- md230x6 replacement
- monitor md230x6
- md230x6 video
- md230x6 user manual
- 23 md230x6
- md230x6 specs
- md230x6 setup
- md230x6 samsung review
- md230x6 reviews
- professional md230x6
- md230x6 prices
- md230x6 multi-monitor
- md230x6 multi-display monitor
- md230x6 multi-display
- md230x6 multi display
- md230x6 monitor
- md230x6 manual
- md230x6 macbook pro