User Manual
Page 2
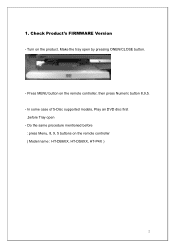
Check Product's FIRMWARE Version - In some case of 5-Disc supported models, Play an DVD disc first ,before : press Menu, 8, 9, 5 buttons on the remote controller ( Model name : HT-DB6XX, HT-DS6XX, HT-P4X ) 2 Turn on the remote controller, then press Numeric button 8,9,5. - Press MENU button on the product. Do the same procedure mentioned before Tray open by pressing ONEN/CLOSE button. - Make the tray open - 1.
Check Product's FIRMWARE Version - In some case of 5-Disc supported models, Play an DVD disc first ,before : press Menu, 8, 9, 5 buttons on the remote controller ( Model name : HT-DB6XX, HT-DS6XX, HT-P4X ) 2 Turn on the remote controller, then press Numeric button 8,9,5. - Press MENU button on the product. Do the same procedure mentioned before Tray open by pressing ONEN/CLOSE button. - Make the tray open - 1.
User Manual
Page 4
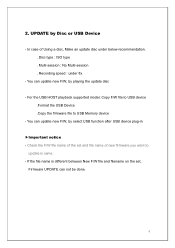
... . UPDATE by select USB function after USB device plug-in ▶Important notice - You can update new F/W, by Disc or USB Device - Check the F/W file name of the set , Firmware UPDATE can update new F/W, by playing the update disc - Multi-session : No Multi-session . In case of new firmware you want to USB Memory device - Recording speed : under below recommendation. . You can not be done. 4 2. For the USB HOST playback supported model, Copy...
... . UPDATE by select USB function after USB device plug-in ▶Important notice - You can update new F/W, by Disc or USB Device - Check the F/W file name of the set , Firmware UPDATE can update new F/W, by playing the update disc - Multi-session : No Multi-session . In case of new firmware you want to USB Memory device - Recording speed : under below recommendation. . You can not be done. 4 2. For the USB HOST playback supported model, Copy...
Quick Guide (easy Manual) (ver.1.0) (English)
Page 2
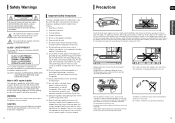
... creating strong magnetic or electric fields (i.e.speakers...). CLASS 1 LASER PRODUCT This Compact Disc player is used with the identification sticker located on modules or other . Keep these operating instructions handy for replacement of cable entry as the power-supply cord or plug is designed for ventilation (3~4inches). A polarized plug has two blades with the manufacturer's instructions. 8) Do not install near any way, such as...
... creating strong magnetic or electric fields (i.e.speakers...). CLASS 1 LASER PRODUCT This Compact Disc player is used with the identification sticker located on modules or other . Keep these operating instructions handy for replacement of cable entry as the power-supply cord or plug is designed for ventilation (3~4inches). A polarized plug has two blades with the manufacturer's instructions. 8) Do not install near any way, such as...
Quick Guide (easy Manual) (ver.1.0) (English)
Page 3
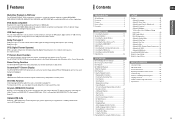
... remote control, by connecting the storage device to the USB port of dynamic range, low-level resolution and high-frequency detail. Features Multi-Disc Playback & FM Tuner The HT-X70/HT-TX72/HT-TX75 combines the convenience of DVD-Audio. AV SYNC Function Video may lag behind the audio if the unit is only available with the video. It delivers full-frequency 5.1 channel sound. To compensate for 3 minutes, the Samsung logo appears on the TV screen. HDMI HDMI transmits DVD video...
... remote control, by connecting the storage device to the USB port of dynamic range, low-level resolution and high-frequency detail. Features Multi-Disc Playback & FM Tuner The HT-X70/HT-TX72/HT-TX75 combines the convenience of DVD-Audio. AV SYNC Function Video may lag behind the audio if the unit is only available with the video. It delivers full-frequency 5.1 channel sound. To compensate for 3 minutes, the Samsung logo appears on the TV screen. HDMI HDMI transmits DVD video...
Quick Guide (easy Manual) (ver.1.0) (English)
Page 5
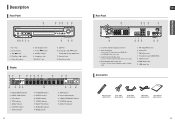
... 2. External Digital Optical Input Jack Use this to the VIDEO OUT Jack on this unit. 3. XM Antenna Jack 8. TITLE indicator 5. PROGRAM indicator 9. RADIO FREQUENCY indicator 18. Standby indicator 9. DOLBY PLll indicator 13. DISC(1~5) indicator 6 78 9 10 11 1. 5.1 Channel Speaker Output Connectors 2. Cooling Fan 7. HDMI Output Jack 11. Description Front Panel 1 2 34 5 6 Rear Panel 1 ENG 23 4 5 PREPARATION 7 8 9 10 11 1. Disc Tray 2. Power ( ) button 8. AUX IN 1 Jack 12 13 14 11. Volume Control 14. Open/Close button Display 12...
... 2. External Digital Optical Input Jack Use this to the VIDEO OUT Jack on this unit. 3. XM Antenna Jack 8. TITLE indicator 5. PROGRAM indicator 9. RADIO FREQUENCY indicator 18. Standby indicator 9. DOLBY PLll indicator 13. DISC(1~5) indicator 6 78 9 10 11 1. 5.1 Channel Speaker Output Connectors 2. Cooling Fan 7. HDMI Output Jack 11. Description Front Panel 1 2 34 5 6 Rear Panel 1 ENG 23 4 5 PREPARATION 7 8 9 10 11 1. Disc Tray 2. Power ( ) button 8. AUX IN 1 Jack 12 13 14 11. Volume Control 14. Open/Close button Display 12...
Quick Guide (easy Manual) (ver.1.0) (English)
Page 7
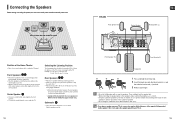
... SR Position of the Home Theater • Place it on the wall through the duct (hole). • If you like. 12 HT-X70 Rear Speaker (R) ENG Center Speaker Rear Speaker (L) CONNECTIONS Front Speaker (R) Front Speaker (L) Subwoofer 1 2 3 Red Black 1 Press and hold the terminal tab. 2 Insert the black wire into the black terminal (-) and the red wire into the duct (hole) of the center speakers. Connecting the Speakers Before moving or installing the product, be...
... SR Position of the Home Theater • Place it on the wall through the duct (hole). • If you like. 12 HT-X70 Rear Speaker (R) ENG Center Speaker Rear Speaker (L) CONNECTIONS Front Speaker (R) Front Speaker (L) Subwoofer 1 2 3 Red Black 1 Press and hold the terminal tab. 2 Insert the black wire into the black terminal (-) and the red wire into the duct (hole) of the center speakers. Connecting the Speakers Before moving or installing the product, be...
Quick Guide (easy Manual) (ver.1.0) (English)
Page 9
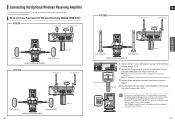
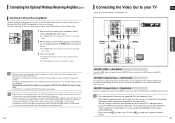
... not output from your Samsung retailer. The product might be removed easily. • Do not insert the TX card upside down or in the wall outlet and switch the power switch . • Do not insert a card other than the TX card dedicated for the product. Connecting the Optional Wireless Receiving Amplifier To connect the rear speakers wirelessly, you have to pages 13~15. 2 With the DVD Player turned...
... not output from your Samsung retailer. The product might be removed easily. • Do not insert the TX card upside down or in the wall outlet and switch the power switch . • Do not insert a card other than the TX card dedicated for the product. Connecting the Optional Wireless Receiving Amplifier To connect the rear speakers wirelessly, you have to pages 13~15. 2 With the DVD Player turned...
Quick Guide (easy Manual) (ver.1.0) (English)
Page 10
... distance of the DVD Player to the HDMI IN jack on your TV. If the wireless receiver module is output from the wireless rear speakers in Power Standby mode. 1 With the main unit turned off, press and hold the remote control's REMAIN button for Component Output. • After making the video connection, set the Video input source on your TV to a TV. See your TV owner's manual for connecting to match the corresponding Video output (HDMI, Component or Composite) on your Home theater. If your...
... distance of the DVD Player to the HDMI IN jack on your TV. If the wireless receiver module is output from the wireless rear speakers in Power Standby mode. 1 With the main unit turned off, press and hold the remote control's REMAIN button for Component Output. • After making the video connection, set the Video input source on your TV to a TV. See your TV owner's manual for connecting to match the corresponding Video output (HDMI, Component or Composite) on your Home theater. If your...
Quick Guide (easy Manual) (ver.1.0) (English)
Page 11
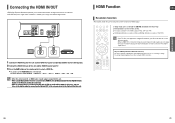
... a DVD video signal digitally without the process of video and audio data with just a single cable. You will not be output. s Resolutions available for the HDMI output are not output. • See your TV. 3 Press the AUX button on how to select the TV's Video Input source. In addition, it enables you to enjoy multi-channel digital audio. 1 Connect the HDMI IN jack of this unit and the HDMI OUT jack of a Cable Box/Satellite receiver (Set-Top Box). 2 Connect the HDMI OUT jack...
... a DVD video signal digitally without the process of video and audio data with just a single cable. You will not be output. s Resolutions available for the HDMI output are not output. • See your TV. 3 Press the AUX button on how to select the TV's Video Input source. In addition, it enables you to enjoy multi-channel digital audio. 1 Connect the HDMI IN jack of this unit and the HDMI OUT jack of a Cable Box/Satellite receiver (Set-Top Box). 2 Connect the HDMI OUT jack...
Quick Guide (easy Manual) (ver.1.0) (English)
Page 12
...; USB ➝ FM ➝ XM. • When the unit is powered on the remote control to select input. s : You can listen to audio through the main unit. 1 Connect AUX IN 1 (Audio) on the Home Theater to the Audio Out of an MP3 player or iPod. 2 Press the AUX button on and you select View TV, the Home Theater will charge your iPod's battery. Connecting Audio from External Components ENG AUX1 : Front Panel (iPod only) AUX1 : Front Panel (MP3 player) Audio Cable...
...; USB ➝ FM ➝ XM. • When the unit is powered on the remote control to select input. s : You can listen to audio through the main unit. 1 Connect AUX IN 1 (Audio) on the Home Theater to the Audio Out of an MP3 player or iPod. 2 Press the AUX button on and you select View TV, the Home Theater will charge your iPod's battery. Connecting Audio from External Components ENG AUX1 : Front Panel (iPod only) AUX1 : Front Panel (MP3 player) Audio Cable...
Quick Guide (easy Manual) (ver.1.0) (English)
Page 13
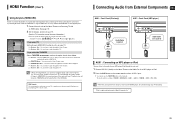
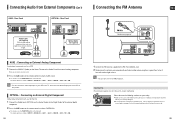
... The mode switches as a VCR. 1 Connect the AUX IN 2 (Audio) on the Home Theater to this product. s You can also use the FUNCTION button on the main unit. s Do not obstruct the cooling fan or ventilation holes. The mode switches as a Set-Top Box. 1 Connect the Digital Input (OPTICAL) on the Home Theater to the Digital Output of the external analog component. OPTICAL : Connecting an External Digital Component Digital signal components such as follows : DVD/CD ➝ DIGITAL IN ➝ AUX 1 ➝ AUX 2 ➝ HDMI...
... The mode switches as a VCR. 1 Connect the AUX IN 2 (Audio) on the Home Theater to this product. s You can also use the FUNCTION button on the main unit. s Do not obstruct the cooling fan or ventilation holes. The mode switches as a Set-Top Box. 1 Connect the Digital Input (OPTICAL) on the Home Theater to the Digital Output of the external analog component. OPTICAL : Connecting an External Digital Component Digital signal components such as follows : DVD/CD ➝ DIGITAL IN ➝ AUX 1 ➝ AUX 2 ➝ HDMI...
Quick Guide (easy Manual) (ver.1.0) (English)
Page 15
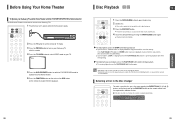
... function works only with DVDs.) s If pressed twice, is displayed, and if the PLAY/PAUSE ( ) button is played automatically. 28 29 Before Using Your Home Theater To Operate your Samsung TV and the Home Theater with the HT-X70/HT-TX72/HT-TX75's Remote Control The DVD Home Theater's remote can load the third, fourth, and fifth discs. 4 Close the compartment by pressing the OPEN/CLOSE button again. VIDEO 5 Press the DVD RECEIVER button to switch to DVD RECEIVER mode to operate the DVD Home Theater 6 Press the FUNCTION button on...
... function works only with DVDs.) s If pressed twice, is displayed, and if the PLAY/PAUSE ( ) button is played automatically. 28 29 Before Using Your Home Theater To Operate your Samsung TV and the Home Theater with the HT-X70/HT-TX72/HT-TX75's Remote Control The DVD Home Theater's remote can load the third, fourth, and fifth discs. 4 Close the compartment by pressing the OPEN/CLOSE button again. VIDEO 5 Press the DVD RECEIVER button to switch to DVD RECEIVER mode to operate the DVD Home Theater 6 Press the FUNCTION button on...
Quick Guide (easy Manual) (ver.1.0) (English)
Page 22
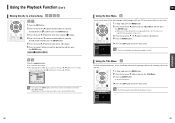
... , , , button to select the desired item. 4 Press the ENTER button. Press the EXIT button to exit the setup screen. • The Title menu display may vary. 1 In Stop mode, press the MENU button. 2 Press the Cursor , button to move to a folder. Using the Title Menu DVD For DVDs containing multiple titles, you select Disc Menu and it is not supported by the disc, the "This menu is not supported" message appears on the remote control...
... , , , button to select the desired item. 4 Press the ENTER button. Press the EXIT button to exit the setup screen. • The Title menu display may vary. 1 In Stop mode, press the MENU button. 2 Press the Cursor , button to move to a folder. Using the Title Menu DVD For DVDs containing multiple titles, you select Disc Menu and it is not supported by the disc, the "This menu is not supported" message appears on the remote control...
Quick Guide (easy Manual) (ver.1.0) (English)
Page 23
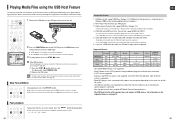
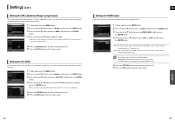
... MP3 player, USB memory stick or digital camera in high quality video with 5.1 channel Home Theater sound by its manufacturerspecific program is connected. • Does not operate with Janus enabled MTP(Media Transfer Protocol) devices. • The USB host function of the unit. 2 Press the FUNCTION button on the DVD Player or the USB button on the remote control to the memory stored in the USB device, perform safe removal before disconnecting the USB cable...
... MP3 player, USB memory stick or digital camera in high quality video with 5.1 channel Home Theater sound by its manufacturerspecific program is connected. • Does not operate with Janus enabled MTP(Media Transfer Protocol) devices. • The USB host function of the unit. 2 Press the FUNCTION button on the DVD Player or the USB button on the remote control to the memory stored in the USB device, perform safe removal before disconnecting the USB cable...
Quick Guide (easy Manual) (ver.1.0) (English)
Page 25
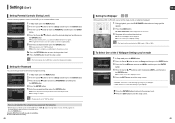
... EXIT button to exit the setup screen. • This function works only if a DVD disc contains the rating level information. The password is set the desired image as background wallpaper. Using the RESET function will erase all settings will return to the default values. • Press the POWER button. Press the EXIT button to exit the setup screen. MOVE ENTER RETURN EXIT MOVE SELECT RETURN EXIT 1 In Stop mode, press the MENU button. 2 Press...
... EXIT button to exit the setup screen. • This function works only if a DVD disc contains the rating level information. The password is set the desired image as background wallpaper. Using the RESET function will erase all settings will return to the default values. • Press the POWER button. Press the EXIT button to exit the setup screen. MOVE ENTER RETURN EXIT MOVE SELECT RETURN EXIT 1 In Stop mode, press the MENU button. 2 Press...
Quick Guide (easy Manual) (ver.1.0) (English)
Page 26
... (Dolby Pro Logic II), the delay time may vary (see page 57). Press the EXIT button to the previous level. Distance between 00 and 15mSEC. • The Center channel is set the mode as DVD-Audio. Set steps 1 ~ 4 again if you can adjust the delay time of Df in the figure, set to the desired speaker and then press the ENTER button. Setting the Speaker Mode Signal outputs and frequency responses from SURROUND SPEAKER Setting REAR (SURROUND) SPEAKERS...
... (Dolby Pro Logic II), the delay time may vary (see page 57). Press the EXIT button to the previous level. Distance between 00 and 15mSEC. • The Center channel is set the mode as DVD-Audio. Set steps 1 ~ 4 again if you can adjust the delay time of Df in the figure, set to the desired speaker and then press the ENTER button. Setting the Speaker Mode Signal outputs and frequency responses from SURROUND SPEAKER Setting REAR (SURROUND) SPEAKERS...
Quick Guide (easy Manual) (ver.1.0) (English)
Page 28
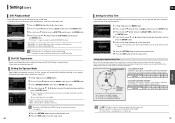
MOVE SELECT RETURN EXIT • ON : Both video and audio signals are transmitted over the HDMI connection cable, and audio is output through the home theater speakers only. • The default setting of this function is HDMI AUDIO OFF. • HDMI AUDIO is automatically down-mixed to the optimal status. SETUP 54 55 MOVE ENTER RETURN EXIT 1 In Stop mode, press the MENU button. 2 Press the Cursor button to move to and then press the...
MOVE SELECT RETURN EXIT • ON : Both video and audio signals are transmitted over the HDMI connection cable, and audio is output through the home theater speakers only. • The default setting of this function is HDMI AUDIO OFF. • HDMI AUDIO is automatically down-mixed to the optimal status. SETUP 54 55 MOVE ENTER RETURN EXIT 1 In Stop mode, press the MENU button. 2 Press the Cursor button to move to and then press the...
Quick Guide (easy Manual) (ver.1.0) (English)
Page 30
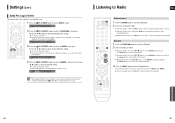
... sets the width of the center image. Manual Tuning : Press the STOP ( ) button to select and then briefly press the button to tune in to the desired station. Listening to Radio ENG Remote Control 1 Press the FM/XM button to select the FM band. 2 Tune in to a lower or higher frequency. The higher the setting, the less sound comes from the front or rear. • When playing a DVD disc encoded with side wall...
... sets the width of the center image. Manual Tuning : Press the STOP ( ) button to select and then briefly press the button to tune in to the desired station. Listening to Radio ENG Remote Control 1 Press the FM/XM button to select the FM band. 2 Tune in to a lower or higher frequency. The higher the setting, the less sound comes from the front or rear. • When playing a DVD disc encoded with side wall...
Quick Guide (easy Manual) (ver.1.0) (English)
Page 35
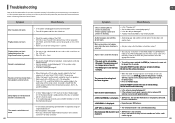
... stored settings. Using the RESET function will erase all stored settings. Receiving only XM channel 0 and • XM Antenna is displayed. • Reposition your XM Antenna. Do not use this unless necessary. If the problem you selected the mode(TV/DVD) functions of main unit, hold the STOP( ) button on the disc? ENG Symptom Check/Remedy • Disc is rotating but 4:3 DVDs can be played on the remote control to the front speakers (L/R) only...
... stored settings. Using the RESET function will erase all stored settings. Receiving only XM channel 0 and • XM Antenna is displayed. • Reposition your XM Antenna. Do not use this unless necessary. If the problem you selected the mode(TV/DVD) functions of main unit, hold the STOP( ) button on the disc? ENG Symptom Check/Remedy • Disc is rotating but 4:3 DVDs can be played on the remote control to the front speakers (L/R) only...
Quick Guide (easy Manual) (ver.1.0) (English)
Page 38
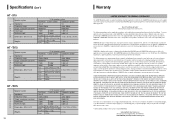
... Challenger Road Ridgefield Park, NJ 07660-0511 1-800-SAMSUNG (726-7864) and www.samsung.com customer adjustments and failure to SAMSUNG or SAMSUNG's authorized service center. cosmetic damage or exterior finish; x 11.8 in . Front 8 lbs Rear 1.8 Ibs 24 Ibs Center 2.8 Ibs HT - X70 Speaker system S Impedance P Frequency range E Output sound pressure level A Rated input K Maximum input E R Dimensions (W x H x D) Weights 5.1ch speaker system Front/Rear /Center speaker Subwoofer speaker 3Ω x 5 150Hz~20KHz 3Ω 40Hz~200Hz 86dB...
... Challenger Road Ridgefield Park, NJ 07660-0511 1-800-SAMSUNG (726-7864) and www.samsung.com customer adjustments and failure to SAMSUNG or SAMSUNG's authorized service center. cosmetic damage or exterior finish; x 11.8 in . Front 8 lbs Rear 1.8 Ibs 24 Ibs Center 2.8 Ibs HT - X70 Speaker system S Impedance P Frequency range E Output sound pressure level A Rated input K Maximum input E R Dimensions (W x H x D) Weights 5.1ch speaker system Front/Rear /Center speaker Subwoofer speaker 3Ω x 5 150Hz~20KHz 3Ω 40Hz~200Hz 86dB...


