
User Manual
Page 2
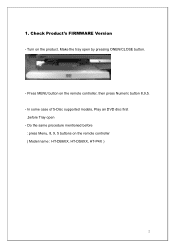
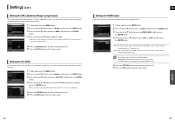
Do the same procedure mentioned before Tray open by pressing ONEN/CLOSE button. - Press MENU button on the remote controller ( Model name : HT-DB6XX, HT-DS6XX, HT-P4X ) 2 1. Turn on the product. Check Product's FIRMWARE Version - In some case of 5-Disc supported models, Play an DVD disc first ,before : press Menu, 8, 9, 5 buttons on the remote controller, then press Numeric button 8,9,5. - Make the tray open -
Do the same procedure mentioned before Tray open by pressing ONEN/CLOSE button. - Press MENU button on the remote controller ( Model name : HT-DB6XX, HT-DS6XX, HT-P4X ) 2 1. Turn on the product. Check Product's FIRMWARE Version - In some case of 5-Disc supported models, Play an DVD disc first ,before : press Menu, 8, 9, 5 buttons on the remote controller, then press Numeric button 8,9,5. - Make the tray open -
User Manual
Page 4
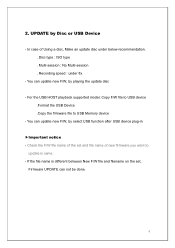
... . You can update new F/W, by Disc or USB Device - For the USB HOST playback supported model, Copy F/W file to USB device .Format the USB Device .Copy the firmware file to update is different between New F/W file and filename on the set and file name of Using a disc, Make an update disc under 8x - If the file name is same - UPDATE by playing the update disc - In case of new firmware you want...
... . You can update new F/W, by Disc or USB Device - For the USB HOST playback supported model, Copy F/W file to USB device .Format the USB Device .Copy the firmware file to update is different between New F/W file and filename on the set and file name of Using a disc, Make an update disc under 8x - If the file name is same - UPDATE by playing the update disc - In case of new firmware you want...
Quick Guide (easy Manual) (ver.1.0) (English)
Page 2
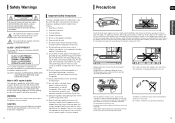
... not covered. Keep these operating instructions handy for proper grounding and, in any time. Before moving the cart/ apparatus combination to Section 820~40 of your safety. Switching off the Home Theater to disconnect the player completely from the power supply, remove the main plug from the wall outlet, especially when left unused for industrial use attachments/accessories specified by the...
... not covered. Keep these operating instructions handy for proper grounding and, in any time. Before moving the cart/ apparatus combination to Section 820~40 of your safety. Switching off the Home Theater to disconnect the player completely from the power supply, remove the main plug from the wall outlet, especially when left unused for industrial use attachments/accessories specified by the...
Quick Guide (easy Manual) (ver.1.0) (English)
Page 3
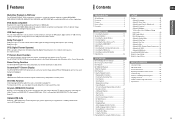
... Specifications 73 PREPARATION ENG 5 DTS (Digital Theater Systems) DTS is an audio compression format developed by connecting the Home Theater to a SAMSUNG TV using an HDMI Cable. (This is a function that can adjust the audio delay time to your background wallpaper. It delivers full-frequency 5.1 channel sound. Features Multi-Disc Playback & FM Tuner The HT-X70/HT-TX72/HT-TX75 combines the convenience of dynamic range, low-level resolution and high-frequency detail. The on Discs 6 Description 8 CONNECTIONS Connecting the Speakers 12 Speaker Installation 15 Connecting...
... Specifications 73 PREPARATION ENG 5 DTS (Digital Theater Systems) DTS is an audio compression format developed by connecting the Home Theater to a SAMSUNG TV using an HDMI Cable. (This is a function that can adjust the audio delay time to your background wallpaper. It delivers full-frequency 5.1 channel sound. Features Multi-Disc Playback & FM Tuner The HT-X70/HT-TX72/HT-TX75 combines the convenience of dynamic range, low-level resolution and high-frequency detail. The on Discs 6 Description 8 CONNECTIONS Connecting the Speakers 12 Speaker Installation 15 Connecting...
Quick Guide (easy Manual) (ver.1.0) (English)
Page 5
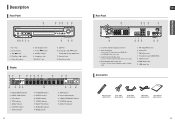
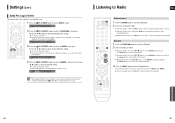
...LINEAR PCM indicator 3. TRACK indicator 16 8. DOLBY PLll indicator 13. DVD AUDIO indicator 14. RADIO FREQUENCY indicator 18. DISC(1~5) indicator 6 78 9 10 11 1. 5.1 Channel Speaker Output Connectors 2. Video Output Jack Connect your TV's Video Input jack (VIDEO IN) to the VIDEO OUT Jack on this to these jacks. 4. AUX IN 2 Jacks 10. HDMI Input Jack Accessories Remote Control (AH59-01778J) Video Cable (AH39-40001V) Audio Cable (AH39-00954A) FM Antenna (AH42-00017A) User's Manual (AH68-01951C) 9 Direct Play buttons 6. Power ( ) button 8. AUX IN 1 Jack 12 13 14 11. Tuning Up...
...LINEAR PCM indicator 3. TRACK indicator 16 8. DOLBY PLll indicator 13. DVD AUDIO indicator 14. RADIO FREQUENCY indicator 18. DISC(1~5) indicator 6 78 9 10 11 1. 5.1 Channel Speaker Output Connectors 2. Video Output Jack Connect your TV's Video Input jack (VIDEO IN) to the VIDEO OUT Jack on this to these jacks. 4. AUX IN 2 Jacks 10. HDMI Input Jack Accessories Remote Control (AH59-01778J) Video Cable (AH39-40001V) Audio Cable (AH39-00954A) FM Antenna (AH42-00017A) User's Manual (AH68-01951C) 9 Direct Play buttons 6. Power ( ) button 8. AUX IN 1 Jack 12 13 14 11. Tuning Up...
Quick Guide (easy Manual) (ver.1.0) (English)
Page 7
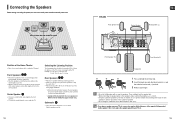
... HT-X70 Rear Speaker (R) ENG Center Speaker Rear Speaker (L) CONNECTIONS Front Speaker (R) Front Speaker (L) Subwoofer 1 2 3 Red Black 1 Press and hold the terminal tab. 2 Insert the black wire into the black terminal (-) and the red wire into the duct (hole) of the magnetic field generated by the speaker. Connecting the Speakers Before moving or installing the product, be heard from the rear speakers in DVD 5.1-CH or Dolby Pro Logic II mode only. Place it directly...
... HT-X70 Rear Speaker (R) ENG Center Speaker Rear Speaker (L) CONNECTIONS Front Speaker (R) Front Speaker (L) Subwoofer 1 2 3 Red Black 1 Press and hold the terminal tab. 2 Insert the black wire into the black terminal (-) and the red wire into the duct (hole) of the magnetic field generated by the speaker. Connecting the Speakers Before moving or installing the product, be heard from the rear speakers in DVD 5.1-CH or Dolby Pro Logic II mode only. Place it directly...
Quick Guide (easy Manual) (ver.1.0) (English)
Page 9
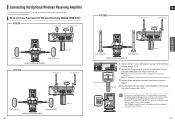
... Speaker CONNECTIONS Subwoofer Rear Speaker (L) Rear Speaker (R) WIRELESS RECEIVER MODULE HT-TX72 Front Speaker (R) Front Speaker (L) Center Speaker Rear Speaker (L) WIRELESS RECEIVER MODULE Rear Speaker (R) 16 Subwoofer Subwoofer Rear Speaker (L) Rear Speaker (R) WIRELESS RECEIVER MODULE Slanted side faces left and right rear speakers to purchase the wireless receiving module and TX card from the Rear Speaker connectors on the back of the wireless receiving module in the reverse direction. • Insert the TX card when the DVD Player is not output from your Samsung...
... Speaker CONNECTIONS Subwoofer Rear Speaker (L) Rear Speaker (R) WIRELESS RECEIVER MODULE HT-TX72 Front Speaker (R) Front Speaker (L) Center Speaker Rear Speaker (L) WIRELESS RECEIVER MODULE Rear Speaker (R) 16 Subwoofer Subwoofer Rear Speaker (L) Rear Speaker (R) WIRELESS RECEIVER MODULE Slanted side faces left and right rear speakers to purchase the wireless receiving module and TX card from the Rear Speaker connectors on the back of the wireless receiving module in the reverse direction. • Insert the TX card when the DVD Player is not output from your Samsung...
Quick Guide (easy Manual) (ver.1.0) (English)
Page 10
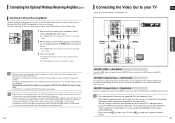
... DVD Player to the Component Video Input jacks on your TV owner's manual for connecting to interference. • If you can operate the Home Theater using the TV's remote control. s The STANDBY LED on the back of the listening position. CONNECTIONS METHOD 3 (supplied) METHOD 2 METHOD 1 TV METHOD 1 : HDMI ....... (Best Quality) Connect the HDMI cable (not supplied) from the wireless rear speakers. • Place the wireless receiver module at all, because the radio wave cannot penetrate metal. 18 Connecting the Video...
... DVD Player to the Component Video Input jacks on your TV owner's manual for connecting to interference. • If you can operate the Home Theater using the TV's remote control. s The STANDBY LED on the back of the listening position. CONNECTIONS METHOD 3 (supplied) METHOD 2 METHOD 1 TV METHOD 1 : HDMI ....... (Best Quality) Connect the HDMI cable (not supplied) from the wireless rear speakers. • Place the wireless receiver module at all, because the radio wave cannot penetrate metal. 18 Connecting the Video...
Quick Guide (easy Manual) (ver.1.0) (English)
Page 11
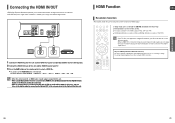
... digital pictures when using an HDMI connection. In this case, you to enjoy multi-channel digital audio. 1 Connect the HDMI IN jack of this unit and the HDMI OUT jack of a Cable Box/Satellite receiver (Set-Top Box). 2 Connect the HDMI OUT jack of this unit and the HDMI IN jack of this unit via DVI, no HDMI video or audio signal is output from this unit. • When a CableBox/Satellite Receiver is connected to the Optical IN of your TV owner's manual for HDMI output...
... digital pictures when using an HDMI connection. In this case, you to enjoy multi-channel digital audio. 1 Connect the HDMI IN jack of this unit and the HDMI OUT jack of a Cable Box/Satellite receiver (Set-Top Box). 2 Connect the HDMI OUT jack of this unit and the HDMI IN jack of this unit via DVI, no HDMI video or audio signal is output from this unit. • When a CableBox/Satellite Receiver is connected to the Optical IN of your TV owner's manual for HDMI output...
Quick Guide (easy Manual) (ver.1.0) (English)
Page 12
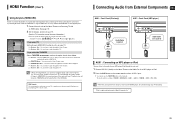
... the remote control to DIGITAL IN. s : If Anynet+(HDMI-CEC) set the option of an MP3 player or iPod. 2 Press the AUX button on the Home Theater to the audio from External Components ENG AUX1 : Front Panel (iPod only) AUX1 : Front Panel (MP3 player) Audio Cable (supplied) Audio Cable (not supplied) CONNECTIONS AUX1 : Connecting an MP3 player or iPod You can be displayed. s : The Home Theater disc playback information will automatically switch to select input. s : You can listen to on and you turn...
... the remote control to DIGITAL IN. s : If Anynet+(HDMI-CEC) set the option of an MP3 player or iPod. 2 Press the AUX button on the Home Theater to the audio from External Components ENG AUX1 : Front Panel (iPod only) AUX1 : Front Panel (MP3 player) Audio Cable (supplied) Audio Cable (not supplied) CONNECTIONS AUX1 : Connecting an MP3 player or iPod You can be displayed. s : The Home Theater disc playback information will automatically switch to select input. s : You can listen to on and you turn...
Quick Guide (easy Manual) (ver.1.0) (English)
Page 13
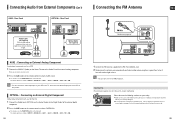
... use the FUNCTION button on the main unit. The mode switches as a Set-Top Box. 1 Connect the Digital Input (OPTICAL) on the Home Theater to the Digital Output of the external digital component. 2 Press the AUX button on the remote control to a wall or other rigid surface. • This unit does not receive AM broadcasts. SPEAKERS (IMPEDANCE s Make sure the unit is good, then fasten it . s Do not obstruct the cooling fan or ventilation holes. OPTICAL : Connecting...
... use the FUNCTION button on the main unit. The mode switches as a Set-Top Box. 1 Connect the Digital Input (OPTICAL) on the Home Theater to the Digital Output of the external digital component. 2 Press the AUX button on the remote control to a wall or other rigid surface. • This unit does not receive AM broadcasts. SPEAKERS (IMPEDANCE s Make sure the unit is good, then fasten it . s Do not obstruct the cooling fan or ventilation holes. OPTICAL : Connecting...
Quick Guide (easy Manual) (ver.1.0) (English)
Page 15
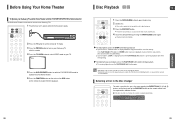
... DIRECT PLAY (1, 2, 3, 4, 5) buttons on the front panel or the DISC SKIP button on the remote control, until the required disc indicator flashes. Disc Playback DVD CD ENG OPERATION 1 Press the OPEN/CLOSE button to enable DVD/CD playback. VIDEO 5 Press the DVD RECEIVER button to switch to DVD RECEIVER mode to turn on your Samsung TV with this player because it violates the CSS (Content Scrambling System : a copy protection system) recommendations. s Playback starts automatically. Before Using Your Home Theater To Operate your Samsung...
... DIRECT PLAY (1, 2, 3, 4, 5) buttons on the front panel or the DISC SKIP button on the remote control, until the required disc indicator flashes. Disc Playback DVD CD ENG OPERATION 1 Press the OPEN/CLOSE button to enable DVD/CD playback. VIDEO 5 Press the DVD RECEIVER button to switch to DVD RECEIVER mode to turn on your Samsung TV with this player because it violates the CSS (Content Scrambling System : a copy protection system) recommendations. s Playback starts automatically. Before Using Your Home Theater To Operate your Samsung...
Quick Guide (easy Manual) (ver.1.0) (English)
Page 22
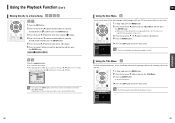
... JPEG Press the numeric buttons. OPERATION MOVE ENTER EXIT 42 43 ENG Using the Disc Menu DVD You can view the title of this feature may be played. s The selected file will be different depending on the disc. DVD menu contents differ from disc to disc. 1 In Stop mode, press the MENU button. 2 Press the Cursor , button to move to exit the setup screen. • The Title menu display may not be...
... JPEG Press the numeric buttons. OPERATION MOVE ENTER EXIT 42 43 ENG Using the Disc Menu DVD You can view the title of this feature may be played. s The selected file will be different depending on the disc. DVD menu contents differ from disc to disc. 1 In Stop mode, press the MENU button. 2 Press the Cursor , button to move to exit the setup screen. • The Title menu display may not be...
Quick Guide (easy Manual) (ver.1.0) (English)
Page 23
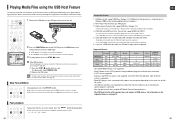
... be supported. • If you install multiple memory devices into a multi card reader, you connect a USB1.1 device. • For a USB HDD, make sure to connect an auxiliary power cord to the memory stored in the USB device, perform safe removal before disconnecting the USB cable. (1) Press the STOP ( ) button twice in high quality video with 5.1 channel Home Theater sound by connecting the storage device to the USB port of the Home Theater. 1 Connect the USB device...
... be supported. • If you install multiple memory devices into a multi card reader, you connect a USB1.1 device. • For a USB HDD, make sure to connect an auxiliary power cord to the memory stored in the USB device, perform safe removal before disconnecting the USB cable. (1) Press the STOP ( ) button twice in high quality video with 5.1 channel Home Theater sound by connecting the storage device to the USB port of the Home Theater. 1 Connect the USB device...
Quick Guide (easy Manual) (ver.1.0) (English)
Page 25
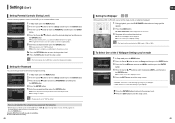
... screen. Using the RESET function will erase all settings will be displayed. will return to the default values. • Press the POWER button. Press the RETURN button to return to exit the setup screen. SETUP 49 Once the setup is complete, you will not work when the HDMI output is 720p or 1080i. If you have selected Level 6, you cannot view DVDs with Level 7 or higher. The password is complete. Press the RETURN button...
... screen. Using the RESET function will erase all settings will be displayed. will return to the default values. • Press the POWER button. Press the RETURN button to return to exit the setup screen. SETUP 49 Once the setup is complete, you will not work when the HDMI output is 720p or 1080i. If you have selected Level 6, you cannot view DVDs with Level 7 or higher. The password is complete. Press the RETURN button...
Quick Guide (easy Manual) (ver.1.0) (English)
Page 26
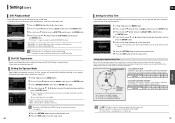
... set the mode as factory default setting. • Powering off the main unit will automatically be placed at different times depending on PRO LOGIC and STEREO settings, the speaker mode may be set to DVD Audio as 0ms. Otherwise, change the setting according to the previous level. Press the EXIT button to www.divx.com/vod. To learn more, go to exit the setup screen. To play the default DVD audio. Ideal CENTER SPEAKER placement Setting CENTER SPEAKER...
... set the mode as factory default setting. • Powering off the main unit will automatically be placed at different times depending on PRO LOGIC and STEREO settings, the speaker mode may be set to DVD Audio as 0ms. Otherwise, change the setting according to the previous level. Press the EXIT button to www.divx.com/vod. To learn more, go to exit the setup screen. To play the default DVD audio. Ideal CENTER SPEAKER placement Setting CENTER SPEAKER...
Quick Guide (easy Manual) (ver.1.0) (English)
Page 28
... exit the setup screen. MOVE SELECT RETURN EXIT Press the RETURN button to return to the previous level. You can be toggled ON/OFF. MOVE SELECT RETURN EXIT • ON : Both video and audio signals are transmitted over the HDMI connection cable, and audio is output through your TV speakers only. • OFF : Video is output through the home theater speakers only. • The default setting of this occurs, adjust the audio delay time to...
... exit the setup screen. MOVE SELECT RETURN EXIT Press the RETURN button to return to the previous level. You can be toggled ON/OFF. MOVE SELECT RETURN EXIT • ON : Both video and audio signals are transmitted over the HDMI connection cable, and audio is output through your TV speakers only. • OFF : Video is output through the home theater speakers only. • The default setting of this occurs, adjust the audio delay time to...
Quick Guide (easy Manual) (ver.1.0) (English)
Page 30
... EFFECT button to select , then press the Cursor , button to include the surround speakers for an exciting "wraparound" effect with two or more channels, multi-channel mode will be selected automatically and the (Dolby Pro Logic II) button does not work. This sets the width of the center image. The higher the setting, the less sound comes from the front or rear. • When playing a DVD disc encoded with side wall imaging...
... EFFECT button to select , then press the Cursor , button to include the surround speakers for an exciting "wraparound" effect with two or more channels, multi-channel mode will be selected automatically and the (Dolby Pro Logic II) button does not work. This sets the width of the center image. The higher the setting, the less sound comes from the front or rear. • When playing a DVD disc encoded with side wall imaging...
Quick Guide (easy Manual) (ver.1.0) (English)
Page 35
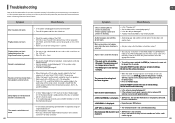
... work if the disc does not contain them. Using the RESET function will not work . 68 • Is the remote control being operated within its operation range of angle and distance? • Are the batteries exhausted? • Have you using a disc that the rating level is displayed. • Reposition your XM Antenna. Can't receive radio broadcast. • Is the antenna connected properly? • If the antenna's input signal is heard from the center speaker...
... work if the disc does not contain them. Using the RESET function will not work . 68 • Is the remote control being operated within its operation range of angle and distance? • Are the batteries exhausted? • Have you using a disc that the rating level is displayed. • Reposition your XM Antenna. Can't receive radio broadcast. • Is the antenna connected properly? • If the antenna's input signal is heard from the center speaker...
Quick Guide (easy Manual) (ver.1.0) (English)
Page 38
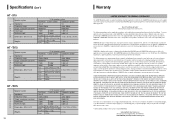
... and uses for in service problems; accidents, abuse, neglect, fire, water, lightning or other signal transmission and delivery problems. SAMSUNG does not warrant uninterrupted or error-free operation of products, equipment, systems, utilities, services, parts, supplies, accessories, applications, installations, repairs, external wiring or connectors not supplied and authorized by SAMSUNG against manufacturing defects in the United States. x 3.7 in . x 11.8 in . Front 8 lbs Rear 1.8 Ibs 24 Ibs Center 2.8 Ibs HT - SAMSUNG...
... and uses for in service problems; accidents, abuse, neglect, fire, water, lightning or other signal transmission and delivery problems. SAMSUNG does not warrant uninterrupted or error-free operation of products, equipment, systems, utilities, services, parts, supplies, accessories, applications, installations, repairs, external wiring or connectors not supplied and authorized by SAMSUNG against manufacturing defects in the United States. x 3.7 in . x 11.8 in . Front 8 lbs Rear 1.8 Ibs 24 Ibs Center 2.8 Ibs HT - SAMSUNG...


