User Manual (user Manual) (ver.1.0) (English)
Page 5
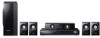
... will be used in manual 8 Disc Types and Characteristics 11 Description 11 Front Panel 12 Rear Panel 13 Remote control CONNECTIONS 15 15 Connecting the Speakers 22 Connecting the Video Out to your TV 24 Connecting the FM Antenna 24 Connecting Audio from External Components SETUP 26 26 Before Starting (Initial Setting) 26 Setting the Setup menu 27 Display 27 TV Aspect 27 BD Wise 27 Resolution 27 HDMI Format 28 Audio 28 Speaker Setting 29 ASC (Auto Sound Calibration) Setting 30 DRC...
... will be used in manual 8 Disc Types and Characteristics 11 Description 11 Front Panel 12 Rear Panel 13 Remote control CONNECTIONS 15 15 Connecting the Speakers 22 Connecting the Video Out to your TV 24 Connecting the FM Antenna 24 Connecting Audio from External Components SETUP 26 26 Before Starting (Initial Setting) 26 Setting the Setup menu 27 Display 27 TV Aspect 27 BD Wise 27 Resolution 27 HDMI Format 28 Audio 28 Speaker Setting 29 ASC (Auto Sound Calibration) Setting 30 DRC...
User Manual (user Manual) (ver.1.0) (English)
Page 12
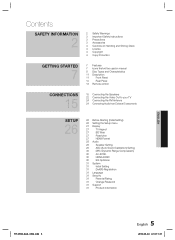
...Rear Panel 1 2 3 4 567 8 DIGITAL AUDIO IN OPTICAL iPod WIRELESS VIDEO OUT HDMI OUT COMPONENT AUX IN 2 OUT 9 FM ANT . 1 5.1 CHANNEL SPEAKER OUTPUT CONNECTORS 2 iPod JACK 3 EXTERNAL DIGITAL OPTICAL IN JACK (DIGITAL AUDIO IN) 4 TX CARD CONNECTION (WIRELESS) 5 HDMI OUT JACK 6 AUX IN 2 JACKS 7 VIDEO OUT JACK 8 COMPONENT VIDEO OUTPUT JACKS 9 FM ANTENNA JACK Connect the front, center,rear speakers and subwoofer. (HT-C650W/C653W/C655W does not have rear speaker connectors on your TV's Video Input jack (VIDEO IN) to the VIDEO OUT jack. Use this HDMI output jack to the HDMI input jack...
...Rear Panel 1 2 3 4 567 8 DIGITAL AUDIO IN OPTICAL iPod WIRELESS VIDEO OUT HDMI OUT COMPONENT AUX IN 2 OUT 9 FM ANT . 1 5.1 CHANNEL SPEAKER OUTPUT CONNECTORS 2 iPod JACK 3 EXTERNAL DIGITAL OPTICAL IN JACK (DIGITAL AUDIO IN) 4 TX CARD CONNECTION (WIRELESS) 5 HDMI OUT JACK 6 AUX IN 2 JACKS 7 VIDEO OUT JACK 8 COMPONENT VIDEO OUTPUT JACKS 9 FM ANTENNA JACK Connect the front, center,rear speakers and subwoofer. (HT-C650W/C653W/C655W does not have rear speaker connectors on your TV's Video Input jack (VIDEO IN) to the VIDEO OUT jack. Use this HDMI output jack to the HDMI input jack...

User Manual (user Manual) (ver.1.0) (English)
Page 13
... menu. Allow access to common functions of the DVD Home Theater such as navigating the Photo List. Select the desired P.BASS or MP3 Enhancement setting. If you to shut off the sound temporarily. Home Theater : Orange - Adjust the volume. Select on the remote control, check this to stop/play a disc. Return to Home Theater or TV mode on -screen menu items and change the audio/subtitle language, angle etc. Regulate and stabilize the volume level against a drastic volume change channels. Use this button...
... menu. Allow access to common functions of the DVD Home Theater such as navigating the Photo List. Select the desired P.BASS or MP3 Enhancement setting. If you to shut off the sound temporarily. Home Theater : Orange - Adjust the volume. Select on the remote control, check this to stop/play a disc. Return to Home Theater or TV mode on -screen menu items and change the audio/subtitle language, angle etc. Regulate and stabilize the volume level against a drastic volume change channels. Use this button...
User Manual (user Manual) (ver.1.0) (English)
Page 19
... 11:58:25 Connect the connecting plugs to the back of the product by matching the Black Red colors of the speaker. 2. See pages 20~21. The rear speakers for the HT-C553/C555 speakers. HT-C550 Front Speaker (R) Center Speaker Front Speaker (L) Rear Speaker (R) DIGITAL AUDIO IN OPTICAL iPod Subwoofer Rear Speaker (L) * Refer to the Wireless Receiver Module. The rear speakers are connected to page 16 for HT-C550/C553/C555 can also be connected to the speaker jacks. Press down the...
... 11:58:25 Connect the connecting plugs to the back of the product by matching the Black Red colors of the speaker. 2. See pages 20~21. The rear speakers for the HT-C553/C555 speakers. HT-C550 Front Speaker (R) Center Speaker Front Speaker (L) Rear Speaker (R) DIGITAL AUDIO IN OPTICAL iPod Subwoofer Rear Speaker (L) * Refer to the Wireless Receiver Module. The rear speakers are connected to page 16 for HT-C550/C553/C555 can also be connected to the speaker jacks. Press down the...
User Manual (user Manual) (ver.1.0) (English)
Page 21
... on your operating environment. With the product turned off . DIGITAL AUDIO IN OPTICAL iPod WIRELESS VIDEO OUT HDMI OUT COMPONENT AUX IN 2 OUT WIRELESS TX card ✎ NOTE The rear speakers for 5 seconds. ! With the product turned off, press remote control's number buttons "0"J"1"J"3"J"5" and the message "W INIT" will be heard due to interference. The transmission distance from the product to the wireless Receiver module. 6. Plug the power cord of the wireless Receiver module in...
... on your operating environment. With the product turned off . DIGITAL AUDIO IN OPTICAL iPod WIRELESS VIDEO OUT HDMI OUT COMPONENT AUX IN 2 OUT WIRELESS TX card ✎ NOTE The rear speakers for 5 seconds. ! With the product turned off, press remote control's number buttons "0"J"1"J"3"J"5" and the message "W INIT" will be heard due to interference. The transmission distance from the product to the wireless Receiver module. 6. Plug the power cord of the wireless Receiver module in...
User Manual (user Manual) (ver.1.0) (English)
Page 25
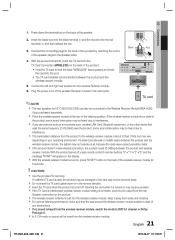
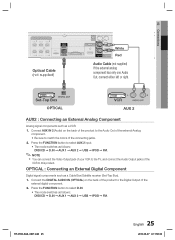
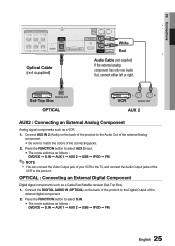
... connect the Video Output jack of your VCR to this product. Press the FUNCTION button to select AUX 2 input. • The mode switches as follows : DVD/CD ➞ D.IN ➞ AUX 1 ➞ AUX 2 ➞ USB ➞ IPOD ➞ FM. Set-Top Box OPTICAL VCR AUX 2 AUX2 : Connecting an External Analog Component Analog signal components such as a Cable Box/Satellite receiver (Set-Top Box). 1. Optical Cable (not supplied) Audio Cable (not supplied) If the external analog component has only one Audio Out, connect either left or right. OPTICAL : Connecting...
... connect the Video Output jack of your VCR to this product. Press the FUNCTION button to select AUX 2 input. • The mode switches as follows : DVD/CD ➞ D.IN ➞ AUX 1 ➞ AUX 2 ➞ USB ➞ IPOD ➞ FM. Set-Top Box OPTICAL VCR AUX 2 AUX2 : Connecting an External Analog Component Analog signal components such as a Cable Box/Satellite receiver (Set-Top Box). 1. Optical Cable (not supplied) Audio Cable (not supplied) If the external analog component has only one Audio Out, connect either left or right. OPTICAL : Connecting...
User Manual (user Manual) (ver.1.0) (English)
Page 30
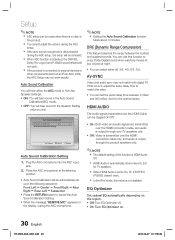
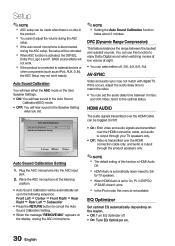
... not work. If the product is not available. If this occurs, adjust the audio delay time to enjoy Dolby Digital sound when watching movies at low volume at the listening position. • Auto Sound Calibration will be toggled On/Off. • On : Both video and audio signals are transmitted over the HDMI connection cable, and audio is output through the product speakers only. ✎ NOTE The default setting of this function is HDMI Audio...
... not work. If the product is not available. If this occurs, adjust the audio delay time to enjoy Dolby Digital sound when watching movies at low volume at the listening position. • Auto Sound Calibration will be toggled On/Off. • On : Both video and audio signals are transmitted over the HDMI connection cable, and audio is output through the product speakers only. ✎ NOTE The default setting of this function is HDMI Audio...
User Manual (user Manual) (ver.1.0) (English)
Page 31
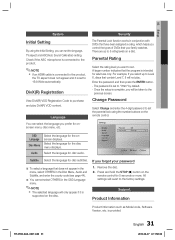
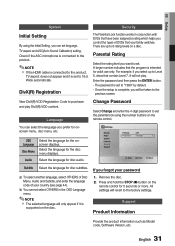
... Parental Lock function works in the Disc Menu, Audio and Subtitle, and enter the county code (see page 44). If you control the types of DVDs that contain Level 7, 8 will revert to Level 6, discs that your password a To select a language that the program is provided. 31 English HT-C550-XAA_0607.indd 31 2010-06-07 11:58:36 03 Setup System Initial Setting By using the number buttons on a disc. OSD Language Disc Menu Select the...
... Parental Lock function works in the Disc Menu, Audio and Subtitle, and enter the county code (see page 44). If you control the types of DVDs that contain Level 7, 8 will revert to Level 6, discs that your password a To select a language that the program is provided. 31 English HT-C550-XAA_0607.indd 31 2010-06-07 11:58:36 03 Setup System Initial Setting By using the number buttons on a disc. OSD Language Disc Menu Select the...
User Manual (user Manual) (ver.1.0) (English)
Page 41
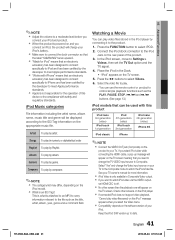
...:48 Press the FUNCTION button to select Videos. 6. Connect the iPod dock connector to the iPod Jack on the iPod player. If connected iPod does not support video playback, "Cannot play video files stored in Composite Video output. If you want to Composite. Select "Yes" and change the TV VIDEO input source to watch the iPod Video file. Press the ◄► buttons to select IPOD. 2. Check other screen than the playback one will be used with safety...
...:48 Press the FUNCTION button to select Videos. 6. Connect the iPod dock connector to the iPod Jack on the iPod player. If connected iPod does not support video playback, "Cannot play video files stored in Composite Video output. If you want to Composite. Select "Yes" and change the TV VIDEO input source to watch the iPod Video file. Press the ◄► buttons to select IPOD. 2. Check other screen than the playback one will be used with safety...
User Manual (user Manual) (ver.1.0) (English)
Page 43
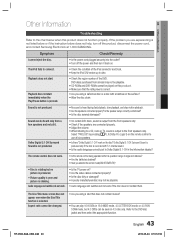
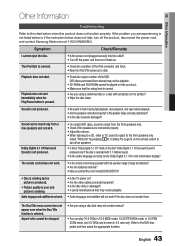
... immediately when the Play/Pause button is selected. Dolby Digital 5.1 CH Surround Sound is not produced. • On certain DVD discs, sound is output from the front speakers only. • Check if the speakers are experiencing is correct. • Are you using a deformed disc or a disc with 5.1 channel sound. • Is the audio language correctly set to Dolby Digital 5.1-CH in the information display? Aspect ratio cannot be changed. • Are you using a disc that does...
... immediately when the Play/Pause button is selected. Dolby Digital 5.1 CH Surround Sound is not produced. • On certain DVD discs, sound is output from the front speakers only. • Check if the speakers are experiencing is correct. • Are you using a deformed disc or a disc with 5.1 channel sound. • Is the audio language correctly set to Dolby Digital 5.1-CH in the information display? Aspect ratio cannot be changed. • Are you using a disc that does...
User Manual (user Manual) (ver.1.0) (English)
Page 49
... this product or result in service problems; To receive warranty service, the purchaser must contact SAMSUNG for in this statement, noncommercial use of products, equipment, systems, utilities, services, parts, supplies, accessories, applications, installations, repairs, external wiring or connectors not supplied and authorized by SAMSUNG under the SAMSUNG brand name are set forth in the applicable end user license agreement. delivery and installation; accidents, abuse, neglect, fire, water...
... this product or result in service problems; To receive warranty service, the purchaser must contact SAMSUNG for in this statement, noncommercial use of products, equipment, systems, utilities, services, parts, supplies, accessories, applications, installations, repairs, external wiring or connectors not supplied and authorized by SAMSUNG under the SAMSUNG brand name are set forth in the applicable end user license agreement. delivery and installation; accidents, abuse, neglect, fire, water...
User Manual (user Manual) (ver.1.0) (Korean)
Page 49
... USE, MISUSE OR INABILITY TO USE THIS PRODUCT SOLD BY SAMSUNG NOT CAUSED DIRECTLY BY THE NEGLIGENCE OF SAMSUNG. This warranty gives you specific legal rights, and you . incorrect electrical line voltage, fluctuations and surges; All replaced parts and products become the property of purchase to follow operating instructions, cleaning, maintenance and environmental instructions that are set forth in shipment; To receive warranty service...
... USE, MISUSE OR INABILITY TO USE THIS PRODUCT SOLD BY SAMSUNG NOT CAUSED DIRECTLY BY THE NEGLIGENCE OF SAMSUNG. This warranty gives you specific legal rights, and you . incorrect electrical line voltage, fluctuations and surges; All replaced parts and products become the property of purchase to follow operating instructions, cleaning, maintenance and environmental instructions that are set forth in shipment; To receive warranty service...
User Manual (user Manual) (ver.1.0) (English)
Page 10
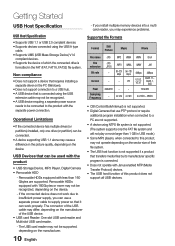
... is connected using the USB extension cable may not be recognized. • A USB device requiring a separate power source needs to be supported, depending on the sector size of which the connected drive is formatted in USB mode.) • Some MP3 players, when connected to the product with Janus enabled MTP (Media Transfer Protocol) devices. • The USB host function of the USB cable may experience problems. Supported file Formats Format Still Picture Music Movie...
... is connected using the USB extension cable may not be recognized. • A USB device requiring a separate power source needs to be supported, depending on the sector size of which the connected drive is formatted in USB mode.) • Some MP3 players, when connected to the product with Janus enabled MTP (Media Transfer Protocol) devices. • The USB host function of the USB cable may experience problems. Supported file Formats Format Still Picture Music Movie...
User Manual (user Manual) (ver.1.0) (English)
Page 13
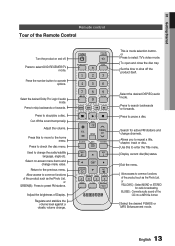
... menu. VOL AUDIO UPSCALE P .BASS This is mode selection button. Press to check the disc menu. Used to preset FM stations. or GREEN(B) : Press to change the audio/subtitle language, angle etc. Select the desired DSP/EQ audio mode. 01 Getting Started Remote control Tour of the Remote Control Turn the product on -screen menu items and change menu value. Press the number button to the home menu. Regulate and stabilize the volume level against a drastic volume change. Use this to move to operate options. Select...
... menu. VOL AUDIO UPSCALE P .BASS This is mode selection button. Press to check the disc menu. Used to preset FM stations. or GREEN(B) : Press to change the audio/subtitle language, angle etc. Select the desired DSP/EQ audio mode. 01 Getting Started Remote control Tour of the Remote Control Turn the product on -screen menu items and change menu value. Press the number button to the home menu. Regulate and stabilize the volume level against a drastic volume change. Use this to move to operate options. Select...
User Manual (user Manual) (ver.1.0) (English)
Page 19
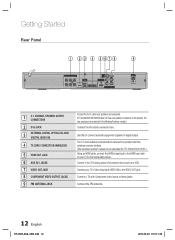
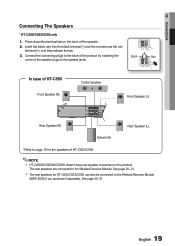
Connect the connecting plugs to the back of the product by matching the Black Red colors of the speaker. 2. The rear speakers are connected to page 16 for HT-C550/C553/C555 can also be connected to the speaker jacks. Press down the terminal tab on the product. In case of HT-C550 Front Speaker (R) Center Speaker Front Speaker (L) DIGITAL AUDIO IN OPTICAL iPod Rear Speaker (R) Subwoofer Rear Speaker (L) * Refer to the Wireless Receiver Module. 02 Connections Connecting The Speakers * HT-C550/C553/C555 only 1. See...
Connect the connecting plugs to the back of the product by matching the Black Red colors of the speaker. 2. The rear speakers are connected to page 16 for HT-C550/C553/C555 can also be connected to the speaker jacks. Press down the terminal tab on the product. In case of HT-C550 Front Speaker (R) Center Speaker Front Speaker (L) DIGITAL AUDIO IN OPTICAL iPod Rear Speaker (R) Subwoofer Rear Speaker (L) * Refer to the Wireless Receiver Module. 02 Connections Connecting The Speakers * HT-C550/C553/C555 only 1. See...
User Manual (user Manual) (ver.1.0) (English)
Page 21
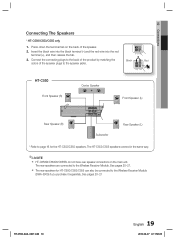
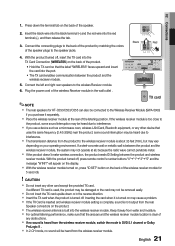
... wall outlet . Plug the power cord of the wireless Receiver module in the reverse direction. Insert the TX card when the product is turned off. DIGITAL AUDIO IN OPTICAL iPod WIRELESS VIDEO OUT HDMI OUT AUX IN 2 COMPONENT OUT WIRELESS TX card ✎ NOTE The rear speakers for 5 seconds. ! With the product turned off , insert the TX card into the TX Card Connection (WIRELESS) on the back of the wireless receiver module for HT-C550...
... wall outlet . Plug the power cord of the wireless Receiver module in the reverse direction. Insert the TX card when the product is turned off. DIGITAL AUDIO IN OPTICAL iPod WIRELESS VIDEO OUT HDMI OUT AUX IN 2 COMPONENT OUT WIRELESS TX card ✎ NOTE The rear speakers for 5 seconds. ! With the product turned off , insert the TX card into the TX Card Connection (WIRELESS) on the back of the wireless receiver module for HT-C550...
User Manual (user Manual) (ver.1.0) (English)
Page 25
... right. Press the FUNCTION button to select AUX 2 input. • The mode switches as a Cable Box/Satellite receiver (Set-Top Box). 1. OPTICAL : Connecting an External Digital Component Digital signal components such as follows : DVD/CD ➞ D.IN ➞ AUX 1 ➞ AUX 2 ➞ USB ➞ IPOD ➞ FM. ✎ NOTE You can connect the Video Output jack of your VCR to the TV, and connect the Audio Output jacks of the VCR to match the colors of the external digital component. 2. Connect AUX IN 2 (Audio) on the...
... right. Press the FUNCTION button to select AUX 2 input. • The mode switches as a Cable Box/Satellite receiver (Set-Top Box). 1. OPTICAL : Connecting an External Digital Component Digital signal components such as follows : DVD/CD ➞ D.IN ➞ AUX 1 ➞ AUX 2 ➞ USB ➞ IPOD ➞ FM. ✎ NOTE You can connect the Video Output jack of your VCR to the TV, and connect the Audio Output jacks of the VCR to match the colors of the external digital component. 2. Connect AUX IN 2 (Audio) on the...
User Manual (user Manual) (ver.1.0) (English)
Page 30
... audio signals are transmitted over the HDMI connection cable, and audio is output through your TV speakers only. • Off : Video is transmitted over the HDMI connection cable only, and audio is output through the product speakers only. ✎ NOTE The default setting of this function to enjoy Dolby Digital sound when watching movies at low volume at the listening position. • Auto Sound Calibration will be automatically set to On, PL II /DSP EQ /P.BASS doesn't work...
... audio signals are transmitted over the HDMI connection cable, and audio is output through your TV speakers only. • Off : Video is transmitted over the HDMI connection cable only, and audio is output through the product speakers only. ✎ NOTE The default setting of this function to enjoy Dolby Digital sound when watching movies at low volume at the listening position. • Auto Sound Calibration will be automatically set to On, PL II /DSP EQ /P.BASS doesn't work...
User Manual (user Manual) (ver.1.0) (English)
Page 31
... not play DivX(R) VOD content. Enter the password and then press the ENTER button. - There are up to set. a To select another language, select OTHERS of Disc Menu, Audio and Subtitle, and enter the language code of DVDs that the program is supported on a disc. OSD Language Disc Menu Select the language for the disc menu displays. 03 Setup System Security Initial Setting By using the number buttons on the remote control for 5 seconds or more. View DivX...
... not play DivX(R) VOD content. Enter the password and then press the ENTER button. - There are up to set. a To select another language, select OTHERS of Disc Menu, Audio and Subtitle, and enter the language code of DVDs that the program is supported on a disc. OSD Language Disc Menu Select the language for the disc menu displays. 03 Setup System Security Initial Setting By using the number buttons on the remote control for 5 seconds or more. View DivX...
User Manual (user Manual) (ver.1.0) (English)
Page 43
... not work . • Is the remote control being operated within its operation range of the DVD. Is the speaker setup correctly customized? • Is the disc severely damaged? If the problem you selected the correct mode(DVD RECEIVER/TV)? • Disc is rotating but 4:3 DVDs can play 16:9 DVDs in 16:9 WIDE mode, 4:3 LETTER BOX mode, or 4:3 PAN SCAN mode, but no picture is produced. • Picture quality is poor and picture is output to use all 6. Select...
... not work . • Is the remote control being operated within its operation range of the DVD. Is the speaker setup correctly customized? • Is the disc severely damaged? If the problem you selected the correct mode(DVD RECEIVER/TV)? • Disc is rotating but 4:3 DVDs can play 16:9 DVDs in 16:9 WIDE mode, 4:3 LETTER BOX mode, or 4:3 PAN SCAN mode, but no picture is produced. • Picture quality is poor and picture is output to use all 6. Select...


