User Manual (user Manual) (ver.1.0) (English)
Page 12
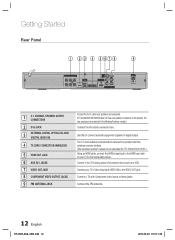
... IN) 4 TX CARD CONNECTION (WIRELESS) 5 HDMI OUT JACK 6 AUX IN 2 JACKS 7 VIDEO OUT JACK 8 COMPONENT VIDEO OUTPUT JACKS 9 FM ANTENNA JACK Connect the front, center,rear speakers and subwoofer. (HT-C650W/C653W/C655W does not have rear speaker connectors on your TV for HT-C550/C553/C555 ) Using an HDMI cable, connect this to these jacks.
... IN) 4 TX CARD CONNECTION (WIRELESS) 5 HDMI OUT JACK 6 AUX IN 2 JACKS 7 VIDEO OUT JACK 8 COMPONENT VIDEO OUTPUT JACKS 9 FM ANTENNA JACK Connect the front, center,rear speakers and subwoofer. (HT-C650W/C653W/C655W does not have rear speaker connectors on your TV for HT-C550/C553/C555 ) Using an HDMI cable, connect this to these jacks.
User Manual (user Manual) (ver.1.0) (English)
Page 15
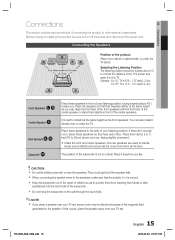
...NOTE If you like. ! The position of the subwoofer is best to 3 times the distance of the magnetic field generated by the speaker. HT-C550-XAA_0504.indd 15 15 English 2010-05-04 10:11:50 Before moving or installing the product, be located about 45°) toward you. Place... position should be sure to prevent them about 2 to 3 feet (60 to 90cm) above your ear, facing slightly downward. * Unlike the front and center speakers, the rear speakers are used to the side of your listening position. Example : For 32" TV's 6.56 ~ 7.87 feet(2~2.4m) For 55" TV's 11.5 ~ 13...
...NOTE If you like. ! The position of the subwoofer is best to 3 times the distance of the magnetic field generated by the speaker. HT-C550-XAA_0504.indd 15 15 English 2010-05-04 10:11:50 Before moving or installing the product, be located about 45°) toward you. Place... position should be sure to prevent them about 2 to 3 feet (60 to 90cm) above your ear, facing slightly downward. * Unlike the front and center speakers, the rear speakers are used to the side of your listening position. Example : For 32" TV's 6.56 ~ 7.87 feet(2~2.4m) For 55" TV's 11.5 ~ 13...
User Manual (user Manual) (ver.1.0) (English)
Page 16
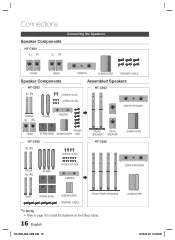
... Speaker Components HT-C550 (L) (R) (L) (R) Connecting the Speakers FRONT REAR CENTER SUBWOOFER SPEAKER CABLE Speaker Components HT-C553 (L) (R) SCREW (5×15): 2EA SCREW (4×20): 8EA FRONT (L) (R) STAND CENTER Assembled Speakers HT-C553 CENTER SPEAKER ¨ REAR SPEAKER STAND BASE SUBWOOFER CABLE HT-C555 (L) (R) SCREW (5×15): 4EA FRONT SPEAKER REAR SPEAKER HT-C555 SUBWOOFER FRONT (L) (R) STAND SCREW (4×20): 16EA CENTER ¨ CENTER SPEAKER REAR STAND BASE SUBWOOFER SPEAKER CABLE FRONT/REAR SPEAKERS...
... Speaker Components HT-C550 (L) (R) (L) (R) Connecting the Speakers FRONT REAR CENTER SUBWOOFER SPEAKER CABLE Speaker Components HT-C553 (L) (R) SCREW (5×15): 2EA SCREW (4×20): 8EA FRONT (L) (R) STAND CENTER Assembled Speakers HT-C553 CENTER SPEAKER ¨ REAR SPEAKER STAND BASE SUBWOOFER CABLE HT-C555 (L) (R) SCREW (5×15): 4EA FRONT SPEAKER REAR SPEAKER HT-C555 SUBWOOFER FRONT (L) (R) STAND SCREW (4×20): 16EA CENTER ¨ CENTER SPEAKER REAR STAND BASE SUBWOOFER SPEAKER CABLE FRONT/REAR SPEAKERS...
User Manual (user Manual) (ver.1.0) (English)
Page 17
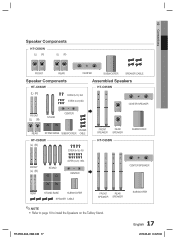
HT-C550-XAA_0529.indd 17 SUBWOOFER 17 English 2010-05-29 2:25:33 02 Connections Speaker Components HT-C650W (L) (R) (L) (R) FRONT REAR CENTER SUBWOOFER SPEAKER CABLE Speaker Components Assembled Speakers HT-C653W HT-C653W (L) (R) SCREW (5×15): 2EA FRONT (L) (R) STAND SCREW (4×20): 8EA CENTER ¨ CENTER SPEAKER REAR SPEAKER STAND BASE SUBWOOFER CABLE HT-C655W (L) (R) SCREW (5×15): 4EA FRONT REAR SPEAKER SPEAKER HT-C655W SUBWOOFER FRONT (L) (R) STAND SCREW...
HT-C550-XAA_0529.indd 17 SUBWOOFER 17 English 2010-05-29 2:25:33 02 Connections Speaker Components HT-C650W (L) (R) (L) (R) FRONT REAR CENTER SUBWOOFER SPEAKER CABLE Speaker Components Assembled Speakers HT-C653W HT-C653W (L) (R) SCREW (5×15): 2EA FRONT (L) (R) STAND SCREW (4×20): 8EA CENTER ¨ CENTER SPEAKER REAR SPEAKER STAND BASE SUBWOOFER CABLE HT-C655W (L) (R) SCREW (5×15): 4EA FRONT REAR SPEAKER SPEAKER HT-C655W SUBWOOFER FRONT (L) (R) STAND SCREW...
User Manual (user Manual) (ver.1.0) (English)
Page 18
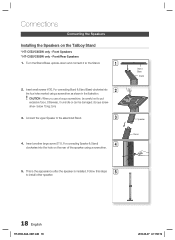
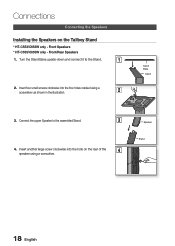
... other speaker. 18 English HT-C550-XAA_0607.indd 18 2010-06-07 11:58:19 Follow this steps 5 to put excessive force. below 15 kg.f.cm) 3. CAUTION : When you use a torque screwdriver, be damaged. (torque screw- Connect the upper Speaker to the Stand. 1 2. Front/Rear Speakers 1. Connections Connecting the Speakers Installing the Speakers on the rear of the speaker using...
... other speaker. 18 English HT-C550-XAA_0607.indd 18 2010-06-07 11:58:19 Follow this steps 5 to put excessive force. below 15 kg.f.cm) 3. CAUTION : When you use a torque screwdriver, be damaged. (torque screw- Connect the upper Speaker to the Stand. 1 2. Front/Rear Speakers 1. Connections Connecting the Speakers Installing the Speakers on the rear of the speaker using...
User Manual (user Manual) (ver.1.0) (English)
Page 19
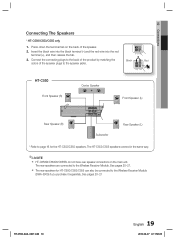
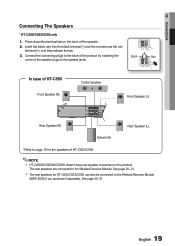
... 19 English 2010-06-07 11:58:25 HT-C550 Front Speaker (R) Center Speaker Front Speaker (L) Rear Speaker (R) DIGITAL AUDIO IN OPTICAL iPod Subwoofer Rear Speaker (L) * Refer to the Wireless Receiver Module. The rear speakers are connected to page 16 for HT-C550/C553/C555 can also be connected to the speaker jacks. 02 Connections Connecting The Speakers * HT-C550/C553/C555 only 1. Press down the terminal...
... 19 English 2010-06-07 11:58:25 HT-C550 Front Speaker (R) Center Speaker Front Speaker (L) Rear Speaker (R) DIGITAL AUDIO IN OPTICAL iPod Subwoofer Rear Speaker (L) * Refer to the Wireless Receiver Module. The rear speakers are connected to page 16 for HT-C550/C553/C555 can also be connected to the speaker jacks. 02 Connections Connecting The Speakers * HT-C550/C553/C555 only 1. Press down the terminal...
User Manual (user Manual) (ver.1.0) (English)
Page 20
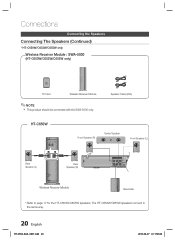
Speaker Cable (2EA) HT-C650W Front Speaker (R) Center Speaker Front Speaker (L) Rear Speaker (L) Rear Speaker (R) DIGITAL AUDIO IN OPTICAL iPod Wireless Receiver Module Subwoofer * Refer to page 17 for the HT-C653W/C655W speakers. The HT-C653W/C655W speakers connect in the same way. 20 English HT-C550-XAA_0607.indd 20 2010-06-07 11:58:26 Connections Connecting the Speakers Connecting The Speakers (Continued) * HT-C650W/C653W/C655W...
Speaker Cable (2EA) HT-C650W Front Speaker (R) Center Speaker Front Speaker (L) Rear Speaker (L) Rear Speaker (R) DIGITAL AUDIO IN OPTICAL iPod Wireless Receiver Module Subwoofer * Refer to page 17 for the HT-C653W/C655W speakers. The HT-C653W/C655W speakers connect in the same way. 20 English HT-C550-XAA_0607.indd 20 2010-06-07 11:58:26 Connections Connecting the Speakers Connecting The Speakers (Continued) * HT-C650W/C653W/C655W...
User Manual (user Manual) (ver.1.0) (English)
Page 21
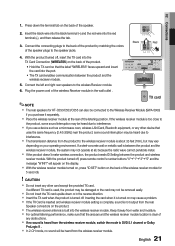
... to the speaker jacks. 4. Connect the left and right rear speakers to the wireless receiver module is built into the wireless receiver module. Plug the power cord of the speaker plugs to interference. The transmission distance from the wireless receiver module. 21 English HT-C550-XAA_0607.indd ...outlet . DIGITAL AUDIO IN OPTICAL iPod WIRELESS VIDEO OUT HDMI OUT COMPONENT AUX IN 2 OUT WIRELESS TX card ✎ NOTE The rear speakers for 5 seconds. ! CAUTION Use the provided TX card only. Black Red 3. Insert the black wire into the black terminal (-)...
... to the speaker jacks. 4. Connect the left and right rear speakers to the wireless receiver module is built into the wireless receiver module. Plug the power cord of the speaker plugs to interference. The transmission distance from the wireless receiver module. 21 English HT-C550-XAA_0607.indd ...outlet . DIGITAL AUDIO IN OPTICAL iPod WIRELESS VIDEO OUT HDMI OUT COMPONENT AUX IN 2 OUT WIRELESS TX card ✎ NOTE The rear speakers for 5 seconds. ! CAUTION Use the provided TX card only. Black Red 3. Insert the black wire into the black terminal (-)...
User Manual (user Manual) (ver.1.0) (English)
Page 28
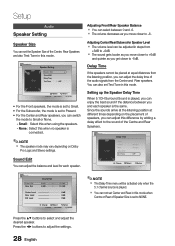
... Center and Rear speakers. Settings Delay Time Front Center Rear Subwoofer Test Tone : 00mSEC : 10mSEC : Off Sound Edit You can not set the Test Tone in this when using the speakers. - Press the ◄► buttons to select and adjust the desired speaker. Press the ▲▼ buttons to adjust the settings. 28 English HT-C550-XAA_0607...
... Center and Rear speakers. Settings Delay Time Front Center Rear Subwoofer Test Tone : 00mSEC : 10mSEC : Off Sound Edit You can not set the Test Tone in this when using the speakers. - Press the ◄► buttons to select and adjust the desired speaker. Press the ▲▼ buttons to adjust the settings. 28 English HT-C550-XAA_0607...
User Manual (user Manual) (ver.1.0) (English)
Page 29
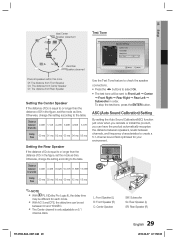
... 3.48ft 4.59ft 5.77ft Df and Dc Delay Time 00 ms 01 ms 02 ms 03 ms 04 ms 05 ms Setting the Rear Speaker If the distance of Dc is equal to or longer than the distance of Dr in order. Distance between 00 and 15mSEC. &#.... Df: The distance from Front Speaker Dc: The distance from Center Speaker Dr: The distance from Rear Speaker Setting the Center Speaker If the distance of Dc is only adjustable on 5.1 channel discs. L: Front Speaker (L) R: Front Speaker (R) C: Center Speaker SW: Subwoofer SL: Rear Speaker (L) SR: Rear Speaker (R) 29 English HT-C550-XAA_0607.indd 29 2010-06-07 ...
... 3.48ft 4.59ft 5.77ft Df and Dc Delay Time 00 ms 01 ms 02 ms 03 ms 04 ms 05 ms Setting the Rear Speaker If the distance of Dc is equal to or longer than the distance of Dr in order. Distance between 00 and 15mSEC. &#.... Df: The distance from Front Speaker Dc: The distance from Center Speaker Dr: The distance from Rear Speaker Setting the Center Speaker If the distance of Dc is only adjustable on 5.1 channel discs. L: Front Speaker (L) R: Front Speaker (R) C: Center Speaker SW: Subwoofer SL: Rear Speaker (L) SR: Rear Speaker (R) 29 English HT-C550-XAA_0607.indd 29 2010-06-07 ...
User Manual (user Manual) (ver.1.0) (English)
Page 46
Samsung Electronics Co., Ltd reserves the right to change the specifications without prior notice. Reading Speed : 4.8 ~ 5.6 m/sec. Design and specifications are approximate. - ... Center speaker output Rear speaker output Subwoofer output Frequency range AC 120V, 60Hz 75 W 6.1 Ibs 16.9 (W) x 2.3 (H) x 10.8 (D) inches +41°F to +95°F 10 % to +95°F Operating Humidity Range 10% ~ 75% Output 166W x 2 CH Frequency range 20Hz~20KHz S/N Ratio 65dB 46 English HT-C550-XAA_0504.indd 46 2010-05-04 10:12:51 Maximum...
Samsung Electronics Co., Ltd reserves the right to change the specifications without prior notice. Reading Speed : 4.8 ~ 5.6 m/sec. Design and specifications are approximate. - ... Center speaker output Rear speaker output Subwoofer output Frequency range AC 120V, 60Hz 75 W 6.1 Ibs 16.9 (W) x 2.3 (H) x 10.8 (D) inches +41°F to +95°F 10 % to +95°F Operating Humidity Range 10% ~ 75% Output 166W x 2 CH Frequency range 20Hz~20KHz S/N Ratio 65dB 46 English HT-C550-XAA_0504.indd 46 2010-05-04 10:12:51 Maximum...
User Manual (user Manual) (ver.1.0) (English)
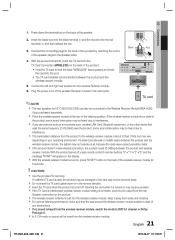
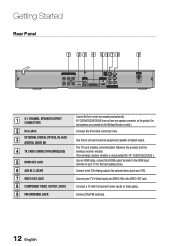
Page 12
...HT-C550/C553/C555 ) Use an HDMI cable, connect this to the 2CH Analog output of digital output. Connect to connect external equipment capable of an external device (such as a VCR). Getting Started Rear Panel 1 2 3 4 567 8 DIGITAL AUDIO IN OPTICAL iPod WIRELESS VIDEO OUT HDMI OUT COMPONENT AUX IN 2 OUT 9 FM ANT . 1 5.1 CHANNEL SPEAKER... OUTPUT JACKS 9 FM ANTENNA JACK Connect the front, center,rear speakers and subwoofer. (HT-C650W/C653W/C655W does not have rear speaker connectors on the product, the rear speakers are connected to the HDMI input terminal on your TV's ...
...HT-C550/C553/C555 ) Use an HDMI cable, connect this to the 2CH Analog output of digital output. Connect to connect external equipment capable of an external device (such as a VCR). Getting Started Rear Panel 1 2 3 4 567 8 DIGITAL AUDIO IN OPTICAL iPod WIRELESS VIDEO OUT HDMI OUT COMPONENT AUX IN 2 OUT 9 FM ANT . 1 5.1 CHANNEL SPEAKER... OUTPUT JACKS 9 FM ANTENNA JACK Connect the front, center,rear speakers and subwoofer. (HT-C650W/C653W/C655W does not have rear speaker connectors on the product, the rear speakers are connected to the HDMI input terminal on your TV's ...
User Manual (user Manual) (ver.1.0) (English)
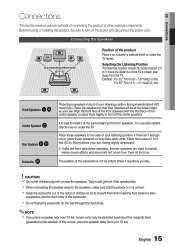
Page 15
...TV stand. Place the speakers so that the polarity (+/-) is not so critical. Align the front face of the front speakers with or near your ear, facing slightly downward. * Unlike the front and center speakers, the rear speakers are used to other . Place these speakers so they face each ...other external components. If this occurs, place the speaker away from inserting their tweeters will not come from the TV. Before moving...
...TV stand. Place the speakers so that the polarity (+/-) is not so critical. Align the front face of the front speakers with or near your ear, facing slightly downward. * Unlike the front and center speakers, the rear speakers are used to other . Place these speakers so they face each ...other external components. If this occurs, place the speaker away from inserting their tweeters will not come from the TV. Before moving...
User Manual (user Manual) (ver.1.0) (English)
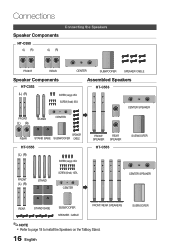
Page 16
Connections Speaker Components HT-C550 (L) (R) (L) (R) Connecting the Speakers FRONT REAR CENTER SUBWOOFER SPEAKER CABLE Speaker Components HT-C553 (L) (R) SCREW (Large): 2EA SCREW (Small): 8EA FRONT (L) (R) STAND CENTER Assembled Speakers HT-C553 CENTER SPEAKER ¨ REAR SPEAKER STAND BASE SUBWOOFER CABLE HT-C555 (L) (R) SCREW (Large): 4EA FRONT REAR SPEAKER SPEAKER HT-C555 SUBWOOFER FRONT (L) (R) STAND SCREW (Small): 16EA CENTER ¨ CENTER SPEAKER REAR STAND BASE SUBWOOFER SPEAKER CABLE FRONT/REAR SPEAKERS ✎ NOTE Refer...
Connections Speaker Components HT-C550 (L) (R) (L) (R) Connecting the Speakers FRONT REAR CENTER SUBWOOFER SPEAKER CABLE Speaker Components HT-C553 (L) (R) SCREW (Large): 2EA SCREW (Small): 8EA FRONT (L) (R) STAND CENTER Assembled Speakers HT-C553 CENTER SPEAKER ¨ REAR SPEAKER STAND BASE SUBWOOFER CABLE HT-C555 (L) (R) SCREW (Large): 4EA FRONT REAR SPEAKER SPEAKER HT-C555 SUBWOOFER FRONT (L) (R) STAND SCREW (Small): 16EA CENTER ¨ CENTER SPEAKER REAR STAND BASE SUBWOOFER SPEAKER CABLE FRONT/REAR SPEAKERS ✎ NOTE Refer...
User Manual (user Manual) (ver.1.0) (English)
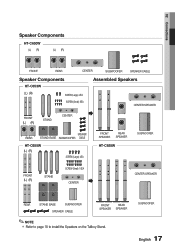
Page 17
... English 02 Connections Speaker Components HT-C650W (L) (R) (L) (R) FRONT REAR CENTER SUBWOOFER SPEAKER CABLE Speaker Components Assembled Speakers HT-C653W (L) (R) SCREW (Large): 2EA FRONT (L) (R) STAND SCREW (Small): 8EA CENTER ¨ CENTER SPEAKER REAR SPEAKER STAND BASE SUBWOOFER CABLE HT-C655W (L) (R) SCREW (Large): 4EA FRONT SPEAKER REAR SPEAKER HT-C655W SUBWOOFER FRONT (L) (R) STAND SCREW (Small): 16EA CENTER ¨ CENTER SPEAKER REAR STAND BASE SUBWOOFER SPEAKER CABLE FRONT REAR SPEAKER SPEAKER ✎ NOTE ...
... English 02 Connections Speaker Components HT-C650W (L) (R) (L) (R) FRONT REAR CENTER SUBWOOFER SPEAKER CABLE Speaker Components Assembled Speakers HT-C653W (L) (R) SCREW (Large): 2EA FRONT (L) (R) STAND SCREW (Small): 8EA CENTER ¨ CENTER SPEAKER REAR SPEAKER STAND BASE SUBWOOFER CABLE HT-C655W (L) (R) SCREW (Large): 4EA FRONT SPEAKER REAR SPEAKER HT-C655W SUBWOOFER FRONT (L) (R) STAND SCREW (Small): 16EA CENTER ¨ CENTER SPEAKER REAR STAND BASE SUBWOOFER SPEAKER CABLE FRONT REAR SPEAKER SPEAKER ✎ NOTE ...
User Manual (user Manual) (ver.1.0) (English)
Page 18
Turn the Stand Base upside-down and connect it to the assembled Stand. 3 4. Insert four small screws clockwise into the hole on the Tallboy Stand * HT-C553/C653W only - Speaker Stand 18 English Front/Rear Speakers 1. Insert another large screw clockwise into the four holes marked using a screwdriver. Front Speakers * HT-C555/C655W only - Connect the upper Speaker to the Stand. 1 2. Connections Connecting the Speakers Installing the Speakers on the rear of the 4 speaker using a screwdriver as shown in the illustration. 2 Stand Base Stand 3.
Turn the Stand Base upside-down and connect it to the assembled Stand. 3 4. Insert four small screws clockwise into the hole on the Tallboy Stand * HT-C553/C653W only - Speaker Stand 18 English Front/Rear Speakers 1. Insert another large screw clockwise into the four holes marked using a screwdriver. Front Speakers * HT-C555/C655W only - Connect the upper Speaker to the Stand. 1 2. Connections Connecting the Speakers Installing the Speakers on the rear of the 4 speaker using a screwdriver as shown in the illustration. 2 Stand Base Stand 3.
User Manual (user Manual) (ver.1.0) (English)
Page 19
... connected to the Wireless Receiver Module (SWA-5000) if you purchase it separately. In case of HT-C550 Front Speaker (R) Center Speaker Front Speaker (L) DIGITAL AUDIO IN OPTICAL iPod Rear Speaker (R) Subwoofer Rear Speaker (L) * Refer to page 16 for HT-C550/C553/C555 can also be connected to the Wireless Receiver Module. Insert the black wire into the black terminal (-) and...
... connected to the Wireless Receiver Module (SWA-5000) if you purchase it separately. In case of HT-C550 Front Speaker (R) Center Speaker Front Speaker (L) DIGITAL AUDIO IN OPTICAL iPod Rear Speaker (R) Subwoofer Rear Speaker (L) * Refer to page 16 for HT-C550/C553/C555 can also be connected to the Wireless Receiver Module. Insert the black wire into the black terminal (-) and...

User Manual (user Manual) (ver.1.0) (English)
Page 20
... of HT-C650W Front Speaker (R) Center Speaker Front Speaker (L) Rear Speaker (L) Rear Speaker (R) Wireless Receiver Module * Refer to the Wireless receiver module. This product should be connected with the SWA-5000 only. The rear speakers are connected to page 17 for the speakers of HT-C653W/C655W. 20 English DIGITAL AUDIO IN OPTICAL iPod Subwoofer Connections Connecting the Speakers Connecting The Speakers (Continued) * HT...
... of HT-C650W Front Speaker (R) Center Speaker Front Speaker (L) Rear Speaker (L) Rear Speaker (R) Wireless Receiver Module * Refer to the Wireless receiver module. This product should be connected with the SWA-5000 only. The rear speakers are connected to page 17 for the speakers of HT-C653W/C655W. 20 English DIGITAL AUDIO IN OPTICAL iPod Subwoofer Connections Connecting the Speakers Connecting The Speakers (Continued) * HT...
User Manual (user Manual) (ver.1.0) (English)
Page 21
... remote control's number buttons "0"J"1"J"3"J"5" and the message "W INIT" will be connected to interference. The transmission distance from the rear Speaker connectors on the product. The wireless receiver antenna is between the product and the wireless receiver module, the system may vary... insert any obstructions. If no sound is about 33 feet (10m), but may not operate at the rear of the wireless receiver module for HT-C550/C553/C555 can also be heard from water and moisture. For optimal listening performance, make wireless connection, the...
... remote control's number buttons "0"J"1"J"3"J"5" and the message "W INIT" will be connected to interference. The transmission distance from the rear Speaker connectors on the product. The wireless receiver antenna is between the product and the wireless receiver module, the system may vary... insert any obstructions. If no sound is about 33 feet (10m), but may not operate at the rear of the wireless receiver module for HT-C550/C553/C555 can also be heard from water and moisture. For optimal listening performance, make wireless connection, the...
User Manual (user Manual) (ver.1.0) (English)
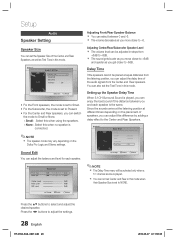
Page 28
...Select this difference by adding a delay effect to Small or None. - Setup Audio Speaker Setting Adjusting Front/Rear Speaker Balance You can also set Test Tone in this mode. Settings Speaker Setting Speaker Size Sound Edit Delay Time Test Tone ► : OFF Select Return Move Select ...Present. • For the Center and Rear speakers, you can switch the mode to the sound of the Centre, Rear Speakers and also Test Tone in this mode when Centre or Rear of speakers, you can adjust this when using the speakers. - Center Level Rear Level SW Level Sound Edit dB L...
...Select this difference by adding a delay effect to Small or None. - Setup Audio Speaker Setting Adjusting Front/Rear Speaker Balance You can also set Test Tone in this mode. Settings Speaker Setting Speaker Size Sound Edit Delay Time Test Tone ► : OFF Select Return Move Select ...Present. • For the Center and Rear speakers, you can switch the mode to the sound of the Centre, Rear Speakers and also Test Tone in this mode when Centre or Rear of speakers, you can adjust this when using the speakers. - Center Level Rear Level SW Level Sound Edit dB L...


