User Manual (ENGLISH)
Page 6
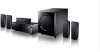
...multi channel sound at 96KHz/24bit. DTS (Digital Theater Systems) DTS plays back 5.1 channel sound with Samsung TV and DVD player supporting Anynet+(HDMI-CEC).) 6 It is compatible with normal stereo audio sources. DTS Reproduces digital PCM or analog stereo over 6.1 channels using an HDMI Cable. (This function is available only in connection with less compression than Dolby Digital for more realistic surround sound with existing DTS Digital Sound formats. DOLBY DIGITAL EX Adds a surround back channel for richer sound. DTS-ES (Extended Surround) DTS-ES adds an additional rear center...
...multi channel sound at 96KHz/24bit. DTS (Digital Theater Systems) DTS plays back 5.1 channel sound with Samsung TV and DVD player supporting Anynet+(HDMI-CEC).) 6 It is compatible with normal stereo audio sources. DTS Reproduces digital PCM or analog stereo over 6.1 channels using an HDMI Cable. (This function is available only in connection with less compression than Dolby Digital for more realistic surround sound with existing DTS Digital Sound formats. DOLBY DIGITAL EX Adds a surround back channel for richer sound. DTS-ES (Extended Surround) DTS-ES adds an additional rear center...
User Manual (ENGLISH)
Page 7
... 24 Setting digital input ...25 Setting HDMI AUDIO...26 Setting DRC (Dynamic Range Compression 27 Test tone ...28 Setting speaker level ...30 Dolby Pro Logic llx mode 31 Setting Dolby Pro Logic llx effect 32 Setting NEO:6 mode...33 Setting EX/ES mode...34 Setting Tone Control ...35 SFE mode...36 Stereo mode ...37 RADIO OPERATION Listening to radio ...38 Presetting radio stations 39 MISCELLANEOUS Convenient functions ...40 Operating your TV with the remote control 43 Operating your DVD or VCR with the remote control 45 Before calling for service 47 Specifications...
... 24 Setting digital input ...25 Setting HDMI AUDIO...26 Setting DRC (Dynamic Range Compression 27 Test tone ...28 Setting speaker level ...30 Dolby Pro Logic llx mode 31 Setting Dolby Pro Logic llx effect 32 Setting NEO:6 mode...33 Setting EX/ES mode...34 Setting Tone Control ...35 SFE mode...36 Stereo mode ...37 RADIO OPERATION Listening to radio ...38 Presetting radio stations 39 MISCELLANEOUS Convenient functions ...40 Operating your TV with the remote control 43 Operating your DVD or VCR with the remote control 45 Before calling for service 47 Specifications...
User Manual (ENGLISH)
Page 9
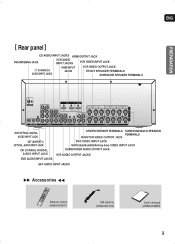
... [ Rear panel ] CD AUDIO INPUT JACKS HDMI OUTPUT JACK FM ANTENNA JACK VCR AUDIO INPUT JACKS VCR VIDEO INPUT JACK 7.1 CH ANALOG AUDIO INPUT JACKS HDMI INPUT JACKS VCR VIDEO OUTPUT JACK FRONT SPEAKER TERMINALS SURROUND SPEAKER TERMINALS DVD OPTICAL DIGITAL AUDIO INPUT JACK SAT (ANYNET+) OPTICAL AUDIO INPUT JACK CD COAXIAL DIGITAL AUDIO INPUT JACK DVD AUDIO INPUT JACKS CENTER SPEAKER TERMINALS SURROUND BACK SPEAKER TERMINALS MONITOR VIDEO OUTPUT JACK DVD VIDEO INPUT JACK SAT(Cable/Satellite/Set-top box) VIDEO INPUT JACK SUBWOOFER AUDIO OUTPUT JACK VCR AUDIO OUTPUT JACKS SAT AUDIO INPUT...
... [ Rear panel ] CD AUDIO INPUT JACKS HDMI OUTPUT JACK FM ANTENNA JACK VCR AUDIO INPUT JACKS VCR VIDEO INPUT JACK 7.1 CH ANALOG AUDIO INPUT JACKS HDMI INPUT JACKS VCR VIDEO OUTPUT JACK FRONT SPEAKER TERMINALS SURROUND SPEAKER TERMINALS DVD OPTICAL DIGITAL AUDIO INPUT JACK SAT (ANYNET+) OPTICAL AUDIO INPUT JACK CD COAXIAL DIGITAL AUDIO INPUT JACK DVD AUDIO INPUT JACKS CENTER SPEAKER TERMINALS SURROUND BACK SPEAKER TERMINALS MONITOR VIDEO OUTPUT JACK DVD VIDEO INPUT JACK SAT(Cable/Satellite/Set-top box) VIDEO INPUT JACK SUBWOOFER AUDIO OUTPUT JACK VCR AUDIO OUTPUT JACKS SAT AUDIO INPUT...
User Manual (ENGLISH)
Page 17
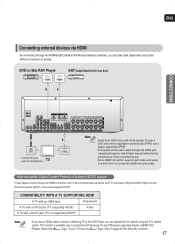
... HDMI connection supports both of the audio output through the HDMI jack (sampling frequency and bit rate) may be played. To play digital contents through the HDMI connection, both video and audio, you don't have to connect an additional audio cable. Video/Audio A TV with a DVI-D jack (TV supporting HDCP) Video A TV with Samsung TV and DVD player supporting Anynet +(HDMI-CEC). • Please check the logo. TV • Audio from SACD discs will not be limited by CPPM, use Anynet+. COMPATIBILITY...
... HDMI connection supports both of the audio output through the HDMI jack (sampling frequency and bit rate) may be played. To play digital contents through the HDMI connection, both video and audio, you don't have to connect an additional audio cable. Video/Audio A TV with a DVI-D jack (TV supporting HDCP) Video A TV with Samsung TV and DVD player supporting Anynet +(HDMI-CEC). • Please check the logo. TV • Audio from SACD discs will not be limited by CPPM, use Anynet+. COMPATIBILITY...
User Manual (ENGLISH)
Page 18
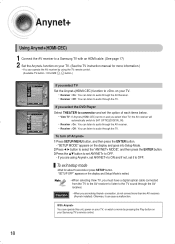
... select the DVD Player Select THEATER to connector and set the option of each items below. • View TV : If Anynet+(HDMI-CEC) set to on and you are making Anynet+ connection, do not connect more information.) • You can operate the AV receiver by pressing the Play button on your TV. • Receiver : On : You can listen to the TV sound through the TV. To turn off Anynet+ 1 Press SETUP/MENU button...
... select the DVD Player Select THEATER to connector and set the option of each items below. • View TV : If Anynet+(HDMI-CEC) set to on and you are making Anynet+ connection, do not connect more information.) • You can operate the AV receiver by pressing the Play button on your TV. • Receiver : On : You can listen to the TV sound through the TV. To turn off Anynet+ 1 Press SETUP/MENU button...
User Manual (ENGLISH)
Page 20
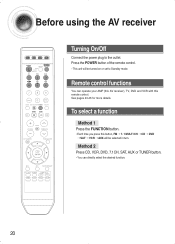
... FUNCTION button. • Each time you press this remote control. Remote control functions You can directly select the desired function. 20 Method 2 Press CD, VCR, DVD, 7.1CH, SAT, AUX or TUNER button. • You can operate your AMP (this AV receiver), TV, DVD and VCR with this button, FM ➝ 7. 1 MULTI CH ➝ CD ➝ DVD ➝ SAT ➝ VCR ➝ AUX will be selected in turn. Before using the AV receiver Turning On/Off Connect the power plug to Standby mode...
... FUNCTION button. • Each time you press this remote control. Remote control functions You can directly select the desired function. 20 Method 2 Press CD, VCR, DVD, 7.1CH, SAT, AUX or TUNER button. • You can operate your AMP (this AV receiver), TV, DVD and VCR with this button, FM ➝ 7. 1 MULTI CH ➝ CD ➝ DVD ➝ SAT ➝ VCR ➝ AUX will be selected in turn. Before using the AV receiver Turning On/Off Connect the power plug to Standby mode...
User Manual (ENGLISH)
Page 25
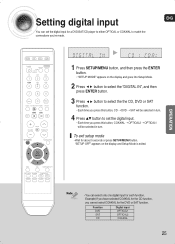
... function, you cannot select COAXIAL for a DVD/SAT/CD player to either OPTICAL or COAXIAL to set the digital input for the DVD or SAT function. OPERATION • You can set the digital input. • Each time you 've made . √ 1 Press SETUP/MENU button, and then press the ENTER button. • "SETUP MODE" appears on the display and Setup Mode is exited. "SETUP OFF" appears on the display and goes into Setup Mode. 2 Press button to select the "DIGITAL...
... function, you cannot select COAXIAL for a DVD/SAT/CD player to either OPTICAL or COAXIAL to set the digital input for the DVD or SAT function. OPERATION • You can set the digital input. • Each time you 've made . √ 1 Press SETUP/MENU button, and then press the ENTER button. • "SETUP MODE" appears on the display and Setup Mode is exited. "SETUP OFF" appears on the display and goes into Setup Mode. 2 Press button to select the "DIGITAL...
User Manual (ENGLISH)
Page 26
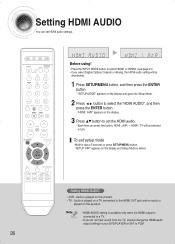
... audio is played on this button, HDMI : AVR ➝ HDMI : TV will be selected in turn. To exit setup mode • Wait for your DVD PLAYER or SAT to PCM. 26 "SETUP OFF" appears on the display and Setup Mode is exited. Setting HDMI AUDIO You can set HDMI audio settings. √ Before using! • Press the INPUT MODE button to select HDMI1 or HDMI2. (see page 21) • If you select Digital (Optical, Coaxial) or Analog, the HDMI audio setting will be deactivated. 1 Press SETUP/MENU button...
... audio is played on this button, HDMI : AVR ➝ HDMI : TV will be selected in turn. To exit setup mode • Wait for your DVD PLAYER or SAT to PCM. 26 "SETUP OFF" appears on the display and Setup Mode is exited. Setting HDMI AUDIO You can set HDMI audio settings. √ Before using! • Press the INPUT MODE button to select HDMI1 or HDMI2. (see page 21) • If you select Digital (Optical, Coaxial) or Analog, the HDMI audio setting will be deactivated. 1 Press SETUP/MENU button...
User Manual (ENGLISH)
Page 27
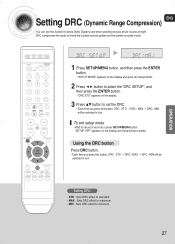
... turn . DRC compresses the audio to make the loudest sounds quieter and the quietest sounds louder. √ 1 Press SETUP/MENU button, and then press the ENTER button. • "SETUP MODE" appears on the display and goes into Setup Mode. 2 Press button to select the "DRC SETUP", and then press the ENTER button. • "DRC:STD" appears on the display and Setup Mode is exited. OPERATION Setting DRC (Dynamic Range Compression) ENG You can use...
... turn . DRC compresses the audio to make the loudest sounds quieter and the quietest sounds louder. √ 1 Press SETUP/MENU button, and then press the ENTER button. • "SETUP MODE" appears on the display and goes into Setup Mode. 2 Press button to select the "DRC SETUP", and then press the ENTER button. • "DRC:STD" appears on the display and Setup Mode is exited. OPERATION Setting DRC (Dynamic Range Compression) ENG You can use...

User Manual (ENGLISH)
Page 29
... be selected in turn. 4 Press ...† button to set the test tone as you want. • You can adjust the speaker output level from -10 to +10dB by 1 step. • The sound gets quieter at -10dB and louder at +10dB. Test Tone Output • F.L (front left) : -10 ~ +10dB • CEN (center) : -10 ~ +10dB • F.R (front right) : -10 ~ +10dB • S.R (surround right) : -10 ~ +10dB • SBR (surround back...
... be selected in turn. 4 Press ...† button to set the test tone as you want. • You can adjust the speaker output level from -10 to +10dB by 1 step. • The sound gets quieter at -10dB and louder at +10dB. Test Tone Output • F.L (front left) : -10 ~ +10dB • CEN (center) : -10 ~ +10dB • F.R (front right) : -10 ~ +10dB • S.R (surround right) : -10 ~ +10dB • SBR (surround back...
User Manual (ENGLISH)
Page 30
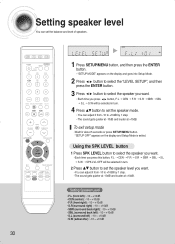
... selected in turn. 2 Press ...† button to set the speaker level you want . • Each time you want . • You can adjust it from -10 to +10dB by 1 step. • The sound gets quieter at -10dB and louder at +10dB. Setting speaker level You can set the balance and level of speakers. √ 1 Press SETUP/MENU button, and then press the ENTER button. • "SETUP MODE" appears on the display and Setup Mode...
... selected in turn. 2 Press ...† button to set the speaker level you want . • Each time you want . • You can adjust it from -10 to +10dB by 1 step. • The sound gets quieter at -10dB and louder at +10dB. Setting speaker level You can set the balance and level of speakers. √ 1 Press SETUP/MENU button, and then press the ENTER button. • "SETUP MODE" appears on the display and Setup Mode...
User Manual (ENGLISH)
Page 31
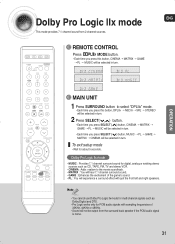
... 5 seconds. Dolby Pro Logic llx mode ENG This mode provides 7.1 channel sound from the surround back speaker if the PCM audio signal is mono. 31 To exit setup mode • Wait for multi channel signals such as CD, TAPE, FM, TV and stereo VCR. • CINEMA : Adds realism to select "DPLIIx" mode. • Each time you press SELECT ( ) button, MUSIC ➝ PL ➝ GAME ➝ MATRIX ➝ CINEMA will be output from 2 channel sources. REMOTE CONTROL Press MODE button. •...
... 5 seconds. Dolby Pro Logic llx mode ENG This mode provides 7.1 channel sound from the surround back speaker if the PCM audio signal is mono. 31 To exit setup mode • Wait for multi channel signals such as CD, TAPE, FM, TV and stereo VCR. • CINEMA : Adds realism to select "DPLIIx" mode. • Each time you press SELECT ( ) button, MUSIC ➝ PL ➝ GAME ➝ MATRIX ➝ CINEMA will be output from 2 channel sources. REMOTE CONTROL Press MODE button. •...
User Manual (ENGLISH)
Page 33
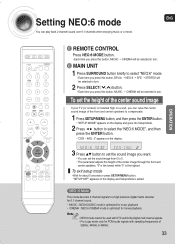
...:6 mode cannot be used with DTS and Dolby Digital multi channel signals. • Pro Logic works only for PCM audio signals with sampling frequencies of 32KHz, 44KHz or 48KHz. 33 "0" is the lowest while "5" is installed high on a wall, you press this button, MUSIC ➝ CINEMA will be selected in turn . OPERATION REMOTE CONTROL Press NEO:6 MODE button. • Each time you can raise the center sound image of the front and center speakers to compensate. 1 Press SETUP/MENU button, and...
...:6 mode cannot be used with DTS and Dolby Digital multi channel signals. • Pro Logic works only for PCM audio signals with sampling frequencies of 32KHz, 44KHz or 48KHz. 33 "0" is the lowest while "5" is installed high on a wall, you press this button, MUSIC ➝ CINEMA will be selected in turn . OPERATION REMOTE CONTROL Press NEO:6 MODE button. • Each time you can raise the center sound image of the front and center speakers to compensate. 1 Press SETUP/MENU button, and...
User Manual (ENGLISH)
Page 34
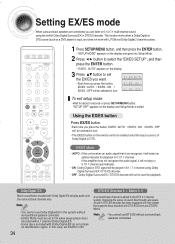
... Direct and DTS-ES Matrix. • You cannot use Dolby Digital-EX in the system without surround back speakers connected. This function works when a Dolby Digital or DTS source (such as a DVD player) is of sound directionality and space. To exit setup mode • Wait for playback. "SETUP OFF" appears on the remote control is enabled only if the input source is input, and does not work with Dolby Digital EX will play in 6.1/7.1 channel automatically. • ON : Dolby Digital...
... Direct and DTS-ES Matrix. • You cannot use Dolby Digital-EX in the system without surround back speakers connected. This function works when a Dolby Digital or DTS source (such as a DVD player) is of sound directionality and space. To exit setup mode • Wait for playback. "SETUP OFF" appears on the remote control is enabled only if the input source is input, and does not work with Dolby Digital EX will play in 6.1/7.1 channel automatically. • ON : Dolby Digital...
User Manual (ENGLISH)
Page 35
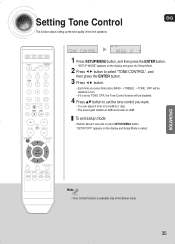
... press SETUP/MENU button. "SETUP OFF" appears on the display and goes into Setup Mode. 2 Press button to select "TONE CONTROL", and then press the ENTER button. 3 Press button. • Each time you press this button, BASS ➝ TREBLE ➝ TONE : OFF will be selected in the Stereo mode. 35 OPERATION • Tone Control function is available only in turn. • If it is set to TONE: OFF, the Tone Control function will be disabled. 4 Press ...† button to set the tone control...
... press SETUP/MENU button. "SETUP OFF" appears on the display and goes into Setup Mode. 2 Press button to select "TONE CONTROL", and then press the ENTER button. 3 Press button. • Each time you press this button, BASS ➝ TREBLE ➝ TONE : OFF will be selected in the Stereo mode. 35 OPERATION • Tone Control function is available only in turn. • If it is set to TONE: OFF, the Tone Control function will be disabled. 4 Press ...† button to set the tone control...
User Manual (ENGLISH)
Page 37
...Mode and Input Signal Chart o = active, - = inactive Surround Mode Input Signal DOLBY (MUSIC, CINEMA, MATRIX, GAME, PRO LOGIC) Dolby D Surr. O O OO - EX Dolby D (5.1ch) Dolby D (2ch) Dolby D (2ch Surr) L.PCM (Audio) Analog NEO:6 (MUSIC, CINEMA) L.PCM (Audio) Analog Dolby D (2ch) Dolby D (2ch Surr) Dolby D (2ch) Dolby D (2ch Surr) SFE L.PCM (Audio) Analog Dolby D Surr. O Display Information Display Signal Format Channel Status DIGITAL DIGITAL DIGITAL DIGITAL L.PCM ANALOG L.PCM ANALOG DIGITAL DIGITAL DIGITAL DIGITAL L.PCM ANALOG DIGITAL DIGITAL dts, ES dts DIGITAL DIGITAL...
...Mode and Input Signal Chart o = active, - = inactive Surround Mode Input Signal DOLBY (MUSIC, CINEMA, MATRIX, GAME, PRO LOGIC) Dolby D Surr. O O OO - EX Dolby D (5.1ch) Dolby D (2ch) Dolby D (2ch Surr) L.PCM (Audio) Analog NEO:6 (MUSIC, CINEMA) L.PCM (Audio) Analog Dolby D (2ch) Dolby D (2ch Surr) Dolby D (2ch) Dolby D (2ch Surr) SFE L.PCM (Audio) Analog Dolby D Surr. O Display Information Display Signal Format Channel Status DIGITAL DIGITAL DIGITAL DIGITAL L.PCM ANALOG L.PCM ANALOG DIGITAL DIGITAL DIGITAL DIGITAL L.PCM ANALOG DIGITAL DIGITAL dts, ES dts DIGITAL DIGITAL...

User Manual (ENGLISH)
Page 38
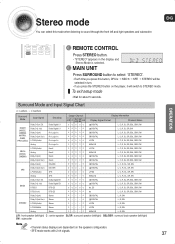
... button, STEREO ➝ MONO will be selected in turn. • If you select MONO in frequency. • Manual tuning : 1) Press TUNING MODE button to select MANUAL. 2) Press TUNING/CH ( , ) button briefly to increase or decrease the frequency step by step. REMOTE CONTROL 1 Press TUNER button. 2 Selected frequency. • Automatic tuning 1 : 1) Press TUNING MODE button to select PRESET. 2) Press TUNING/CH ( , ) button to select the preset frequency. • Automatic tuning 2 : 1) Press TUNING MODE button to select MANUAL 2) Press and hold TUNING/CH ( , ) button to automatically tune...
... button, STEREO ➝ MONO will be selected in turn. • If you select MONO in frequency. • Manual tuning : 1) Press TUNING MODE button to select MANUAL. 2) Press TUNING/CH ( , ) button briefly to increase or decrease the frequency step by step. REMOTE CONTROL 1 Press TUNER button. 2 Selected frequency. • Automatic tuning 1 : 1) Press TUNING MODE button to select PRESET. 2) Press TUNING/CH ( , ) button to select the preset frequency. • Automatic tuning 2 : 1) Press TUNING MODE button to select MANUAL 2) Press and hold TUNING/CH ( , ) button to automatically tune...
User Manual (ENGLISH)
Page 40
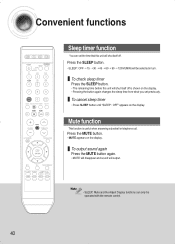
... off is useful when answering a doorbell or telephone call. Convenient functions Sleep timer function You can only be selected in turn. To output sound again Press the MUTE button again. • MUTE will disappear and sound will be operated with the remote control. 40 To cancel sleep timer • Press SLEEP button until "SLEEP : OFF" appears on the display. Press the SLEEP button. • SLEEP...
... off is useful when answering a doorbell or telephone call. Convenient functions Sleep timer function You can only be selected in turn. To output sound again Press the MUTE button again. • MUTE will disappear and sound will be operated with the remote control. 40 To cancel sleep timer • Press SLEEP button until "SLEEP : OFF" appears on the display. Press the SLEEP button. • SLEEP...
User Manual (ENGLISH)
Page 47
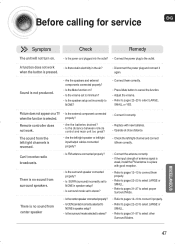
.../right speaker or left/right input/output cables connected properly? • Connect it correctly. • Replace with good reception. Can't receive radio broadcasts. • Is FM antenna connected properly? • Connect the antenna correctly. • If the input strength of antenna signal is pressed. • Disconnect the power plug and connect it again. Picture does not appear on . • Is the power cord plugged into the outlet? • Connect the power plug to select other Surround Modes. 47 MISCELLANEOUS Sound...
.../right speaker or left/right input/output cables connected properly? • Connect it correctly. • Replace with good reception. Can't receive radio broadcasts. • Is FM antenna connected properly? • Connect the antenna correctly. • If the input strength of antenna signal is pressed. • Disconnect the power plug and connect it again. Picture does not appear on . • Is the power cord plugged into the outlet? • Connect the power plug to select other Surround Modes. 47 MISCELLANEOUS Sound...
User Manual (ENGLISH)
Page 50
... may provide their own warranties. All replaced parts and products become the property of SAMSUNG and must contact SAMSUNG for in this statement, noncommercial use of products, equipment, systems, utilities, services, parts, supplies, accessories, applications, installations, repairs, external wiring or connectors not supplied and authorized by SAMSUNG against manufacturing defects in service problems; SAMSUNG's obligations with new or reconditioned parts or products if found to be...
... may provide their own warranties. All replaced parts and products become the property of SAMSUNG and must contact SAMSUNG for in this statement, noncommercial use of products, equipment, systems, utilities, services, parts, supplies, accessories, applications, installations, repairs, external wiring or connectors not supplied and authorized by SAMSUNG against manufacturing defects in service problems; SAMSUNG's obligations with new or reconditioned parts or products if found to be...


