

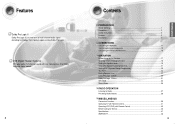
Quick Guide (easy Manual) (ver.1.0) (English)
Page 2
... amplifiers or other heat sources. Do not stack anything on the back of the player. Switching off the DVD player to the environment. This symbol alerts you to disconnect the player completely from the power supply, remove the main plug from the AC supply if the player malfunctions. This player is not intended for continuous use . In order to important operating and maintenance instructions accompanying...
... amplifiers or other heat sources. Do not stack anything on the back of the player. Switching off the DVD player to the environment. This symbol alerts you to disconnect the player completely from the power supply, remove the main plug from the AC supply if the player malfunctions. This player is not intended for continuous use . In order to important operating and maintenance instructions accompanying...
Quick Guide (easy Manual) (ver.1.0) (English)
Page 3
... the power-supply cord or plug is in wire to an antenna discharge unit, size of grounding conductors, location of the lead-in proper operating condition. If liquid has been spilled, or objects have been followed. OVERLOADING Do not overload wall outlets and extension cords as opening or removing covers may touch dangerous voltage points or short-out parts that the video...
... the power-supply cord or plug is in wire to an antenna discharge unit, size of grounding conductors, location of the lead-in proper operating condition. If liquid has been spilled, or objects have been followed. OVERLOADING Do not overload wall outlets and extension cords as opening or removing covers may touch dangerous voltage points or short-out parts that the video...
Quick Guide (easy Manual) (ver.1.0) (English)
Page 4
... AM Antennas 16 OPERATION Before Using the AV Receiver 17 Selecting External Component Input 18 Setting the Speaker Mode 19 Setting the Speaker Listening Distance 21 Setting DRC (Dynamic Range Compression 23 Test Tone ...24 Setting Speaker Level ...27 Dolby Pro Logic ll Mode 29 Dolby Pro Logic ll Effect 31 SFE Mode...33 Stereo Mode ...35 RADIO OPERATION Listening to Radio ...37 Presetting Radio Stations 38 MISCELLANEOUS Convenient Functions ...39 Operating TV with Remote Control 41 Operating VCR (DVD) with Remote Control 43 Before Calling for Service 45 Specifications...
... AM Antennas 16 OPERATION Before Using the AV Receiver 17 Selecting External Component Input 18 Setting the Speaker Mode 19 Setting the Speaker Listening Distance 21 Setting DRC (Dynamic Range Compression 23 Test Tone ...24 Setting Speaker Level ...27 Dolby Pro Logic ll Mode 29 Dolby Pro Logic ll Effect 31 SFE Mode...33 Stereo Mode ...35 RADIO OPERATION Listening to Radio ...37 Presetting Radio Stations 38 MISCELLANEOUS Convenient Functions ...39 Operating TV with Remote Control 41 Operating VCR (DVD) with Remote Control 43 Before Calling for Service 45 Specifications...
Quick Guide (easy Manual) (ver.1.0) (English)
Page 5
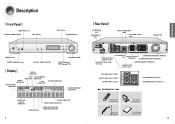
...VCR VIDEO OUTPUT JACK COOLING FAN PREPARATION POWER button REMOTE CONTROL Sensor ANALOG / DIGITAL BUTTON VOLUME CONTROL SELECTION button TUNER ( , ) button [ Display ] MPEG2 INDICATOR DTS INDICATOR DOLBY INDICATOR DOLBY DIGITAL INDICATOR LIVE SURROUND INDICATOR L.PCM INDICATOR SPEAKER INDICATOR RADIO FREQUENCY INDICATOR DOLBY PRO LOGIC II INDICATOR FRONT DISPLAY DIGITAL INDICATOR RADIO STEREO INDICATOR RADIO BROADCASTING RECEIVING INDICATOR 7 CD COAXIAL DIGITAL AUDIO INPUT JACK DVD OPTICAL DIGITAL AUDIO INPUT JACK DVD VIDEO INPUT JACK FRONT SPEAKER TERMINALS SUBWOOFER SPEAKER...
...VCR VIDEO OUTPUT JACK COOLING FAN PREPARATION POWER button REMOTE CONTROL Sensor ANALOG / DIGITAL BUTTON VOLUME CONTROL SELECTION button TUNER ( , ) button [ Display ] MPEG2 INDICATOR DTS INDICATOR DOLBY INDICATOR DOLBY DIGITAL INDICATOR LIVE SURROUND INDICATOR L.PCM INDICATOR SPEAKER INDICATOR RADIO FREQUENCY INDICATOR DOLBY PRO LOGIC II INDICATOR FRONT DISPLAY DIGITAL INDICATOR RADIO STEREO INDICATOR RADIO BROADCASTING RECEIVING INDICATOR 7 CD COAXIAL DIGITAL AUDIO INPUT JACK DVD OPTICAL DIGITAL AUDIO INPUT JACK DVD VIDEO INPUT JACK FRONT SPEAKER TERMINALS SUBWOOFER SPEAKER...

Quick Guide (easy Manual) (ver.1.0) (English)
Page 7
... supplied) FRONT (R) FRONT (L) SURROUND(R) SURROUND(L) PS-AF600 PS-AF600 PS-AR600 PS-AR600 CONNECTIONS SL SR Position of AV Receiver • Place AV Receiver on . SYSTEM MODEL NAME : HT-AS600 MAIN UNIT AV-R600 FRONT SPEAKER PS-AF600 CENTER SPEAKER PS-AC600 SURROUND SPEAKER PS-AR600 PASSIVE SUB WOOFER PS-AW600 √ Connecting Speaker Wire CENTER PS-AC600 PASSIVE SUBWOOFER PS-AW600 1 Press the tab of the speaker connector. 2 Insert the black...
... supplied) FRONT (R) FRONT (L) SURROUND(R) SURROUND(L) PS-AF600 PS-AF600 PS-AR600 PS-AR600 CONNECTIONS SL SR Position of AV Receiver • Place AV Receiver on . SYSTEM MODEL NAME : HT-AS600 MAIN UNIT AV-R600 FRONT SPEAKER PS-AF600 CENTER SPEAKER PS-AC600 SURROUND SPEAKER PS-AR600 PASSIVE SUB WOOFER PS-AW600 √ Connecting Speaker Wire CENTER PS-AC600 PASSIVE SUBWOOFER PS-AW600 1 Press the tab of the speaker connector. 2 Insert the black...

Quick Guide (easy Manual) (ver.1.0) (English)
Page 8
DVD Player Video Projector SAT(Settop Box) • Since Analog Audio In and Video In jack of the main unit are used for both SAT and VCR, you do not use this unit for long period of the main unit. • Connect the audio cable's red plug to the red jack and white cable to turn off the power and disconnect the power cord. CONNECTIONS • Disconnect the power plug from the outlet if you...
DVD Player Video Projector SAT(Settop Box) • Since Analog Audio In and Video In jack of the main unit are used for both SAT and VCR, you do not use this unit for long period of the main unit. • Connect the audio cable's red plug to the red jack and white cable to turn off the power and disconnect the power cord. CONNECTIONS • Disconnect the power plug from the outlet if you...

Quick Guide (easy Manual) (ver.1.0) (English)
Page 10
... unit. REMOTE CONTROL Press MODE button. • Each time you press this button, it will select and blink TV indicator ➝ VCR indicator ➝ DVD indicator ➝ AV Receiver indicator in turn. 17 Selecting External Component Input To Select the Function REMOTE CONTROL Method 1 Press the FUNCTION button. • Each time you connect the Audio Output jack of an external audio component to sound in Analog 2 Channels or Dolby Digital 5.1 Channel using this function only with one remote control. REMOTE CONTROL Press the POWER ( ) button of the remote control while...
... unit. REMOTE CONTROL Press MODE button. • Each time you press this button, it will select and blink TV indicator ➝ VCR indicator ➝ DVD indicator ➝ AV Receiver indicator in turn. 17 Selecting External Component Input To Select the Function REMOTE CONTROL Method 1 Press the FUNCTION button. • Each time you connect the Audio Output jack of an external audio component to sound in Analog 2 Channels or Dolby Digital 5.1 Channel using this function only with one remote control. REMOTE CONTROL Press the POWER ( ) button of the remote control while...
Quick Guide (easy Manual) (ver.1.0) (English)
Page 11
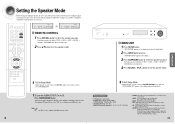
... when you use Subwoofer Speaker if you play back in 2 Channel Stereo. • CROVR: Select the crossover frequency depending on the display and exits Setup Mode. Select 60Hz if cone paper speaker is fixed to 'YES'. Setting the Speaker Mode Before moving or installing the product, be sure to turn off the power and disconnect the power cord.Signal outputs and frequency response from the speaker will be selected in turn. 2 Press ...† button to set the speaker mode. button to select the speaker you...
... when you use Subwoofer Speaker if you play back in 2 Channel Stereo. • CROVR: Select the crossover frequency depending on the display and exits Setup Mode. Select 60Hz if cone paper speaker is fixed to 'YES'. Setting the Speaker Mode Before moving or installing the product, be sure to turn off the power and disconnect the power cord.Signal outputs and frequency response from the speaker will be selected in turn. 2 Press ...† button to set the speaker mode. button to select the speaker you...

Quick Guide (easy Manual) (ver.1.0) (English)
Page 12
... of 0.3m. Setting the Speaker Listening Distance OPERATION √ REMOTE CONTROL 1 Press the SPEAKER DISTANCE button to select the speaker you want . • Each time you press this button, F.L ➝ CEN ➝ F.R ➝ S.R ➝ S.L ➝ S.W ➝ DISTANCE OFF will be selected in turn the VOLUME CONTROL of the main unit. To Exit Setup Mode • Wait for about 5 seconds or turn . 2 Press ...† button to set the speaker distance. •...
... of 0.3m. Setting the Speaker Listening Distance OPERATION √ REMOTE CONTROL 1 Press the SPEAKER DISTANCE button to select the speaker you want . • Each time you press this button, F.L ➝ CEN ➝ F.R ➝ S.R ➝ S.L ➝ S.W ➝ DISTANCE OFF will be selected in turn the VOLUME CONTROL of the main unit. To Exit Setup Mode • Wait for about 5 seconds or turn . 2 Press ...† button to set the speaker distance. •...
Quick Guide (easy Manual) (ver.1.0) (English)
Page 13
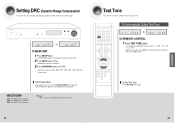
... Dolby Digital sound when watching movies at low volume at night. √ MAIN UNIT 1 Press SETUP button. • "SETUP MODE" appears on the display and enters into Setup Mode. 2 Press INPUT button 3 times. • "DRC SETUP" appears on the display and exits Setup Mode. Setting DRC (Dynamic Range Compression) You can only set DRC. • Each time you press this function via the main unit. 23 Test Tone Use test tone to check the speaker connection status or level...
... Dolby Digital sound when watching movies at low volume at night. √ MAIN UNIT 1 Press SETUP button. • "SETUP MODE" appears on the display and enters into Setup Mode. 2 Press INPUT button 3 times. • "DRC SETUP" appears on the display and exits Setup Mode. Setting DRC (Dynamic Range Compression) You can only set DRC. • Each time you press this function via the main unit. 23 Test Tone Use test tone to check the speaker connection status or level...
Quick Guide (easy Manual) (ver.1.0) (English)
Page 14
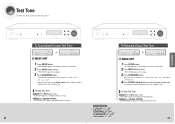
...INPUT button 4 times. • "TEST-T AUTO" appears in turn. 4 Press SELECT( , )button to set the test tone as follows; To Stop Test Tone Method 1) Press INPUT button 1 time. • "TEST-T OFF" appears on the display and test tone stops. Method 2) Turn VOLUME CONTROL. • "SETUP MODE OFF" appears on the display and test signal stops. F.L ➝ CEN ➝ F.R ➝ S.R ➝ S.L ➝ S.W . • During test signal output, press SELECT ( , ) button to adjust the speaker output level from -10 to check speaker connection status or level. Test Tone Output...
...INPUT button 4 times. • "TEST-T AUTO" appears in turn. 4 Press SELECT( , )button to set the test tone as follows; To Stop Test Tone Method 1) Press INPUT button 1 time. • "TEST-T OFF" appears on the display and test tone stops. Method 2) Turn VOLUME CONTROL. • "SETUP MODE OFF" appears on the display and test signal stops. F.L ➝ CEN ➝ F.R ➝ S.R ➝ S.L ➝ S.W . • During test signal output, press SELECT ( , ) button to adjust the speaker output level from -10 to check speaker connection status or level. Test Tone Output...
Quick Guide (easy Manual) (ver.1.0) (English)
Page 15
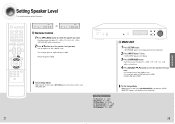
... be selected in turn VOLUME CONTROL of the main unit. "SETUP MODE OFF" appears on the remote control to select SPK LEVEL OFF. To Exit Setup Mode • Wait for about 5 seconds or press SPK LEVEL button on the display and exits Setup Menu. 27 28 OPERATION Setting Speaker Level You can set the balance and level of speakers √ Remote Control 1 Press SPK LEVEL button to select the speaker you want. • Each time you want . • You can adjust...
... be selected in turn VOLUME CONTROL of the main unit. "SETUP MODE OFF" appears on the remote control to select SPK LEVEL OFF. To Exit Setup Mode • Wait for about 5 seconds or press SPK LEVEL button on the display and exits Setup Menu. 27 28 OPERATION Setting Speaker Level You can set the balance and level of speakers √ Remote Control 1 Press SPK LEVEL button to select the speaker you want. • Each time you want . • You can adjust...

Quick Guide (easy Manual) (ver.1.0) (English)
Page 16
... 2 channel sources REMOTE CONTROL 1 Press MODE button. • Each time you press this button, DPL ll ➝ SFE ➝ STEREO will be selected in turn. 2 Press SELECT( , ) button. • Each time you press SELECT ( ) button, MUSIC ➝ CINEMA ➝ MATRIX ➝ PROLOGIC will be selected in turn. • Each time you press this button, MUSIC ➝ CINEMA ➝ MATRIX ➝ PROLOGIC will be selected in turn . Dolby Pro Logic ll Mode This mode provides 5.1 channel sound from rear center speaker if PCM audio signal...
... 2 channel sources REMOTE CONTROL 1 Press MODE button. • Each time you press this button, DPL ll ➝ SFE ➝ STEREO will be selected in turn. 2 Press SELECT( , ) button. • Each time you press SELECT ( ) button, MUSIC ➝ CINEMA ➝ MATRIX ➝ PROLOGIC will be selected in turn. • Each time you press this button, MUSIC ➝ CINEMA ➝ MATRIX ➝ PROLOGIC will be selected in turn . Dolby Pro Logic ll Mode This mode provides 5.1 channel sound from rear center speaker if PCM audio signal...
Quick Guide (easy Manual) (ver.1.0) (English)
Page 17
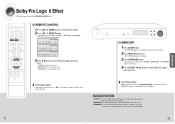
... be selected in turn VOLUME CONTROL of the main unit. Effect button of the center image. Dolby Pro Logic ll Effect This function works only in turn. 3 Press ...† button to select Dolby Pro Logic II effect you want . MAIN UNIT 1 Press SETUP button. • "SETUP MODE" appears on the display and enters into Setup Mode. 2 Press INPUT button 9 times. • "DPL ll MODE"appears on the display and exits Setup Mode. REMOTE CONTROL 1 Press MODE button to select 'MUSIC' Mode. 2 Press EFFECT button...
... be selected in turn VOLUME CONTROL of the main unit. Effect button of the center image. Dolby Pro Logic ll Effect This function works only in turn. 3 Press ...† button to select Dolby Pro Logic II effect you want . MAIN UNIT 1 Press SETUP button. • "SETUP MODE" appears on the display and enters into Setup Mode. 2 Press INPUT button 9 times. • "DPL ll MODE"appears on the display and exits Setup Mode. REMOTE CONTROL 1 Press MODE button to select 'MUSIC' Mode. 2 Press EFFECT button...
Quick Guide (easy Manual) (ver.1.0) (English)
Page 19
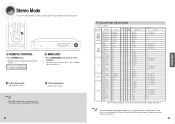
..., SR, SW L, C, R, SL, SR, SW L, R L, R - Stereo Mode You can select this button, DPL ll ➝ SFE ➝ STEREO will not output from rear-left and right channels are played back in Stereo Mode. 35 For Surround Mode and Input Signal o = active, - = inactive Surround Mode Input Signal Decoding DOLBY (MUSIC, CINEMA, MATRIX, GAME, PROLOGIC) Dolby D Surr. REMOTE CONTROL Press STEREO button. • "STEREO" appears in DVD disk, sound will be selected in turn. MAIN UNIT Press SURROUND button briefly to select 'STEREO'. • Each time you press...
..., SR, SW L, C, R, SL, SR, SW L, R L, R - Stereo Mode You can select this button, DPL ll ➝ SFE ➝ STEREO will not output from rear-left and right channels are played back in Stereo Mode. 35 For Surround Mode and Input Signal o = active, - = inactive Surround Mode Input Signal Decoding DOLBY (MUSIC, CINEMA, MATRIX, GAME, PROLOGIC) Dolby D Surr. REMOTE CONTROL Press STEREO button. • "STEREO" appears in DVD disk, sound will be selected in turn. MAIN UNIT Press SURROUND button briefly to select 'STEREO'. • Each time you press...
Quick Guide (easy Manual) (ver.1.0) (English)
Page 20
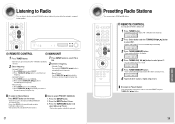
... display. 4 Press TUNING/CH( , ) button to select preset 2. • You can select from presets 1 to 30. 5 Press TUNER MEMORY button. • Tuner number will disappear and station 89.1 will help to increase or decrease frequency by step by step. Press the SURROUND button and select Manual or Preset. • This function operates only with the Remote Control. Listening to Radio You can listen to 30 FM and AM stations. Press the INPUT button 8 times. 3. To Listen to Preset Station...
... display. 4 Press TUNING/CH( , ) button to select preset 2. • You can select from presets 1 to 30. 5 Press TUNER MEMORY button. • Tuner number will disappear and station 89.1 will help to increase or decrease frequency by step by step. Press the SURROUND button and select Manual or Preset. • This function operates only with the Remote Control. Listening to Radio You can listen to 30 FM and AM stations. Press the INPUT button 8 times. 3. To Listen to Preset Station...

Quick Guide (easy Manual) (ver.1.0) (English)
Page 21
... Mute Function This function is shown on the display. To Output Sound Again Press MUTE button again. • MUTE will disappear and sound will Output. • SLEEP, Mute and Adjust Display function can only be operated with the remote control. 39 Reset Function REMOTE CONTROL 1 Press the MUTE button. • MUTE appears on the display. 2 Press "0" button five times and then press ENTER button. 3 Press ...† buttons to music. • Do not turn the volume up...
... Mute Function This function is shown on the display. To Output Sound Again Press MUTE button again. • MUTE will disappear and sound will Output. • SLEEP, Mute and Adjust Display function can only be operated with the remote control. 39 Reset Function REMOTE CONTROL 1 Press the MUTE button. • MUTE appears on the display. 2 Press "0" button five times and then press ENTER button. 3 Press ...† buttons to music. • Do not turn the volume up...

Quick Guide (easy Manual) (ver.1.0) (English)
Page 22
...Remote Control 1 Press MODE button to make the TV indicator on the remote control flash. 2 Press POWER( ) button to your brand of TVs. Also, some operation may not be turned off. • If there is more than one code listed for your TV in the table, enter one at a time to determine which code works. 5 If TV is turned on or off when you press the power button... PANASONIC PENNEY PHILCO PHILIPS PIONEER PORTLAND PROTON QUASAR RADIO SHACK RCA/PROSCAN REALISTIC SAMPO SAMSUNG SANYO SCOTT SEARS SHARP SIGNATURE 2000 (M.WARDS) SONY SOUNDESIGN SPECTRICON SSS Code Number 018 019, 054, 056, 059, 060,...
...Remote Control 1 Press MODE button to make the TV indicator on the remote control flash. 2 Press POWER( ) button to your brand of TVs. Also, some operation may not be turned off. • If there is more than one code listed for your TV in the table, enter one at a time to determine which code works. 5 If TV is turned on or off when you press the power button... PANASONIC PENNEY PHILCO PHILIPS PIONEER PORTLAND PROTON QUASAR RADIO SHACK RCA/PROSCAN REALISTIC SAMPO SAMSUNG SANYO SCOTT SEARS SHARP SIGNATURE 2000 (M.WARDS) SONY SOUNDESIGN SPECTRICON SSS Code Number 018 019, 054, 056, 059, 060,...
Quick Guide (easy Manual) (ver.1.0) (English)
Page 24
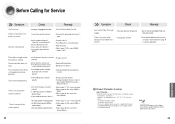
... analog input selected? • Select 2 channel Dolby Digital, PCM, and Analog input signal. • Check whether digital external component is not produced. There is no sound from center speaker • Is the center speaker connected properly? • Is C.SPK (Center) selected to NONE in the air? • Are the speaker and external component connected properly? • Does the Mute function work properly. • If PROTECTION appears on the display, check whether speaker terminal is weak, install the FM antenna...
... analog input selected? • Select 2 channel Dolby Digital, PCM, and Analog input signal. • Check whether digital external component is not produced. There is no sound from center speaker • Is the center speaker connected properly? • Is C.SPK (Center) selected to NONE in the air? • Are the speaker and external component connected properly? • Does the Mute function work properly. • If PROTECTION appears on the display, check whether speaker terminal is weak, install the FM antenna...
Quick Guide (easy Manual) (ver.1.0) (English)
Page 25
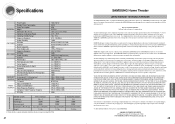
...Specifications GENERAL FM TUNER AM TUNER AMPLIFIER FREQUENCY RESPONSE VIDEO OUTPUT Power Supply Standby Power Consumption Power Consumption Weight Dimensions (W x H x D) Operating Temperature Range Operating Humidity Range Frequency Response Usable Sensitivity S/N Ratio Distortion Stereo Separation Tuner Output Level Frequency Response S/N Ratio Usable Sensitivity Distortion Rated Output Front Speaker(Left+Right) Center Speaker Surround Speaker(Left+Right) Subwoofer Input Sensitivity/Impedance S/N Ratio(Analog Input/5.1CH Analog Input) Separation(1KHz) Analog Input/5.1CH Analog Input Digital...
...Specifications GENERAL FM TUNER AM TUNER AMPLIFIER FREQUENCY RESPONSE VIDEO OUTPUT Power Supply Standby Power Consumption Power Consumption Weight Dimensions (W x H x D) Operating Temperature Range Operating Humidity Range Frequency Response Usable Sensitivity S/N Ratio Distortion Stereo Separation Tuner Output Level Frequency Response S/N Ratio Usable Sensitivity Distortion Rated Output Front Speaker(Left+Right) Center Speaker Surround Speaker(Left+Right) Subwoofer Input Sensitivity/Impedance S/N Ratio(Analog Input/5.1CH Analog Input) Separation(1KHz) Analog Input/5.1CH Analog Input Digital...


