
Open Source Guide (ENGLISH)
Page 1
... a work based on the Program) on a medium customarily used to time. You may copy and distribute the Program (or a work as a consequence of a court judgment or allegation of patent infringement or for all the rights that users may at least the "copyright" line and a pointer to copy, distribute and/or modify the software. However, as a special exception, the source code distributed need to...
... a work based on the Program) on a medium customarily used to time. You may copy and distribute the Program (or a work as a consequence of a court judgment or allegation of patent infringement or for all the rights that users may at least the "copyright" line and a pointer to copy, distribute and/or modify the software. However, as a special exception, the source code distributed need to...

Open Source Guide (ENGLISH)
Page 2
...pointer to where the full notice is safest to attach them to the start of each source file to most effectively convey the exclusion of the greatest possible use to the public, we recommend making it free software that everyone can do so by permitting redistribution under these terms, attach the following notices to... OPERATE WITH ANY OTHER SOFTWARE), EVEN IF SUCH HOLDER OR OTHER PARTY HAS BEEN ADVISED OF THE POSSIBILITY OF SUCH DAMAGES. How to Apply These Terms to Your New Libraries If you develop a new library, and you want it to the library. You can redistribute and change. 16. It is...
...pointer to where the full notice is safest to attach them to the start of each source file to most effectively convey the exclusion of the greatest possible use to the public, we recommend making it free software that everyone can do so by permitting redistribution under these terms, attach the following notices to... OPERATE WITH ANY OTHER SOFTWARE), EVEN IF SUCH HOLDER OR OTHER PARTY HAS BEEN ADVISED OF THE POSSIBILITY OF SUCH DAMAGES. How to Apply These Terms to Your New Libraries If you develop a new library, and you want it to the library. You can redistribute and change. 16. It is...
User Manual (ENGLISH)
Page 4
... Menu Language 47 Using the Game Mode 47 Viewing Closed Captions (On-Screen Text Messages) - Analog 34 Automatic Volume Control 34 Selecting the Internal Mute 35 Setting the On/Off Melody 35 Listening to the Sound of Features 5 Accessories 5 Viewing the Control Panel 6 Viewing the Connection Panel 7 Remote Control 8 Installing Batteries in the Remote Control 9 CONNECTIONS Connecting VHF and UHF Antennas 9 Connecting Cable TV 10 Connecting a VCR 11 Connecting an S-VHS VCR 11 Connecting a Camcorder 12 Connecting a DVD Player/Set-Top Box 12 Connecting a DVD Player/Set-Top Box...
... Menu Language 47 Using the Game Mode 47 Viewing Closed Captions (On-Screen Text Messages) - Analog 34 Automatic Volume Control 34 Selecting the Internal Mute 35 Setting the On/Off Melody 35 Listening to the Sound of Features 5 Accessories 5 Viewing the Control Panel 6 Viewing the Connection Panel 7 Remote Control 8 Installing Batteries in the Remote Control 9 CONNECTIONS Connecting VHF and UHF Antennas 9 Connecting Cable TV 10 Connecting a VCR 11 Connecting an S-VHS VCR 11 Connecting a Camcorder 12 Connecting a DVD Player/Set-Top Box 12 Connecting a DVD Player/Set-Top Box...

User Manual (ENGLISH)
Page 5
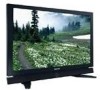
... available at most DVD players, Set-top boxes, Cable Boxes and VCRs. Remote Control (BN59-00511A) / AAA Batteries (4301-000103) Power Cord (3903-000144) Owner's Instructions / Quick Setup Guide Warranty Card / Registration Card / Safety Guide Manual (Not available in the TV's memory. Automatic timer to operate the TV as well as most electronics stores. SRS TruSurround XT - General Information List of Features Adjustable picture settings that can be stored in all locations) Ferrite Core for Power Cord (3301-001110) Ferrite...
... available at most DVD players, Set-top boxes, Cable Boxes and VCRs. Remote Control (BN59-00511A) / AAA Batteries (4301-000103) Power Cord (3903-000144) Owner's Instructions / Quick Setup Guide Warranty Card / Registration Card / Safety Guide Manual (Not available in the TV's memory. Automatic timer to operate the TV as well as most electronics stores. SRS TruSurround XT - General Information List of Features Adjustable picture settings that can be stored in all locations) Ferrite Core for Power Cord (3301-001110) Ferrite...

User Manual (ENGLISH)
Page 6
... and lights up in stand-by mode. To use the more advanced features, you would use the + VOL - In the on-screen menu, use the CH buttons as you would use the remote control. Œ SOURCE Toggles between all the available input sources (TV, AV1, AV2, S-Video1, S-Video2, Component1, Component2, PC, HDMI1, or HDMI2). ´ MENU Press to increase or decrease the volume. Viewing the Control Panel Buttons on the Lower-Right Part...
... and lights up in stand-by mode. To use the more advanced features, you would use the + VOL - In the on-screen menu, use the CH buttons as you would use the remote control. Œ SOURCE Toggles between all the available input sources (TV, AV1, AV2, S-Video1, S-Video2, Component1, Component2, PC, HDMI1, or HDMI2). ´ MENU Press to increase or decrease the volume. Viewing the Control Panel Buttons on the Lower-Right Part...

User Manual (ENGLISH)
Page 7
... audio inputs on connecting equipment, see pages 9-14. Œ POWER IN Connect the supplied power cord. HDMI output. ˝ SERVICE 1/SERVICE 2 ˇ HDMI 1/DVI IN These jacks are for external devices, such as VCR or DVD players. Connect to the DVI audio output jack of headphones to your television if you to receive left side panel jacks to watch a television program without disturbing other people in the room. this connection. VIDEO (AV IN 1) When using an optional HDMI/DVI adapter, the DVI Video input...
... audio inputs on connecting equipment, see pages 9-14. Œ POWER IN Connect the supplied power cord. HDMI output. ˝ SERVICE 1/SERVICE 2 ˇ HDMI 1/DVI IN These jacks are for external devices, such as VCR or DVD players. Connect to the DVI audio output jack of headphones to your television if you to receive left side panel jacks to watch a television program without disturbing other people in the room. this connection. VIDEO (AV IN 1) When using an optional HDMI/DVI adapter, the DVI Video input...
User Manual (ENGLISH)
Page 8
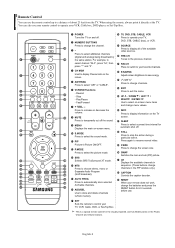
... cut off the sound. ' MENU Displays the main on the TV screen. - Press to display information on -screen menu. ˝ S.MODE Press to select the sound mode. Ô PIP Picture-in the PIP window only.) ¥ CAPTION Controls the caption decoder. ≥ RESET When your TV, VCR, Cable, DVD, or Set-Top Box. ➢ This is a special remote control for 2-3 seconds before use. ˜ SET Sets the remote to choose stereo, mono or Separate Audio Program (SAP broadcast). Æ AUTO PROG. Fast...
... cut off the sound. ' MENU Displays the main on the TV screen. - Press to display information on -screen menu. ˝ S.MODE Press to select the sound mode. Ô PIP Picture-in the PIP window only.) ¥ CAPTION Controls the caption decoder. ≥ RESET When your TV, VCR, Cable, DVD, or Set-Top Box. ➢ This is a special remote control for 2-3 seconds before use. ˜ SET Sets the remote to choose stereo, mono or Separate Audio Program (SAP broadcast). Æ AUTO PROG. Fast...
User Manual (ENGLISH)
Page 12
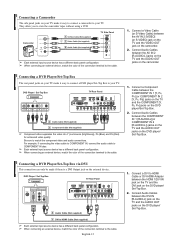
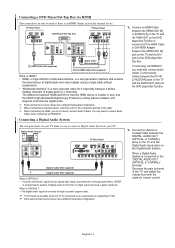
... view the camcorder tapes without using a VCR Camcorder 1 S-Video Cable (Not supplied) or 1 Video Cable (Not supplied) 2 Audio Cable (Not supplied) TV Side Panel ➢ Each external input source device has a different back panel configuration. ➢ When connecting an external device, match the color of the connection terminal to the cable. 1. Connect a DVI to HDMI Cable or DVI-HDMI Adapter between the DVI IN [R-AUDIO-L] jack on the TV and the AUDIO OUT jacks on the DVD player/ Set-Top Box. DVD Player / Set-Top Box TV Rear Panel 2 Audio Cable (Not supplied) 1 Component...
... view the camcorder tapes without using a VCR Camcorder 1 S-Video Cable (Not supplied) or 1 Video Cable (Not supplied) 2 Audio Cable (Not supplied) TV Side Panel ➢ Each external input source device has a different back panel configuration. ➢ When connecting an external device, match the color of the connection terminal to the cable. 1. Connect a DVI to HDMI Cable or DVI-HDMI Adapter between the DVI IN [R-AUDIO-L] jack on the TV and the AUDIO OUT jacks on the DVD player/ Set-Top Box. DVD Player / Set-Top Box TV Rear Panel 2 Audio Cable (Not supplied) 1 Component...
User Manual (ENGLISH)
Page 13
...the color of digital audio (5.1 channels). What is COAXIAL:? • The digital audio signal is connected to connect Audio Cables. Connecting a Digital Audio System 1. When a Digital Audio System is received through glass fibers. English-13 You only need to the "DIGITAL AUDIO OUT (OPTICAL or COAXIAL)" terminal: Decrease the gain (volume) of a light wave that uses a glass conductor. The rear panel jacks on your TV. TV Rear Panel TV Rear Panel DVD Player/Set-Top Box 1 HDMI Cable (Not supplied) Audio Cable (Not supplied) DVI to the cable. ➢ When connecting via HDMI...
...the color of digital audio (5.1 channels). What is COAXIAL:? • The digital audio signal is connected to connect Audio Cables. Connecting a Digital Audio System 1. When a Digital Audio System is received through glass fibers. English-13 You only need to the "DIGITAL AUDIO OUT (OPTICAL or COAXIAL)" terminal: Decrease the gain (volume) of a light wave that uses a glass conductor. The rear panel jacks on your TV. TV Rear Panel TV Rear Panel DVD Player/Set-Top Box 1 HDMI Cable (Not supplied) Audio Cable (Not supplied) DVI to the cable. ➢ When connecting via HDMI...

User Manual (ENGLISH)
Page 14
... be adjusted. English-14 Connect a PC Audio Cable between the AUDIO OUT [R-AUDIO-L] on the TV and AUDIO IN [R-AUDIO-L] on the Amplifier/DVD Home Theater. Connect Audio Cables between PC IN [AUDIO] jack on the TV and the Audio Out jack of the sound card on your computer. Connecting a PC PC TV Rear Panel 2 PC Audio Cable (Not supplied) 1 D-Sub Cable (Not supplied) ➢ Each external input source device has a different back panel configuration. ➢ When connecting an external device, match the color...
... be adjusted. English-14 Connect a PC Audio Cable between the AUDIO OUT [R-AUDIO-L] on the TV and AUDIO IN [R-AUDIO-L] on the Amplifier/DVD Home Theater. Connect Audio Cables between PC IN [AUDIO] jack on the TV and the Audio Out jack of the sound card on your computer. Connecting a PC PC TV Rear Panel 2 PC Audio Cable (Not supplied) 1 D-Sub Cable (Not supplied) ➢ Each external input source device has a different back panel configuration. ➢ When connecting an external device, match the color...
User Manual (ENGLISH)
Page 15
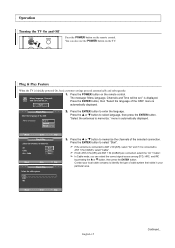
... ... i Menu language, Channels and Time will be set ." is Start automatically displayed. or † button to memorize. Move Enter Skip Plug & Play Select the antennas to select language, then press the ENTER button. Air Start Cable Start Air + Cable Start Move Enter Skip Plug & Play Select the cable system. Move Enter Skip English-15 Continued... Operation Turning the TV On and Off Press the POWER button on the remote control. You...
... ... i Menu language, Channels and Time will be set ." is Start automatically displayed. or † button to memorize. Move Enter Skip Plug & Play Select the antennas to select language, then press the ENTER button. Air Start Cable Start Air + Cable Start Move Enter Skip Plug & Play Select the cable system. Move Enter Skip English-15 Continued... Operation Turning the TV On and Off Press the POWER button on the remote control. You...
User Manual (ENGLISH)
Page 28
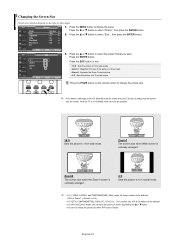
... † button to display the menu. Press the MENU button to select "Size", then press the ENTER button. Zoom1 The screen size when Wide screen is set to Double. Press the ... Changing the Screen Size Screen size selection depends on the screen. • Zoom2 : Expands the Zoom1 format picture. • 4:3 : Sets the picture to 4:3 normal mode. or † button to select the screen format you can move the picture on the remote control to change the picture size when PIP is vertically enlarged.
... † button to display the menu. Press the MENU button to select "Size", then press the ENTER button. Zoom1 The screen size when Wide screen is set to Double. Press the ... Changing the Screen Size Screen size selection depends on the screen. • Zoom2 : Expands the Zoom1 format picture. • 4:3 : Sets the picture to 4:3 normal mode. or † button to select the screen format you can move the picture on the remote control to change the picture size when PIP is vertically enlarged.
User Manual (ENGLISH)
Page 41
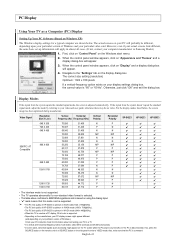
...; The interlace mode is not supported. • The TV operates abnormally if a non-standard video format is selected. • The table above conforms to IBM/VESA regulations and is based on using the Analog Input. • "✔" mark means that the PC is connected. When the control panel window appears, click on "Appearance and Themes" and a display dialog-box will appear. 4. The correct size setting (resolution) Optimum: 1024...
...; The interlace mode is not supported. • The TV operates abnormally if a non-standard video format is selected. • The table above conforms to IBM/VESA regulations and is based on using the Analog Input. • "✔" mark means that the PC is connected. When the control panel window appears, click on "Appearance and Themes" and a display dialog-box will appear. 4. The correct size setting (resolution) Optimum: 1024...

User Manual (ENGLISH)
Page 44
... pressing the Move Adjust Return number buttons on the remote control. Press the EXIT button to select "Clock Mode". Move Enter Return TV Clock 4. or "am /pm ➢ The current time will appear every time you press the INFO button. -- -- -- ➢ You can check the time while watching the TV. (Just press the INFO button.) Option 1: Setting the Clock Manually TV Plug & Play Language Time Game Mode V-Chip Caption † More Setup √ : English...
... pressing the Move Adjust Return number buttons on the remote control. Press the EXIT button to select "Clock Mode". Move Enter Return TV Clock 4. or "am /pm ➢ The current time will appear every time you press the INFO button. -- -- -- ➢ You can check the time while watching the TV. (Just press the INFO button.) Option 1: Setting the Clock Manually TV Plug & Play Language Time Game Mode V-Chip Caption † More Setup √ : English...
User Manual (ENGLISH)
Page 47
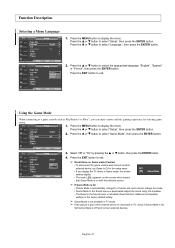
... ... Adjust the sound using the equalizer. • The Reset in the Sound menu is On. Move Enter Return Using the Game Mode When connecting to Custom and users cannot change the mode. • Sound Mode in the Sound menu is on the screen which means that Game Mode is activated. Press the ... Plug & Play Language Time Game Mode V-Chip Caption † More Move : English : OOfff On Enter Return 4. Move Enter Return TV Plug & Play Language Time Game Mode V-Chip Caption † More Setup : EEnngglilsishh...
... ... Adjust the sound using the equalizer. • The Reset in the Sound menu is On. Move Enter Return Using the Game Mode When connecting to Custom and users cannot change the mode. • Sound Mode in the Sound menu is on the screen which means that Game Mode is activated. Press the ... Plug & Play Language Time Game Mode V-Chip Caption † More Move : English : OOfff On Enter Return 4. Move Enter Return TV Plug & Play Language Time Game Mode V-Chip Caption † More Setup : EEnngglilsishh...

User Manual (ENGLISH)
Page 48
... † button to select the desired caption option, then press the TV Caption ENTER button. You can change the background color of "Default", "White", "Black", "Red", "Green", "Blue", "Yellow", "Magenta", and "Cyan". Press the MENU button to select "Caption", then press the ENTER button. 3. Press the ... or † button to display the menu. Move Enter Return TV Caption Caption Caption Mode Caption Options : On √ : Default √ √ Move Enter Return TV Caption 5. or † button to select submenu (Default, Service1...
... † button to select the desired caption option, then press the TV Caption ENTER button. You can change the background color of "Default", "White", "Black", "Red", "Green", "Blue", "Yellow", "Magenta", and "Cyan". Press the MENU button to select "Caption", then press the ENTER button. 3. Press the ... or † button to display the menu. Move Enter Return TV Caption Caption Caption Mode Caption Options : On √ : Default √ √ Move Enter Return TV Caption 5. or † button to select submenu (Default, Service1...

User Manual (ENGLISH)
Page 49
... on the remote control to augment information carried in either analog TV channel mode or external signal mode. (Depending on the broadcasting signal, the Analog Caption function may be various non-program related data. • Text2: Second Text Service. Similar to select "Setup", then press the ENTER button. 2. Press the ... Caption Caption Mode Caption Options : ODnefault : DCCeCCf12ault CC3 CC4 Press the ... This channel carries data that must be used only...
... on the remote control to augment information carried in either analog TV channel mode or external signal mode. (Depending on the broadcasting signal, the Analog Caption function may be various non-program related data. • Text2: Second Text Service. Similar to select "Setup", then press the ENTER button. 2. Press the ... Caption Caption Mode Caption Options : ODnefault : DCCeCCf12ault CC3 CC4 Press the ... This channel carries data that must be used only...
User Manual (ENGLISH)
Page 59
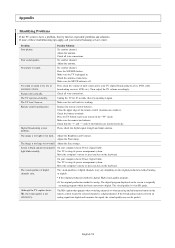
... is using its power management system. Try another channel. Power, Signal Cable. Adjust the antenna. Appendix Identifying Problems If the TV seems to your TV (digital broadcasting receiver, DVD, cable broadcasting receiver, VCR, etc.). Make sure the remote has batteries. Check all wire connections. The TV is originally an analog program which has been converted to put your remote in . The TV won't turn on the keyboard. Adjust the antenna. The visual qualities of the remote control...
... is using its power management system. Try another channel. Power, Signal Cable. Adjust the antenna. Appendix Identifying Problems If the TV seems to your TV (digital broadcasting receiver, DVD, cable broadcasting receiver, VCR, etc.). Make sure the remote has batteries. Check all wire connections. The TV is originally an analog program which has been converted to put your remote in . The TV won't turn on the keyboard. Adjust the antenna. The visual qualities of the remote control...

User Manual (ENGLISH)
Page 60
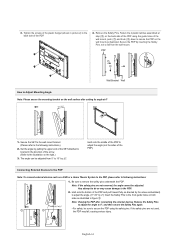
... sold separately. Wall Installation Instructions Refer to the installation guide supplied with your dealer.) Please use only the parts and components provided for wall mount installation. 1 Wall Mount Bracket Left : 1 Right : 1 ASSY-HINGE Plastic Hanger : 4 Screw : 4 Accessories How to assemble the Wall Mount Bracket 1. The product may vary depending on plaster or wood. 4. Parts (Wall attachment panel is for installing on the wall mount bracket. • Please avoid catching your fingers while installing and adjusting the angle...
... sold separately. Wall Installation Instructions Refer to the installation guide supplied with your dealer.) Please use only the parts and components provided for wall mount installation. 1 Wall Mount Bracket Left : 1 Right : 1 ASSY-HINGE Plastic Hanger : 4 Screw : 4 Accessories How to assemble the Wall Mount Bracket 1. The product may vary depending on plaster or wood. 4. Parts (Wall attachment panel is for installing on the wall mount bracket. • Please avoid catching your fingers while installing and adjusting the angle...
User Manual (ENGLISH)
Page 61
... secure the PDP using the safety pins. PDP Wall Bracket Wall How to Adjust Mounting Angle Note: Please secure the mounting bracket on the back side of the PDP using the guide holes of the arrow. (Refer to the PDP Note: To connect external devices such as illustrated. Note: Viewing the PDP after setting its angle at step (#) on the wall surface after connecting the external devices Remove the Safety Pins to adjust the...
... secure the PDP using the safety pins. PDP Wall Bracket Wall How to Adjust Mounting Angle Note: Please secure the mounting bracket on the back side of the PDP using the guide holes of the arrow. (Refer to the PDP Note: To connect external devices such as illustrated. Note: Viewing the PDP after setting its angle at step (#) on the wall surface after connecting the external devices Remove the Safety Pins to adjust the...


