
Owner Instructions
Page 21
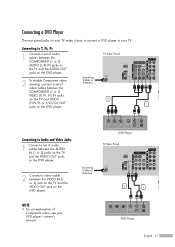
... the AUDIO OUT jacks on the DVD player. Connecting to your DVD player's owner's manual. TV Rear Panel 2 To enable Component video viewing, connect a set of Component video, see your TV. DVD Player English - 21 DVD Player TV Rear Panel Incoming Cable or Antenna 2 1 NOTE • For an explanation of audio cables between the Incoming Cable...
... the AUDIO OUT jacks on the DVD player. Connecting to your DVD player's owner's manual. TV Rear Panel 2 To enable Component video viewing, connect a set of Component video, see your TV. DVD Player English - 21 DVD Player TV Rear Panel Incoming Cable or Antenna 2 1 NOTE • For an explanation of audio cables between the Incoming Cable...

Owner Instructions
Page 22
...Connecting to DVI (Digital Visual Interface) 1 Connect a set of audio cables between the HDMI/DVI IN jack on the TV and the DVI OUT jack on the Set-Top Box. DTV Set-Top Box TV Rear Panel 2 Connect an HDMI/DVI video cable between the COMPONENT (1 or 2) AUDIO (L, R) IN jacks on the...Connections Connecting a DTV Set-Top Box Connecting to select it in the TV menu's source list. English - 22 Incoming Cable or Antenna 2 1 DTV Set-Top Box NOTES • For an explanation of Component video, see your Set-Top Box owner's manual. • Requires a Cable Converter. • Make sure the ...
...Connecting to DVI (Digital Visual Interface) 1 Connect a set of audio cables between the HDMI/DVI IN jack on the TV and the DVI OUT jack on the Set-Top Box. DTV Set-Top Box TV Rear Panel 2 Connect an HDMI/DVI video cable between the COMPONENT (1 or 2) AUDIO (L, R) IN jacks on the...Connections Connecting a DTV Set-Top Box Connecting to select it in the TV menu's source list. English - 22 Incoming Cable or Antenna 2 1 DTV Set-Top Box NOTES • For an explanation of Component video, see your Set-Top Box owner's manual. • Requires a Cable Converter. • Make sure the ...
Owner Instructions
Page 24
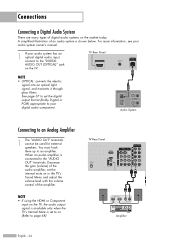
TV Rear Panel NOTE • OPTICAL: converts the electric signal into an optical light signal, and transmits it through glass fibers. You must hook them up to an Analog Amplifier 1 The "AUDIO OUT" terminals cannot be used for external speakers. For more information, see your audio system owner's manual. 1 ...has an optical digital audio input, connect to the "DIGITAL AUDIO OUT (OPTICAL)" jack on . (Refer to on the TV. See page 67 to set to page 68) TV Rear Panel Amplifier English - 24 NOTE • If using the HDMI or Component input on the market today. A simplified illustration...
TV Rear Panel NOTE • OPTICAL: converts the electric signal into an optical light signal, and transmits it through glass fibers. You must hook them up to an Analog Amplifier 1 The "AUDIO OUT" terminals cannot be used for external speakers. For more information, see your audio system owner's manual. 1 ...has an optical digital audio input, connect to the "DIGITAL AUDIO OUT (OPTICAL)" jack on . (Refer to on the TV. See page 67 to set to page 68) TV Rear Panel Amplifier English - 24 NOTE • If using the HDMI or Component input on the market today. A simplified illustration...
Owner Instructions
Page 28
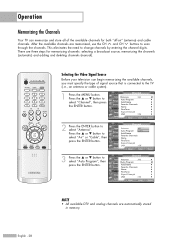
Selecting the Video Signal Source Before your television can memorize and store all of signal source that is connected to the TV (i.e., an antenna or cable system). 1 Press the MENU button. or † button to select "Antenna". There are memorized, use... Cable Add/Delete Favorite Channels Name Fine Tune Signal Strength LNA : Off Move Enter Return 3 Press the ... Operation Memorizing the Channels Your TV can begin memorizing the available channels, you must specify the type of the available channels for memorizing channels: selecting a broadcast source, memorizing the...
Selecting the Video Signal Source Before your television can memorize and store all of signal source that is connected to the TV (i.e., an antenna or cable system). 1 Press the MENU button. or † button to select "Antenna". There are memorized, use... Cable Add/Delete Favorite Channels Name Fine Tune Signal Strength LNA : Off Move Enter Return 3 Press the ... Operation Memorizing the Channels Your TV can begin memorizing the available channels, you must specify the type of the available channels for memorizing channels: selecting a broadcast source, memorizing the...
Owner Instructions
Page 34
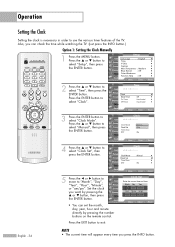
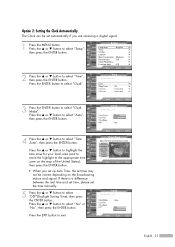
...or † button to use the various timer features of the TV. Input Picture Sound Channel Setup Guide • You can check the time while watching the TV. (Just press the INFO button.) Option 1: Setting the Clock Manually 1 Press the MENU button. English - 34 NOTE • ...8730; : Inactivated √ Setup Guide Move Enter Return 3 Press the ENTER button to select "Manual", then press the ENTER button. Clock Input Picture Sound Channel Setup Clock Mode Clock Set Time Zone DST : Manual : No Guide Move Enter Return 5 Press the œ or √ button to move ...
...or † button to use the various timer features of the TV. Input Picture Sound Channel Setup Guide • You can check the time while watching the TV. (Just press the INFO button.) Option 1: Setting the Clock Manually 1 Press the MENU button. English - 34 NOTE • ...8730; : Inactivated √ Setup Guide Move Enter Return 3 Press the ENTER button to select "Manual", then press the ENTER button. Clock Input Picture Sound Channel Setup Clock Mode Clock Set Time Zone DST : Manual : No Guide Move Enter Return 5 Press the œ or √ button to move ...
Owner Instructions
Page 35
... Sound Channel Setup Guide Time Zone Select the time zone where you set up Auto Time, the set time may not be set the time manually. 5 Press the ... If there is a difference between the real time and set time, please set automatically if you are receiving a digital signal. 1 Press the MENU...
... Sound Channel Setup Guide Time Zone Select the time zone where you set up Auto Time, the set time may not be set the time manually. 5 Press the ... If there is a difference between the real time and set time, please set automatically if you are receiving a digital signal. 1 Press the MENU...

Owner Instructions
Page 44
... Strength LNA : Off Move Enter Return 3 Press the œ or √ button to select "Fine Tune", then press the ENTER button. NOTE • Only analog TV channels can be fine tuned. 1 Press the MENU button. or † button to adjust the fine tuning. To reset the fine tuning setting, press the... - 44 or † button to exit. Cable 26 Fine Tune Not Fine Tuned 3 Adjust Reset Save Return 4 To store the fine tuning setting in the TV's memory, press the ENTER button. Channel Control Fine Tuning Analog Channels Analog Use fine tuning to...
... Strength LNA : Off Move Enter Return 3 Press the œ or √ button to select "Fine Tune", then press the ENTER button. NOTE • Only analog TV channels can be fine tuned. 1 Press the MENU button. or † button to adjust the fine tuning. To reset the fine tuning setting, press the... - 44 or † button to exit. Cable 26 Fine Tune Not Fine Tuned 3 Adjust Reset Save Return 4 To store the fine tuning setting in the TV's memory, press the ENTER button. Channel Control Fine Tuning Analog Channels Analog Use fine tuning to...

Owner Instructions
Page 67
...connecting an optical digital-audio component, you must specify the transmission format (Dolby or PCM, as appropriate to your TV. Sound Input Picture Sound Channel Setup Guide Mode : Custom √ Equalizer √ DNSe : Off √ ... Mute : Off Digital Output : DPoClbMy Digital Melody : POCnM Move Enter Return Manufactured under license from the rear-panel connector on your digital audio component). The digital sound output is an optical connector labeled "Optical Out".... button. English - 67 Press the ... See the owner's manual of Dolby Laboratories.
...connecting an optical digital-audio component, you must specify the transmission format (Dolby or PCM, as appropriate to your TV. Sound Input Picture Sound Channel Setup Guide Mode : Custom √ Equalizer √ DNSe : Off √ ... Mute : Off Digital Output : DPoClbMy Digital Melody : POCnM Move Enter Return Manufactured under license from the rear-panel connector on your digital audio component). The digital sound output is an optical connector labeled "Optical Out".... button. English - 67 Press the ... See the owner's manual of Dolby Laboratories.


