User Manual (ENGLISH)
Page 3
...Samsung 3351 Michelson Drive, Suite #290, Irvine, CA92612 USA Warning User must accept any service or repairs to this TV, ask the service technician to perform safety checks to determine that may result in additional damage to the unit. • Upon completion of the FCC Rules. Before making the connection...pinched by following two conditions: (1) This device may not cause harmful interference, and (2) This device must use shielded signal interface cables to maintain FCC compliance for additional suggestions. However, there is a detachable power supply cord with similar ...
...Samsung 3351 Michelson Drive, Suite #290, Irvine, CA92612 USA Warning User must accept any service or repairs to this TV, ask the service technician to perform safety checks to determine that may result in additional damage to the unit. • Upon completion of the FCC Rules. Before making the connection...pinched by following two conditions: (1) This device may not cause harmful interference, and (2) This device must use shielded signal interface cables to maintain FCC compliance for additional suggestions. However, there is a detachable power supply cord with similar ...
User Manual (ENGLISH)
Page 4
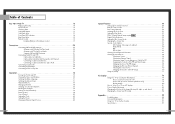
...Your New Wide TV 10 Replacing the Lamp 10 List of Features ...12 Checking Parts...12 Side Panel Buttons 13 Side Panel Jacks 13 Front Panel LED Indicators 14 Rear Panel Jacks 15 Remote Control ...16 Installing Batteries in the Remote Control 17 Connections ...20 Connecting VHF and UHF... Settings: Choosing a Soundtrack 61 Virtual Dolby 62 BBE ...63 Auto Volume 64 Setting The On/Off Melody 65 Viewing Closed Caption Information 66 Viewing Picture-in-Picture 67 Selecting a PIP Screen 67 Selecting an External Signal 68 Selecting a Signal Source (Antenna or Cable) for PIP 69 ...
...Your New Wide TV 10 Replacing the Lamp 10 List of Features ...12 Checking Parts...12 Side Panel Buttons 13 Side Panel Jacks 13 Front Panel LED Indicators 14 Rear Panel Jacks 15 Remote Control ...16 Installing Batteries in the Remote Control 17 Connections ...20 Connecting VHF and UHF... Settings: Choosing a Soundtrack 61 Virtual Dolby 62 BBE ...63 Auto Volume 64 Setting The On/Off Melody 65 Viewing Closed Caption Information 66 Viewing Picture-in-Picture 67 Selecting a PIP Screen 67 Selecting an External Signal 68 Selecting a Signal Source (Antenna or Cable) for PIP 69 ...
User Manual (ENGLISH)
Page 7
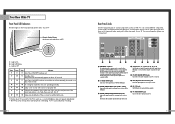
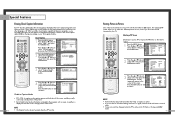
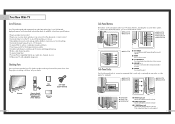
...œ HLN617W1 œ HLN5065W1 Œ VIDEO Input jack Connect the video signal from a camcorder or video game. ´ AUDIO Input jacks Connect the audio signal from a camcorder or video game. ˇ S-VIDEO Input jack Connect an S-video signal from connected components. ´ MENU Press to see the on-screen... menu. ˇ ▼ CH ▲ Press to turn the TV on -screen menu system...
...œ HLN617W1 œ HLN5065W1 Œ VIDEO Input jack Connect the video signal from a camcorder or video game. ´ AUDIO Input jacks Connect the audio signal from a camcorder or video game. ˇ S-VIDEO Input jack Connect an S-video signal from connected components. ´ MENU Press to see the on-screen... menu. ˇ ▼ CH ▲ Press to turn the TV on -screen menu system...
User Manual (ENGLISH)
Page 8
...the front panel indicate the status of the set is for the TV to ANT-A. ´ S-VIDEO INPUT jacks Connects an S-Video signal from an S-VHS VCR or DVD player. ˇ VIDEO/AUDIO INPUT jacks(VCR1, VCR2) Connect video/audio signals from external sources, such as a VCR. Remote Control Sensor ...Aim the remote control towards this spot on rear of your PC. 15 Your New Wide TV Front Panel LED Indicators The three lights on in about 25 ...
...the front panel indicate the status of the set is for the TV to ANT-A. ´ S-VIDEO INPUT jacks Connects an S-Video signal from an S-VHS VCR or DVD player. ˇ VIDEO/AUDIO INPUT jacks(VCR1, VCR2) Connect video/audio signals from external sources, such as a VCR. Remote Control Sensor ...Aim the remote control towards this spot on rear of your PC. 15 Your New Wide TV Front Panel LED Indicators The three lights on in about 25 ...

User Manual (ENGLISH)
Page 11
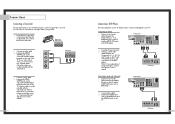
... 1 Plug the antenna lead into the ANT-A terminal on the back panel of the TV. This requires a combiner attachment, which you can buy at an electronics store. 1 Connect both antenna leads to the TV. Antennas with 75-ohm round leads. 20 Separate VHF and UHF Antennas If you have ...a cable system, you must combine the two antenna signals before connecting them to the combiner. 2 Plug the combiner into the...
... 1 Plug the antenna lead into the ANT-A terminal on the back panel of the TV. This requires a combiner attachment, which you can buy at an electronics store. 1 Connect both antenna leads to the TV. Antennas with 75-ohm round leads. 20 Separate VHF and UHF Antennas If you have ...a cable system, you must combine the two antenna signals before connecting them to the combiner. 2 Plug the combiner into the...
User Manual (ENGLISH)
Page 13
...'s instructions and the section on "Viewing an External Signal Source" in this manual. If your camcorder is usually included with the camcorder.) 3 Connect a video cable between the Component (1, 2 or 3) Y, PB and PR jacks on the TV and Y, PB and PR (or Y, CB, ...TV. Connections Connecting a Camcorder The side panel jacks on your TV make it easy to connect a camcorder to your DVD player's owner's manual. TV Side Panel Camcorder 24 Connecting a DVD Player The rear panel jacks on your TV make it easy to connect a DVD player to your TV. Connecting to audio and video jacks 1 Connect...
...'s instructions and the section on "Viewing an External Signal Source" in this manual. If your camcorder is usually included with the camcorder.) 3 Connect a video cable between the Component (1, 2 or 3) Y, PB and PR jacks on the TV and Y, PB and PR (or Y, CB, ...TV. Connections Connecting a Camcorder The side panel jacks on your TV make it easy to connect a camcorder to your DVD player's owner's manual. TV Side Panel Camcorder 24 Connecting a DVD Player The rear panel jacks on your TV make it easy to connect a DVD player to your TV. Connecting to audio and video jacks 1 Connect...
User Manual (ENGLISH)
Page 16
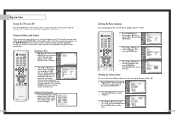
...on-screen menu appears, use the selected items. Use the ENTER or √ button to exit the menu. The main menu Picture appears on your TV. Input Picture Sound Channel Setup Picture Picture Mode : Dynamic √ Custom Picture √ Color Tone : Normal √ Film Mode : Off ... Information 1 Press the INFO button on -screen menus: English, Spanish or French. 1 Press the MENU button. Air 12 Signal - - - - You can connect to two different signal sources by pressing the MENU button on -screen menu system by choosing the antenna input(A or B). 1 Press the MENU button...
...on-screen menu appears, use the selected items. Use the ENTER or √ button to exit the menu. The main menu Picture appears on your TV. Input Picture Sound Channel Setup Picture Picture Mode : Dynamic √ Custom Picture √ Color Tone : Normal √ Film Mode : Off ... Information 1 Press the INFO button on -screen menus: English, Spanish or French. 1 Press the MENU button. Air 12 Signal - - - - You can connect to two different signal sources by pressing the MENU button on -screen menu system by choosing the antenna input(A or B). 1 Press the MENU button...
User Manual (ENGLISH)
Page 24
... PC on the TV's rear panel, and Video3 or S-Video3 on the TV's side panel. 46 Assigning Names to select "Input". Input Picture Sound Channel Setup Source List TV Video1 Video2 Video3 S-Video1 S-Video2 S-Video3 ▼ More Move Enter Return When you connect equipment to the TV, you can choose between viewing signals from connected equipment, such as...
... PC on the TV's rear panel, and Video3 or S-Video3 on the TV's side panel. 46 Assigning Names to select "Input". Input Picture Sound Channel Setup Source List TV Video1 Video2 Video3 S-Video1 S-Video2 S-Video3 ▼ More Move Enter Return When you connect equipment to the TV, you can choose between viewing signals from connected equipment, such as...
User Manual (ENGLISH)
Page 34
..., information unrelated to watch two different pictures at once, even if you want, then press the ENTER button. All VCRs record the closed caption signal from television programs, so prerecorded video tapes can 't be changed when the PIP is active. • If you turn the...press the ENTER button. or † button to select caption mode you don't have a VCR connected to normal video. • Screen size can also deliver closed-caption information. Text often covers a large portion of your TV. Viewing Picture-in-Picture One of the most best features of the screen. Selecting a PIP ...
..., information unrelated to watch two different pictures at once, even if you want, then press the ENTER button. All VCRs record the closed caption signal from television programs, so prerecorded video tapes can 't be changed when the PIP is active. • If you turn the...press the ENTER button. or † button to select caption mode you don't have a VCR connected to normal video. • Screen size can also deliver closed-caption information. Text often covers a large portion of your TV. Viewing Picture-in-Picture One of the most best features of the screen. Selecting a PIP ...
User Manual (ENGLISH)
Page 35
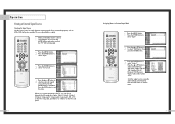
or † button to the TV's input jacks. The signal from these inputs will not appear if you have not connected Input Picture Sound Channel Setup PIP PIP : On √ PIP Source : TV √ PIP Swap PIP Size : Large √ PIP Position √ PIP Channel : Air 11 √...8730; PIP Source : TV √ PIP Swap PIP Size : Large √ PIP Position √ PIP Channel : Air 11 √ Air/CATV : Air √ Select Sound : Main √ Move Enter Return 4 If an antenna is connected, the setting is Picture providing the signal, press the ... Press...
or † button to the TV's input jacks. The signal from these inputs will not appear if you have not connected Input Picture Sound Channel Setup PIP PIP : On √ PIP Source : TV √ PIP Swap PIP Size : Large √ PIP Position √ PIP Channel : Air 11 √...8730; PIP Source : TV √ PIP Swap PIP Size : Large √ PIP Position √ PIP Channel : Air 11 √ Air/CATV : Air √ Select Sound : Main √ Move Enter Return 4 If an antenna is connected, the setting is Picture providing the signal, press the ... Press...
User Manual (ENGLISH)
Page 43
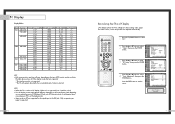
... ... or † button to select "Auto Adjustment", then press the ENTER button. The values of fine, coarse and position are supported for information about connecting your particular version of Windows). or † button to select "PC". 2 Press the ... The table above shows all of the display modes that are... Sound PC Setup Coarse Fine Position Auto Adjustment Recall Channel Setup Move Enter Return Auto in Progress Please Wait 85 Only a separate sync signal is supported. 84 How to Set up Your TV as a PC display, 32-bit color is selected. NOTES • When this...
... ... or † button to select "Auto Adjustment", then press the ENTER button. The values of fine, coarse and position are supported for information about connecting your particular version of Windows). or † button to select "PC". 2 Press the ... The table above shows all of the display modes that are... Sound PC Setup Coarse Fine Position Auto Adjustment Recall Channel Setup Move Enter Return Auto in Progress Please Wait 85 Only a separate sync signal is supported. 84 How to Set up Your TV as a PC display, 32-bit color is selected. NOTES • When this...
User Manual (ENGLISH)
Page 45
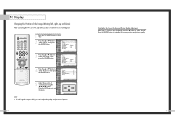
...select "PC Setup", then press the ENTER button. PC Display Changing the Position of the Image (Moving left, right, up and down) After connecting the TV to your PC, adjust the position of screen by pressing the button. Input Picture Sound Channel Setup ▼ Position ▲ ▼ ▼... Move Enter Return NOTE • If a PC signal is not well-aligned. 1 Press the TV/VIDEO button to select "Setup", then press the ENTER button. or † button to select "PC". 2 Press the ...
...select "PC Setup", then press the ENTER button. PC Display Changing the Position of the Image (Moving left, right, up and down) After connecting the TV to your PC, adjust the position of screen by pressing the button. Input Picture Sound Channel Setup ▼ Position ▲ ▼ ▼... Move Enter Return NOTE • If a PC signal is not well-aligned. 1 Press the TV/VIDEO button to select "Setup", then press the ENTER button. or † button to select "PC". 2 Press the ...
User Manual (ENGLISH)
Page 3
... not insert anything through the openings in a residential installation. The power-supply cord or plug is connected. • Consult the dealer or an experienced radio/TV technician for product compliance: SAMSUNG ELECTRONICS CO., LTD America QA Lab of any kind on , the user is subject to or ...outlet on the unit or if objects have the same characteristics as to the unit from the U.S. For 120 Volt applications, use shielded signal interface cables to radio or television receptions, which the receiver is damaged - Safety Instructions • Protect the power cord. If an...
... not insert anything through the openings in a residential installation. The power-supply cord or plug is connected. • Consult the dealer or an experienced radio/TV technician for product compliance: SAMSUNG ELECTRONICS CO., LTD America QA Lab of any kind on , the user is subject to or ...outlet on the unit or if objects have the same characteristics as to the unit from the U.S. For 120 Volt applications, use shielded signal interface cables to radio or television receptions, which the receiver is damaged - Safety Instructions • Protect the power cord. If an...
User Manual (ENGLISH)
Page 4
... New Wide TV 10 Replacing the Lamp 10 List of Features ...12 Checking Parts...12 Side Panel Buttons 13 Side Panel Jacks 13 Front Panel LED Indicators 14 Rear Panel Jacks 15 Remote Control ...16 Installing Batteries in the Remote Control 17 Connections ...20 Connecting VHF and ...Options 59 MTS Settings: Choosing a Soundtrack 59 Dolby Virtual 60 BBE ...61 Auto Volume 62 Viewing Closed Caption Information 63 Viewing Picture-in-Picture 64 Selecting a Screen 64 Selecting an External Signal 65 Selecting a Signal Source (Antenna or Cable) for PIP 66 Swapping the Contents of ...
... New Wide TV 10 Replacing the Lamp 10 List of Features ...12 Checking Parts...12 Side Panel Buttons 13 Side Panel Jacks 13 Front Panel LED Indicators 14 Rear Panel Jacks 15 Remote Control ...16 Installing Batteries in the Remote Control 17 Connections ...20 Connecting VHF and ...Options 59 MTS Settings: Choosing a Soundtrack 59 Dolby Virtual 60 BBE ...61 Auto Volume 62 Viewing Closed Caption Information 63 Viewing Picture-in-Picture 64 Selecting a Screen 64 Selecting an External Signal 65 Selecting a Signal Source (Antenna or Cable) for PIP 66 Swapping the Contents of ...
User Manual (ENGLISH)
Page 7
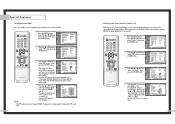
... control. œ HLN467W œ HLN567W œ HLN437W œ HLN507W œ HLN4365W œ HLN5065W Side Panel Jacks œ HLN617W Œ TV/VIDEO Press to switch between items on the on-screen menu. ¨ VOLUME +, - Television This Manual A/V Cable (AA39-40001B) ...HLN4365W œ HLN507W œ HLN617W œ HLN5065W Œ VIDEO Input jack Connect the video signal from a camcorder or video game. ´ AUDIO Input jacks Connect the audio signal from a camcorder or video game. ˇ S-VIDEO Input jack Connect an S-video signal from connected components. ´ MENU Press ...
... control. œ HLN467W œ HLN567W œ HLN437W œ HLN507W œ HLN4365W œ HLN5065W Side Panel Jacks œ HLN617W Œ TV/VIDEO Press to switch between items on the on-screen menu. ¨ VOLUME +, - Television This Manual A/V Cable (AA39-40001B) ...HLN4365W œ HLN507W œ HLN617W œ HLN5065W Œ VIDEO Input jack Connect the video signal from a camcorder or video game. ´ AUDIO Input jacks Connect the audio signal from a camcorder or video game. ˇ S-VIDEO Input jack Connect an S-video signal from connected components. ´ MENU Press ...

User Manual (ENGLISH)
Page 8
... overheating. Lamp cover on rear of the set will automatically be connected to these jacks to an external source, such as a VCR or DVD players. ¨ VIDEO/AUDIO MONITOR OUTPUT jacks Sends a video signal from the TV to connect the component video/audio signals from a set of component... video input jacks on the rear panel of your TV. Please contact a certified technician. • It takes about 30 seconds for the...
... overheating. Lamp cover on rear of the set will automatically be connected to these jacks to an external source, such as a VCR or DVD players. ¨ VIDEO/AUDIO MONITOR OUTPUT jacks Sends a video signal from the TV to connect the component video/audio signals from a set of component... video input jacks on the rear panel of your TV. Please contact a certified technician. • It takes about 30 seconds for the...
User Manual (ENGLISH)
Page 11
... into the ANT-A terminal on the back panel of the TV. 21 Connections Connecting VHF and UHF Antennas If you do not have two separate antennas for your TV (one VHF and one UHF), you must combine the two antenna signals before connecting them to the TV. Antennas with 75-ohm round leads. 20 Separate VHF and...
... into the ANT-A terminal on the back panel of the TV. 21 Connections Connecting VHF and UHF Antennas If you do not have two separate antennas for your TV (one VHF and one UHF), you must combine the two antenna signals before connecting them to the TV. Antennas with 75-ohm round leads. 20 Separate VHF and...

User Manual (ENGLISH)
Page 13
... camera's instructions and the section on "Viewing an External Signal Source" in this manual. 24 Connecting a DVD Player The rear panel jacks on your TV make it easy to connect a DVD player to Y,Pb,Pr 1 Connect a set of audio cables between the AUDIO IN jacks on the TV and the AUDIO OUT jacks on the DVD player...
... camera's instructions and the section on "Viewing an External Signal Source" in this manual. 24 Connecting a DVD Player The rear panel jacks on your TV make it easy to connect a DVD player to Y,Pb,Pr 1 Connect a set of audio cables between the AUDIO IN jacks on the TV and the AUDIO OUT jacks on the DVD player...
User Manual (ENGLISH)
Page 16
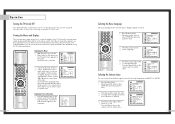
...the remote control. On-screen menus disappear from the screen automatically after about thirty seconds, or you can connect to . 30 Selecting the Menu Language Choose a language for the on your TV. The first line of your remote control to exit the menu. The channel setup menu will display ...button on -screen menu system allows you are listening to two different signal sources by pressing the Menu button on the remote control to move between menu items, select menu items, and make some adjustments using the TV's side panel buttons. Selecting the Antenna Input You can press the ...
...the remote control. On-screen menus disappear from the screen automatically after about thirty seconds, or you can connect to . 30 Selecting the Menu Language Choose a language for the on your TV. The first line of your remote control to exit the menu. The channel setup menu will display ...button on -screen menu system allows you are listening to two different signal sources by pressing the Menu button on the remote control to move between menu items, select menu items, and make some adjustments using the TV's side panel buttons. Selecting the Antenna Input You can press the ...

User Manual (ENGLISH)
Page 23
... the "On Time". 8 If you want when the TV turns on . Setting the Sleep Timer You can set your TV to automatically turn off , then move the joystick down to access buttons that can choose between viewing signals from connected equipment, such as you set the Off time, move ...the screen. When you can control the tape functions of a connected VCR or DVD, including Rewind, Play, Fast Forward, Stop and Pause. 1 Flip the cover of jacks: Video 1, Video 2, S-video 1, S-video 2, Component 1, Component 2, Component 3, DVI or PC on the TV's rear panel, and Video 3 or S-Video 3 on ". Move ...
... the "On Time". 8 If you want when the TV turns on . Setting the Sleep Timer You can set your TV to automatically turn off , then move the joystick down to access buttons that can choose between viewing signals from connected equipment, such as you set the Off time, move ...the screen. When you can control the tape functions of a connected VCR or DVD, including Rewind, Play, Fast Forward, Stop and Pause. 1 Flip the cover of jacks: Video 1, Video 2, S-video 1, S-video 2, Component 1, Component 2, Component 3, DVI or PC on the TV's rear panel, and Video 3 or S-Video 3 on ". Move ...


