User Manual (ENGLISH)
Page 3
...parties. This license is limited to any product unit other than one program on the same TV channel) and datacasting. No rights are always broadcast in widescreen, and offer much higher picture quality than this user manual is licensed under this license for commercial use . No rights... Dolby Surround Sound With DTV, you can listen to the ISO/IEC 11172-3 or ISO/IEC 13818-3. Digital Television Services • Digital Picture Quality DTV programs are granted under certain intellectual property rights of Dolby digital audio formats from Dolby Surround 2.0 to the ISO/IEC 11172-3 ...
...parties. This license is limited to any product unit other than one program on the same TV channel) and datacasting. No rights are always broadcast in widescreen, and offer much higher picture quality than this user manual is licensed under this license for commercial use . No rights... Dolby Surround Sound With DTV, you can listen to the ISO/IEC 11172-3 or ISO/IEC 13818-3. Digital Television Services • Digital Picture Quality DTV programs are granted under certain intellectual property rights of Dolby digital audio formats from Dolby Surround 2.0 to the ISO/IEC 11172-3 ...
User Manual (ENGLISH)
Page 6
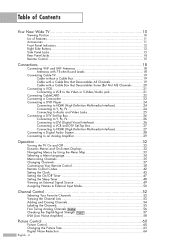
...Front Panel Indicators 12 Right Side Buttons 13 Side Panel Jacks ...13 Rear Panel Jacks ...14 Remote Control...15 Connections 18 Connecting VHF and UHF Antennas 18 Antennas with 75-ohm Round Leads 18 Connecting Cable TV 19 Cable without a Cable Box 19 Cable with a Cable Box ...52 Viewing the Channel Lists 53 Adding and Erasing Channels 54 Labeling the Channels 55 Fine Tuning Analog Channels Analog 56 Checking the Digital-Signal Strength Digital 57 LNA (Low Noise Amplifier 58 Picture Control 60 Picture Control...60 Changing the Picture Size 63 Digital Noise Reduction 64 English - 6
...Front Panel Indicators 12 Right Side Buttons 13 Side Panel Jacks ...13 Rear Panel Jacks ...14 Remote Control...15 Connections 18 Connecting VHF and UHF Antennas 18 Antennas with 75-ohm Round Leads 18 Connecting Cable TV 19 Cable without a Cable Box 19 Cable with a Cable Box ...52 Viewing the Channel Lists 53 Adding and Erasing Channels 54 Labeling the Channels 55 Fine Tuning Analog Channels Analog 56 Checking the Digital-Signal Strength Digital 57 LNA (Low Noise Amplifier 58 Picture Control 60 Picture Control...60 Changing the Picture Size 63 Digital Noise Reduction 64 English - 6
User Manual (ENGLISH)
Page 7
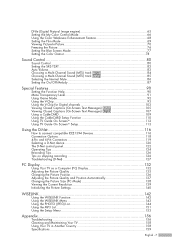
... ...124 Recording Tips...126 Tips on stopping recording 126 Troubleshooting (D-Net 127 PC Display 132 Using Your TV as a Computer (PC) Display 132 Adjusting the Picture Quality 135 Changing the Picture Position 136 Adjusting the Picture Quality and Position Automatically 137 Changing the Picture Size (PC Mode 138 Viewing the Current Resolution 139 Initializing the...
... ...124 Recording Tips...126 Tips on stopping recording 126 Troubleshooting (D-Net 127 PC Display 132 Using Your TV as a Computer (PC) Display 132 Adjusting the Picture Quality 135 Changing the Picture Position 136 Adjusting the Picture Quality and Position Automatically 137 Changing the Picture Size (PC Mode 138 Viewing the Current Resolution 139 Initializing the...

User Manual (ENGLISH)
Page 11
...-channel sound decoder for stereo and bilingual listening • Built-in, dual channel speakers • A special sleep timer • Picture-in-Picture capability that lets you watch two channels at once • Widescreen TV with adjustable image size • Life-like clear images provided by using the latest technology. It is a full-featured...
...-channel sound decoder for stereo and bilingual listening • Built-in, dual channel speakers • A special sleep timer • Picture-in-Picture capability that lets you watch two channels at once • Widescreen TV with adjustable image size • Life-like clear images provided by using the latest technology. It is a full-featured...
User Manual (ENGLISH)
Page 12
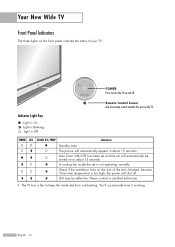
The picture will automatically be defective. Indicator Light Key : Light is On : Light is Blinking : Light is not operating normally. Check if the ventilation hole on the rear of your TV. Please contact a certified technician. • The TV has a fan to turn the TV on and off . LED may be turned on in about 15 seconds...
The picture will automatically be defective. Indicator Light Key : Light is On : Light is Blinking : Light is not operating normally. Check if the ventilation hole on the rear of your TV. Please contact a certified technician. • The TV has a fan to turn the TV on and off . LED may be turned on in about 15 seconds...
User Manual (ENGLISH)
Page 15
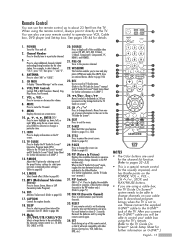
... previous channel. 22. Press to select additional channels (digital and analog) being broadcast by the Samsung remote control (i.e., TV, DVD, STB, CABLE, or VCR). 20. While using the TV's remote. (Refer to the TV Guide On ScreenTM Quick Setup Sheet for the visually impaired, and has Braille points on -screen ... are using the remote control again. 34. D-NET Runs the D-Net view function. (Refer to page 82) 17. PIP (Picture In Picture) Displays the available channels in the TV Guide on and off . (Refer to page 48) 19. You can use the remote control up to about 2~3 seconds. Moves...
... previous channel. 22. Press to select additional channels (digital and analog) being broadcast by the Samsung remote control (i.e., TV, DVD, STB, CABLE, or VCR). 20. While using the TV's remote. (Refer to the TV Guide On ScreenTM Quick Setup Sheet for the visually impaired, and has Braille points on -screen ... are using the remote control again. 34. D-NET Runs the D-Net view function. (Refer to page 82) 17. PIP (Picture In Picture) Displays the available channels in the TV Guide on and off . (Refer to page 48) 19. You can use the remote control up to about 2~3 seconds. Moves...
User Manual (ENGLISH)
Page 32
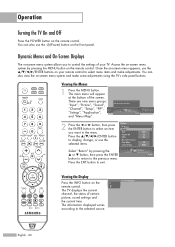
... options. Press the ENTER button to the selected source. Dynamic Menus and On-Screen Displays The on your TV. Once the on-screen menu appears, use the selected items. Picture Return Mode Size Digital NR DNIe My Color Control Film Mode Color Gamut √ 16:9 On On Off... Wide Select "Return" by pressing the MENU button on the Air remote control. 3 The TV displays the current channel, the status of the screen. There are nine menu groups: "Input", "Picture", "Sound", "Channel", "Setup", "PIP", "Listings", "Application", and "Menu Map". You can also view ...
... options. Press the ENTER button to the selected source. Dynamic Menus and On-Screen Displays The on your TV. Once the on-screen menu appears, use the selected items. Picture Return Mode Size Digital NR DNIe My Color Control Film Mode Color Gamut √ 16:9 On On Off... Wide Select "Return" by pressing the MENU button on the Air remote control. 3 The TV displays the current channel, the status of the screen. There are nine menu groups: "Input", "Picture", "Sound", "Channel", "Setup", "PIP", "Listings", "Application", and "Menu Map". You can also view ...

User Manual (ENGLISH)
Page 58
...Enter NOTES • LNA functions only when antenna is set to On, select Off. Channel Control LNA (Low Noise Amplifier) If the TV is noisy with the LNA set to select Channel Return "LNA", then press the ENTER button. Antenna Air Auto Program Channel Manager Fine Tune...Press the EXIT button to select "Channel", then press the ENTER button. The LNA setting must be made separately for each channel. • If the picture is operating in a weak-signal area, sometimes the LNA function can improve the reception (a low-noise preamplifier boosts the incoming signal). 1 Press the MENU...
...Enter NOTES • LNA functions only when antenna is set to On, select Off. Channel Control LNA (Low Noise Amplifier) If the TV is noisy with the LNA set to select Channel Return "LNA", then press the ENTER button. Antenna Air Auto Program Channel Manager Fine Tune...Press the EXIT button to select "Channel", then press the ENTER button. The LNA setting must be made separately for each channel. • If the picture is operating in a weak-signal area, sometimes the LNA function can improve the reception (a low-noise preamplifier boosts the incoming signal). 1 Press the MENU...
User Manual (ENGLISH)
Page 60
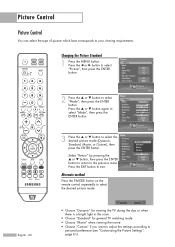
..."Mode", then press the ENTER button. or † button to personal preference (see "Customizing the Picture Settings", page 61). Press the ... English - 60 Dynamic • Choose "Dynamic" for viewing the TV during the day or when there is a bright light in the room. • Choose "Standard"... for general TV watching mode. • Choose "Movie" when viewing the movie. • Choose "Custom" if you want to adjust the settings according to select the Mode Return desired picture mode (Dynamic, Mode Standard, Movie, or Custom), then press...
..."Mode", then press the ENTER button. or † button to personal preference (see "Customizing the Picture Settings", page 61). Press the ... English - 60 Dynamic • Choose "Dynamic" for viewing the TV during the day or when there is a bright light in the room. • Choose "Standard"... for general TV watching mode. • Choose "Movie" when viewing the movie. • Choose "Custom" if you want to adjust the settings according to select the Mode Return desired picture mode (Dynamic, Mode Standard, Movie, or Custom), then press...

User Manual (ENGLISH)
Page 61
...Control Film Mode Color Gamut 16:9 On On Off Wide 2 Press the ... Mode Return Mode Contrast Brightness Sharpness Color Tint Color Tone Reset Picture Enter Dynamic 100 45 75 55 G50 R50 Cool1 OK 3 Press the ... Press the œ or √ button to select "Mode...also select another option (Contrast, Brightness, Sharpness, Color, or Tint) by pressing the ... Press the œ or √ button to select the desired picture mode (Dynamic, Standard, Movie, or Custom), then press the ENTER button. or † button to select a particular option (Contrast, Brightness, Sharpness, Color...
...Control Film Mode Color Gamut 16:9 On On Off Wide 2 Press the ... Mode Return Mode Contrast Brightness Sharpness Color Tint Color Tone Reset Picture Enter Dynamic 100 45 75 55 G50 R50 Cool1 OK 3 Press the ... Press the œ or √ button to select "Mode...also select another option (Contrast, Brightness, Sharpness, Color, or Tint) by pressing the ... Press the œ or √ button to select the desired picture mode (Dynamic, Standard, Movie, or Custom), then press the ENTER button. or † button to select a particular option (Contrast, Brightness, Sharpness, Color...

User Manual (ENGLISH)
Page 62
... Return Mode Contrast Brightness Sharpness Color Tint Color Tone Reset Standard 80 Cool2 45 Cool1 75 Normal 55 G50Warm1 R50 Warm2Cool1 OK Picture Enter Resetting the Picture Settings to the factory defaults. English - 62 or † button to "Mode". or † button, then press ...button. Press the ... Mode Return Mode Contrast Brightness Sharpness Color Tint G50 Color Tone Reset Standard 80 40 50 50 R50 Cool1 OK Picture Enter NOTE • The reset function must be reset to the Factory Defaults 7 To return the factory defaults, select "Reset" by...
... Return Mode Contrast Brightness Sharpness Color Tint Color Tone Reset Standard 80 Cool2 45 Cool1 75 Normal 55 G50Warm1 R50 Warm2Cool1 OK Picture Enter Resetting the Picture Settings to the factory defaults. English - 62 or † button to "Mode". or † button, then press ...button. Press the ... Mode Return Mode Contrast Brightness Sharpness Color Tint G50 Color Tone Reset Standard 80 40 50 50 R50 Cool1 OK Picture Enter NOTE • The reset function must be reset to the Factory Defaults 7 To return the factory defaults, select "Reset" by...
User Manual (ENGLISH)
Page 63
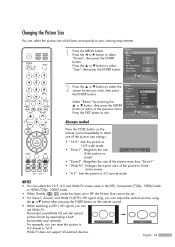
... Film Mode Color Gamut Zoom14:3 Zoom2On Off Wide Fit 4:3 Off Wide Press the EXIT button to select the Picture Return screen format you can reset the picture in PIP, the Picture Size cannot be set in 4:3 format to the previous menu. Press the œ or √ button ...Fit (DTV's HD signal only), you can adjust the vertical position using the ... Film Mode Color Gamut Off Wide Picture Enter 2 Press the ... Horizontal zoom(Wide Fit) sets the optical picture format by pressing the ... Select "Return" by expanding it both horizontally and vertically. 4 : 3 Wide Fit ...
... Film Mode Color Gamut Zoom14:3 Zoom2On Off Wide Fit 4:3 Off Wide Press the EXIT button to select the Picture Return screen format you can reset the picture in PIP, the Picture Size cannot be set in 4:3 format to the previous menu. Press the œ or √ button ...Fit (DTV's HD signal only), you can adjust the vertical position using the ... Film Mode Color Gamut Off Wide Picture Enter 2 Press the ... Horizontal zoom(Wide Fit) sets the optical picture format by pressing the ... Select "Return" by expanding it both horizontally and vertically. 4 : 3 Wide Fit ...
User Manual (ENGLISH)
Page 64
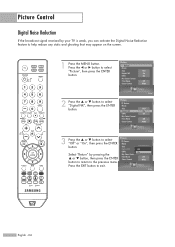
...† button to exit. Select "Return" by your TV is weak, you can activate the Digital Noise Reduction feature to select "Digital NR", then press the ENTER button. Picture Control Digital Noise Reduction If the broadcast signal received by pressing the ... Picture Return Mode Size Digital NR DNIe My Color Control Film Mode... "Off" or "On", then press the ENTER Mode button. or † button, then press the ENTER button to return to select "Picture", then press the ENTER button. Press the œ or √ button to the previous menu. Size Digital NR DNIe My Color Control Film ...
...† button to exit. Select "Return" by your TV is weak, you can activate the Digital Noise Reduction feature to select "Digital NR", then press the ENTER button. Picture Control Digital Noise Reduction If the broadcast signal received by pressing the ... Picture Return Mode Size Digital NR DNIe My Color Control Film Mode... "Off" or "On", then press the ENTER Mode button. or † button, then press the ENTER button to return to select "Picture", then press the ENTER button. Press the œ or √ button to the previous menu. Size Digital NR DNIe My Color Control Film ...
User Manual (ENGLISH)
Page 65
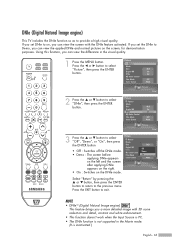
... DNIe My Color Control Film Mode Color Gamut 16:9 On On Off Wide Picture Enter 3 Press the ... Press the EXIT button to select "Picture", then press the ENTER button. or † button to provide a high visual quality. Picture Enter • On : Switches on the DNIe mode. NOTE • ... is PC. • The DNle function is inactivated.) English - 65 DNIe (Digital Natural Image engine) This TV includes the DNIe function so as to select "Off", "Demo", or "On", then press Picture Return Mode the ENTER button. • Off : Switches off the DNIe mode. • Demo : The ...
... DNIe My Color Control Film Mode Color Gamut 16:9 On On Off Wide Picture Enter 3 Press the ... Press the EXIT button to select "Picture", then press the ENTER button. or † button to provide a high visual quality. Picture Enter • On : Switches on the DNIe mode. NOTE • ... is PC. • The DNle function is inactivated.) English - 65 DNIe (Digital Natural Image engine) This TV includes the DNIe function so as to select "Off", "Demo", or "On", then press Picture Return Mode the ENTER button. • Off : Switches off the DNIe mode. • Demo : The ...
User Manual (ENGLISH)
Page 66
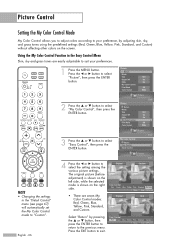
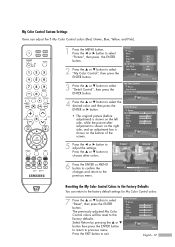
...button to return to select "Easy Control", then press the ENTER button. Easy Control Red Green Blue Yellow Pink Standard Custom Move Enter Return Picture Control Setting the My Color Control Mode My Color Control allows you to adjust colors according to your preferences. English - 66 1 Press ...in the "Detail Control" menu (see page 67) will automatically set the My Color Control mode to suit your preference, by pressing the ... Picture Enter Picture Return Mode Size Digital NR DNIe My Color Control Film Mode Color Gamut 16:9 On On √ Off Wide 3 Press the ... Press the...
...button to return to select "Easy Control", then press the ENTER button. Easy Control Red Green Blue Yellow Pink Standard Custom Move Enter Return Picture Control Setting the My Color Control Mode My Color Control allows you to adjust colors according to your preferences. English - 66 1 Press ...in the "Detail Control" menu (see page 67) will automatically set the My Color Control mode to suit your preference, by pressing the ... Picture Enter Picture Return Mode Size Digital NR DNIe My Color Control Film Mode Color Gamut 16:9 On On √ Off Wide 3 Press the ... Press the...
User Manual (ENGLISH)
Page 67
...the œ or √ button to select "Detail Control", then press the My Color Control Return Easy Control ENTER button. or † button to select "Picture", then press the ENTER button. 2 Press the ... or † button to the previous menu. Original Adjusted 6 Press the ENTER or MENU button to confirm... and return to select the desired color and then press the ENTER or √ button. • The original picture (before adjustment) is shown on the left side, while the picture after adjustment is shown on the right side, and an adjustment bar is shown on the bottom of the screen...
...the œ or √ button to select "Detail Control", then press the My Color Control Return Easy Control ENTER button. or † button to select "Picture", then press the ENTER button. 2 Press the ... or † button to the previous menu. Original Adjusted 6 Press the ENTER or MENU button to confirm... and return to select the desired color and then press the ENTER or √ button. • The original picture (before adjustment) is shown on the left side, while the picture after adjustment is shown on the right side, and an adjustment bar is shown on the bottom of the screen...
User Manual (ENGLISH)
Page 68
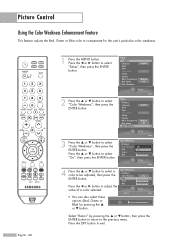
... previous menu. Setup Enter 4 Press the ... or † button, then press the ENTER button to return to select "Color Weakness", then press the ENTER button. Picture Control Using the Color Weakness Enhancement Feature This feature adjusts the Red, Green or Blue color to select "Setup", then press the ENTER button. Adjust...
... previous menu. Setup Enter 4 Press the ... or † button, then press the ENTER button to return to select "Color Weakness", then press the ENTER button. Picture Control Using the Color Weakness Enhancement Feature This feature adjusts the Red, Green or Blue color to select "Setup", then press the ENTER button. Adjust...
User Manual (ENGLISH)
Page 69
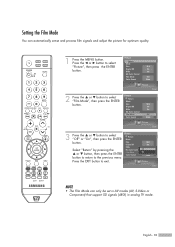
... Gamut 16:9 On On Off Wide Picture Enter 3 Press the ... Size 16:9 Digital NR On Select "Return" by pressing the ... English - 69 Setting the Film Mode You can only be set in AV modes (AV, S-Video or Component) that support SD signals (480i) in analog TV mode. or † button to select... "Picture", then press the ENTER button. DNIe My Color Control Film Mode Color Gamut Off Off On Off Wide Press the EXIT button...
... Gamut 16:9 On On Off Wide Picture Enter 3 Press the ... Size 16:9 Digital NR On Select "Return" by pressing the ... English - 69 Setting the Film Mode You can only be set in AV modes (AV, S-Video or Component) that support SD signals (480i) in analog TV mode. or † button to select... "Picture", then press the ENTER button. DNIe My Color Control Film Mode Color Gamut Off Off On Off Wide Press the EXIT button...

User Manual (ENGLISH)
Page 70
... the ENTER button. or † button to exit. or † button, then press the ENTER button to return to your TV is supported even when both the main and the sub pictures are analog. NOTES • This feature doesn't function when the "V-Chip" is active. • If you don't have a VCR or... DVD connected to the previous menu. The advanced PIP system allows you to watch two different pictures at once, even if you turn the TV off while watching and turn it on again, then the mode will return to activate or deactivate the PIP. Swap Size Position...
... the ENTER button. or † button to exit. or † button, then press the ENTER button to return to your TV is supported even when both the main and the sub pictures are analog. NOTES • This feature doesn't function when the "V-Chip" is active. • If you don't have a VCR or... DVD connected to the previous menu. The advanced PIP system allows you to watch two different pictures at once, even if you turn the TV off while watching and turn it on again, then the mode will return to activate or deactivate the PIP. Swap Size Position...
User Manual (ENGLISH)
Page 71
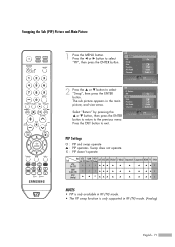
...the œ or √ button to exit. Press the EXIT button to select "PIP", then press the ENTER button. The sub picture appears in RF (TV) mode. (Analog) English - 71 or † button to the previous menu. PIP Return PIP Swap Size Position Air/Cable Channel Select...; ▲ ▲▲ X NOTES • PIP is only available in RF (TV) mode. • The PIP swap function is only supported in the main picture, and vice versa. Swapping the Sub (PIP) Picture and Main Picture 1 Press the MENU button. PIP Return PIP Swap Size Position Air/Cable Channel 2 Press...
...the œ or √ button to exit. Press the EXIT button to select "PIP", then press the ENTER button. The sub picture appears in RF (TV) mode. (Analog) English - 71 or † button to the previous menu. PIP Return PIP Swap Size Position Air/Cable Channel Select...; ▲ ▲▲ X NOTES • PIP is only available in RF (TV) mode. • The PIP swap function is only supported in the main picture, and vice versa. Swapping the Sub (PIP) Picture and Main Picture 1 Press the MENU button. PIP Return PIP Swap Size Position Air/Cable Channel 2 Press...


