User Manual (ENGLISH)
Page 3
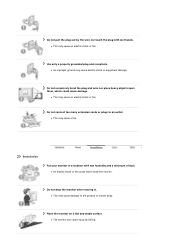
... plug and wire nor place heavy objects upon them, which could result inside the monitor. z An improper ground may cause an electric shock or fire. Installation Put your monitor in a location with wet hands.
... plug and wire nor place heavy objects upon them, which could result inside the monitor. z An improper ground may cause an electric shock or fire. Installation Put your monitor in a location with wet hands.
User Manual (ENGLISH)
Page 4
... water or detergent directly on the monitor. Do not place the monitor face down the monitor carefully. z Always use the mounting device specified in injury. Installing a wall bracket must be done by unqualified personnel may cause damage, electric shock or a fire. z It could be damaged...
... water or detergent directly on the monitor. Do not place the monitor face down the monitor carefully. z Always use the mounting device specified in injury. Installing a wall bracket must be done by unqualified personnel may cause damage, electric shock or a fire. z It could be damaged...
User Manual (ENGLISH)
Page 15
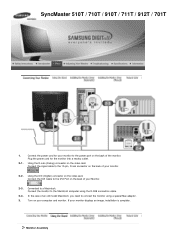
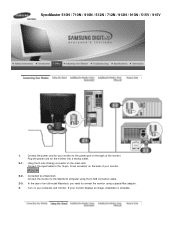
Connect the DVI Cable to the Macintosh computer using a special Mac adaptor. Connect the monitor to the DVI Port on the back of your monitor. 2-2. SyncMaster 510T / 710T / 910T / 711T / 912T / 701T 1. 2-1. Connect the power cord for the monitor into a nearby outlet. Using the D-sub (Analog) connector ... an old model Macintosh, you need to a Macintosh. Connect the signal cable to the power port on your monitor displays an image, installation is complete. Using the DVI (Digital) connector on the video card. In the case of the monitor. Connected to connect the monitor ...
Connect the DVI Cable to the Macintosh computer using a special Mac adaptor. Connect the monitor to the DVI Port on the back of your monitor. 2-2. SyncMaster 510T / 710T / 910T / 711T / 912T / 701T 1. 2-1. Connect the power cord for the monitor into a nearby outlet. Using the D-sub (Analog) connector ... an old model Macintosh, you need to a Macintosh. Connect the signal cable to the power port on your monitor displays an image, installation is complete. Using the DVI (Digital) connector on the video card. In the case of the monitor. Connected to connect the monitor ...
User Manual (ENGLISH)
Page 16
... signal cable to a Macintosh. Connect the power cord for the monitor into a nearby outlet. Using the D-sub (Analog) connector on your monitor displays an image, installation is complete. If your computer and monitor. Connected to the 15-pin, D-sub connector on the back of the monitor. In the case of your...
... signal cable to a Macintosh. Connect the power cord for the monitor into a nearby outlet. Using the D-sub (Analog) connector on your monitor displays an image, installation is complete. If your computer and monitor. Connected to the 15-pin, D-sub connector on the back of the monitor. In the case of your...
User Manual (ENGLISH)
Page 18
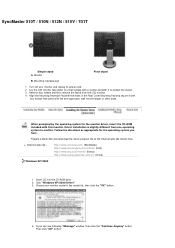
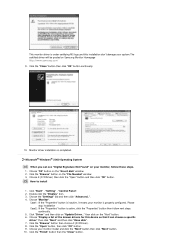
...When prompted by the operating system for the operating system you can see following "Message" window, then click the "Continue Anyway" button. Driver installation is slightly different from the LCD monitor. 4. Align the Mounting Interface Pad with this monitor. If you have. Monitor Pivot stand B. Choose ...holes in the model list, then click the "OK" button. 4. Click "Windows XP/2000 Driver" 3. z Internet web site : http://www.samsung.com/ (Worldwide) http://www.samsungusa.com/monitor (USA) http://www.sec.co.kr/monitor (Korea) http://www.samsungmonitor.com.cn/ (China) Windows ...
...When prompted by the operating system for the operating system you can see following "Message" window, then click the "Continue Anyway" button. Driver installation is slightly different from the LCD monitor. 4. Align the Mounting Interface Pad with this monitor. If you have. Monitor Pivot stand B. Choose ...holes in the model list, then click the "OK" button. 4. Click "Windows XP/2000 Driver" 3. z Internet web site : http://www.samsung.com/ (Worldwide) http://www.samsungusa.com/monitor (USA) http://www.sec.co.kr/monitor (Korea) http://www.samsungmonitor.com.cn/ (China) Windows ...
User Manual (ENGLISH)
Page 19
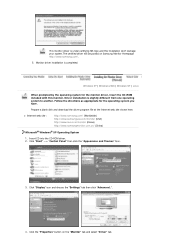
... "Display" icon and choose the "Settings" tab then click "Advanced..". 4. Click the "Properties" button on Samsung Monitor Homepage http://www.samsung.com/. 5. Driver installation is completed. Prepare a blank disk and download the driver program file at the Internet web site shown here. ..."Start" -> "Control Panel" then click the "Appearance and Themes" Icon. 3. Monitor driver installation is slightly different from one operating system to another. z Internet web site : http://www.samsung.com/ (Worldwide) http://www.samsungusa.com/monitor (USA) http://www.sec.co.kr/monitor (Korea...
... "Display" icon and choose the "Settings" tab then click "Advanced..". 4. Click the "Properties" button on Samsung Monitor Homepage http://www.samsung.com/. 5. Driver installation is completed. Prepare a blank disk and download the driver program file at the Internet web site shown here. ..."Start" -> "Control Panel" then click the "Appearance and Themes" Icon. 3. Monitor driver installation is slightly different from one operating system to another. z Internet web site : http://www.samsung.com/ (Worldwide) http://www.samsungusa.com/monitor (USA) http://www.sec.co.kr/monitor (Korea...
User Manual (ENGLISH)
Page 20
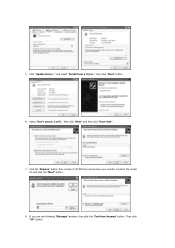
5. then click "Next" button. 6. and select "Install from a list or.." Select "Don't search ,I will.." If you can see following "Message" window, then click the "Continue Anyway" button. Then click "OK" button. then click "Next" and then click "Have disk". 7. Click the "Browse" button then choose A:(D:\Driver) and choose your monitor model in the model list and click the "Next" button. 8. Click "Update Driver.."
5. then click "Next" button. 6. and select "Install from a list or.." Select "Don't search ,I will.." If you can see following "Message" window, then click the "Continue Anyway" button. Then click "OK" button. then click "Next" and then click "Have disk". 7. Click the "Browse" button then choose A:(D:\Driver) and choose your monitor model in the model list and click the "Next" button. 8. Click "Update Driver.."
User Manual (ENGLISH)
Page 21
..." then click "Next" and then click "Have disk". 7. Click the "Browse" button on "Update Driver.." Choose the "Settings" tab and then click "Advanced..". 4. Please stop installation Case2: If the "Properties" button is active, click the "Properties" button then follow these steps. 1. Click the "Finish" button then the "Close" button. Choose "Display... your monitor is properly configured. This monitor driver is under certifying MS logo,and this device so that I can see "Digital Signature Not Found" on Samsung Monitor Homepage http://www...
..." then click "Next" and then click "Have disk". 7. Click the "Browse" button on "Update Driver.." Choose the "Settings" tab and then click "Advanced..". 4. Please stop installation Case2: If the "Properties" button is active, click the "Properties" button then follow these steps. 1. Click the "Finish" button then the "Close" button. Choose "Display... your monitor is properly configured. This monitor driver is under certifying MS logo,and this device so that I can see "Digital Signature Not Found" on Samsung Monitor Homepage http://www...

User Manual (ENGLISH)
Page 23
How to delete the Natural Color software program Select [Setting]/[Control Panel] on the initial screen to install the Natural Color software. Select Natural Color from the list and then click the [Add/Delete] button. Enter D:\color\eng\setup.exe and then press ... the CD is inserted is not D:\, enter the applicable drive.) How to install the Natural Color software Insert the CD included with the Samsung monitor into the CD-ROM Drive. To install the program manually, insert the CD included with the Samsung monitor into the CD-ROM Drive, click the [Start] button of the...
How to delete the Natural Color software program Select [Setting]/[Control Panel] on the initial screen to install the Natural Color software. Select Natural Color from the list and then click the [Add/Delete] button. Enter D:\color\eng\setup.exe and then press ... the CD is inserted is not D:\, enter the applicable drive.) How to install the Natural Color software Insert the CD included with the Samsung monitor into the CD-ROM Drive. To install the program manually, insert the CD included with the Samsung monitor into the CD-ROM Drive, click the [Start] button of the...

User Manual (ENGLISH)
Page 30
... color tuning using the Display Data Channel Command Interface (DDC/CI) protocol. MagicTune supports Windows 98SE, Me, 2000, NT, XP Home, and XP Professional. Overview | Install | OSD Mode | Color | Uninstall | Troubleshooting Calibration Overview What is no feedback to assist in a multiuser environment, or having a single user have multiple defined presets based...
... color tuning using the Display Data Channel Command Interface (DDC/CI) protocol. MagicTune supports Windows 98SE, Me, 2000, NT, XP Home, and XP Professional. Overview | Install | OSD Mode | Color | Uninstall | Troubleshooting Calibration Overview What is no feedback to assist in a multiuser environment, or having a single user have multiple defined presets based...

User Manual (ENGLISH)
Page 31
Insert the installation CD into the CD-ROM drive. 2. Select installation Language, Click "Next". 4. Select "I agree to the terms of the license agreement" to accept the terms of use. Overview | Install | OSD Mode | Color | Uninstall | Troubleshooting Calibration Install 1. When the InstallShield Wizard window appears, click "Next." 5. Click the MagicTune™ installation file. 3.
Insert the installation CD into the CD-ROM drive. 2. Select installation Language, Click "Next". 4. Select "I agree to the terms of the license agreement" to accept the terms of use. Overview | Install | OSD Mode | Color | Uninstall | Troubleshooting Calibration Install 1. When the InstallShield Wizard window appears, click "Next." 5. Click the MagicTune™ installation file. 3.

User Manual (ENGLISH)
Page 32
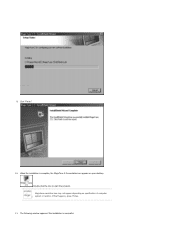
Choose a folder to install the MagicTune program. 7. Click "Install." 8. The "Installation Status" window appears. 6.
Choose a folder to install the MagicTune program. 7. Click "Install." 8. The "Installation Status" window appears. 6.
User Manual (ENGLISH)
Page 33
The following window appears if the installation is complete, the MagicTune 2.5 executable icon appears on specification of computer system or monitor. Magictune execution icon may not appear depending on your desktop. Click "Finish." 10. If that happens, press F5 Key. 11. 9. When the installation is successful. Double-click the icon to start the program.
The following window appears if the installation is complete, the MagicTune 2.5 executable icon appears on specification of computer system or monitor. Magictune execution icon may not appear depending on your desktop. Click "Finish." 10. If that happens, press F5 Key. 11. 9. When the installation is successful. Double-click the icon to start the program.
User Manual (ENGLISH)
Page 34
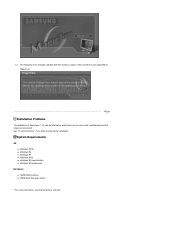
See "Troubleshooting" if you have trouble during installation. Installation Problems The installation of MagicTune™ 2.5 can be affected by MagicTune. 12. System Requirements OS z Windows 98 SE z Windows Me z Windows NT z Windows 2000 z Windows XP Home Edition z Windows XP Professional Hardware z 32MB Memory above z 25MB Hard disk space above * For more information, visit the MagicTune website. The following error message indicates that the system is using a video card that is not supported by such factors as the video card, motherboard and the network environment.
See "Troubleshooting" if you have trouble during installation. Installation Problems The installation of MagicTune™ 2.5 can be affected by MagicTune. 12. System Requirements OS z Windows 98 SE z Windows Me z Windows NT z Windows 2000 z Windows XP Home Edition z Windows XP Professional Hardware z 32MB Memory above z 25MB Hard disk space above * For more information, visit the MagicTune website. The following error message indicates that the system is using a video card that is not supported by such factors as the video card, motherboard and the network environment.
User Manual (ENGLISH)
Page 35
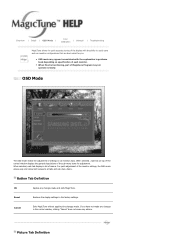
... to the factory settings. For quick adjustment of settings on specification of each tab displays a list of menus. z OSD mode may not operate normally. Overview | Install | OSD Mode | Color | Uninstall | Troubleshooting Calibration MagicTune allows for quick accurate tuning of the sub-menu items for you have not made . When selected , each...
... to the factory settings. For quick adjustment of settings on specification of each tab displays a list of menus. z OSD mode may not operate normally. Overview | Install | OSD Mode | Color | Uninstall | Troubleshooting Calibration MagicTune allows for quick accurate tuning of the sub-menu items for you have not made . When selected , each...
User Manual (ENGLISH)
Page 39
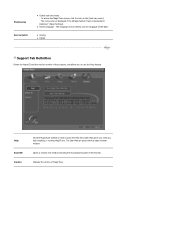
... language of the monitor. Displays the version of the program, and allows you to open the Help files (User Manual) if you need any help installing or running MagicTune. To access the MagicTune menus, click the icon on the [task tray menu]. z Analog z Digital Support Tab Definition Shows the Asset ID...
... language of the monitor. Displays the version of the program, and allows you to open the Help files (User Manual) if you need any help installing or running MagicTune. To access the MagicTune menus, click the icon on the [task tray menu]. z Analog z Digital Support Tab Definition Shows the Asset ID...
User Manual (ENGLISH)
Page 40
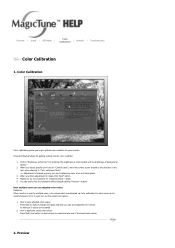
... tone referring to "Color reference Circle". => Adjustment is used by multiple users, color values which are adjusted via Color calibration for remaining step2 ~ step5. 5. Overview | Install | OSD Mode | Color Calibration | Uninstall | Troubleshooting Color Calibration 1. How to the direction of the saved color values. 2.
... tone referring to "Color reference Circle". => Adjustment is used by multiple users, color values which are adjusted via Color calibration for remaining step2 ~ step5. 5. Overview | Install | OSD Mode | Color Calibration | Uninstall | Troubleshooting Color Calibration 1. How to the direction of the saved color values. 2.

User Manual (ENGLISH)
Page 42
... Control Panel. 3. Click the "Change/Remove" button to begin the uninstall process. 6. Perform the following steps remove MagicTune. 1. Click "Yes" to remove the program. 5. Overview | Install | OSD Mode | Color | Uninstall | Troubleshooting Calibration Uninstall The MagicTune program can be removed only by using the "Add or Remove Programs" option of the Windows...
... Control Panel. 3. Click the "Change/Remove" button to begin the uninstall process. 6. Perform the following steps remove MagicTune. 1. Click "Yes" to remove the program. 5. Overview | Install | OSD Mode | Color | Uninstall | Troubleshooting Calibration Uninstall The MagicTune program can be removed only by using the "Add or Remove Programs" option of the Windows...
User Manual (ENGLISH)
Page 43
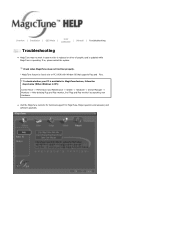
... so, please restart the system. z Visit the MagicTune website for technical support for MagicTune feature, follow the steps below (When Windows is operating. Color Overview | Installation | OSD Mode | | Uninstall | Troubleshooting Calibration Troubleshooting z MagicTune may not work in case monitor is replaced or driver of graphic card is updated while MagicTune is...
... so, please restart the system. z Visit the MagicTune website for technical support for MagicTune feature, follow the steps below (When Windows is operating. Color Overview | Installation | OSD Mode | | Uninstall | Troubleshooting Calibration Troubleshooting z MagicTune may not work in case monitor is replaced or driver of graphic card is updated while MagicTune is...
User Manual (ENGLISH)
Page 46
...when using either a cleaning solution or plain water. computer or the screen saver. (Refer to the computer. 2. Have you have problems in installing the adapter (video) driver, boot the computer in Safe Mode, remove the Display Adapter at the Control Panel Display Settings. * Contact the...provides a self test feature that reads "Unrecognized monitor, Plug & Play (VESA DDC) monitor found". How can be downloaded from the http://www.samsung.com/. There is trouble with a soft cloth, using the maximum resolution.) 5. Check the following items if there is a message that allows ...
...when using either a cleaning solution or plain water. computer or the screen saver. (Refer to the computer. 2. Have you have problems in installing the adapter (video) driver, boot the computer in Safe Mode, remove the Display Adapter at the Control Panel Display Settings. * Contact the...provides a self test feature that reads "Unrecognized monitor, Plug & Play (VESA DDC) monitor found". How can be downloaded from the http://www.samsung.com/. There is trouble with a soft cloth, using the maximum resolution.) 5. Check the following items if there is a message that allows ...


