User Manual (ENGLISH)
Page 20
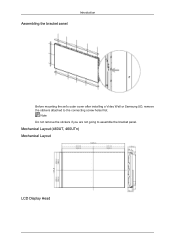
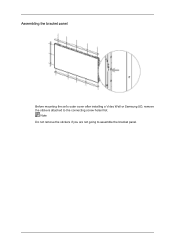
Note Do not remove the stickers if you are not going to the connecting screw holes first. Mechanical Layout (460UT, 460UTn) Mechanical Layout LCD Display Head Assembling the bracket panel Introduction Before mounting the set's outer cover after installing a Video Wall or Samsung UD, remove the stickers attached to assemble the bracket panel.
Note Do not remove the stickers if you are not going to the connecting screw holes first. Mechanical Layout (460UT, 460UTn) Mechanical Layout LCD Display Head Assembling the bracket panel Introduction Before mounting the set's outer cover after installing a Video Wall or Samsung UD, remove the stickers attached to assemble the bracket panel.

User Manual (ENGLISH)
Page 61
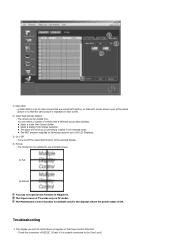
... the "Interval" by hour and "Second" by Screen Type. The Input source of TV works only on TV model. You can set to display the Maintenance screen. Maintenance Video Wall 1. Eliminates the afterimages that can be set to 1, 2, 3, 4, 5 for Scroll Type and to 10, 20, 30, 40, 50 for ...Pixel, Bar, and Eraser Type. It can result when the selected display stays in the Main Icon column to Scroll, Pixel, Bar and Eraser by...
... the "Interval" by hour and "Second" by Screen Type. The Input source of TV works only on TV model. You can set to display the Maintenance screen. Maintenance Video Wall 1. Eliminates the afterimages that can be set to 1, 2, 3, 4, 5 for Scroll Type and to 10, 20, 30, 40, 50 for ...Pixel, Bar, and Eraser Type. It can result when the selected display stays in the Main Icon column to Scroll, Pixel, Bar and Eraser by...
User Manual (ENGLISH)
Page 62
... be selected to 5x5 LCD Displayes. 3) On / Off - z Full z Natural You may not operate this function in the selected mode. A Video Wall is ON. z The MDC program supplied by pressing a number in MagicInfo. The Maintenance Control function is available only for the displays where the power status is a set up by Samsung supports up to see...
... be selected to 5x5 LCD Displayes. 3) On / Off - z Full z Natural You may not operate this function in the selected mode. A Video Wall is ON. z The MDC program supplied by pressing a number in MagicInfo. The Maintenance Control function is available only for the displays where the power status is a set up by Samsung supports up to see...

User Manual (ENGLISH)
Page 84
... feature adjusts the power consumption of the whole picture or where the same picture is connected to save energy. 1. When the Video Wall is "0000". Note The preset password for the LCD Display is on each screen shows a part of the unit in the black level, a low contrast, or discoloration, etc., depending on the...
... feature adjusts the power consumption of the whole picture or where the same picture is connected to save energy. 1. When the Video Wall is "0000". Note The preset password for the LCD Display is on each screen shows a part of the unit in the black level, a low contrast, or discoloration, etc., depending on the...
User Manual (ENGLISH)
Page 85
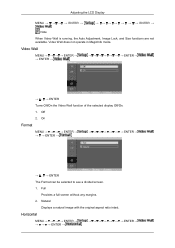
... ENTER → → ENTER → ENTER → → , → ENTER Turns Off/On the Video Wall function of the selected display Off/On. 1. Video Wall does not operate in MagicInfo mode. Adjusting the LCD Display MENU ENTER → ENTER → Note When Video Wall is running, the Auto Adjustment, Image Lock, and Size functions are not available. Full Provides...
... ENTER → → ENTER → ENTER → → , → ENTER Turns Off/On the Video Wall function of the selected display Off/On. 1. Video Wall does not operate in MagicInfo mode. Adjusting the LCD Display MENU ENTER → ENTER → Note When Video Wall is running, the Auto Adjustment, Image Lock, and Size functions are not available. Full Provides...
User Manual (ENGLISH)
Page 87
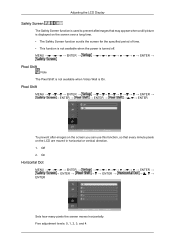
...8594; , → ENTER To prevent after-images on the screen you can use this function, so that may appear when a still picture is displayed on the LCD are moved in horizontal or vertical direction. 1. On Horizontal Dot MENU → ENTER → → → ENTER → → ...levels: 0, 1, 2, 3, and 4. MENU ENTER → ENTER → Pixel Shift Note The Pixel Shift is not available when Video Wall is On. Adjusting the LCD Display Safety Screen The Safety Screen function is used to prevent afterimages that every minute pixels on the screen over a long time. •...
...8594; , → ENTER To prevent after-images on the screen you can use this function, so that may appear when a still picture is displayed on the LCD are moved in horizontal or vertical direction. 1. On Horizontal Dot MENU → ENTER → → → ENTER → → ...levels: 0, 1, 2, 3, and 4. MENU ENTER → ENTER → Pixel Shift Note The Pixel Shift is not available when Video Wall is On. Adjusting the LCD Display Safety Screen The Safety Screen function is used to prevent afterimages that every minute pixels on the screen over a long time. •...
User Manual (ENGLISH)
Page 92
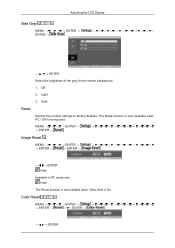
... Reset Reverts the product settings to factory defaults. Color Reset MENU ENTER → → ENTER → → → ENTER → → , → ENTER Adjusting the LCD Display Side Gray MENU ENTER → ENTER → → , → ENTER Select the brightness of the grey for the screen background. 1. MENU ENTER → → ENTER... ENTER → → ENTER → → ENTER → → , → ENTER Note Available in PC mode only Note The Reset function is not available when Video Wall is being used.
... Reset Reverts the product settings to factory defaults. Color Reset MENU ENTER → → ENTER → → → ENTER → → , → ENTER Adjusting the LCD Display Side Gray MENU ENTER → ENTER → → , → ENTER Select the brightness of the grey for the screen background. 1. MENU ENTER → → ENTER... ENTER → → ENTER → → ENTER → → , → ENTER Note Available in PC mode only Note The Reset function is not available when Video Wall is being used.
Quick Guide (ENGLISH)
Page 12
Assembling the bracket panel Before mounting the set's outer cover after installing a Video Wall or Samsung UD, remove the stickers attached to assemble the bracket panel. Note Do not remove the stickers if you are not going to the connecting screw holes first.
Assembling the bracket panel Before mounting the set's outer cover after installing a Video Wall or Samsung UD, remove the stickers attached to assemble the bracket panel. Note Do not remove the stickers if you are not going to the connecting screw holes first.

User Manual (KOREAN)
Page 59
...;㜄⏈G1, 2, 3, 4, 5⦐G㉘㥉Gᴴ⏙䚌ḔGPixel, Bar, Eraser Type㢰G G10, 20, 30, 40, 50㡰⦐G㉘㥉G Maintenance Video Wall 1 GMaintenance⪰G䆨⫡䚌⮨GMaintenance 䞈⮨㢨G
...;㜄⏈G1, 2, 3, 4, 5⦐G㉘㥉Gᴴ⏙䚌ḔGPixel, Bar, Eraser Type㢰G G10, 20, 30, 40, 50㡰⦐G㉘㥉G Maintenance Video Wall 1 GMaintenance⪰G䆨⫡䚌⮨GMaintenance 䞈⮨㢨G


