User Manual (ENGLISH)
Page 40
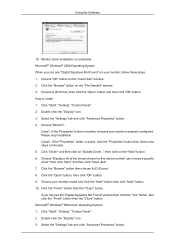
Microsoft® Windows® 2000 Operating System When you can choose a specific driver" then click "Next" and then click "Have disk". 7. Double click the "Display" icon. 3. Case1 : If the "Properties" button is properly configured. Click "Driver" and then click on your monitor, follow... button. 9. And click the "Finish" button then the "Close" button. Double click the "Display" icon. 3. How to install 1. Please stop installation Case2 : If the "Properties" button is completed. Choose "Display a list of the known drivers for this device so that I can see "Digital Signature Not ...
Microsoft® Windows® 2000 Operating System When you can choose a specific driver" then click "Next" and then click "Have disk". 7. Double click the "Display" icon. 3. Case1 : If the "Properties" button is properly configured. Click "Driver" and then click on your monitor, follow... button. 9. And click the "Finish" button then the "Close" button. Double click the "Display" icon. 3. How to install 1. Please stop installation Case2 : If the "Properties" button is completed. Choose "Display a list of the known drivers for this device so that I can see "Digital Signature Not ...
User Manual (ENGLISH)
Page 41
Choose "Display a list of all devices" and choose the monitor that you wish to a different mode (lower mode of colors and Vertical frequency) and then click "OK". 4. Select "Show all the driver in a specific location..." Continue choosing "Close" button and "OK" button ...or frequency). Choose "Specify the location of X-Window. Specify A:\(D:\driver) then click "OK" button. 10. In Display Registration Information window, click Settings Tab and then click "All Display Modes". 3. Set a Keyboard for your monitor. (You can enter the frequency directly.) 8. Set a vertical ...
Choose "Display a list of all devices" and choose the monitor that you wish to a different mode (lower mode of colors and Vertical frequency) and then click "OK". 4. Select "Show all the driver in a specific location..." Continue choosing "Close" button and "OK" button ...or frequency). Choose "Specify the location of X-Window. Specify A:\(D:\driver) then click "OK" button. 10. In Display Registration Information window, click Settings Tab and then click "All Display Modes". 3. Set a Keyboard for your monitor. (You can enter the frequency directly.) 8. Set a vertical ...

User Manual (ENGLISH)
Page 43
... is complete, the MDC executable icon appears on specification of the Windows® Control Panel. The "Installation Status" window appears. 7. When the Installation Shield Wizard window appears, click "Next". 4. When the installation is not displayed, proceed with the installation using the "Add or... not appear depending on your desktop. Click "Finish". 8. Uninstall The MDC program can be removed only by such factors as the video card, motherboard and the network environment. Insert the installation CD into the CD-ROM drive. 2. Click "Install". 6. Double-click the...
... is complete, the MDC executable icon appears on specification of the Windows® Control Panel. The "Installation Status" window appears. 7. When the Installation Shield Wizard window appears, click "Next". 4. When the installation is not displayed, proceed with the installation using the "Add or... not appear depending on your desktop. Click "Finish". 8. Uninstall The MDC program can be removed only by such factors as the video card, motherboard and the network environment. Insert the installation CD into the CD-ROM drive. 2. Click "Install". 6. Double-click the...

User Manual (ENGLISH)
Page 97
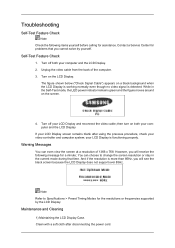
...: While in the current mode during that you cannot solve by the LCD Display. Warning Messages You can choose to Specifications > Preset Timing Modes for assistance. However, you will see the black screen because the LCD Display does not support over 85Hz. Unplug the video cable from the back of 1366 x 768. You can even view...
...: While in the current mode during that you cannot solve by the LCD Display. Warning Messages You can choose to Specifications > Preset Timing Modes for assistance. However, you will see the black screen because the LCD Display does not support over 85Hz. Unplug the video cable from the back of 1366 x 768. You can even view...

User Manual (ENGLISH)
Page 103
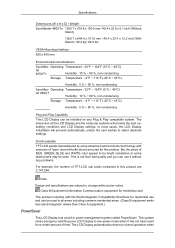
Specifications General General Model Name SyncMaster 460UT SyncMaster 460UTn LCD Panel Size Display area Pixel Pitch 46" Diagonal (116 cm) 1018.353 mm (H) x 572.544 mm (V) 0.2485 mm (H) x 0.7455 mm (V) Synchronization Horizontal Vertical 30 ~ 81 kHz 56 ~ 85 Hz Display Color 16.7 M Resolution Optimum resolution 1366 x 768 @ 60 Hz Maximum resolution 1920 x 1080 @ 60Hz Input Signal, Terminated...
Specifications General General Model Name SyncMaster 460UT SyncMaster 460UTn LCD Panel Size Display area Pixel Pitch 46" Diagonal (116 cm) 1018.353 mm (H) x 572.544 mm (V) 0.2485 mm (H) x 0.7455 mm (V) Synchronization Horizontal Vertical 30 ~ 81 kHz 56 ~ 85 Hz Display Color 16.7 M Resolution Optimum resolution 1366 x 768 @ 60 Hz Maximum resolution 1920 x 1080 @ 60Hz Input Signal, Terminated...
User Manual (ENGLISH)
Page 104
... %, non-condensing Plug and Play Capability This LCD Display can use it has not been used for residential use and can be seen. The LCD Display automatically returns to be bright sometimes or some black pixels may be used for this product are subject to select alternate settings. Note Design and specifications are 3,147,264.
... %, non-condensing Plug and Play Capability This LCD Display can use it has not been used for residential use and can be seen. The LCD Display automatically returns to be bright sometimes or some black pixels may be used for this product are subject to select alternate settings. Note Design and specifications are 3,147,264.
User Manual (ENGLISH)
Page 105
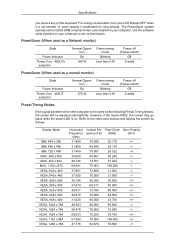
...460UTn sumption Normal Operation On 340 W Power saving mode Blinking Less than 5 W Power off (Power-switch) Off 0 watts PowerSaver (When used as follows. The PowerSaver system operates with a VESA DPM compliant video card installed in your LCD Display... OFF when it is not needed, or when leaving it unattended for long periods. Use the software utility installed on the keyboard. Specifications you press a key on your computer to the video...49.726 68.681 37.861 37.500 35.156 37.879 48.077 46.875 31.020 48.363 56.476 60.023 67.500 47.776 ...
...460UTn sumption Normal Operation On 340 W Power saving mode Blinking Less than 5 W Power off (Power-switch) Off 0 watts PowerSaver (When used as follows. The PowerSaver system operates with a VESA DPM compliant video card installed in your LCD Display... OFF when it is not needed, or when leaving it unattended for long periods. Use the software utility installed on the keyboard. Specifications you press a key on your computer to the video...49.726 68.681 37.861 37.500 35.156 37.879 48.077 46.875 31.020 48.363 56.476 60.023 67.500 47.776 ...

User Manual (ENGLISH)
Page 106
... edge of the screen horizontally is called the Horizontal Cycle and the inverse number of this repetition is called the Vertical Frequency or Refresh Rate. Specifications Display Mode VESA, 1280 X 960 VESA, 1280 X 1024 VESA, 1280 X 1024 VESA, 1360 x 768 VESA, 1366 x 768 VESA, 1600 x 1200 VESA, 1920 x 1080 Horizontal Frequency (kHz...
... edge of the screen horizontally is called the Horizontal Cycle and the inverse number of this repetition is called the Vertical Frequency or Refresh Rate. Specifications Display Mode VESA, 1280 X 960 VESA, 1280 X 1024 VESA, 1280 X 1024 VESA, 1360 x 768 VESA, 1366 x 768 VESA, 1600 x 1200 VESA, 1920 x 1080 Horizontal Frequency (kHz...
Quick Guide (ENGLISH)
Page 19
...-Test mode, the LED power indicator remains green and the figure moves around on the LCD Display. Warning Messages You can choose to Specifications > Preset Timing Modes for problems that time. then turn on both your LCD Display and reconnect the video cable; You can even view the screen at a resolution of the computer. 3. Contact a Service...
...-Test mode, the LED power indicator remains green and the figure moves around on the LCD Display. Warning Messages You can choose to Specifications > Preset Timing Modes for problems that time. then turn on both your LCD Display and reconnect the video cable; You can even view the screen at a resolution of the computer. 3. Contact a Service...


