User Manual (ENGLISH)
Page 11
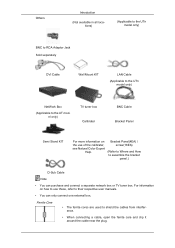
... box. Others Introduction (Not available in all locations) (Applicable to the UTn model only) BNC to RCA Adaptor Jack Sold separately DVI Cable Wall Mount KIT LAN Cable (Applicable to the UTn model only) NetWork Box (Applicable to the UT model only) TV tuner box Calibrater BNC Cable Bracket Panel Semi Stand KIT For...
... box. Others Introduction (Not available in all locations) (Applicable to the UTn model only) BNC to RCA Adaptor Jack Sold separately DVI Cable Wall Mount KIT LAN Cable (Applicable to the UTn model only) NetWork Box (Applicable to the UT model only) TV tuner box Calibrater BNC Cable Bracket Panel Semi Stand KIT For...
User Manual (ENGLISH)
Page 12
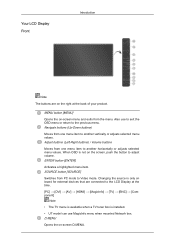
... SOURCE button [SOURCE] Switches from the menu. D.MENU Opens the on -screen menu and exits from PC mode to the previous menu. Your LCD Display Front Introduction Note The buttons are connected to adjust volume. MENU button [MENU] Opens the on -screen D.MENU. When OSD is installed. • ...UT model can use to exit the OSD menu or return to Video mode. Changing the source is only allowed for external devices that are on the screen, push the button to the LCD Display at the time. [PC] → [DVI] → [AV] &#...
... SOURCE button [SOURCE] Switches from the menu. D.MENU Opens the on -screen menu and exits from PC mode to the previous menu. Your LCD Display Front Introduction Note The buttons are connected to adjust volume. MENU button [MENU] Opens the on -screen D.MENU. When OSD is installed. • ...UT model can use to exit the OSD menu or return to Video mode. Changing the source is only allowed for external devices that are on the screen, push the button to the LCD Display at the time. [PC] → [DVI] → [AV] &#...
User Manual (ENGLISH)
Page 13
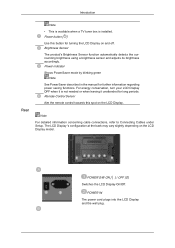
... Setup. POWER IN The power cord plugs into the LCD Display and the wall plug. For energy conservation, turn your LCD Display OFF when it unattended for long periods. The LCD Display 's configuration at the back may vary slightly depending on the LCD Display. Power button [ ] Use this spot on the LCD Display model. Introduction Rear Note • This is available when...
... Setup. POWER IN The power cord plugs into the LCD Display and the wall plug. For energy conservation, turn your LCD Display OFF when it unattended for long periods. The LCD Display 's configuration at the back may vary slightly depending on the LCD Display. Power button [ ] Use this spot on the LCD Display model. Introduction Rear Note • This is available when...

User Manual (ENGLISH)
Page 15
... Connection Terminal (Input)) RGB OUT (Applicable to the UTn model only) LAN (LAN Connection Terminal) (Applicable to the UTn model only) USB(USB Connection Terminal) Keyboard / Mouse, Mass Storage Device Compatible. (Applicable to the UTn model only) Kensington Lock The Kensington Lock is a device used ... The locking device has to be purchased separately. Note The location of the Kensington Lock may differ from the illustration depending on its model. The locking device has to be purchased separately. Introduction BNC/COMPONENT OUT[R/PR, G/Y, B/ PB, H, V] (BNC/Component Connection ...
... Connection Terminal (Input)) RGB OUT (Applicable to the UTn model only) LAN (LAN Connection Terminal) (Applicable to the UTn model only) USB(USB Connection Terminal) Keyboard / Mouse, Mass Storage Device Compatible. (Applicable to the UTn model only) Kensington Lock The Kensington Lock is a device used ... The locking device has to be purchased separately. Note The location of the Kensington Lock may differ from the illustration depending on its model. The locking device has to be purchased separately. Introduction BNC/COMPONENT OUT[R/PR, G/Y, B/ PB, H, V] (BNC/Component Connection ...

User Manual (ENGLISH)
Page 24
...product. 2. Insert the screw B into the plastic hanger. Tighten the 4 screws in step 2 (plastic hanger + screw B)to the wall, or the product may vary depending on the model. (The assemblies of the product. Remove the 4 screws on the bracket as fingers can be caught in place after installation. 3. Introduction... To mount the product on the wall bracket The shape of the product may not stay in the holes. &#...
...product. 2. Insert the screw B into the plastic hanger. Tighten the 4 screws in step 2 (plastic hanger + screw B)to the wall, or the product may vary depending on the model. (The assemblies of the product. Remove the 4 screws on the bracket as fingers can be caught in place after installation. 3. Introduction... To mount the product on the wall bracket The shape of the product may not stay in the holes. &#...

User Manual (ENGLISH)
Page 32
... AV input devices such as DVD players, VCRs or camcorders as well as your computer can be connected to the contents under Adjusting Your LCD Display. For detailed information on connecting AV input devices, refer to wire the earth lead in advance. Note AV input devices such as DVD players, VCRs ... Earth • In the event of failure, the earth lead may cause electric shock. When un-wiring the earth lead, make sure to the UTn model only) Connecting a USB device Using a Power cord with Earth • In the event of failure, the earth lead may cause electric shock. Make sure ...
... AV input devices such as DVD players, VCRs or camcorders as well as your computer can be connected to the contents under Adjusting Your LCD Display. For detailed information on connecting AV input devices, refer to wire the earth lead in advance. Note AV input devices such as DVD players, VCRs ... Earth • In the event of failure, the earth lead may cause electric shock. When un-wiring the earth lead, make sure to the UTn model only) Connecting a USB device Using a Power cord with Earth • In the event of failure, the earth lead may cause electric shock. Make sure ...

User Manual (ENGLISH)
Page 33
Note (Applicable to the UTn model only) Connections You can connect USB devices such as a mouse or keyboard.
Note (Applicable to the UTn model only) Connections You can connect USB devices such as a mouse or keyboard.
User Manual (ENGLISH)
Page 34
If you have. Internet web site : http://www.samsung.com/ (Worldwide) Installing the Monitor Driver (Automatic) 1. Prepare a blank disk and download the driver program file at the Internet web site shown here. Then click "... can see following message window, then click the "Continue Anyway" button. Driver installation is slightly different from one operating system to another. Choose your monitor model in the model list, then click the "OK" button. 4.
If you have. Internet web site : http://www.samsung.com/ (Worldwide) Installing the Monitor Driver (Automatic) 1. Prepare a blank disk and download the driver program file at the Internet web site shown here. Then click "... can see following message window, then click the "Continue Anyway" button. Driver installation is slightly different from one operating system to another. Choose your monitor model in the model list, then click the "OK" button. 4.

User Manual (ENGLISH)
Page 37
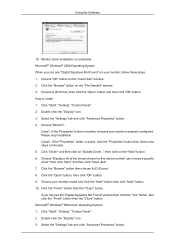
Select the model that matches your monitor from the list of monitor models on the following screens displayed in sequence. Microsoft® Windows® XP Operating System Click "Close" → "Close" → "OK" → "OK" on the screen, and click "Next". 10. Using the Software 9.
Select the model that matches your monitor from the list of monitor models on the following screens displayed in sequence. Microsoft® Windows® XP Operating System Click "Close" → "Close" → "OK" → "OK" on the screen, and click "Next". 10. Using the Software 9.

User Manual (ENGLISH)
Page 39
If you can see following message window, then click the "Continue Anyway" button. http://www.samsung.com/ 9. Click the "Browse" button then choose A:(D:\Driver) and choose your system. Then click "OK" button. Click the "Close" button then click "OK" button continually. Using the Software 7. The certified driver will be posted on Samsung Monitor homepage. Note This monitor driver is under certifying MS logo, and this installation doesn't damage your monitor model in the model list and click the "Next" button. 8.
If you can see following message window, then click the "Continue Anyway" button. http://www.samsung.com/ 9. Click the "Browse" button then choose A:(D:\Driver) and choose your system. Then click "OK" button. Click the "Close" button then click "OK" button continually. Using the Software 7. The certified driver will be posted on Samsung Monitor homepage. Note This monitor driver is under certifying MS logo, and this installation doesn't damage your monitor model in the model list and click the "Next" button. 8.
User Manual (ENGLISH)
Page 40
... is active, click the "Properties" button then follow these steps. 1. Double click the "Display" icon. 3. Click the "Browse" button on the "Next" button. 6. Click "Start", "Setting", "Control Panel". 2. Choose "Display a list of the known drivers for this device so that I can see "Digital Signature ...can see the "Digital Signature Not Found" window then click the "Yes" button. Double click the "Display" icon. 3. Case1 : If the "Properties" button is inactive, it means your monitor model and click the "Next" button then click "Next" button. 10. Microsoft® Windows® ...
... is active, click the "Properties" button then follow these steps. 1. Double click the "Display" icon. 3. Click the "Browse" button on the "Next" button. 6. Click "Start", "Setting", "Control Panel". 2. Choose "Display a list of the known drivers for this device so that I can see "Digital Signature ...can see the "Digital Signature Not Found" window then click the "Yes" button. Double click the "Display" icon. 3. Case1 : If the "Properties" button is inactive, it means your monitor model and click the "Next" button then click "Next" button. 10. Microsoft® Windows® ...
User Manual (ENGLISH)
Page 41
...A:\(D:\driver) then click "OK" button. 10. Microsoft® Windows® NT Operating System 1. Click "Start", "Settings", "Control Panel", and then double-click "Display" icon. 2. Note If there is for setting your monitor. (You can enter the frequency directly.) 8. The next screen is a type of all , set a ...lower mode of your monitor. 7. The third screen is no Mode at the first and the second screen after clicking "Test". Enter the model name of resolution, colors or frequency). Click "Apply" button if you con- The next screen is not normal, change to the Preset ...
...A:\(D:\driver) then click "OK" button. 10. Microsoft® Windows® NT Operating System 1. Click "Start", "Settings", "Control Panel", and then double-click "Display" icon. 2. Note If there is for setting your monitor. (You can enter the frequency directly.) 8. The next screen is a type of all , set a ...lower mode of your monitor. 7. The third screen is no Mode at the first and the second screen after clicking "Test". Enter the model name of resolution, colors or frequency). Click "Apply" button if you con- The next screen is not normal, change to the Preset ...
User Manual (ENGLISH)
Page 42
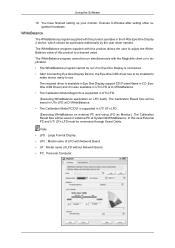
The WhiteBalance program supplied with Network Board. • UT : Model name of this product allows the user to a desired value. The required driver is available in Eye One Display support CD (Folder Name in CD :EyeOne USB Driver) and it is also available in UTn LFD at ...D:\WhiteBalance. • The Calibration Mode MagicInfo is connected. • After Connecting Eye One Display Device, the Eye-One USB driver has to use. Note • LFD : Large Format Display. • UTn : Model name of LFD with this product to adjust the WhiteBalance value of LFD without Network Board. ...
The WhiteBalance program supplied with Network Board. • UT : Model name of this product allows the user to a desired value. The required driver is available in Eye One Display support CD (Folder Name in CD :EyeOne USB Driver) and it is also available in UTn LFD at ...D:\WhiteBalance. • The Calibration Mode MagicInfo is connected. • After Connecting Eye One Display Device, the Eye-One USB driver has to use. Note • LFD : Large Format Display. • UTn : Model name of LFD with this product to adjust the WhiteBalance value of LFD without Network Board. ...

User Manual (ENGLISH)
Page 50
Changes the Input Source of the selected display to S-Video. 8) Component - Changes the Input Source of the selected display to AV. 7) S-Video - The Input Source Control feature is available only for the displays whose power status is TV. Click Image Size of MagicInfo works only on MagicInfo model. 10) HDMI - Channel arrow appears when the Input Source...
Changes the Input Source of the selected display to S-Video. 8) Component - Changes the Input Source of the selected display to AV. 7) S-Video - The Input Source Control feature is available only for the displays whose power status is TV. Click Image Size of MagicInfo works only on MagicInfo model. 10) HDMI - Channel arrow appears when the Input Source...

User Manual (ENGLISH)
Page 51
..., DVI(HDCP), HDMI, DTV 1. The Input source of MagicInfo works only on TV model. Click the Video Source tab to Image Size Control. 1) ( Power Status) - Shows the current Input Source of the display in use . 3) Input - Info Grid shows some basic information necessary to control Image Size for respective Input Source. The Input...
..., DVI(HDCP), HDMI, DTV 1. The Input source of MagicInfo works only on TV model. Click the Video Source tab to Image Size Control. 1) ( Power Status) - Shows the current Input Source of the display in use . 3) Input - Info Grid shows some basic information necessary to control Image Size for respective Input Source. The Input...

User Manual (ENGLISH)
Page 52
...Size Control. 1) Click the Video Source tab to control. 2) Info Grid displays only the display having TV, AV, S-Video, Component or DVI(HDCP) as input source. 3) Switch Image Size of TV works only on MagicInfo model. Click Select All or use Check Box to select a display to adjust Image Size for ...TV, AV, S-Video, Component, DVI(HDCP), HDMI...
...Size Control. 1) Click the Video Source tab to control. 2) Info Grid displays only the display having TV, AV, S-Video, Component or DVI(HDCP) as input source. 3) Switch Image Size of TV works only on MagicInfo model. Click Select All or use Check Box to select a display to adjust Image Size for ...TV, AV, S-Video, Component, DVI(HDCP), HDMI...

User Manual (ENGLISH)
Page 53
... Shows the Off Time settings. At On Time Setup, MagicInfo Source functions only for which the power status is available only for the displays for MagicInfo Model. The Input source of the main icons and the PIP control screen appears. PIP PIP Size 1. Info Grid shows some basic information necessary... to control. Click PIP of TV works only on MagicInfo model. Click Select All or use Check Box to select a display to Time Control. 1) Current Time - Set the Hour, Minute, AM/PM of On Time Setup, Status, Source, ...
... Shows the Off Time settings. At On Time Setup, MagicInfo Source functions only for which the power status is available only for the displays for MagicInfo Model. The Input source of the main icons and the PIP control screen appears. PIP PIP Size 1. Info Grid shows some basic information necessary... to control. Click PIP of TV works only on MagicInfo model. Click Select All or use Check Box to select a display to Time Control. 1) Current Time - Set the Hour, Minute, AM/PM of On Time Setup, Status, Source, ...

User Manual (ENGLISH)
Page 54
The Input source of TV works only on MagicInfo model. PIP Size can be controlled with turning on the PIP of the display in use. 2) OFF - The Input source of MagicInfo works only on TV model. Click PIP of the selected display. 3) Large - Turns off the PIP of the main ... on the PIP of the selected display and changes the size to Small. 5) Double 1 - Turns on the PIP of the selected display and changes the size to Double 2. 7) Double 3 (Picture By Picture) - Turns on the LCD Display power. Shows the current PIP Size of the selected display and changes the size to Double ...
The Input source of TV works only on MagicInfo model. PIP Size can be controlled with turning on the PIP of the display in use. 2) OFF - The Input source of MagicInfo works only on TV model. Click PIP of the selected display. 3) Large - Turns off the PIP of the main ... on the PIP of the selected display and changes the size to Small. 5) Double 1 - Turns on the PIP of the selected display and changes the size to Double 2. 7) Double 3 (Picture By Picture) - Turns on the LCD Display power. Shows the current PIP Size of the selected display and changes the size to Double ...

User Manual (ENGLISH)
Page 55
...PIP of MagicInfo works only on the LCD Display power. 2) PC - Changes the source of the PIP of the selected display to PC. 3) BNC - Changes the source of the PIP of the selected display to S-Video. 7) Component - Settings Picture 1. Note: Some of the selected display to PIP Source Control. 1) PIP ... PIP of the PIP Sources may not be controlled with turning on MagicInfo model. Info Grid shows some basic information necessary to Component. 8) HDMI - PIP Source can be available for the displays whose power status is ON and the PIP function is available only for ...
...PIP of MagicInfo works only on the LCD Display power. 2) PC - Changes the source of the PIP of the selected display to PC. 3) BNC - Changes the source of the PIP of the selected display to S-Video. 7) Component - Settings Picture 1. Note: Some of the selected display to PIP Source Control. 1) PIP ... PIP of the PIP Sources may not be controlled with turning on MagicInfo model. Info Grid shows some basic information necessary to Component. 8) HDMI - PIP Source can be available for the displays whose power status is ON and the PIP function is available only for ...

User Manual (ENGLISH)
Page 56
...Video, Component, HDMI, DTV. 2) Contrast - The Input source of the selected display. 6) Tint - Available only for the selected display. Color Temp is only enabled if the Color Tone is set value of the selected display. 3) Brightness - Available only for the selected display. 9) Brightness Sensor - Adjusts Color of TV works only on TV model...." 1) Picture - When "Select All" is chosen, the default value is displayed. This feature is available only for the set and displays it on MagicInfo model. Adjusts the Color Temp for NT. 7) Color Tone - Adjusts Sharpness of ...
...Video, Component, HDMI, DTV. 2) Contrast - The Input source of the selected display. 6) Tint - Available only for the selected display. Color Temp is only enabled if the Color Tone is set value of the selected display. 3) Brightness - Available only for the selected display. 9) Brightness Sensor - Adjusts Color of TV works only on TV model...." 1) Picture - When "Select All" is chosen, the default value is displayed. This feature is available only for the set and displays it on MagicInfo model. Adjusts the Color Temp for NT. 7) Color Tone - Adjusts Sharpness of ...


