
Owners Instructions
Page 2
..., DO NOT REMOVE REAR COVER, NO USER SERVICEABLE PARTS INSIDE. Caution: FCC/CSA regulations state that any unauthorized changes or modifications to this equipment may be copyrighted and any unauthorized recording in whole or in its class. We designed it with easy-to-use on-screen menus and closed captioning capabilities, making it . Warning! Your new Samsung LCD TV/Monitor represents the...
..., DO NOT REMOVE REAR COVER, NO USER SERVICEABLE PARTS INSIDE. Caution: FCC/CSA regulations state that any unauthorized changes or modifications to this equipment may be copyrighted and any unauthorized recording in whole or in its class. We designed it with easy-to-use on-screen menus and closed captioning capabilities, making it . Warning! Your new Samsung LCD TV/Monitor represents the...
Owners Instructions
Page 4
.../Monitor. when the LCD TV/Monitor exhibits a distinct change in the vicinity of the FCC rules. 4 Adjusting other electric light or power circuits or where it can be placed in performance x If you make adjustments yourself, adjust only those that are required, be sure the service technician uses replacement parts specified by the operating instructions. When installing an outside antenna or cable system is connected to the LCD TV/Monitor...
.../Monitor. when the LCD TV/Monitor exhibits a distinct change in the vicinity of the FCC rules. 4 Adjusting other electric light or power circuits or where it can be placed in performance x If you make adjustments yourself, adjust only those that are required, be sure the service technician uses replacement parts specified by the operating instructions. When installing an outside antenna or cable system is connected to the LCD TV/Monitor...

Owners Instructions
Page 5
... of their respective owners. 5 Information in this material. TFT LCD panel manufactured by using soft and dry cloth and polish it . 4. If excessive force is appeared as described below to be the trademarks or registered trademarks of Video Electronics Standard Association. But the pixels of RED, GREEN, BLUE and WHITE color seem to change without uneasiness. • For example, the number of Samsung Electronics Co...
... of their respective owners. 5 Information in this material. TFT LCD panel manufactured by using soft and dry cloth and polish it . 4. If excessive force is appeared as described below to be the trademarks or registered trademarks of Video Electronics Standard Association. But the pixels of RED, GREEN, BLUE and WHITE color seem to change without uneasiness. • For example, the number of Samsung Electronics Co...

Owners Instructions
Page 6
... Changing your Language ...15 Setting the Channel ...16 Setting the Picture...18 Setting the Sound ...19 Viewing the Picture In Picture (PIP)...20 Viewing the Picture By Picture (PBP 21 Viewing Closed Captions ...22 Viewing the V-Chip ...23 PC Functions and Adjustments ...25 Setting the Sleep Timer ...28 Switching the Sound Off Temporarily 28 Viewing pictures from External Sources 28 Displaying Information ...28 PC Display Modes ...29 PowerSaver ...29 Troubleshooting Image ...30 Audio & TV ...31 Technical and Environmental Specifications 32 Service...
... Changing your Language ...15 Setting the Channel ...16 Setting the Picture...18 Setting the Sound ...19 Viewing the Picture In Picture (PIP)...20 Viewing the Picture By Picture (PBP 21 Viewing Closed Captions ...22 Viewing the V-Chip ...23 PC Functions and Adjustments ...25 Setting the Sleep Timer ...28 Switching the Sound Off Temporarily 28 Viewing pictures from External Sources 28 Displaying Information ...28 PC Display Modes ...29 PowerSaver ...29 Troubleshooting Image ...30 Audio & TV ...31 Technical and Environmental Specifications 32 Service...

Owners Instructions
Page 7
... all locations) Warranty Card (Not available in all locations) Owner's Instructions LCD TV/Monitor & Speakers Power SOURCE AUTO DISPLAY STILL P.STD S.STD CH VOL MENU VOL CH MUTE EXIT 1 2 3 4 5 6 7 +100 SLEEP 8 9 PRE-CH 0 V.DOLBY ASPECT MTS ADD/ERASE CH.SCAN PBP LOCATE SIZE PIP ON V.CHIP CAPTION Remote Control & Batteries (AAA x 2) Power Cord DC Adapter Speaker Connection Cable 15-pin D-Sub Signal Cable Inserting the Batteries in the Remote Control 1 Remove the cover on the remote control x - on the...
... all locations) Warranty Card (Not available in all locations) Owner's Instructions LCD TV/Monitor & Speakers Power SOURCE AUTO DISPLAY STILL P.STD S.STD CH VOL MENU VOL CH MUTE EXIT 1 2 3 4 5 6 7 +100 SLEEP 8 9 PRE-CH 0 V.DOLBY ASPECT MTS ADD/ERASE CH.SCAN PBP LOCATE SIZE PIP ON V.CHIP CAPTION Remote Control & Batteries (AAA x 2) Power Cord DC Adapter Speaker Connection Cable 15-pin D-Sub Signal Cable Inserting the Batteries in the Remote Control 1 Remove the cover on the remote control x - on the...

Owners Instructions
Page 8
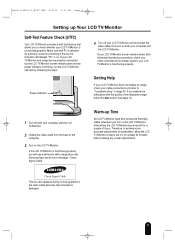
... mechanical part of the new VESA® Plug and Play solution eliminates complicated and time consuming setup. Viewing angle Tilt the screen until you install your LCD TV/Monitor. Your PC system can automatically configure itself for use the flat panel display. Please do not tilt the LCD TV/Monitor other than specified range. If your PC system needs a monitor driver, follow the instructions given below before you feel comfortable working with your display...
... mechanical part of the new VESA® Plug and Play solution eliminates complicated and time consuming setup. Viewing angle Tilt the screen until you install your LCD TV/Monitor. Your PC system can automatically configure itself for use the flat panel display. Please do not tilt the LCD TV/Monitor other than specified range. If your PC system needs a monitor driver, follow the instructions given below before you feel comfortable working with your display...
Owners Instructions
Page 9
... display an image, check your cable connections and refer to warm (be turned off both your computer and the LCD TV/Monitor. 2 Unplug the video cable from the back of the computer. 3 Turn on the LCD TV/Monitor. If your LCD TV/Monitor and computer are properly connected but the LCD TV/Monitor screen remains dark and the power indicator is blinking, run the LCD TV/Monitor self-test by checking if the source indicator LED...
... display an image, check your cable connections and refer to warm (be turned off both your computer and the LCD TV/Monitor. 2 Unplug the video cable from the back of the computer. 3 Turn on the LCD TV/Monitor. If your LCD TV/Monitor and computer are properly connected but the LCD TV/Monitor screen remains dark and the power indicator is blinking, run the LCD TV/Monitor self-test by checking if the source indicator LED...

Owners Instructions
Page 10
.... - For driver installation, please refer "Installing Monitor Driver" section on the accompanied CD. Connect the RCA DTV Cable to the Video port of the video signal cable to "Audio Out" terminal of the Set-Top Box. Connect the RCA Cable to "Y", "Pb", and "Pr" on the rear of the LCD TV/Monitor and the other end to "Audio Out" terminal of the sound card on the rear of the LCD TV/Monitor and...
.... - For driver installation, please refer "Installing Monitor Driver" section on the accompanied CD. Connect the RCA DTV Cable to the Video port of the video signal cable to "Audio Out" terminal of the Set-Top Box. Connect the RCA Cable to "Y", "Pb", and "Pr" on the rear of the LCD TV/Monitor and the other end to "Audio Out" terminal of the sound card on the rear of the LCD TV/Monitor and...
Owners Instructions
Page 14
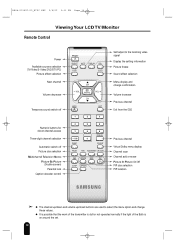
... Page 14 Viewing Your LCD TV/Monitor Remote Control Power Available sources selection (TV/Video/S-Video/DVD/DTV/PC) Picture effect selection Next channel Volume decrease Temporary sound switch-off Numeric buttons for direct channel access Three-digit channel selection Automatic switch-off Picture size selection Multichannel Television Stereo Picture-By-Picture (Double screen) Parental lock Caption decoder control Power SOURCE AUTO DISPLAY STILL P.STD S.STD CH VOL MENU VOL CH MUTE EXIT 1 2 3 4 5 6 7 +100 SLEEP 8 9 PRE-CH 0 V.DOLBY P.SIZE MTS...
... Page 14 Viewing Your LCD TV/Monitor Remote Control Power Available sources selection (TV/Video/S-Video/DVD/DTV/PC) Picture effect selection Next channel Volume decrease Temporary sound switch-off Numeric buttons for direct channel access Three-digit channel selection Automatic switch-off Picture size selection Multichannel Television Stereo Picture-By-Picture (Double screen) Parental lock Caption decoder control Power SOURCE AUTO DISPLAY STILL P.STD S.STD CH VOL MENU VOL CH MUTE EXIT 1 2 3 4 5 6 7 +100 SLEEP 8 9 PRE-CH 0 V.DOLBY P.SIZE MTS...
Owners Instructions
Page 15
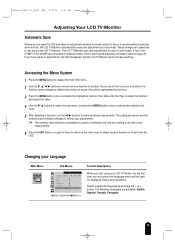
... the LCD TV/Monitor does not save adjustments for up to 4 user modes. As you move from the OSD. or + button. The following languages are saved into a user area in table on page 29. menu. 5 After selecting a function, use the ➛/❿ buttons to make necessary adjustments. Accessing the Menu System 1 Press the MENU button to display the main OSD menu. 2 Use the buttons to move from one function to another , the function name changes...
... the LCD TV/Monitor does not save adjustments for up to 4 user modes. As you move from the OSD. or + button. The following languages are saved into a user area in table on page 29. menu. 5 After selecting a function, use the ➛/❿ buttons to make necessary adjustments. Accessing the Menu System 1 Press the MENU button to display the main OSD menu. 2 Use the buttons to move from one function to another , the function name changes...

Owners Instructions
Page 16
... by pressing the ADD/ERASE button on the remote control. BN68-00169C-00_NTSC ENG 2/5/02 3:41 PM Page 16 Adjusting Your LCD TV/Monitor Setting the Channel Main Menu Sub-Menus Function Descriptions Channel Ant/CATV Auto Program Fine Tune è ¨ Ant à 00 ¨ Add/Erase : Erased LNA : Off Selecting the Video Signal Source Before begin memorizing all of...
... by pressing the ADD/ERASE button on the remote control. BN68-00169C-00_NTSC ENG 2/5/02 3:41 PM Page 16 Adjusting Your LCD TV/Monitor Setting the Channel Main Menu Sub-Menus Function Descriptions Channel Ant/CATV Auto Program Fine Tune è ¨ Ant à 00 ¨ Add/Erase : Erased LNA : Off Selecting the Video Signal Source Before begin memorizing all of...
Owners Instructions
Page 20
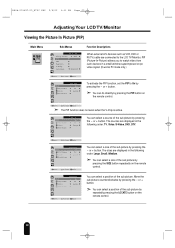
The sources are connected to the LCD TV/Monitor, PIP (Picture-In-Picture) allows you to watch video from such devices in a small window superimposed on pc video signal. (It works PC mode only.) Move Select Exit Function PIP TV/Video Size Position : On à ¨ TV è ¨ Large To activate the PIP function, set the PIP to On by pressing the - The sizes are displayed in...
The sources are connected to the LCD TV/Monitor, PIP (Picture-In-Picture) allows you to watch video from such devices in a small window superimposed on pc video signal. (It works PC mode only.) Move Select Exit Function PIP TV/Video Size Position : On à ¨ TV è ¨ Large To activate the PIP function, set the PIP to On by pressing the - The sizes are displayed in...

Owners Instructions
Page 25
... Adjusting Your LCD TV/Monitor PC functions and adjustments - The sizes are displayed in the following order: Expanded 1, Expanded 2, Normal. ➣ You can select a image size by pressing the P.SIZE (Picture Size) button repeatedly on the remote control. 25 Image Main Menu Sub-Menus PC Image Image Lock Position Color Adjust Recall ¨¨¨ ¨¨ 1024x768 48kHz 59Hz Function Descriptions Move Select Exit PC Image Brightness à ¨ Contrast Size Expanded 1 Use the ➛/❿ buttons...
... Adjusting Your LCD TV/Monitor PC functions and adjustments - The sizes are displayed in the following order: Expanded 1, Expanded 2, Normal. ➣ You can select a image size by pressing the P.SIZE (Picture Size) button repeatedly on the remote control. 25 Image Main Menu Sub-Menus PC Image Image Lock Position Color Adjust Recall ¨¨¨ ¨¨ 1024x768 48kHz 59Hz Function Descriptions Move Select Exit PC Image Brightness à ¨ Contrast Size Expanded 1 Use the ➛/❿ buttons...

Owners Instructions
Page 26
... change the width of fine, coarse and position are not obtained using the Fine adjustment, use the Coarse adjustment and then use Fine again. Use the H-Position menu to your LCD TV/Monitor to center the image on the screen. The values of the image. Use the ➛/❿ buttons to adjust the positions (Horizontal/Vertical). BN68-00169C-00_NTSC ENG 2/5/02 3:42 PM Page 26 Adjusting Your LCD TV/Monitor PC functions and adjustments - PC Image Image Lock Position Color Adjust...
... change the width of fine, coarse and position are not obtained using the Fine adjustment, use the Coarse adjustment and then use Fine again. Use the H-Position menu to your LCD TV/Monitor to center the image on the screen. The values of the image. Use the ➛/❿ buttons to adjust the positions (Horizontal/Vertical). BN68-00169C-00_NTSC ENG 2/5/02 3:42 PM Page 26 Adjusting Your LCD TV/Monitor PC functions and adjustments - PC Image Image Lock Position Color Adjust...

Owners Instructions
Page 27
... tune and get the best image by removing noises that create unstable images with the factory default values. 27 The following color modes are replaced with jitters and shimmers. or + button to center the image on the screen. Then press the - Use the H-Position menu to adjust the value of the image. Customizing the Color Select the required option (Red, Green, Blue) by pressing the - This function may change the width of...
... tune and get the best image by removing noises that create unstable images with the factory default values. 27 The following color modes are replaced with jitters and shimmers. or + button to center the image on the screen. Then press the - Use the H-Position menu to adjust the value of the image. Customizing the Color Select the required option (Red, Green, Blue) by pressing the - This function may change the width of...

Owners Instructions
Page 29
...", "Sleep", and "Deep Sleep". State Normal Operation Power-Saving Function mode (EPA/NUTEK) Horizontal Sync Active Inactive Vertical Sync Active Inactive Power Indicator Green Green, Blinking (1 sec interval) Power Consumption 211MP : 110W (Max.) 241MP : 120W (Max.) Less than 8W ➣ This LCD TV/Monitor automatically returns to the standard signal mode, the screen is EPA ENERGY STAR® compliant and NUTEK compliant when used for long periods. 29 Mode HDTV Format VGA SVGA...
...", "Sleep", and "Deep Sleep". State Normal Operation Power-Saving Function mode (EPA/NUTEK) Horizontal Sync Active Inactive Vertical Sync Active Inactive Power Indicator Green Green, Blinking (1 sec interval) Power Consumption 211MP : 110W (Max.) 241MP : 120W (Max.) Less than 8W ➣ This LCD TV/Monitor automatically returns to the standard signal mode, the screen is EPA ENERGY STAR® compliant and NUTEK compliant when used for long periods. 29 Mode HDTV Format VGA SVGA...
Owners Instructions
Page 30
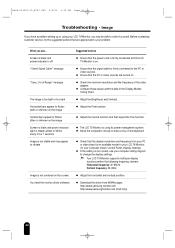
... connected and the LCD TV/Monitor is not correct, use your LCD TV/Monitor, you see... x Adjust the Brightness and Contrast. You need the monitor driver software Suggested Actions x Ensure that the display resolution and frequency from WWW pages: http://www.samsung-monitor.com http://www.samsungmonitor.com (USA Only) 30 What you may appear to your computer check: Control Panel, Display, Settings. Image If you have a problem setting up or using its power management system. Screen is black and power...
... connected and the LCD TV/Monitor is not correct, use your LCD TV/Monitor, you see... x Adjust the Brightness and Contrast. You need the monitor driver software Suggested Actions x Ensure that the display resolution and frequency from WWW pages: http://www.samsung-monitor.com http://www.samsungmonitor.com (USA Only) 30 What you may appear to your computer check: Control Panel, Display, Settings. Image If you have a problem setting up or using its power management system. Screen is black and power...

Owners Instructions
Page 31
... that the audio cable is still too low after turning the control to both the audio-in port on your LCD TV/Monitor and the audio-out port on the computer sound card or software program. x Check the volume level. x If the volume is firmly connected to its maximum, check the volume control on your sound card. x Check "TV Tuner Box". 31 x Check the volume level. x Select "Channel auto program" to appropriate level. x Adjust the Treble and...
... that the audio cable is still too low after turning the control to both the audio-in port on your LCD TV/Monitor and the audio-out port on the computer sound card or software program. x Check the volume level. x If the volume is firmly connected to its maximum, check the volume control on your sound card. x Check "TV Tuner Box". 31 x Check the volume level. x Select "Channel auto program" to appropriate level. x Adjust the Treble and...
Owners Instructions
Page 32
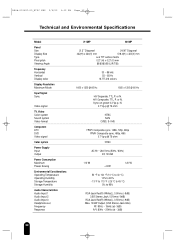
... Jack Red(R) White(L), 0.5Vrms (-9dB) 3.5Ø Stereo Jack, 0.5Vrms (-9dB) RCA Jack Red(R) White(L), 0.5Vrms (-9dB) Max. 10mW Output (3.5Ø Stereo Jack 32Ω) RF: 80Hz ~ 15kHz (at- 3dB) A/V: 80Hz ~ 20kHz (at - 3dB) 32 H/V Composite, TTL, P. or N. or N. BN68-00169C-00_NTSC ENG 2/5/02 3:42 PM Page 32 Technical and Environmental Specifications Model Panel Size Display Size Type Pixel pitch Viewing Angle Frequency Horizontal Vertical Display color Display Resolution Maximum Mode Input Signal Sync.
... Jack Red(R) White(L), 0.5Vrms (-9dB) 3.5Ø Stereo Jack, 0.5Vrms (-9dB) RCA Jack Red(R) White(L), 0.5Vrms (-9dB) Max. 10mW Output (3.5Ø Stereo Jack 32Ω) RF: 80Hz ~ 15kHz (at- 3dB) A/V: 80Hz ~ 20kHz (at - 3dB) 32 H/V Composite, TTL, P. or N. or N. BN68-00169C-00_NTSC ENG 2/5/02 3:42 PM Page 32 Technical and Environmental Specifications Model Panel Size Display Size Type Pixel pitch Viewing Angle Frequency Horizontal Vertical Display color Display Resolution Maximum Mode Input Signal Sync.
Owners Instructions
Page 33
User Information Changes or modifications not expressly approved by the party responsible for help. Before making the connection, make sure the voltage rating of the computer convenience outlet is the same as the monitor and that to or exceeds the monitor voltage rating. Radio Frequency Interference x EN55024:1998 - Power Line Harmonics x EN61000-3-3:1995 - Product Safety. 33 x Connect the equipment into an outlet on , the...
User Information Changes or modifications not expressly approved by the party responsible for help. Before making the connection, make sure the voltage rating of the computer convenience outlet is the same as the monitor and that to or exceeds the monitor voltage rating. Radio Frequency Interference x EN55024:1998 - Power Line Harmonics x EN61000-3-3:1995 - Product Safety. 33 x Connect the equipment into an outlet on , the...


