User Manual (ENGLISH)
Page 3
... plugs to one outlet. Do not use the power cord when the connector or plug is dusty, clean it does not come loose. A bad connection may cause fire. Do not disconnect the power cord while using the monitor. Do not pull the plug out by the separation and may damage the monitor. This may cause fire. If the connector or plug of the power cord is dusty. Using the power cord...
... plugs to one outlet. Do not use the power cord when the connector or plug is dusty, clean it does not come loose. A bad connection may cause fire. Do not disconnect the power cord while using the monitor. Do not pull the plug out by the separation and may damage the monitor. This may cause fire. If the connector or plug of the power cord is dusty. Using the power cord...
User Manual (ENGLISH)
Page 7
... the signal cable. Do not cover the vents on the monitor. This may malfunction, causing electric shock or fire. This may cause electric shock or fire. This may cause a breakdown, electric shock or fire due to damage to the cable. If the monitor is dropped or the casing is damaged, turn the monitor off and unplug the power cord. Do...
... the signal cable. Do not cover the vents on the monitor. This may malfunction, causing electric shock or fire. This may cause electric shock or fire. This may cause a breakdown, electric shock or fire due to damage to the cable. If the monitor is dropped or the casing is damaged, turn the monitor off and unplug the power cord. Do...
User Manual (ENGLISH)
Page 8
... Service Center. If an alien substances or water enters the product, turn the product off, unplug the power connector from combustible chemical sprays or inflammable substances. Do not install the product on an unstable, uneven surface or a location prone to a changing picture when away from the monitor for an extended period of using the monitor. When viewing a fixed screen for the model. Adjust the resolution and frequency...
... Service Center. If an alien substances or water enters the product, turn the product off, unplug the power connector from combustible chemical sprays or inflammable substances. Do not install the product on an unstable, uneven surface or a location prone to a changing picture when away from the monitor for an extended period of using the monitor. When viewing a fixed screen for the model. Adjust the resolution and frequency...
User Manual (ENGLISH)
Page 12
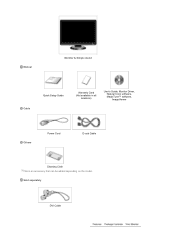
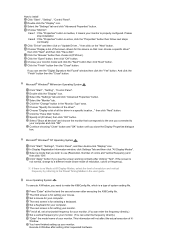
Manual Monitor & Simple stand Cable Quick Setup Guide Warranty Card (Not available in all locations) User's Guide, Monitor Driver, Natural Color software, MagicTune™ software, ImageViewer Others Power Cord D-sub Cable Cleaning Cloth This is an accessory that can be added depending on the model. Sold separately DVI Cable
Manual Monitor & Simple stand Cable Quick Setup Guide Warranty Card (Not available in all locations) User's Guide, Monitor Driver, Natural Color software, MagicTune™ software, ImageViewer Others Power Cord D-sub Cable Cleaning Cloth This is an accessory that can be added depending on the model. Sold separately DVI Cable
User Manual (ENGLISH)
Page 14
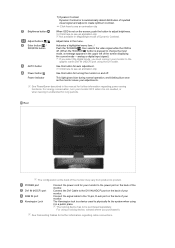
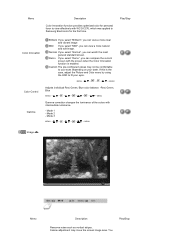
... using the DVI cable. Brightness button [ ] Adjust buttons [ ] Enter button [ ] / SOURCE button AUTO button Power button [ ] Power indicator 7) Dynamic Contrast Dynamic Contrast is to automatically detect distribution of inputted visual signal and adjust to create optimum contrast. >> Click here to see an animation clip When OSD is not on the screen, push the button to adjust brightness. >> Click here to see an animation clip Use this button for turning the monitor on and off . (When the 'SOURCE/ ' button is pressed to change the input mode...
... using the DVI cable. Brightness button [ ] Adjust buttons [ ] Enter button [ ] / SOURCE button AUTO button Power button [ ] Power indicator 7) Dynamic Contrast Dynamic Contrast is to automatically detect distribution of inputted visual signal and adjust to create optimum contrast. >> Click here to see an animation clip When OSD is not on the screen, push the button to adjust brightness. >> Click here to see an animation clip Use this button for turning the monitor on and off . (When the 'SOURCE/ ' button is pressed to change the input mode...
User Manual (ENGLISH)
Page 17
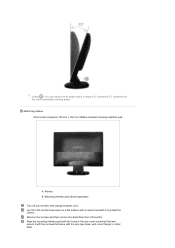
... cover mounting Pad and secure it to 23° backward for the most comfortable viewing angle. A. Remove four screws and then remove the stand from the LCD monitor. Using ( ), You can adjust the tilt anlgle within a range of 0° forward to protect the screen. Align the mounting interface pad with the arm-type base, wall mount hanger or other base. Mounting interface pad (Sold separately) Turn off your monitor and unplug its power cord...
... cover mounting Pad and secure it to 23° backward for the most comfortable viewing angle. A. Remove four screws and then remove the stand from the LCD monitor. Using ( ), You can adjust the tilt anlgle within a range of 0° forward to protect the screen. Align the mounting interface pad with the arm-type base, wall mount hanger or other base. Mounting interface pad (Sold separately) Turn off your monitor and unplug its power cord...
User Manual (ENGLISH)
Page 19
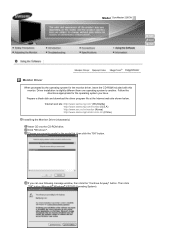
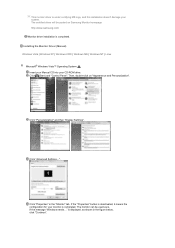
...) Installing the Monitor Driver (Automatic) Insert CD into the CD-ROM drive. Model SyncMaster 226CW Monitor Driver When prompted by the operating system for the operating system you can see following message window, then click the "Continue Anyway" button. Click "Windows". If you have. Follow the directions appropriate for the monitor driver, insert the CD-ROM included with this monitor. Choose your monitor model in the model...
...) Installing the Monitor Driver (Automatic) Insert CD into the CD-ROM drive. Model SyncMaster 226CW Monitor Driver When prompted by the operating system for the operating system you can see following message window, then click the "Continue Anyway" button. Click "Windows". If you have. Follow the directions appropriate for the monitor driver, insert the CD-ROM included with this monitor. Choose your monitor model in the model...
User Manual (ENGLISH)
Page 20
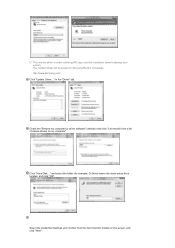
Click (Start) and "Control Panel". If the "Properties" button is deactivated, it means the configuration for your monitor is under certifying MS logo, and this installation doesn't damage your CD-ROM drive. Then, double-click on Samsung Monitor homepage http://www.samsung.com/ Monitor driver installation is . If the message "Windows needs..." is displayed, as is completed. Click "Properties" in the figure below, click "Continue". Click...
Click (Start) and "Control Panel". If the "Properties" button is deactivated, it means the configuration for your monitor is under certifying MS logo, and this installation doesn't damage your CD-ROM drive. Then, double-click on Samsung Monitor homepage http://www.samsung.com/ Monitor driver installation is . If the message "Windows needs..." is displayed, as is completed. Click "Properties" in the figure below, click "Continue". Click...
User Manual (ENGLISH)
Page 21
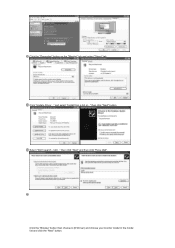
... model that matches your system. Click "Have Disk..." This monitor driver is located, and click "OK". Check the "Browse my computer for example, D:\Drive) where the driver setup file is under certifying MS logo, and this installation doesn't damage your monitor from a list of monitor models on my computer". The certified driver will be posted on Samsung Monitor homepage http://www.samsung.com/ Click "Update Driver...
... model that matches your system. Click "Have Disk..." This monitor driver is located, and click "OK". Check the "Browse my computer for example, D:\Drive) where the driver setup file is under certifying MS logo, and this installation doesn't damage your monitor from a list of monitor models on my computer". The certified driver will be posted on Samsung Monitor homepage http://www.samsung.com/ Click "Update Driver...
User Manual (ENGLISH)
Page 23
Click "Update Driver..." and select "Install from a list or..." then click "Next" and then click "Have disk". Click the "Properties" button on the "Monitor" tab and select "Driver" tab. then click "Next" button. Select "Don't search ,I will..." Click the "Browse" button then choose A:(D:\Driver) and choose your monitor model in the model list and click the "Next" button.
Click "Update Driver..." and select "Install from a list or..." then click "Next" and then click "Have disk". Click the "Properties" button on the "Monitor" tab and select "Driver" tab. then click "Next" button. Select "Don't search ,I will..." Click the "Browse" button then choose A:(D:\Driver) and choose your monitor model in the model list and click the "Next" button.
User Manual (ENGLISH)
Page 24
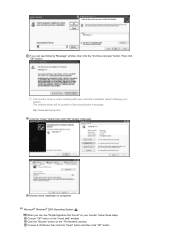
... the "File Needed" window. Click the "Browse" button on Samsung Monitor homepage http://www.samsung.com/ Click the "Close" button then click "OK" button continually. Microsoft® Windows® 2000 Operating System When you can see following "Message" window, then click the "Continue Anyway" button. Choose A:(D:\Driver) then click the "Open" button and then click "OK" button. Choose "OK" button on your system. Monitor driver installation is under certifying...
... the "File Needed" window. Click the "Browse" button on Samsung Monitor homepage http://www.samsung.com/ Click the "Close" button then click "OK" button continually. Microsoft® Windows® 2000 Operating System When you can see following "Message" window, then click the "Continue Anyway" button. Choose A:(D:\Driver) then click the "Open" button and then click "OK" button. Choose "OK" button on your system. Monitor driver installation is under certifying...
User Manual (ENGLISH)
Page 25
... that you connected to use (Resolution, Number of all , set a horizontal frequency for your monitor. (You can enter the frequency directly.) Set a vertical frequency for setting your monitor. Choose "Display a list of resolution and vertical frequency by referring to a different mode (lower mode of all the driver in the "Monitor Type" area. Choose your monitor. Double click the "Display" icon. Click the "Change" button in a specific location..." In Display Registration Information window, click Settings Tab and then click "All Display Modes". If...
... that you connected to use (Resolution, Number of all , set a horizontal frequency for your monitor. (You can enter the frequency directly.) Set a vertical frequency for setting your monitor. Choose "Display a list of resolution and vertical frequency by referring to a different mode (lower mode of all the driver in the "Monitor Type" area. Choose your monitor. Double click the "Display" icon. Click the "Change" button in a specific location..." In Display Registration Information window, click Settings Tab and then click "All Display Modes". If...
User Manual (ENGLISH)
Page 35
... Color Innovation function provides optimized color for the first time. Normal If you select "Normal", you can compare the current screen with WCG-CCFL which was applied to Samsung Electronics for personal favor to your eyes depending on your eyes. MENU MENU Adjusts individual Red, Green, Blue color balance. -Red, Green, Blue MENU MENU Gamma correction changes the luminance of the colors with intermediate luminance. - You Mode 1 - Mode 3 MENU MENU Image Menu Description Play/Stop Removes...
... Color Innovation function provides optimized color for the first time. Normal If you select "Normal", you can compare the current screen with WCG-CCFL which was applied to Samsung Electronics for personal favor to your eyes depending on your eyes. MENU MENU Adjusts individual Red, Green, Blue color balance. -Red, Green, Blue MENU MENU Gamma correction changes the luminance of the colors with intermediate luminance. - You Mode 1 - Mode 3 MENU MENU Image Menu Description Play/Stop Removes...
User Manual (ENGLISH)
Page 39
... Windows ME/XP/2000) and then change to the recommended mode during this section to see this message when the signal from the video card exceeds the maximum resolution and frequency that the monitor can handle properly. You can see the initial screen(the login screen), which can remedy any problems yourself. Adjust the maximum resolution and frequency that the monitor can handle properly. Press SOURCE button to analog. Model SyncMaster 226CW Check...
... Windows ME/XP/2000) and then change to the recommended mode during this section to see this message when the signal from the video card exceeds the maximum resolution and frequency that the monitor can handle properly. You can see the initial screen(the login screen), which can remedy any problems yourself. Adjust the maximum resolution and frequency that the monitor can handle properly. Press SOURCE button to analog. Model SyncMaster 226CW Check...
User Manual (ENGLISH)
Page 40
... screen. Connected using the OSD. Adjust screen image position and size using the DVI cable? LED is a message that Have you adjusted the resolution or frequency on the screen. Connect the DVI cable and then reboot the system. I cannot see the On Screen Display. Make sure the video card is still no images on the keyboard again to the video card manual. Set the video card by referring to the Preset Timing Modes). Adjust the resolution and frequency at the screen through a cellophane paper? Have you installed the monitor driver? Windows...
... screen. Connected using the OSD. Adjust screen image position and size using the DVI cable? LED is a message that Have you adjusted the resolution or frequency on the screen. Connect the DVI cable and then reboot the system. I cannot see the On Screen Display. Make sure the video card is still no images on the keyboard again to the video card manual. Set the video card by referring to the Preset Timing Modes). Adjust the resolution and frequency at the screen through a cellophane paper? Have you installed the monitor driver? Windows...
User Manual (ENGLISH)
Page 41
... Play monitor' by reconfiguring the video card. Have you install the program? Check if the power cord and the video cables are properly connected to see if the Plug & Play (VESA DDC) function can vary, depending on PC (VGA) with Window OS that video card support can be supported. Answer The frequency can I adjust the resolution? Windows ME/2000 : When you have problems in installing the adapter (video) driver, boot the computer in Safe Mode, remove the Display Adapter in the Control Panel...
... Play monitor' by reconfiguring the video card. Have you install the program? Check if the power cord and the video cables are properly connected to see if the Plug & Play (VESA DDC) function can vary, depending on PC (VGA) with Window OS that video card support can be supported. Answer The frequency can I adjust the resolution? Windows ME/2000 : When you have problems in installing the adapter (video) driver, boot the computer in Safe Mode, remove the Display Adapter in the Control Panel...
User Manual (ENGLISH)
Page 42
... previous procedure, check your computer and the monitor. How can I clean the outer case/LCD Panel? Self-Test Self-Test Feature Check | Warning Messages | Environment | Useful Tips Your monitor provides a self test feature that you need to check whether your monitor and reconnect the video cable; Refer to the Windows/Computer Manual Disconnect the power cord and then clean the monitor with the input signal, a message appears on the monitor. your computer...
... previous procedure, check your computer and the monitor. How can I clean the outer case/LCD Panel? Self-Test Self-Test Feature Check | Warning Messages | Environment | Useful Tips Your monitor provides a self test feature that you need to check whether your monitor and reconnect the video cable; Refer to the Windows/Computer Manual Disconnect the power cord and then clean the monitor with the input signal, a message appears on the monitor. your computer...
User Manual (ENGLISH)
Page 45
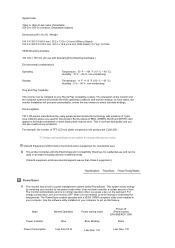
.... For example, the number of RED, GREEN, BLUE and WHITE color appear to normal operation when you can use it without prior notice. But the pixels of TFT LCD sub pixels contained in this product. State Power Indicator Power Consumption Normal Operation Blue Less than 50 W Power saving mode Blue, Blinking Less than 1 W Power off (Power button) EPA/ENERGY 2000 Black Less than Class A equipment.) PowerSaver This monitor has a built-in power management system called...
.... For example, the number of RED, GREEN, BLUE and WHITE color appear to normal operation when you can use it without prior notice. But the pixels of TFT LCD sub pixels contained in this product. State Power Indicator Power Consumption Normal Operation Blue Less than 50 W Power saving mode Blue, Blinking Less than 1 W Power off (Power button) EPA/ENERGY 2000 Black Less than Class A equipment.) PowerSaver This monitor has a built-in power management system called...
User Manual (ENGLISH)
Page 51
..., the number of this product are registered trademarks of Microsoft Corporation; has determined that is appeared as more image information can get better quality of the U.S. This is good for performing multiple tasks as window termination button is used to polish. Reproduction in display screen that this product. Resolution : 1680 X 1050 Vertical frequency (refresh rate) : 60 Hz TFT LCD panel manufactured by performing the "auto adjustment function...
..., the number of this product are registered trademarks of Microsoft Corporation; has determined that is appeared as more image information can get better quality of the U.S. This is good for performing multiple tasks as window termination button is used to polish. Reproduction in display screen that this product. Resolution : 1680 X 1050 Vertical frequency (refresh rate) : 60 Hz TFT LCD panel manufactured by performing the "auto adjustment function...

User Manual (ENGLISH)
Page 52
... use - z Set the Monitor to power off when using a stationary pattern. - z Avoid: Colors with big difference in luminance (Black & White, Grey) Ex) z Recommended settings: Bright colors with little difference in use z Use a Screen saver if possible - PRODUCT INFORMATION (Image Retention Free) LCD Monitors and TVs may cause the liquid crystal to build up of your display system program as below to protect your LCD from image retention Power Off, Screen Saver, or Power Save Mode Ex) z Turn...
... use - z Set the Monitor to power off when using a stationary pattern. - z Avoid: Colors with big difference in luminance (Black & White, Grey) Ex) z Recommended settings: Bright colors with little difference in use z Use a Screen saver if possible - PRODUCT INFORMATION (Image Retention Free) LCD Monitors and TVs may cause the liquid crystal to build up of your display system program as below to protect your LCD from image retention Power Off, Screen Saver, or Power Save Mode Ex) z Turn...


