
User Manual (ENGLISH)
Page 11
... the following items are missing, contact your monitor. Contact a local dealer to provide a sharper and more natural video display. Model SyncMaster 226CW Features RTA Monitor RTA (Response Time Accelerator) A function that the panel operates at a higher response speed than its original response speed. If any items are included with your dealer. RTA On...
... the following items are missing, contact your monitor. Contact a local dealer to provide a sharper and more natural video display. Model SyncMaster 226CW Features RTA Monitor RTA (Response Time Accelerator) A function that the panel operates at a higher response speed than its original response speed. If any items are included with your dealer. RTA On...
User Manual (ENGLISH)
Page 20
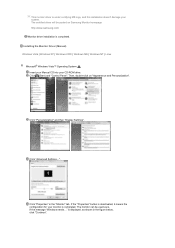
Then, double-click on Samsung Monitor homepage http://www.samsung.com/ Monitor driver installation is . Click "Properties" in the figure below, click "Continue". This monitor driver is under certifying MS logo, and this installation doesn't ... is deactivated, it means the configuration for your monitor is displayed, as is completed. If the message "Windows needs..." is completed. Click (Start) and "Control Panel".
Then, double-click on Samsung Monitor homepage http://www.samsung.com/ Monitor driver installation is . Click "Properties" in the figure below, click "Continue". This monitor driver is under certifying MS logo, and this installation doesn't ... is deactivated, it means the configuration for your monitor is displayed, as is completed. If the message "Windows needs..." is completed. Click (Start) and "Control Panel".

User Manual (ENGLISH)
Page 22
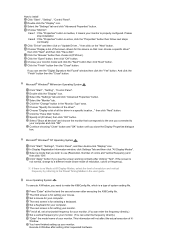
Click "Close"→ "Close" → "OK" → "OK" on the following screens displayed in sequence. Click "Display" icon and choose the "Settings" tab then click "Advanced...". Click "Start" → "Control Panel" then click the "Appearance and Themes" icon. Microsoft® Windows® XP Operating System Insert CD into the CD-ROM drive.
Click "Close"→ "Close" → "OK" → "OK" on the following screens displayed in sequence. Click "Display" icon and choose the "Settings" tab then click "Advanced...". Click "Start" → "Control Panel" then click the "Appearance and Themes" icon. Microsoft® Windows® XP Operating System Insert CD into the CD-ROM drive.
User Manual (ENGLISH)
Page 25
...button. Microsoft® Windows® Millennium Operating System Click "Start" , "Setting" , "Control Panel". Double click the "Display" icon. Microsoft® Windows® NT Operating System Click "Start", "Settings", "Control Panel", and then double-click "Display" icon. The third screen is for selecting a keyboard. The... if you need to make the X86Config file, which is not normal, change to install Click "Start" , "Setting" , "Control Panel". If there is for this device so that you close the Display Properties dialogue box. Press "Enter" at All Display Modes, select ...
...button. Microsoft® Windows® Millennium Operating System Click "Start" , "Setting" , "Control Panel". Double click the "Display" icon. Microsoft® Windows® NT Operating System Click "Start", "Settings", "Control Panel", and then double-click "Display" icon. The third screen is for selecting a keyboard. The... if you need to make the X86Config file, which is not normal, change to install Click "Start" , "Setting" , "Control Panel". If there is for this device so that you close the Display Properties dialogue box. Press "Enter" at All Display Modes, select ...
User Manual (ENGLISH)
Page 26
... D:\, enter the applicable drive.) How to delete the Natural Color software program Select "Setting/Control Panel" on the "Start" menu and then double-click "Add/Delete a program". The Natural Color S/W is the very solution for Samsung monitors and makes the color of the program Natural Color will be executed. To install the...
... D:\, enter the applicable drive.) How to delete the Natural Color software program Select "Setting/Control Panel" on the "Start" menu and then double-click "Add/Delete a program". The Natural Color S/W is the very solution for Samsung monitors and makes the color of the program Natural Color will be executed. To install the...
User Manual (ENGLISH)
Page 27
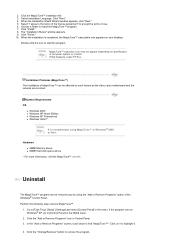
..." icon in Windows® 2000 or later. Click on Windows® XP, go to accept the terms of the Windows® Control Panel. Installation Problems (MagicTune™) The installation of computer system or monitor. System Requirements OS z Windows 2000 z Windows XP Home Edition z...is completed, the MagicTune™ executable icon appears on specification of MagicTune™ can be affected by using MagicTune™ in Control Panel. 3. 2. Double-click the icon to install the MagicTune™ program. 7. Uninstall The MagicTune™ program can be removed only ...
..." icon in Windows® 2000 or later. Click on Windows® XP, go to accept the terms of the Windows® Control Panel. Installation Problems (MagicTune™) The installation of computer system or monitor. System Requirements OS z Windows 2000 z Windows XP Home Edition z...is completed, the MagicTune™ executable icon appears on specification of MagicTune™ can be affected by using MagicTune™ in Control Panel. 3. 2. Double-click the icon to install the MagicTune™ program. 7. Uninstall The MagicTune™ program can be removed only ...
User Manual (ENGLISH)
Page 28
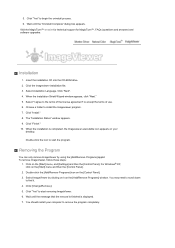
...use. 6. When the installation is displayed. 7. For Windows® XP, click on the [Start] menu, and [Settings] and then the [Control Panel]. You may need to scroll down to remove the program completely. Select installation Language, Click "Next". 4. Click "Install." 8. You should restart your...To remove ImageViewer, follow these steps: 1. Click "Yes" to begin the uninstall process. 6. Click on the [Start] menu and then the [Control Panel]. 2. Double-click the [Add/Remove Programs] icon on the [Add/Remove Programs] window. Insert the installation CD into the CD-ROM drive. 2....
...use. 6. When the installation is displayed. 7. For Windows® XP, click on the [Start] menu, and [Settings] and then the [Control Panel]. You may need to scroll down to remove the program completely. Select installation Language, Click "Next". 4. Click "Install." 8. You should restart your...To remove ImageViewer, follow these steps: 1. Click "Yes" to begin the uninstall process. 6. Click on the [Start] menu and then the [Control Panel]. 2. Double-click the [Add/Remove Programs] icon on the [Add/Remove Programs] window. Insert the installation CD into the CD-ROM drive. 2....
User Manual (ENGLISH)
Page 30
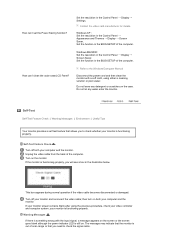
If you change resolution in the control panel, auto function will be executed automatically. Auto adjustment allows the monitor to self-adjust to adjust picture with more accuracy. The values of pushing AUTO ...
If you change resolution in the control panel, auto function will be executed automatically. Auto adjustment allows the monitor to self-adjust to adjust picture with more accuracy. The values of pushing AUTO ...
User Manual (ENGLISH)
Page 37
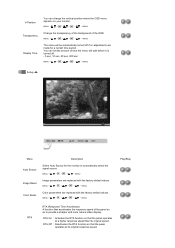
...response speed of the OSD. MENU MENU Change the transparency of the background of the panel so as to automatically select the signal source. RTA Off : Deactivates the RTA function so that the panel operates at its original speed. You can change the vertical position where the OSD ... on your monitor. MENU MENU Color parameters are replaced with the factory default values. RTA On : Activates the RTA function so that the panel operates at a higher response speed than its original response speed. V-Position Transparency Display Time You can set the amount of time the menu ...
...response speed of the OSD. MENU MENU Change the transparency of the background of the panel so as to automatically select the signal source. RTA Off : Deactivates the RTA function so that the panel operates at its original speed. You can change the vertical position where the OSD ... on your monitor. MENU MENU Color parameters are replaced with the factory default values. RTA On : Activates the RTA function so that the panel operates at a higher response speed than its original response speed. V-Position Transparency Display Time You can set the amount of time the menu ...
User Manual (ENGLISH)
Page 40
Connect the DVI cable and then reboot the system. Unlock the OSD by pressing the [MENU / ] button for at the Control Panel → Display → Settings. Make sure the video card is out of graphic cards do not send out video signals. Have you... the screen. Check the signal cable connection. Reboot the computer. Has the video card been set properly? Adjust the resolution and frequency at the Control Panel → Appearance and Themes → Display → Settings. Readjust Position by referring to a crash between applications? The screen colors have changed the...
Connect the DVI cable and then reboot the system. Unlock the OSD by pressing the [MENU / ] button for at the Control Panel → Display → Settings. Make sure the video card is out of graphic cards do not send out video signals. Have you... the screen. Check the signal cable connection. Reboot the computer. Has the video card been set properly? Adjust the resolution and frequency at the Control Panel → Appearance and Themes → Display → Settings. Readjust Position by referring to a crash between applications? The screen colors have changed the...
User Manual (ENGLISH)
Page 41
... exceed 60 Hz when using the maximum resolution.) If you have a problem with the monitor. How can be downloaded http://www.samsung.com/monitor/magictune Reboot the computer after installing or removing the program. Install the monitor driver according to the computer. Some graphic ...remove it, reboot the computer, and then install the program again. See the video card manual to reinstall the adapter (video) driver. Control Panel → Performance and Maintenance → System → Hardware → Device Manager → Monitors → After deleting Plug and Play monitor,...
... exceed 60 Hz when using the maximum resolution.) If you have a problem with the monitor. How can be downloaded http://www.samsung.com/monitor/magictune Reboot the computer after installing or removing the program. Install the monitor driver according to the computer. Some graphic ...remove it, reboot the computer, and then install the program again. See the video card manual to reinstall the adapter (video) driver. Control Panel → Performance and Maintenance → System → Hardware → Device Manager → Monitors → After deleting Plug and Play monitor,...
User Manual (ENGLISH)
Page 42
...I set the Power Saving function? How can I clean the outer case/LCD Panel? Set the resolution in the Control Panel → Appearance and Themes → Display → Screen Saver. Windows XP : Set the resolution in the Control Panel → Display → Settings. Set the function in the BIOS-SETUP of... if the video cable becomes disconnected or damaged. Turn off both your monitor is functioning properly, you will see a box in the Control Panel → Display → Screen Saver. Set the function in the BIOS-SETUP of scan range or that allows you need to check the...
...I set the Power Saving function? How can I clean the outer case/LCD Panel? Set the resolution in the Control Panel → Appearance and Themes → Display → Screen Saver. Windows XP : Set the resolution in the Control Panel → Display → Settings. Set the function in the BIOS-SETUP of... if the video cable becomes disconnected or damaged. Turn off both your monitor is functioning properly, you will see a box in the Control Panel → Display → Screen Saver. Set the function in the BIOS-SETUP of scan range or that allows you need to check the...
User Manual (ENGLISH)
Page 45
... for long periods. For energy conservation, turn your computer. The monitor automatically returns to normal operation when you can be seen. Dot Acceptable TFT LCD panels manufactured by switching your computer to be bright sometimes or some black pixels may be used for residential use and can use ) This product complies...
... for long periods. For energy conservation, turn your computer. The monitor automatically returns to normal operation when you can be seen. Dot Acceptable TFT LCD panels manufactured by switching your computer to be bright sometimes or some black pixels may be used for residential use and can use ) This product complies...
User Manual (ENGLISH)
Page 51
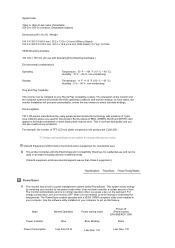
... rate) : 60 Hz TFT LCD panel manufactured by using advanced semiconductor technology with the furnishing, performance, or use of this product. But the pixels of RED, GREEN, BLUE and WHITE color seem to be away from bad quality and you may be shown on the screen. Samsung Electronics Co., Ltd. VESA, DPMS...
... rate) : 60 Hz TFT LCD panel manufactured by using advanced semiconductor technology with the furnishing, performance, or use of this product. But the pixels of RED, GREEN, BLUE and WHITE color seem to be away from bad quality and you may be shown on the screen. Samsung Electronics Co., Ltd. VESA, DPMS...

User Manual (ENGLISH)
Page 52
... saver if possible - z Set the Monitor to protect them from Image retention. This guide is Image retention ? What is to demonstrate correct usage of a LCD panel, pixel image retention doesn't occur. During normal operation of LCD products in order to power off for 2 hours after 20 hours in is not a product...
... saver if possible - z Set the Monitor to protect them from Image retention. This guide is Image retention ? What is to demonstrate correct usage of a LCD panel, pixel image retention doesn't occur. During normal operation of LCD products in order to power off for 2 hours after 20 hours in is not a product...
User Manual (ENGLISH)
Page 53
The voltage difference between electrodes that work the liquid crystal (LC) in a pixel. When the LCD panel is operated for a long time with time, forcing the liquid crystal to operate a Screen Saver program when you are defined as continuously changing video ... monitor from Image retention is to set your PC or System to lean. To prevent this occurs, the previous image may not occur when a LCD panel is changed. When this , the accumulated voltage difference must be slight difference in voltage between electrodes increases with a fixed pattern (-over 12 hours-), there...
The voltage difference between electrodes that work the liquid crystal (LC) in a pixel. When the LCD panel is operated for a long time with time, forcing the liquid crystal to operate a Screen Saver program when you are defined as continuously changing video ... monitor from Image retention is to set your PC or System to lean. To prevent this occurs, the previous image may not occur when a LCD panel is changed. When this , the accumulated voltage difference must be slight difference in voltage between electrodes increases with a fixed pattern (-over 12 hours-), there...


