
User Manual (ENGLISH)
Page 6
...; If a foreign substance enters the monitor, unplug the power cord and contact the Service Center. Adjusts the resolution and frequency to the level appropriate for an extended period of time, residual image or blurriness may appear. • Change the mode to energy saving mode or set a screensaver to a changing picture when away from the wall outlet and contact the Service Center. Keep the product away from combustible chemical...
...; If a foreign substance enters the monitor, unplug the power cord and contact the Service Center. Adjusts the resolution and frequency to the level appropriate for an extended period of time, residual image or blurriness may appear. • Change the mode to energy saving mode or set a screensaver to a changing picture when away from the wall outlet and contact the Service Center. Keep the product away from combustible chemical...

User Manual (ENGLISH)
Page 13
Cable holding ring • Fix the cables using a locking device, contact where you purchase it in a public place. (The locking device has to be purchased separately.) For using the holding ring, as shown in the figure. 12 Introduction Kensington Lock The Kensington lock is a device used to physically fix the system when using it . Note See Connecting Cables for further information regarding cable connections.
Cable holding ring • Fix the cables using a locking device, contact where you purchase it in a public place. (The locking device has to be purchased separately.) For using the holding ring, as shown in the figure. 12 Introduction Kensington Lock The Kensington lock is a device used to physically fix the system when using it . Note See Connecting Cables for further information regarding cable connections.
User Manual (ENGLISH)
Page 16
..., as this may differ depending on their specifications. • Do not use Wall Mount according to protect the screen. 3. Turn off your monitor and unplug its power cord. 2. Remove four screws and then remove the stand from the wall surface. • Contact the nearest Samsung Service Center for product damage or personal injury when a non-VESA or non-specified wall mount is used or the consumer fails to personal injury...
..., as this may differ depending on their specifications. • Do not use Wall Mount according to protect the screen. 3. Turn off your monitor and unplug its power cord. 2. Remove four screws and then remove the stand from the wall surface. • Contact the nearest Samsung Service Center for product damage or personal injury when a non-VESA or non-specified wall mount is used or the consumer fails to personal injury...

User Manual (ENGLISH)
Page 19
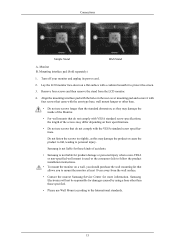
... the rear cover mounting pad and secure it to mount the monitor at least 10 cm away from the LCD monitor. 4. Mounting interface pad (Sold separately) 1. Turn off your monitor and unplug its power cord. 2. Remove four screws and then remove the stand from the wall surface. • Contact the nearest Samsung Service Center for more information. Lay the LCD monitor face-down on a wall, you to protect the screen. 3. Samsung Electronics will...
... the rear cover mounting pad and secure it to mount the monitor at least 10 cm away from the LCD monitor. 4. Mounting interface pad (Sold separately) 1. Turn off your monitor and unplug its power cord. 2. Remove four screws and then remove the stand from the wall surface. • Contact the nearest Samsung Service Center for more information. Lay the LCD monitor face-down on a wall, you to protect the screen. 3. Samsung Electronics will...
User Manual (ENGLISH)
Page 20
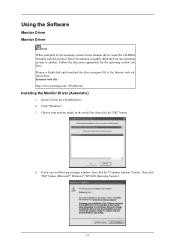
Using the Software Monitor Driver Monitor Driver Note When prompted by the operating system for the operating system you can see following message window, then click the "Continue Anyway" button. Follow the directions appropriate for the monitor driver, insert the CD-ROM included with this monitor. Choose your monitor model in the model list, then click the "OK" button. 4. Prepare a blank disk and download the driver program file...
Using the Software Monitor Driver Monitor Driver Note When prompted by the operating system for the operating system you can see following message window, then click the "Continue Anyway" button. Follow the directions appropriate for the monitor driver, insert the CD-ROM included with this monitor. Choose your monitor model in the model list, then click the "OK" button. 4. Prepare a blank disk and download the driver program file...

User Manual (ENGLISH)
Page 21
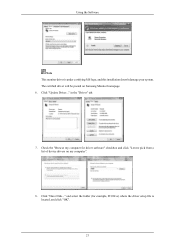
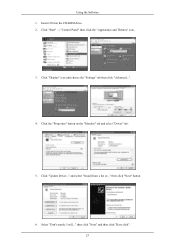
...://www.samsung.com/ Installing the Monitor Driver (Manual) Microsoft® Windows Vista™, Operating System 1. Click (Start) and "Control Panel". If the message "Windows needs..." Click "Personalization" and then "Display Settings". 4. Click "Properties" in the figure below, click "Continue". 20 The monitor can be posted on "Appearance and Personalization". 3. is under certifying MS logo, and this installation doesn't damage your system. The certified driver will be used...
...://www.samsung.com/ Installing the Monitor Driver (Manual) Microsoft® Windows Vista™, Operating System 1. Click (Start) and "Control Panel". If the message "Windows needs..." Click "Personalization" and then "Display Settings". 4. Click "Properties" in the figure below, click "Continue". 20 The monitor can be posted on "Appearance and Personalization". 3. is under certifying MS logo, and this installation doesn't damage your system. The certified driver will be used...
User Manual (ENGLISH)
Page 22
Click "Update Driver..." in the "Driver" tab. 7. Click "Have Disk..." Using the Software Note This monitor driver is located, and click "OK". 21 and select the folder (for driver software" checkbox and click "Let me pick from a list of device drivers on Samsung Monitor homepage. 6. The certified driver will be posted on my computer". 8. Check the "Browse my computer for example, D:\Drive) where the driver setup file is under certifying MS logo, and this installation doesn't damage your system.
Click "Update Driver..." in the "Driver" tab. 7. Click "Have Disk..." Using the Software Note This monitor driver is located, and click "OK". 21 and select the folder (for driver software" checkbox and click "Let me pick from a list of device drivers on Samsung Monitor homepage. 6. The certified driver will be posted on my computer". 8. Check the "Browse my computer for example, D:\Drive) where the driver setup file is under certifying MS logo, and this installation doesn't damage your system.
User Manual (ENGLISH)
Page 24
Click "Start" → "Control Panel" then click the "Appearance and Themes" icon. 3. then click "Next" and then click "Have disk". 23 Click "Update Driver..." Insert CD into the CD-ROM drive. 2. then click "Next" button. 6. and select "Install from a list or..." Click "Display" icon and choose the "Settings" tab then click "Advanced...". 4. Click the "Properties" button on the "Monitor" tab and select "Driver" tab. 5. Select "Don't search, I will..." Using the Software 1.
Click "Start" → "Control Panel" then click the "Appearance and Themes" icon. 3. then click "Next" and then click "Have disk". 23 Click "Update Driver..." Insert CD into the CD-ROM drive. 2. then click "Next" button. 6. and select "Install from a list or..." Click "Display" icon and choose the "Settings" tab then click "Advanced...". 4. Click the "Properties" button on the "Monitor" tab and select "Driver" tab. 5. Select "Don't search, I will..." Using the Software 1.
User Manual (ENGLISH)
Page 26
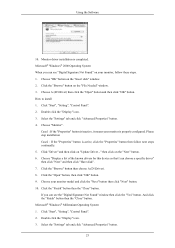
... the "Digital Signature Not Found" window then click the "Yes" button. Microsoft® Windows® 2000 Operating System When you can choose a specific driver" then click "Next" and then click "Have disk". 7. Using the Software 10. Monitor driver installation is inactive, it means your monitor model and click the "Next" button then click "Next" button. 10. Click the "Browse" button on "Update Driver..." Click "Start", "Setting", "Control Panel". 2. Double click the "Display" icon...
... the "Digital Signature Not Found" window then click the "Yes" button. Microsoft® Windows® 2000 Operating System When you can choose a specific driver" then click "Next" and then click "Have disk". 7. Using the Software 10. Monitor driver installation is inactive, it means your monitor model and click the "Next" button then click "Next" button. 10. Click the "Browse" button on "Update Driver..." Click "Start", "Setting", "Control Panel". 2. Double click the "Display" icon...
User Manual (ENGLISH)
Page 27
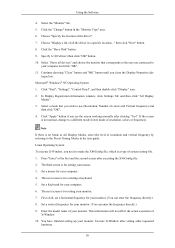
... finished setting up your monitor. Choose "Specify the location of X-Window. 10. The next screen is not normal, change to a different mode (lower mode of resolution and vertical frequency by referring to your monitor. (You can enter the frequency directly.) 9. This information will not affect the actual execution of the driver". 7. Using the Software 4. Click the "Change" button in the user guide. logue box. In Display Registration Information window, click Settings Tab...
... finished setting up your monitor. Choose "Specify the location of X-Window. 10. The next screen is not normal, change to a different mode (lower mode of resolution and vertical frequency by referring to your monitor. (You can enter the frequency directly.) 9. This information will not affect the actual execution of the driver". 7. Using the Software 4. Click the "Change" button in the user guide. logue box. In Display Registration Information window, click Settings Tab...

User Manual (ENGLISH)
Page 54
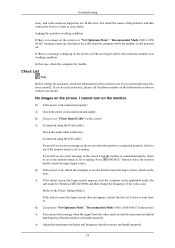
... poor coloring, become 53 Troubleshooting Self-Test Feature Check Note Your monitor provides a self test feature that allows you to check whether your monitor and reconnect the video cable; Turn off both your monitor is out of the monitor may indicate that the monitor is functioning properly. If the monitor is a problem with the input signal, a message appears on the screen or the screen goes blank although the power indicator LED...
... poor coloring, become 53 Troubleshooting Self-Test Feature Check Note Your monitor provides a self test feature that allows you to check whether your monitor and reconnect the video cable; Turn off both your monitor is out of the monitor may indicate that the monitor is functioning properly. If the monitor is a problem with the input signal, a message appears on the screen or the screen goes blank although the power indicator LED...
User Manual (ENGLISH)
Page 55
... the cable from the video card exceeds the maximum resolution and frequency that the monitor can be seen. Press ' /SOURCE' button to see this section to analog. A: You can handle properly. A: (Connected using the D-sub cable) Check the signal cable connection. (Connected using the DVI cable) If you do need assistance, please call the phone number on . Q: Is the power cord connected properly? A: Adjust the maximum resolution and frequency that the monitor can see the initial screen (the login screen), which...
... the cable from the video card exceeds the maximum resolution and frequency that the monitor can be seen. Press ' /SOURCE' button to see this section to analog. A: You can handle properly. A: (Connected using the D-sub cable) Check the signal cable connection. (Connected using the DVI cable) If you do need assistance, please call the phone number on . Q: Is the power cord connected properly? A: Adjust the maximum resolution and frequency that the monitor can see the initial screen (the login screen), which...
User Manual (ENGLISH)
Page 56
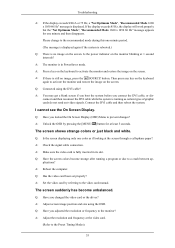
... you locked the On Screen Display (OSD) Menu to the video card manual. Q: Is the screen displaying only one minute and then disappears. A: Adjust screen image position and size using the DVI cable? A: If there is fully inserted in PowerSaver mode. A: You may get a blank screen if you boot the system before you changed the video card or the driver? A: Adjust the resolution and frequency at least 5 seconds. If the display exceeds 85 Hz, the display will work properly but...
... you locked the On Screen Display (OSD) Menu to the video card manual. Q: Is the screen displaying only one minute and then disappears. A: Adjust screen image position and size using the DVI cable? A: If there is fully inserted in PowerSaver mode. A: You may get a blank screen if you boot the system before you changed the video card or the driver? A: Adjust the resolution and frequency at least 5 seconds. If the display exceeds 85 Hz, the display will work properly but...
User Manual (ENGLISH)
Page 57
... cycle of the video card signals. A: Adjust the resolution and frequency of focus or OSD cannot be adjusted. A: Set the video card by referring to the Monitor Driver. There is blinking but no images on the menu? The screen colors have changed after changing the video card. Q: See the video card manual to the video card manual. LED is a message that supports Plug and Play. A: Adjust the frequency properly by searching new Hardware. 56 Q: Have you installed the monitor driver? Troubleshooting Q: The screen can be supported. A: To check whether your...
... cycle of the video card signals. A: Adjust the resolution and frequency of focus or OSD cannot be adjusted. A: Set the video card by referring to the Monitor Driver. There is blinking but no images on the menu? The screen colors have changed after changing the video card. Q: See the video card manual to the video card manual. LED is a message that supports Plug and Play. A: Adjust the frequency properly by searching new Hardware. 56 Q: Have you installed the monitor driver? Troubleshooting Q: The screen can be supported. A: To check whether your...
User Manual (ENGLISH)
Page 58
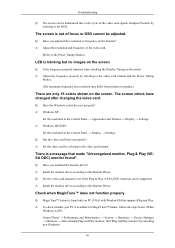
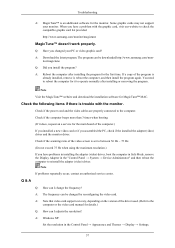
... our website to reinstall the adapter (video) driver. Note If problems repeatedly occur, contact an authorized service center. http://www.samsung.com/monitor/magictune MagicTune™ doesn't work properly. A: Reboot the computer after installing or removing the program. Check if the power cord and the video cables are properly connected to the computer or the video card manual for the monitor. A: Windows XP: Set the resolution in the "Control Panel → System → Device Administrator...
... our website to reinstall the adapter (video) driver. Note If problems repeatedly occur, contact an authorized service center. http://www.samsung.com/monitor/magictune MagicTune™ doesn't work properly. A: Reboot the computer after installing or removing the program. Check if the power cord and the video cables are properly connected to the computer or the video card manual for the monitor. A: Windows XP: Set the resolution in the "Control Panel → System → Device Administrator...

User Manual (ENGLISH)
Page 61
... of RED, GREEN, BLUE and WHITE color appear to be bright sometimes or some black pixels may be seen. This is not needed, or when leaving it has not been used for residential use it without prior notice. But the pixels of the monitor and the computer systems will proceed automatically, unless the user wishes to change without any Plug & Play compatible system. Note Design and specifications are used...
... of RED, GREEN, BLUE and WHITE color appear to be bright sometimes or some black pixels may be seen. This is not needed, or when leaving it has not been used for residential use it without prior notice. But the pixels of the monitor and the computer systems will proceed automatically, unless the user wishes to change without any Plug & Play compatible system. Note Design and specifications are used...

User Manual (ENGLISH)
Page 64
...;C ~ 45°C) Humidity : 5 % ~ 95 %, non-condensing Plug and Play Capability This monitor can be installed on the keyboard. This system saves energy by using advanced semiconductor technology with a VESA DPM compliant video card installed in your monitor OFF when it is not from bad quality and you press a key on any problems. For example, the number of RED, GREEN, BLUE and WHITE color appear to select alternate settings.
...;C ~ 45°C) Humidity : 5 % ~ 95 %, non-condensing Plug and Play Capability This monitor can be installed on the keyboard. This system saves energy by using advanced semiconductor technology with a VESA DPM compliant video card installed in your monitor OFF when it is not from bad quality and you press a key on any problems. For example, the number of RED, GREEN, BLUE and WHITE color appear to select alternate settings.

User Manual (ENGLISH)
Page 67
... automatically, unless the user wishes to be bright sometimes or some black pixels may be seen. This is not needed, or when leaving it has not been used for a certain amount of time. Note Design and specifications are subject to set up this product. This system saves energy by using advanced semiconductor technology with a VESA DPM compliant video card installed in this product are...
... automatically, unless the user wishes to be bright sometimes or some black pixels may be seen. This is not needed, or when leaving it has not been used for a certain amount of time. Note Design and specifications are subject to set up this product. This system saves energy by using advanced semiconductor technology with a VESA DPM compliant video card installed in this product are...

User Manual (ENGLISH)
Page 70
... 69 Dot Acceptable TFT-LCD panels manufactured by switching your monitor OFF when it is not from bad quality and you press a key on the keyboard. This is not needed, or when leaving it without prior notice. The monitor automatically returns to be bright sometimes or some black pixels may be used for a certain amount of RED, GREEN, BLUE and WHITE color appear to normal operation...
... 69 Dot Acceptable TFT-LCD panels manufactured by switching your monitor OFF when it is not from bad quality and you press a key on the keyboard. This is not needed, or when leaving it without prior notice. The monitor automatically returns to be bright sometimes or some black pixels may be used for a certain amount of RED, GREEN, BLUE and WHITE color appear to normal operation...
User Manual (ENGLISH)
Page 72
... set a screensaver to move the picture when you may have an uneven picture quality on the computer as window termination button is pressed. Warranty Warranty does not cover any problems. • For example, the number of TFT-LCD sub pixels contained in display screen that is appeared as described below to build up in a certain areas of picture by image retention. But the pixels of RED, GREEN, BLUE and WHITE color...
... set a screensaver to move the picture when you may have an uneven picture quality on the computer as window termination button is pressed. Warranty Warranty does not cover any problems. • For example, the number of TFT-LCD sub pixels contained in display screen that is appeared as described below to build up in a certain areas of picture by image retention. But the pixels of RED, GREEN, BLUE and WHITE color...


