
User Manual (ENGLISH)
Page 1
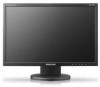
SyncMaster 2043BW/2043BWX/2243BW/2243BWX LCD Monitor User Manual imagine the possibilities
SyncMaster 2043BW/2043BWX/2243BW/2243BWX LCD Monitor User Manual imagine the possibilities

User Manual (ENGLISH)
Page 3
...with a dry cloth. • Using the power cord with a dusty plug or connector may cause electric shock or fire inside the monitor. Do not drop the monitor when moving it. • This may cause damage to someone walking by the separation and may cause electric shock or fire. Do ...an unstable or small surface area. • Place the product on an even and stable surface, as at airports, train stations etc. Install the monitor base in a location with heavy dust, high or low temperatures, high humidity, and exposed to the product or the person carrying it . Safety ...
...with a dry cloth. • Using the power cord with a dusty plug or connector may cause electric shock or fire inside the monitor. Do not drop the monitor when moving it. • This may cause damage to someone walking by the separation and may cause electric shock or fire. Do ...an unstable or small surface area. • Place the product on an even and stable surface, as at airports, train stations etc. Install the monitor base in a location with heavy dust, high or low temperatures, high humidity, and exposed to the product or the person carrying it . Safety ...

User Manual (ENGLISH)
Page 4
...; Installing the bracket by unqualified personnel may damage the TFT-LCD surface. When cleaning the monitor case or the surface of children's reach. • The plastic packaging (bag) may damage the monitor. Do not place the monitor face down the monitor carefully. • Failing to the product or the person ...• Always use the mounting device specified in the internal temperature may cause fire. Keep the plastic packaging (bag) out of the TFT-LCD screen, wipe with it . Keep any object or part of your body on the floor. • Take care, as someone, specifically...
...; Installing the bracket by unqualified personnel may damage the TFT-LCD surface. When cleaning the monitor case or the surface of children's reach. • The plastic packaging (bag) may damage the monitor. Do not place the monitor face down the monitor carefully. • Failing to the product or the person ...• Always use the mounting device specified in the internal temperature may cause fire. Keep the plastic packaging (bag) out of the TFT-LCD screen, wipe with it . Keep any object or part of your body on the floor. • Take care, as someone, specifically...

User Manual (ENGLISH)
Page 5
... Do not remove the cover (or back). • This may cause electric shock or fire. Use the recommended detergent with a smooth cloth. If your monitor does not operate normally - in particular, if there is not used for a long period of time. • Failure to do not install inside a ... • Otherwise, this may cause electric shock or fire. • Refer to a qualified servicing company. Then contact the Service Center. • The monitor may cause electric shock or fire. unplug it properly using a soft, dry cloth. • Do not use any unusual sound or smell coming from the...
... Do not remove the cover (or back). • This may cause electric shock or fire. Use the recommended detergent with a smooth cloth. If your monitor does not operate normally - in particular, if there is not used for a long period of time. • Failure to do not install inside a ... • Otherwise, this may cause electric shock or fire. • Refer to a qualified servicing company. Then contact the Service Center. • The monitor may cause electric shock or fire. unplug it properly using a soft, dry cloth. • Do not use any unusual sound or smell coming from the...

User Manual (ENGLISH)
Page 6
...connector from combustible chemical sprays or inflammable substances. • This may cause an explosion or fire. Safety Instructions Do not try to move the monitor right or left by pulling only the wire or the signal cable. • This may cause a breakdown, electric shock or fire due ...image or blurriness may appear. • Change the mode to energy saving mode or set a screensaver to a changing picture when away from the monitor for the model. • An inappropriate resolution may cause undesirable picture quality. Do not insert metal objects such as chopsticks, wire and tools or...
...connector from combustible chemical sprays or inflammable substances. • This may cause an explosion or fire. Safety Instructions Do not try to move the monitor right or left by pulling only the wire or the signal cable. • This may cause a breakdown, electric shock or fire due ...image or blurriness may appear. • Change the mode to energy saving mode or set a screensaver to a changing picture when away from the monitor for the model. • An inappropriate resolution may cause undesirable picture quality. Do not insert metal objects such as chopsticks, wire and tools or...

User Manual (ENGLISH)
Page 7
... it . • A falling product may cause injury to your armpits. • Keep your arms level with the back of you. • Tilt the monitor upwards by 10 ~ 20 degrees. terest on the screen. Try to maintain your arms perpendicular to the person or even fatality. When not using the... may cause the product to vibrations. • Dropping the product may damage it . Look at least a five-minute break after every hour of using the monitor. • Keep your back straight. • Keep a distance of time, keep the product unplugged. • Otherwise, this may try to climb on an ...
... it . • A falling product may cause injury to your armpits. • Keep your arms level with the back of you. • Tilt the monitor upwards by 10 ~ 20 degrees. terest on the screen. Try to maintain your arms perpendicular to the person or even fatality. When not using the... may cause the product to vibrations. • Dropping the product may damage it . Look at least a five-minute break after every hour of using the monitor. • Keep your back straight. • Keep a distance of time, keep the product unplugged. • Otherwise, this may try to climb on an ...
User Manual (ENGLISH)
Page 9
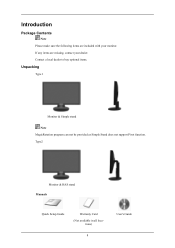
Type2 Monitor & HAS stand Manuals Quick Setup Guide Warranty Card (Not available in all loca- Contact a local dealer to buy optional items. Unpacking Type 1 Monitor & Simple stand Note MagicRotation program can not be provided as Simple Stand does not support Pivot function. Introduction Package Contents Note Please make sure the following items are missing, contact your monitor. If any items are included with your dealer. tions) 8 User's Guide
Type2 Monitor & HAS stand Manuals Quick Setup Guide Warranty Card (Not available in all loca- Contact a local dealer to buy optional items. Unpacking Type 1 Monitor & Simple stand Note MagicRotation program can not be provided as Simple Stand does not support Pivot function. Introduction Package Contents Note Please make sure the following items are missing, contact your monitor. If any items are included with your dealer. tions) 8 User's Guide

User Manual (ENGLISH)
Page 10
Your Monitor Initial Settings Select the language using the up to adjust the resolution of your PC resolution so that it is the same as a product feature. ... displayed up or down key. It can be displayed again. Adjust your PC before reaching the maximum count. Cables Introduction D-Sub Cable Others Power Cord DVI Cable (option) Cleaning Cloth Note This is only provided for highly polished black products as the optimal resolution for this product. 9 It will disappear after...
Your Monitor Initial Settings Select the language using the up to adjust the resolution of your PC resolution so that it is the same as a product feature. ... displayed up or down key. It can be displayed again. Adjust your PC before reaching the maximum count. Cables Introduction D-Sub Cable Others Power Cord DVI Cable (option) Cleaning Cloth Note This is only provided for highly polished black products as the optimal resolution for this product. 9 It will disappear after...

User Manual (ENGLISH)
Page 12
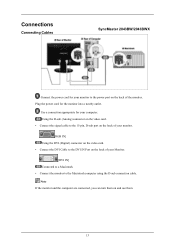
... the DVI Cable to the DVI IN port on the back of the monitor may vary from product to the POWER port on and off. Note The configuration at the back of your monitor. Simple Stand HAS Stand POWER port Connect the power cord for auto adjustment. >> Click here to the 15-pin, RGB IN... port on the back of the monitor. For energy conservation, turn your adjustments. RGB IN port Connect the D-sub cable to see an animation clip AUTO button Use this button for turning the...
... the DVI Cable to the DVI IN port on the back of the monitor may vary from product to the POWER port on and off. Note The configuration at the back of your monitor. Simple Stand HAS Stand POWER port Connect the power cord for auto adjustment. >> Click here to the 15-pin, RGB IN... port on the back of the monitor. For energy conservation, turn your adjustments. RGB IN port Connect the D-sub cable to see an animation clip AUTO button Use this button for turning the...
User Manual (ENGLISH)
Page 14
...Connected to a Macintosh. • Connect the monitor to the DVI IN Port on the back of the monitor. Using the D-sub (Analog) connector on the video card. • Connect the signal cable to the 15-pin, D-sub port on the back of your monitor. [RGB IN] Using the DVI (Digital) connector on the video card. ...• Connect the DVI Cable to the Macintosh computer ...
...Connected to a Macintosh. • Connect the monitor to the DVI IN Port on the back of the monitor. Using the D-sub (Analog) connector on the video card. • Connect the signal cable to the 15-pin, D-sub port on the back of your monitor. [RGB IN] Using the DVI (Digital) connector on the video card. ...• Connect the DVI Cable to the Macintosh computer ...

User Manual (ENGLISH)
Page 15
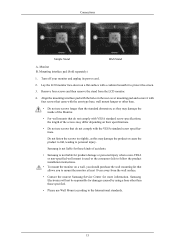
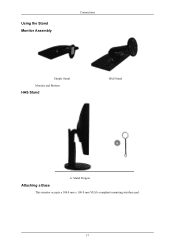
Stand Stopper Attaching a Base This monitor accepts a 75.0 mm x 75.0 mm VESA-compliant mounting interface pad. 14 Using the Stand Monitor Assembly Connections Simple Stand Monitor and Bottom HAS Stand HAS Stand A.
Stand Stopper Attaching a Base This monitor accepts a 75.0 mm x 75.0 mm VESA-compliant mounting interface pad. 14 Using the Stand Monitor Assembly Connections Simple Stand Monitor and Bottom HAS Stand HAS Stand A.
User Manual (ENGLISH)
Page 16
... HAS Stand A. Lay the LCD monitor face-down on a wall, you to personal injury. Mounting interface pad (Sold separately) 1. Turn off your monitor and unplug its power cord. 2. Do not fasten the screws too tightly, as they may damage the inside of accidents. • Samsung is not liable for more ...information. Remove four screws and then remove the stand from the wall surface. • Contact the nearest Samsung Service Center for these kinds of the Monitor. • For wall mounts that do not comply with a cushion beneath it with four screws that came with the...
... HAS Stand A. Lay the LCD monitor face-down on a wall, you to personal injury. Mounting interface pad (Sold separately) 1. Turn off your monitor and unplug its power cord. 2. Do not fasten the screws too tightly, as they may damage the inside of accidents. • Samsung is not liable for more ...information. Remove four screws and then remove the stand from the wall surface. • Contact the nearest Samsung Service Center for these kinds of the Monitor. • For wall mounts that do not comply with a cushion beneath it with four screws that came with the...

User Manual (ENGLISH)
Page 17
... 2243BW/2243BWX Connect the power cord for your monitor to the power port on the back of your Monitor. [DVI IN] Connected to a Macintosh. • Connect the monitor to the Macintosh computer using the D-sub connection cable. Plug the power cord for your monitor. [RGB IN] Using the DVI (Digital) connector on the video card. • Connect...
... 2243BW/2243BWX Connect the power cord for your monitor to the power port on the back of your Monitor. [DVI IN] Connected to a Macintosh. • Connect the monitor to the Macintosh computer using the D-sub connection cable. Plug the power cord for your monitor. [RGB IN] Using the DVI (Digital) connector on the video card. • Connect...
User Manual (ENGLISH)
Page 18
Stand Stopper Attaching a Base This monitor accepts a 100.0 mm x 100.0 mm VESA-compliant mounting interface pad. 17 Using the Stand Monitor Assembly Connections Simple Stand Monitor and Bottom HAS Stand HAS Stand A.
Stand Stopper Attaching a Base This monitor accepts a 100.0 mm x 100.0 mm VESA-compliant mounting interface pad. 17 Using the Stand Monitor Assembly Connections Simple Stand Monitor and Bottom HAS Stand HAS Stand A.

User Manual (ENGLISH)
Page 19
... Do not use screws longer than those specified. • Please use screws that allows you to mount the monitor at least 10 cm away from the LCD monitor. 4. Samsung is not liable for these kinds of the screws may damage the product or cause the product to fall, ... screw specifications, the length of accidents. • Samsung is not liable for more information. Mounting interface pad (Sold separately) 1. Monitor B. Remove four screws and then remove the stand from the wall surface. • Contact the nearest Samsung Service Center for product damage or personal injury when ...
... Do not use screws longer than those specified. • Please use screws that allows you to mount the monitor at least 10 cm away from the LCD monitor. 4. Samsung is not liable for these kinds of the screws may damage the product or cause the product to fall, ... screw specifications, the length of accidents. • Samsung is not liable for more information. Mounting interface pad (Sold separately) 1. Monitor B. Remove four screws and then remove the stand from the wall surface. • Contact the nearest Samsung Service Center for product damage or personal injury when ...
User Manual (ENGLISH)
Page 20
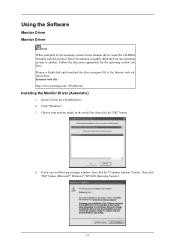
... in the model list, then click the "OK" button. 4. Internet web site : http://www.samsung.com/ (Worldwide) Installing the Monitor Driver (Automatic) 1. Then click "OK" button (Microsoft® Windows® XP/2000 Operating System). 19 Driver installation is slightly... different from one operating system to another. Follow the directions appropriate for the monitor driver, insert the CD-ROM included with this monitor. Using the Software Monitor Driver Monitor Driver Note When prompted by the operating system for the operating system you can see following ...
... in the model list, then click the "OK" button. 4. Internet web site : http://www.samsung.com/ (Worldwide) Installing the Monitor Driver (Automatic) 1. Then click "OK" button (Microsoft® Windows® XP/2000 Operating System). 19 Driver installation is slightly... different from one operating system to another. Follow the directions appropriate for the monitor driver, insert the CD-ROM included with this monitor. Using the Software Monitor Driver Monitor Driver Note When prompted by the operating system for the operating system you can see following ...

User Manual (ENGLISH)
Page 21
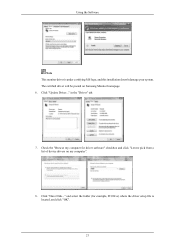
.... 2. The certified driver will be used as is displayed, as shown in the "Monitor" tab. The monitor can be posted on "Appearance and Personalization". 3. Click (Start) and "Control Panel". If the message "Windows needs..." http://www.samsung.com/ Installing the Monitor Driver (Manual) Microsoft® Windows Vista™, Operating System 1. is . Click "Personalization" and...
.... 2. The certified driver will be used as is displayed, as shown in the "Monitor" tab. The monitor can be posted on "Appearance and Personalization". 3. Click (Start) and "Control Panel". If the message "Windows needs..." http://www.samsung.com/ Installing the Monitor Driver (Manual) Microsoft® Windows Vista™, Operating System 1. is . Click "Personalization" and...
User Manual (ENGLISH)
Page 22
Check the "Browse my computer for example, D:\Drive) where the driver setup file is under certifying MS logo, and this installation doesn't damage your system. and select the folder (for driver software" checkbox and click "Let me pick from a list of device drivers on Samsung Monitor homepage. 6. in the "Driver" tab. 7. Click "Update Driver..." The certified driver will be posted on my computer". 8. Click "Have Disk..." Using the Software Note This monitor driver is located, and click "OK". 21
Check the "Browse my computer for example, D:\Drive) where the driver setup file is under certifying MS logo, and this installation doesn't damage your system. and select the folder (for driver software" checkbox and click "Let me pick from a list of device drivers on Samsung Monitor homepage. 6. in the "Driver" tab. 7. Click "Update Driver..." The certified driver will be posted on my computer". 8. Click "Have Disk..." Using the Software Note This monitor driver is located, and click "OK". 21

User Manual (ENGLISH)
Page 23
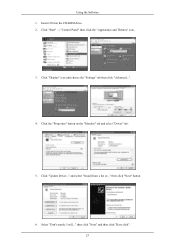
Microsoft® Windows® XP Operating System 22 Select the model that matches your monitor from the list of monitor models on the following screens displayed in sequence. Using the Software 9. Click "Close" → "Close" → "OK" → "OK" on the screen, and click "Next". 10.
Microsoft® Windows® XP Operating System 22 Select the model that matches your monitor from the list of monitor models on the following screens displayed in sequence. Using the Software 9. Click "Close" → "Close" → "OK" → "OK" on the screen, and click "Next". 10.
User Manual (ENGLISH)
Page 24
Click "Display" icon and choose the "Settings" tab then click "Advanced...". 4. Select "Don't search, I will..." Click "Update Driver..." then click "Next" button. 6. Insert CD into the CD-ROM drive. 2. Click "Start" → "Control Panel" then click the "Appearance and Themes" icon. 3. Click the "Properties" button on the "Monitor" tab and select "Driver" tab. 5. then click "Next" and then click "Have disk". 23 and select "Install from a list or..." Using the Software 1.
Click "Display" icon and choose the "Settings" tab then click "Advanced...". 4. Select "Don't search, I will..." Click "Update Driver..." then click "Next" button. 6. Insert CD into the CD-ROM drive. 2. Click "Start" → "Control Panel" then click the "Appearance and Themes" icon. 3. Click the "Properties" button on the "Monitor" tab and select "Driver" tab. 5. then click "Next" and then click "Have disk". 23 and select "Install from a list or..." Using the Software 1.


