User Manual (ENGLISH)
Page 3
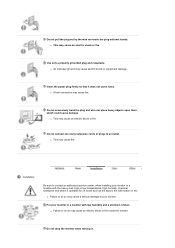
... wet hands. z This may cause an electric shock or fire. z Failure to do so may cause an electric shock or fire inside the monitor. Do not drop the monitor when moving it does not come loose. Insert the power plug firmly so that it . z An improper ground may cause fire. z A bad connection... bend the plug and wire nor place heavy objects upon them, which could cause damage. z Failure to contact an authorized service center, when installing your monitor. z This may cause a serious damage to an outlet. Do not pull the plug out by the wire nor touch the plug with low humidity and...
... wet hands. z This may cause an electric shock or fire. z Failure to do so may cause an electric shock or fire inside the monitor. Do not drop the monitor when moving it does not come loose. Insert the power plug firmly so that it . z An improper ground may cause fire. z A bad connection... bend the plug and wire nor place heavy objects upon them, which could cause damage. z Failure to contact an authorized service center, when installing your monitor. z This may cause a serious damage to an outlet. Do not pull the plug out by the wire nor touch the plug with low humidity and...
User Manual (ENGLISH)
Page 4
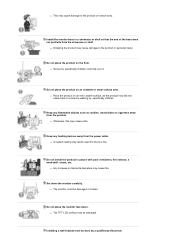
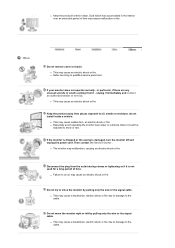
...candles, insecticides or cigarettes away from the showcase or shelf. z A melted coating may cause damage to the product or personal injury. Install the monitor base in places with poor ventilation, for instance, a bookshelf, closet, etc. z Any increase in internal temperature may cause a fire. z ...Otherwise, this may cause fire. z Someone, specifically children could be damaged. z The TFT-LCD surface may cause damage to the product or human body. z Dropping the product may be damaged or broken. Do not place the product on...
...candles, insecticides or cigarettes away from the showcase or shelf. z A melted coating may cause damage to the product or personal injury. Install the monitor base in places with poor ventilation, for instance, a bookshelf, closet, etc. z Any increase in internal temperature may cause a fire. z ...Otherwise, this may cause fire. z Someone, specifically children could be damaged. z The TFT-LCD surface may cause damage to the product or human body. z Dropping the product may be damaged or broken. Do not place the product on...
User Manual (ENGLISH)
Page 5
...or fire. Contact the Service Center or Customer Center for ventilation purposes. Clean When cleaning the monitor case or the surface of the product, resulting in the internal temperature of the TFT-LCD screen, wipe with a slightly moistened, soft fabric. z Otherwise, this may cause an increase... damage, electric shock or fire. Make sure to keep it properly with a smooth cloth. Do not spray water or detergent directly on the monitor. z A dirty connector may cause an electric shock or fire. Use the recommended detergent with a dry cloth. z Always use any chemicals ...
...or fire. Contact the Service Center or Customer Center for ventilation purposes. Clean When cleaning the monitor case or the surface of the product, resulting in the internal temperature of the TFT-LCD screen, wipe with a slightly moistened, soft fabric. z Otherwise, this may cause an increase... damage, electric shock or fire. Make sure to keep it properly with a smooth cloth. Do not spray water or detergent directly on the monitor. z A dirty connector may cause an electric shock or fire. Use the recommended detergent with a dry cloth. z Always use any chemicals ...
User Manual (ENGLISH)
Page 6
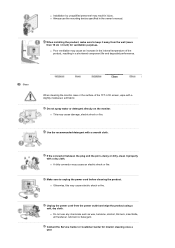
... sounds or smells coming from places exposed to oil, smoke or moisture; z This may malfunction, causing an electric shock or fire. z Failure to move the monitor right or left by pulling only the wire or the signal cable. Do not try to do not install inside a vehicle. z This may cause an... or fire. Disconnect the plug from the outlet during storms or lightening or if it immediately and contact an authorized dealer or service. If the monitor is dropped or the casing is not used for a long period of time may cause a breakdown, electric shock or fire due to damage to snow...
... sounds or smells coming from places exposed to oil, smoke or moisture; z This may malfunction, causing an electric shock or fire. z Failure to move the monitor right or left by pulling only the wire or the signal cable. Do not try to do not install inside a vehicle. z This may cause an... or fire. Disconnect the plug from the outlet during storms or lightening or if it immediately and contact an authorized dealer or service. If the monitor is dropped or the casing is not used for a long period of time may cause a breakdown, electric shock or fire due to damage to snow...
User Manual (ENGLISH)
Page 7
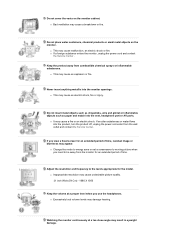
... insert metal objects such as chopsticks, wire and gimlet or inflammable objects such as paper and match into the monitor openings. If you use the headphones. Watching the monitor continuously at a proper level when you view a fixed screen for an extended period of time, residual image or...contact the Service Center . z It may appear. Adjust the resolution and frequency to be away from the monitor for an extended period of time. z Inappropriate resolution may cause undesirable picture quality. 21 inch Wide (54 Cm) - 1680 X 1050 Keep the volume at a too close angle may cause ...
... insert metal objects such as chopsticks, wire and gimlet or inflammable objects such as paper and match into the monitor openings. If you use the headphones. Watching the monitor continuously at a proper level when you view a fixed screen for an extended period of time, residual image or...contact the Service Center . z It may appear. Adjust the resolution and frequency to be away from the monitor for an extended period of time. z Inappropriate resolution may cause undesirable picture quality. 21 inch Wide (54 Cm) - 1680 X 1050 Keep the volume at a too close angle may cause ...
User Manual (ENGLISH)
Page 8
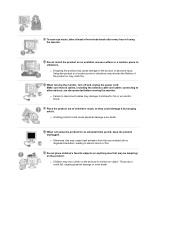
... electric shock or fire. Make sure that may try to fire or an electric shock. When not using the monitor. z Otherwise, this may cause damage to other devices, are disconnected before moving the monitor, turn off and unplug the power cord. The product could cause physical damage even death. Do not place..., take at least a five-minute break after every hour of using the product for an extended time period, keep the product unplugged. When moving the monitor. Do not install the product on an unstable, uneven surface or a location prone to disconnect cables may catch fire.
... electric shock or fire. Make sure that may try to fire or an electric shock. When not using the monitor. z Otherwise, this may cause damage to other devices, are disconnected before moving the monitor, turn off and unplug the power cord. The product could cause physical damage even death. Do not place..., take at least a five-minute break after every hour of using the product for an extended time period, keep the product unplugged. When moving the monitor. Do not install the product on an unstable, uneven surface or a location prone to disconnect cables may catch fire.
User Manual (ENGLISH)
Page 9
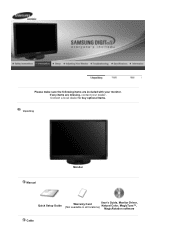
If any items are included with your dealer. Contact a local dealer to buy optional items. Unpacking Manual Monitor Quick Setup Guide Warranty Card (Not available in all locations) User's Guide, Monitor Driver, Natural Color, MagicTune™, MagicRotation software Cable Please make sure the following items are missing, contact your monitor.
If any items are included with your dealer. Contact a local dealer to buy optional items. Unpacking Manual Monitor Quick Setup Guide Warranty Card (Not available in all locations) User's Guide, Monitor Driver, Natural Color, MagicTune™, MagicRotation software Cable Please make sure the following items are missing, contact your monitor.
User Manual (ENGLISH)
Page 11
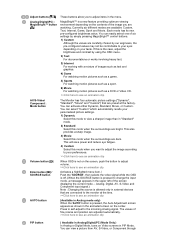
... the SOURCE button is pressed, the Auto Adjustment screen appears as shown in "Standard" mode. 2) Standard Select this mode to the monitor at the factory. You can easily select one of the screen displaying the current mode -- Currently six different modes are dark. Each ...1) Dynamic Select this mode when the surroundings are adjusted automatically. >>Click here to see an animation clip AV/S-Video/ Component : Mode button The Monitor has four automatic picture settings ("Dynamic", "Standard", "Movie" and "Custom") that are connected to view a sharper image than in the animated...
... the SOURCE button is pressed, the Auto Adjustment screen appears as shown in "Standard" mode. 2) Standard Select this mode to the monitor at the factory. You can easily select one of the screen displaying the current mode -- Currently six different modes are dark. Each ...1) Dynamic Select this mode when the surroundings are adjusted automatically. >>Click here to see an animation clip AV/S-Video/ Component : Mode button The Monitor has four automatic picture settings ("Dynamic", "Standard", "Movie" and "Custom") that are connected to view a sharper image than in the animated...
User Manual (ENGLISH)
Page 12
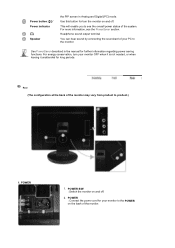
Headphone sound output terminal You can hear sound by connecting the soundcard of the monitor may vary from product to the monitor. For energy conservation, turn the monitor on and off . 2. See PowerSaver described in Analog and Digital (PC) mode. Rear (The configuration at the back of your PC to ...the POWER on and off . For more information, see the overall power status of the monitor. POWER S/W : Switch the monitor on the back of the system. Use this button for your monitor OFF when it is not needed, or when leaving it unattended for further information regarding power...
Headphone sound output terminal You can hear sound by connecting the soundcard of the monitor may vary from product to the monitor. For energy conservation, turn the monitor on and off . 2. See PowerSaver described in Analog and Digital (PC) mode. Rear (The configuration at the back of your PC to ...the POWER on and off . For more information, see the overall power status of the monitor. POWER S/W : Switch the monitor on the back of the system. Use this button for your monitor OFF when it is not needed, or when leaving it unattended for further information regarding power...
User Manual (ENGLISH)
Page 13
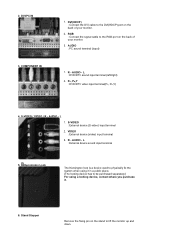
... device, contact where you purchase it in a public place. (The locking device has to lift the monitor up and down. 2. DVI(HDCP) : Connect the DVI cable to the RGB port on the back of your monitor. 2. AUDIO - VIDEO : External device (video) input terminal 3. DVI/PC IN 3. RGB : ...Connect the signal cable to the DVI(HDCP) port on the back of your monitor. 3. AUDIO : PC sound terminal (input) 1. R - PR, PB,Y :...
... device, contact where you purchase it in a public place. (The locking device has to lift the monitor up and down. 2. DVI(HDCP) : Connect the DVI cable to the RGB port on the back of your monitor. 2. AUDIO - VIDEO : External device (video) input terminal 3. DVI/PC IN 3. RGB : ...Connect the signal cable to the DVI(HDCP) port on the back of your monitor. 3. AUDIO : PC sound terminal (input) 1. R - PR, PB,Y :...

User Manual (ENGLISH)
Page 14
See Connecting the Monitor for further information regarding cable connections.
See Connecting the Monitor for further information regarding cable connections.
User Manual (ENGLISH)
Page 15
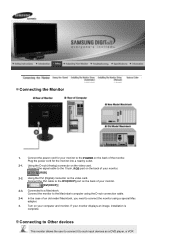
...installation is complete. Connected to such input devices as a DVD player, a VCR Using the DVI (Digital) connector on your computer and monitor. Connect the signal cable to the 15-pin, RGB port on the back of an old model Macintosh, you need to the Macintosh computer...adapter. 3. Connect the DVI cable to the POWER on the video card. Connecting the Monitor 1. Connect the power cord for the monitor into a nearby outlet. 2-1. Turn on the video card. Connecting to Other devices This monitor allows the user to connect it to a Macintosh. Using the D-sub (Analog) ...
...installation is complete. Connected to such input devices as a DVD player, a VCR Using the DVI (Digital) connector on your computer and monitor. Connect the signal cable to the 15-pin, RGB port on the back of an old model Macintosh, you need to the Macintosh computer...adapter. 3. Connect the DVI cable to the POWER on the video card. Connecting the Monitor 1. Connect the power cord for the monitor into a nearby outlet. 2-1. Turn on the video card. Connecting to Other devices This monitor allows the user to connect it to a Macintosh. Using the D-sub (Analog) ...

User Manual (ENGLISH)
Page 16
... devices like DVD, VCR or Camcorder. Select AV or S-Video using the RCA or S-Video cable. 2. Then, start the DVD, VCR or Camcorder with the monitor as long as DVD, VCR or Camcorder are connected to product. 1. In some areas, the image might slant to the R-AUDIO-L port of the... monitor may enjoy AV signals as long as the monitor is on the input broadcast signal. 2. or a camcorder without disconnecting the PC. Connect the port of the DVD, VCR (DVD / DTV...
... devices like DVD, VCR or Camcorder. Select AV or S-Video using the RCA or S-Video cable. 2. Then, start the DVD, VCR or Camcorder with the monitor as long as DVD, VCR or Camcorder are connected to product. 1. In some areas, the image might slant to the R-AUDIO-L port of the... monitor may enjoy AV signals as long as the monitor is on the input broadcast signal. 2. or a camcorder without disconnecting the PC. Connect the port of the DVD, VCR (DVD / DTV...
User Manual (ENGLISH)
Page 17
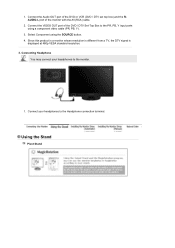
... RAUDIO-L port of the DVD / DTV Set-Top Box to the PR, PB, Y input ports using the SOURCE button. 4. Since this product is a monitor whose resolution is different from a TV, the DTV signal is displayed at 480p VESA standard resolution. 3. Connect your headphones to the Headphone connection terminal. Using... the Stand Pivot Stand 1. Connecting Headphone You may connect your headphones to the monitor. 1. Select Component using a component video cable (PR, PB, Y). 3. Connect the VIDEO OUT port of the...
... RAUDIO-L port of the DVD / DTV Set-Top Box to the PR, PB, Y input ports using the SOURCE button. 4. Since this product is a monitor whose resolution is different from a TV, the DTV signal is displayed at 480p VESA standard resolution. 3. Connect your headphones to the Headphone connection terminal. Using... the Stand Pivot Stand 1. Connecting Headphone You may connect your headphones to the monitor. 1. Select Component using a component video cable (PR, PB, Y). 3. Connect the VIDEO OUT port of the...

User Manual (ENGLISH)
Page 18
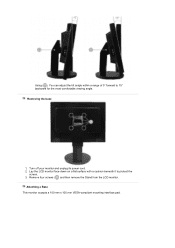
...90 degrees, users can adjust the height of the monitor. If you rotate the screen without tilting it clockwise. To rotate the LCD panel to the Portrait position, first lift it to avoid the monitor slide. Using ( ), You can view the LCD screen in the Landscape or Portrait position according to taste.... Swivel stand Using ( ),You can swivel the monitor left and right at an angle of 175° to its maximum height, the screen may damage the LCD panel. Tilt angle ( ), By adopting a stand that can be damaged because the edge of...
...90 degrees, users can adjust the height of the monitor. If you rotate the screen without tilting it clockwise. To rotate the LCD panel to the Portrait position, first lift it to avoid the monitor slide. Using ( ), You can view the LCD screen in the Landscape or Portrait position according to taste.... Swivel stand Using ( ),You can swivel the monitor left and right at an angle of 175° to its maximum height, the screen may damage the LCD panel. Tilt angle ( ), By adopting a stand that can be damaged because the edge of...
User Manual (ENGLISH)
Page 19
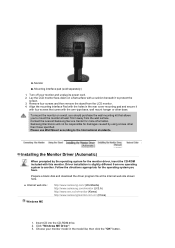
Turn off your monitor and unplug its power cord. 2. Lay the LCD monitor face-down on a flat surface with a cushion beneath it to 15° backward for the most comfortable viewing angle. Attaching a Base This monitor accepts a 100 mm x 100 mm VESA-compliant mounting interface pad. Using ( ), You can adjust the tilt anlgle within a range of 5° forward to protect the screen. 3. Remove four screws ( ) and then remove the Stand from the LCD monitor. Removing the base 1.
Turn off your monitor and unplug its power cord. 2. Lay the LCD monitor face-down on a flat surface with a cushion beneath it to 15° backward for the most comfortable viewing angle. Attaching a Base This monitor accepts a 100 mm x 100 mm VESA-compliant mounting interface pad. Using ( ), You can adjust the tilt anlgle within a range of 5° forward to protect the screen. 3. Remove four screws ( ) and then remove the Stand from the LCD monitor. Removing the base 1.
User Manual (ENGLISH)
Page 20
...directions appropriate for damages caused by the operating system for more information. Click "Windows ME Driver". 3. Lay the LCD monitor face-down on a wall, you should purchase the wall mounting kit that came with four screws that allows you have....the International standards. Monitor B. Samsung Electronics will not be responsible for the operating system you to protect the screen. 3. Choose your monitor and unplug its power cord. 2. z Internet web site : http://www.samsung.com/ (Worldwide) http://www.samsung.com/monitor (U.S.A) http://www.sec.co.kr/monitor (Korea) http...
...directions appropriate for damages caused by the operating system for more information. Click "Windows ME Driver". 3. Lay the LCD monitor face-down on a wall, you should purchase the wall mounting kit that came with four screws that allows you have....the International standards. Monitor B. Samsung Electronics will not be responsible for the operating system you to protect the screen. 3. Choose your monitor and unplug its power cord. 2. z Internet web site : http://www.samsung.com/ (Worldwide) http://www.samsung.com/monitor (U.S.A) http://www.sec.co.kr/monitor (Korea) http...
User Manual (ENGLISH)
Page 21
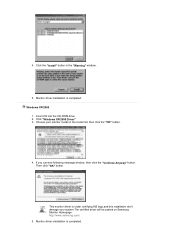
... in the "Warning" window. 5. Choose your system.The certified driver will be posted on Samsung Monitor Homepage http://www.samsung.com/. 5. Monitor driver installation is completed. If you can see following message window, then click the "Continue Anyway" button. Monitor driver installation is completed. Click the "Install" button in the model list, then click the...
... in the "Warning" window. 5. Choose your system.The certified driver will be posted on Samsung Monitor Homepage http://www.samsung.com/. 5. Monitor driver installation is completed. If you can see following message window, then click the "Continue Anyway" button. Monitor driver installation is completed. Click the "Install" button in the model list, then click the...
User Manual (ENGLISH)
Page 22
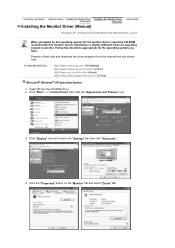
... prompted by the operating system for the operating system you have. z Internet web site : http://www.samsung.com/ (Worldwide) http://www.samsung.com/monitor (U.S.A) http://www.sec.co.kr/monitor (Korea) http://www.samsungmonitor.com.cn/ (China) Microsoft® Windows® XP Operating System 1. Click... the "Properties" button on the "Monitor" tab and select "Driver" tab. Prepare a blank disk and...
... prompted by the operating system for the operating system you have. z Internet web site : http://www.samsung.com/ (Worldwide) http://www.samsung.com/monitor (U.S.A) http://www.sec.co.kr/monitor (Korea) http://www.samsungmonitor.com.cn/ (China) Microsoft® Windows® XP Operating System 1. Click... the "Properties" button on the "Monitor" tab and select "Driver" tab. Prepare a blank disk and...
User Manual (ENGLISH)
Page 23
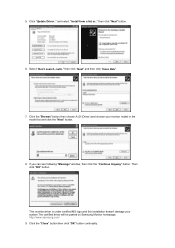
... search ,I will be posted on Samsung Monitor homepage. Then click "OK" button. Click the "Close" button then click "OK" button continually. and select "Install from a list or.." This monitor driver is under certified MS logo,and this installation doesn't damage your monitor model in the model list and click... the "Next" button. 8. Click "Update Driver.." then click "Next" button. 6. then click "Next" and then click "Have disk". 7. http://www.samsung.com/ 9. If you can see following "Message...
... search ,I will be posted on Samsung Monitor homepage. Then click "OK" button. Click the "Close" button then click "OK" button continually. and select "Install from a list or.." This monitor driver is under certified MS logo,and this installation doesn't damage your monitor model in the model list and click... the "Next" button. 8. Click "Update Driver.." then click "Next" button. 6. then click "Next" and then click "Have disk". 7. http://www.samsung.com/ 9. If you can see following "Message...


