User Manual (ENGLISH)
Page 13
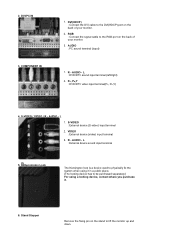
COMPONENT IN 1. AUDIO : PC sound terminal (input) 1. VIDEO : External device (video) input terminal 3. L : External device sound input terminal 5. DVI(HDCP) : Connect the DVI cable to the DVI(HDCP) port on the stand to lift the monitor up and down. R - R - Kensington Lock The Kensington lock is a device used to physically fix the system when using...
COMPONENT IN 1. AUDIO : PC sound terminal (input) 1. VIDEO : External device (video) input terminal 3. L : External device sound input terminal 5. DVI(HDCP) : Connect the DVI cable to the DVI(HDCP) port on the stand to lift the monitor up and down. R - R - Kensington Lock The Kensington lock is a device used to physically fix the system when using...
User Manual (ENGLISH)
Page 15
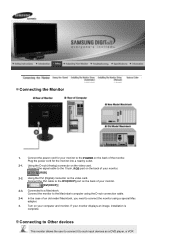
...Using the DVI (Digital) connector on the video card. If your computer and monitor. Using the D-sub (Analog) connector on the video card. Turn on the back of your monitor. [DVI(HDCP)] 2-3. Connecting to Other devices This monitor allows the user to connect it to the POWER on the back of your... monitor. [RGB] 2-2. Connect the DVI cable to the 15-pin, RGB port on...
...Using the DVI (Digital) connector on the video card. If your computer and monitor. Using the D-sub (Analog) connector on the video card. Turn on the back of your monitor. [DVI(HDCP)] 2-3. Connecting to Other devices This monitor allows the user to connect it to the POWER on the back of your... monitor. [RGB] 2-2. Connect the DVI cable to the 15-pin, RGB port on...
Service Manual
Page 3
...When the monitor is rotated in 90 degree, the display LED and OSD also are Anaolg and Digital - Designs and specifications are running. 2-2 Specifications Item Description LCD Panel Scanning Frequency Display Colors Maximum Resolution TFT-LCD panel, RGB vertical stripe, normally black transmissive, 21-Inch viewable...SECAM / PAL M / PAL N / NT43 / PAL60 support DVI mode : 480i/p,720p@50Hz, 720p@60Hz , 1080i@50Hz 1080i@60Hz (Support HDCP) Level : TTL level Maximum Pixel Clock rate 165 MHz Active Display Horizontal/Vertical 453.6(H) X 283.5(V) mm AC power voltage & Frequency AC 90 ...
...When the monitor is rotated in 90 degree, the display LED and OSD also are Anaolg and Digital - Designs and specifications are running. 2-2 Specifications Item Description LCD Panel Scanning Frequency Display Colors Maximum Resolution TFT-LCD panel, RGB vertical stripe, normally black transmissive, 21-Inch viewable...SECAM / PAL M / PAL N / NT43 / PAL60 support DVI mode : 480i/p,720p@50Hz, 720p@60Hz , 1080i@50Hz 1080i@60Hz (Support HDCP) Level : TTL level Maximum Pixel Clock rate 165 MHz Active Display Horizontal/Vertical 453.6(H) X 283.5(V) mm AC power voltage & Frequency AC 90 ...

Service Manual
Page 18
......3 CN101 3701-001219 ...3 CN604 3722-001782 ...3 CN605 3722-001784 ...3 CN603 3722-002081 ...3 CN103 3722-002267 ...3 CN104 3722-002275 ...3 CN705 3722-002389 ...3 HDCP KEY BN97-00707A ....4 BN46-00018A ...3 T0174 BN97-00832A ....4 CIS5 0202-001477 ....4 D101 0401-001056 ....4 D102 0401-001056 ....4 D103 0401-001056 ....4 D104 0401...WHT/YEL,ANGLE JACK-DIN;4P,-,SN,BLK,JACK-PIN;3P,AU,RED/BLU/GRN,ANGLE ASSY HDCP;BN46-00018A,BR20/21BS_CS,MSTAR KEY CODE-CERTIFICATE;(HDCP KEY)PPM42M5S, ASSY SMD;LS21DPWAB/XAA SOLDER-CREAM;LST309-M,-,D20~45?,96.5Sn/3 DIODE-SWITCHING;...
......3 CN101 3701-001219 ...3 CN604 3722-001782 ...3 CN605 3722-001784 ...3 CN603 3722-002081 ...3 CN103 3722-002267 ...3 CN104 3722-002275 ...3 CN705 3722-002389 ...3 HDCP KEY BN97-00707A ....4 BN46-00018A ...3 T0174 BN97-00832A ....4 CIS5 0202-001477 ....4 D101 0401-001056 ....4 D102 0401-001056 ....4 D103 0401-001056 ....4 D104 0401...WHT/YEL,ANGLE JACK-DIN;4P,-,SN,BLK,JACK-PIN;3P,AU,RED/BLU/GRN,ANGLE ASSY HDCP;BN46-00018A,BR20/21BS_CS,MSTAR KEY CODE-CERTIFICATE;(HDCP KEY)PPM42M5S, ASSY SMD;LS21DPWAB/XAA SOLDER-CREAM;LST309-M,-,D20~45?,96.5Sn/3 DIODE-SWITCHING;...

Service Manual
Page 44
DVI/PC IN 1. POWER S/W : Switch the monitor on the back of your monitor. 2. 10-2 Rear 10 Operating Instructions and Installation 1. AUDIO : PC sound terminal (input) 10-3 POWER 2. RGB : Connect the signal cable to the RGB port on and off. 2. POWER : Connect the power cord for your monitor to the DVI(HDCP) port on the back of your monitor. 3. DVI(HDCP) : Connect the DVI cable to the POWER on the back of the monitor. 1.
DVI/PC IN 1. POWER S/W : Switch the monitor on the back of your monitor. 2. 10-2 Rear 10 Operating Instructions and Installation 1. AUDIO : PC sound terminal (input) 10-3 POWER 2. RGB : Connect the signal cable to the RGB port on and off. 2. POWER : Connect the power cord for your monitor to the DVI(HDCP) port on the back of your monitor. 3. DVI(HDCP) : Connect the DVI cable to the POWER on the back of the monitor. 1.

Service Manual
Page 56
... a nearby outlet. 2-1. Using the DVI (Digital) connector on your computer and monitor. If your monitor to the DVI(HDCP) port on the video card. Connect the DVI cable to the POWER on the back of an old model Macintosh, you need to the Macintosh ...computer using a special Mac adapter. 3. Connected to the 15-pin, RGB port on the back of your monitor. 2-2. Turn on the video...
... a nearby outlet. 2-1. Using the DVI (Digital) connector on your computer and monitor. If your monitor to the DVI(HDCP) port on the video card. Connect the DVI cable to the POWER on the back of an old model Macintosh, you need to the Macintosh ...computer using a special Mac adapter. 3. Connected to the 15-pin, RGB port on the back of your monitor. 2-2. Turn on the video...
